How to Automate Paid InMails With Sales Navigator
Most LinkedIn users have closed profiles, meaning no connection requests and no free InMails. If you have Sales Navigator, you get 50 InMail credits a month to reach them. But until now, you were sending them one by one, manually, with no way to tie them into a broader sequence.
That changes now. Expandi supports paid InMail automation natively. You can add a Paid InMail step to any campaign, and your Sales Navigator credits do the rest. Here’s how it works, why you should care about it, and how to set it up.
Why most of your prospects are harder to reach than you think
Here’s the reality of LinkedIn outreach in 2026: the prospects you want to talk to the most are the hardest to get to. Senior decision-makers, C-suite executives, heads of department. They’ve turned off open messaging. They ignore connection requests from people they don’t recognize.
That leaves you with two options. Wait and hope they accept your connection request. Or send a paid InMail.
Paid InMails land directly in their inbox regardless of connection status. They include a subject line, which regular messages don’t. And LinkedIn gives you 50 of them per month with Sales Navigator.
The problem is this: until now, there was no good way to automate them. You’d log into Sales Navigator, find the lead, compose the message, send it. One at a time.
For 50 credits a month, that’s manageable in theory. But if you’re running campaigns with hundreds of leads and some portion of them have closed profiles, the manual work adds up fast. You’re context-switching between your outreach tool and LinkedIn’s native interface, losing momentum on every lead that requires special handling.
The silent failure you probably don’t know about
Here’s something most Sales Navigator users don’t realize: if you’ve been using a LinkedIn automation tool alongside Sales Navigator, your messages may have been silently failing.
When you click “Send Message” on a closed profile while logged into Sales Navigator, LinkedIn redirects to the Sales Navigator environment. Most automation tools can’t follow that redirect. The message never sends, and you don’t even get notified that your lead’s never actually heard from you.
Our production data showed this was happening roughly 1,000 times per day across Expandi users. And the majority of those failed messages had paid InMail credits available that could have been used instead. The tool just didn’t know how to send them.
This is the kind of problem that doesn’t show up in your campaign reports as a clear failure. The lead simply never replies, and you assume they weren’t interested. In reality, they never received your message at all.
We fixed this by rebuilding how Expandi handles Sales Navigator at the infrastructure level. No patches or workarounds: a ground-up approach to detecting, routing, and delivering messages through Sales Navigator’s environment.
Why “just adding InMail support” isn’t enough
Some outreach tools let you send InMails. That’s not new. What matters is how the system handles the complexity around it.
Consider what happens after you send a paid InMail:
Your prospect replies. Where does that reply go? Into the Sales Navigator inbox, not the regular LinkedIn inbox. If your automation tool only reads the regular inbox, you’ll never see that reply. Your campaign doesn’t know the lead responded. It sends a follow-up. Your prospect gets a duplicate message from someone who apparently didn’t read their reply.
This is how you damage relationships at scale.
Then there’s the routing question. Not every lead on your list has a closed profile. Some have open profiles (free InMails work fine). Some are already connections (regular messages work). Manually sorting leads into buckets before launching a campaign defeats the purpose of automation.
And what about credits? You get 50 per month. If your campaign burns through all of them on the first 50 closed-profile leads, what happens to leads 51 through 200? Do they get skipped permanently?
These are the realities of running InMail at any meaningful volume. And they’re exactly the problems most tools leave unsolved.
How Expandi handles paid InMail differently
Expandi now handles the full lifecycle of paid InMails: sending, routing, replies, and credit management. Here’s the mechanism.
Step 1: You create a campaign in the Builder and add a “Paid InMail” node as a step.
Step 2: You write your subject line and message body. You can use AI Hyper personalized messages here to generate unique copy for each lead based on their profile data, company information, and recent activity. More on this in the examples section below.
Step 3: When the campaign runs, Expandi checks each lead’s profile automatically:
- If the lead has an open profile, Expandi sends a free InMail. No credits used.
- If the lead has a closed profile, Expandi sends a paid InMail using your Sales Navigator credits.
- If you’re out of credits, the lead is put on hold. Not failed. Not skipped. It sends automatically when your credits refresh next month.
This routing happens without manual configuration. The system adds “If not connected” and “If open profile” conditions for you. You build one campaign. The system figures out the optimal delivery path for each individual lead.
Step 4: When a lead replies to your paid InMail, that reply appears in your Expandi inbox alongside all your other conversations. Clear badges distinguish which messages came through Sales Navigator (“Paid InMail” badge) and which came through regular LinkedIn. Your campaigns pause automatically when a lead replies from either inbox.
No message falls through the cracks. No duplicate follow-ups to people who already responded.
Every Sales Navigator tier, no exceptions
Expandi’s approach to InMaisl works with Sales Navigator Core, Advanced, and Advanced Plus. Expandi detects your subscription type automatically and adjusts accordingly.
This matters more than it sounds. Many outreach tools technically support Sales Navigator but break on Team or Enterprise plans because those tiers handle authentication and permissions differently. If you’re on a Team or Enterprise plan, you may have experienced this firsthand: features that worked during your trial suddenly stop working once you connect your real account.
Expandi’s integration was built to handle all three tiers from day one. No tier-specific limitations. No surprises after you commit.
LinkedIn InMail prompt examples for messages that actually get replies
The best paid InMails don’t use templates with placeholder brackets. They feel like one human wrote specifically to another. That’s what AI Hyper personalized messages feature is built for.
Instead of writing a template like “Hi [First Name], I noticed [Company] recently [trigger event]…” you write a prompt that tells the AI what kind of message to generate. The AI then writes a unique message for every lead, pulling from their LinkedIn profile, job title, company details, and recent activity.
The result: your InMails read like individually written messages at the scale of an automated campaign.
Here are three LinkedIn InMail examples built as AI prompts you can use directly in your Paid InMail campaigns.
Example 1: The direct ask (for warm leads who recently changed roles)
Message prompt: Write a casual, peer-to-peer InMail to someone who recently started as {job_title} at {company_name}. Acknowledge the new role without being congratulatory or generic. Mention that most people stepping into this kind of position are under pressure to build pipeline quickly, and that you’ve been helping teams in {industry} do exactly that using automated LinkedIn outreach with Expandi. End with a low-friction ask for a 15-minute call this week. Keep the tone like you’re reaching out to someone you’d meet at a conference. No fluff, no “I hope this finds you well.” Max 5 sentences
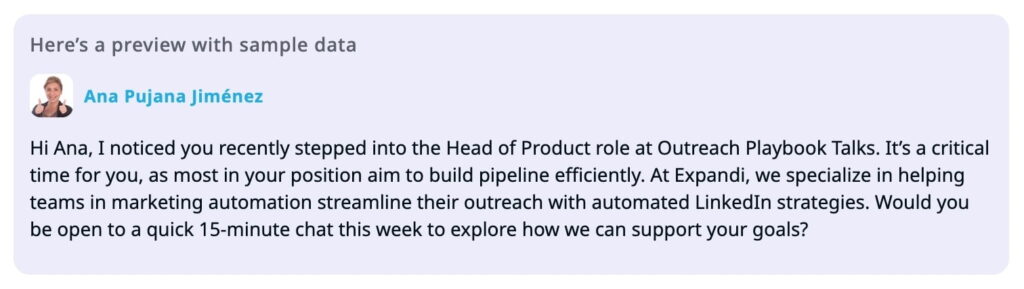
Why this works: The AI pulls the lead’s actual job title, start date, and company name from their profile. Combined with the specific tone instructions, every message reads like you did 5 minutes of research on them personally. The “no fluff” guardrail keeps the output conversational instead of stiff.
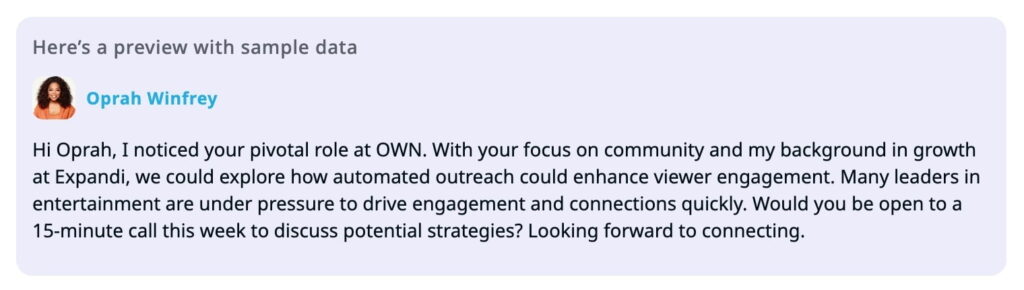
Example 2: The value-first approach (for cold outreach to senior decision-makers)
Message prompt: Write a helpful, non-pitchy InMail to a {job_title} at {company} in the {industry} space. Open with a specific observation about their company or industry that connects to outbound pipeline challenges (hiring patterns, expansion signals, competitive moves). Mention that you recently put together a short breakdown on how similar {industry} companies are generating pipeline through LinkedIn outreach, and offer to share it if relevant. Reference {resource_title} as the asset you’d send. Don’t pitch your product. Don’t ask for a call. The only ask is whether they’d find the resource useful. Keep the tone like a helpful peer, not a sales rep. Max 5 sentences.
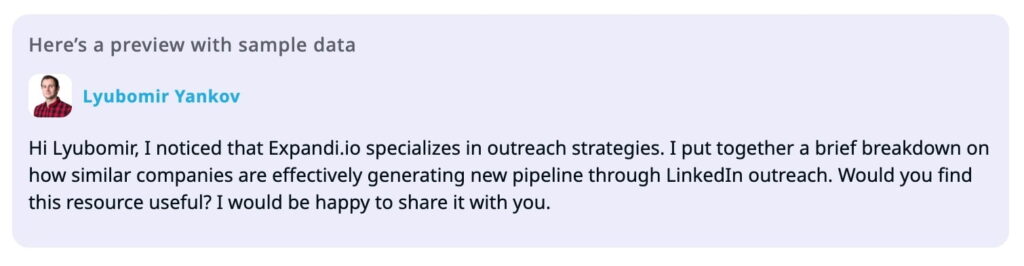
Why this works: Value-first InMails consistently outperform direct pitches to cold leads. The AI personalizes the industry reference, company context, and specific challenge based on each lead’s profile. By naming a real resource in your prompt, the message has a concrete offer instead of a vague “I’d love to share some insights.”
Example 3: The mutual connection bridge
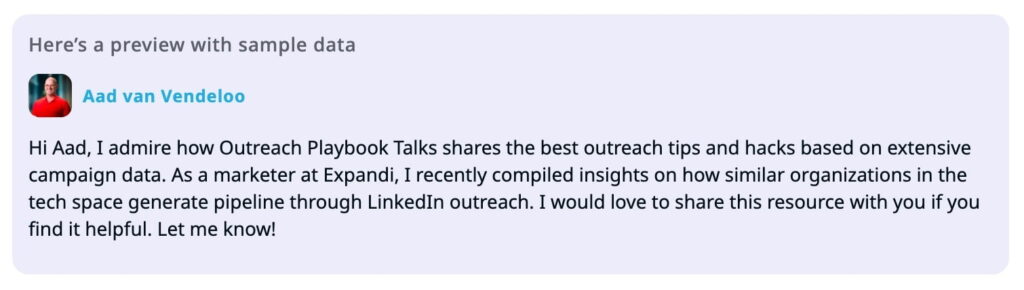
Message prompt: Write a warm, personal InMail to {lead_name} at {company_name}. Mention that a mutual connection suggested you connect because of their work in their expertise area. Ask one thoughtful question about a challenge they’re likely facing in their expertise area that relates to scaling outreach or pipeline generation. If they’re open to it, suggest a quick call, but frame it as a conversation, not a demo. Write like you’re being genuinely introduced, not using the connection as a foot in the door. Max 4 sentences.
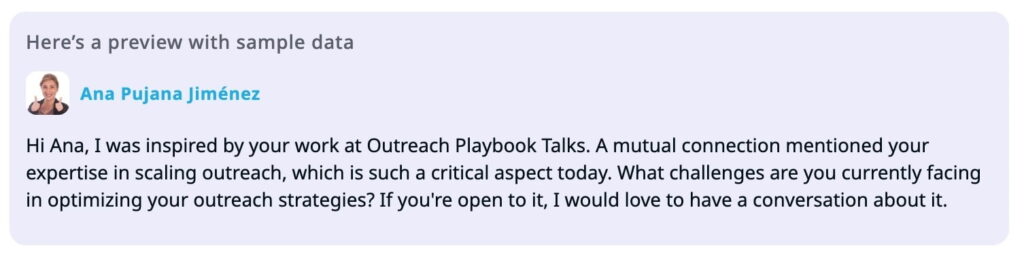

Why this works: Social proof and specificity. The AI crafts the framing around the introduction with a relevant question tailored to the lead’s expertise. The prospect feels accountable to respond because a real person made the connection.
Keeping track of everything: the visibility problem most teams overlook
Sending InMails is one challenge. Knowing what happened after you sent them is another.
If you’re managing outreach across multiple LinkedIn accounts (common for agencies and sales teams), your conversations are already scattered. Regular LinkedIn messages in one place. Sales Navigator replies in another. Different accounts in different browser sessions.
Expandi’s Global Inbox pulls all of this into a single view. Every conversation, from every connected LinkedIn account, including paid InMail threads. Sorted by most recent message. You can see at a glance which leads replied, which conversations need attention, and which InMails are still waiting for a response.
For team leads or account managers overseeing multiple reps, this means you can see what your team’s paid InMail credits are being used for without logging into each Sales Navigator account individually. One view. All accounts. All message types, including the paid InMails that used to live in a separate inbox entirely.
What you need to know before setting up your first campaign
A few practical details that will save you time.
Paid InMail is a terminal node. You can’t add campaign steps after it. This is intentional. Sending a paid InMail creates a separate conversation thread in Sales Navigator. If the campaign continued with a regular LinkedIn message after the InMail, your prospect would see two separate threads from you, one in their LinkedIn inbox and one in Sales Navigator. The terminal design keeps conversations clean and avoids confusion.
This doesn’t mean InMail has to be your only outreach step. You can build multi-step campaigns where InMail is the final escalation. For example: connection request first, then a follow-up message if they accept, then a paid InMail if they don’t connect within a set timeframe. The InMail becomes the last resort for reaching closed-profile leads who didn’t respond through other channels.
Credit limits are configurable. In Settings > Account > Paid InMail Limits, you can set how many credits a single campaign is allowed to use. This prevents one aggressive campaign from burning through your entire monthly allocation, leaving nothing for your other campaigns.
Credit rollover and holds. LinkedIn refreshes your 50 InMail credits on the first of each month. If a campaign exhausts your credits mid-month, remaining leads are placed on hold automatically. When credits refresh, those leads resume sending without any manual intervention. You don’t need to restart the campaign or re-queue anything.
Open profile detection saves credits. Before spending a paid credit, Expandi checks whether the lead has an open profile. Open profiles can receive free InMails. This means you’re only spending credits on leads who genuinely require them. Over the course of a month, this can save a meaningful portion of your allocation.
Designing your first Paid InMail campaign: a step-by-step walkthrough
Here’s how to set it up from scratch.
1. Open the Builder and create a new campaign. Give it a name that reflects the audience segment you’re targeting (e.g., “Q2 VP Sales outreach, closed profiles”).
2. Import your lead list. You can pull leads from a Sales Navigator search, a CSV, or an existing Expandi search. The system will check each lead’s profile status when the campaign runs.
3. Add your campaign steps. A common structure:
- Start with a connection request (catches leads who are willing to connect)
- Add a delay (3 to 5 days)
- Add a condition: “If not connected”
- Under that condition, add the Paid InMail node
This way, you only use InMail credits on leads who didn’t accept your connection request. Leads who connected get regular follow-up messages through the standard path.
4. Write your InMail prompt. In the Paid InMail node, write your subject line and message body. If you’re using AI Hyper personalized messages, write the prompt as shown in the examples above. Preview a few generated messages to make sure the tone and specificity match what you want.
5. Set your credit limit. Go to Settings > Account > Paid InMail Limits and decide how many credits this campaign can use. If you’re running multiple campaigns, split your 50 monthly credits accordingly.
6. Launch. Expandi handles the routing from here. Open profiles get free InMails. Closed profiles get paid InMails. Out-of-credit leads go on hold. Replies from all channels sync back into your Expandi inbox.
When paid InMail makes sense (and when it doesn’t)
Paid InMail is not a replacement for connection requests. It’s a precision tool for reaching specific leads who are otherwise unreachable.
Use paid InMail when:
- Your target audience has a high concentration of closed profiles (common among C-suite, VPs, and senior decision-makers)
- You’ve already tried connection requests and a meaningful portion went unaccepted
- The value of reaching a specific lead justifies using one of your 50 monthly credits
- You’re running account-based campaigns where every lead on your list is high-value
Skip paid InMail when:
- Your audience is mostly open profiles or active LinkedIn users who accept connections regularly
- You’re running high-volume campaigns with thousands of leads (50 credits won’t make a dent)
- The leads aren’t qualified enough to justify the credit spend
The credit limit feature helps here. Set a conservative limit on experimental campaigns. Increase it once you see reply rates that justify the spend.
Try it now
Your Sales Navigator credits were sitting unused on every closed-profile lead you couldn’t reach. Now they’re not.
Open the Builder and add your first Paid InMail node — or start a free 14-day trial if you’re not on Expandi yet.
You’ve made it all the way down here, take the final step