The 2 Sales Navigator Filters That Actually Signal Buying Intent

Demographic filters — industry, company size, revenue — tell you who a lead is. They can’t tell you when they’re ready to buy. That gap is expensive: 79% of leads never convert to sales, and most of them fail at the timing stage, not the targeting stage.
Two Sales Navigator filters close it: less than one year in current role, and active on LinkedIn in the last 30 days. Applied together, a list of 12,000 leads becomes ~200 people who are both in a buying window and likely to see your message.
This guide shows exactly how to apply them, and how to export the resulting list to Expandi in one click.
Why big lead lists produce small results
A list of 10,000 companies that match your ICP in terms of industry, size, and revenue feels like a strong starting point. Weeks into outreach, the reply rate tells a different story. The issue is timing.
LinkedIn demographic filters sort leads by fit. They tell you nothing about where a prospect is in a buying cycle — whether they’re actively evaluating tools, stuck in budget freeze, or three months away from a renewal conversation. Without that context, a well-built list is still mostly noise.
Signal-based filters change the question from “who matches our ICP?” to “who matches our ICP and is likely to buy right now?” Research shows 50% of sales leaders use intent data to improve account prioritization — not because fit stopped mattering, but because timing is what converts fit into the pipeline and ensures good LinkedIn ROI.
The two filters in this guide are the highest-signal combination available in Sales Navigator for individual lead targeting. Here’s why each one works.
The two filters explained
There are various intent signals to help you identify prospects who are more likely to convert. Think job changes, funding announcements, website visits, technology used, and more. However, these two LinkedIn Sales Navigator filters can help you cut down your high-volume list to zero in on those who are ready to buy. These signals include:
1. Prospects who had a recent job change
“Changed jobs in the last year” — why new role means high intent
A new executive has roughly 90 days to show results. That means they’re evaluating tools, reassessing existing vendors, and open to conversations that someone 18 months into the same role would ignore. New executives in their first 90 days are 2.5x more likely to buy new software to prove their value early.
That window is what this filter isolates. It’s not just that they’re new — it’s that being new creates the specific pressure that makes outreach land differently. They have fresh budget discussions happening, no legacy vendor loyalty locked in, and a mandate to make changes. The filter surfaces them while that window is still open.
Apply it when your prospect has been recently promoted, joined a new company, or taken on an expanded scope. Pair it with relevant job title keywords to stay focused on the roles that actually have purchasing authority.
2. Prospects who are active on LinkedIn in the past 30 days
A perfectly targeted prospect who hasn’t opened LinkedIn in three months won’t see your connection request, notice your comment, or open your DM. Your message lands — nobody receives it. That’s a dead-end.
Active LinkedIn users respond 40–60% more frequently to LinkedIn outreach because they’re actually on the platform. But the filter does more than confirm reachability.
What someone is posting about tells you what they’re working on. What they’re engaging with tells you what problems are front of mind. Both are inputs that make your opening message sharper.
Applying both filters in LinkedIn Sales Navigator
Here’s how to apply both filters in Sales Navigator to narrow your list from thousands to hundreds of leads.
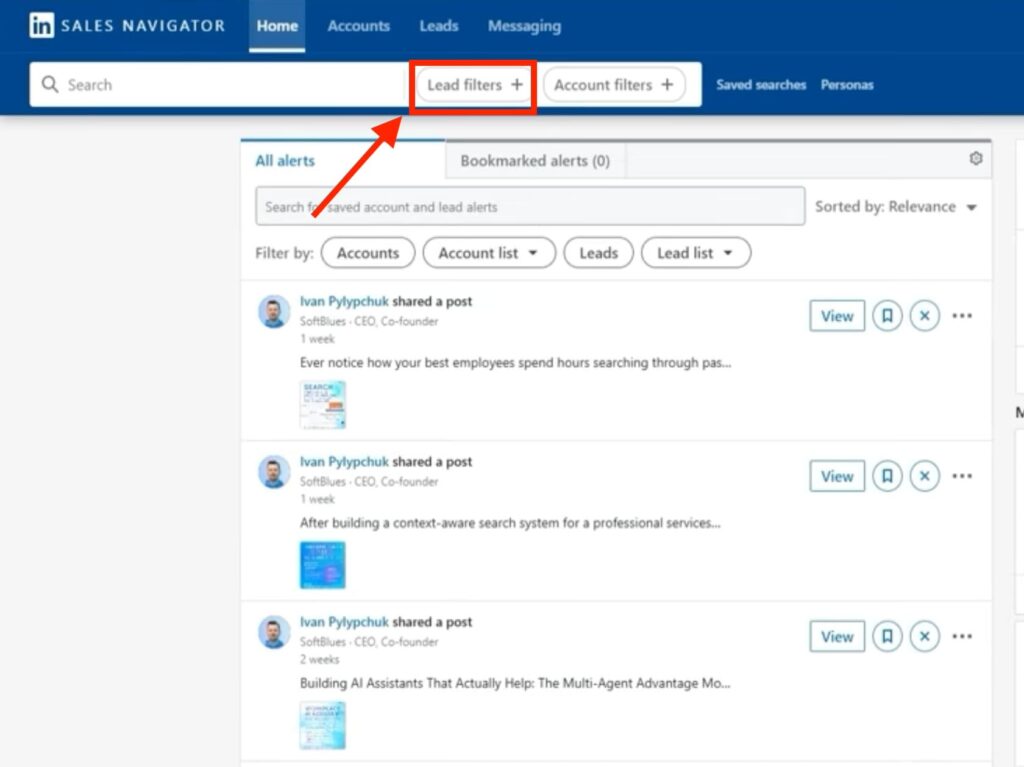
From your LinkedIn Sales Navigator homepage, click on the search bar to create a new search. Click “Lead filter” to display the filters and find the specific decision-makers you want to reach.
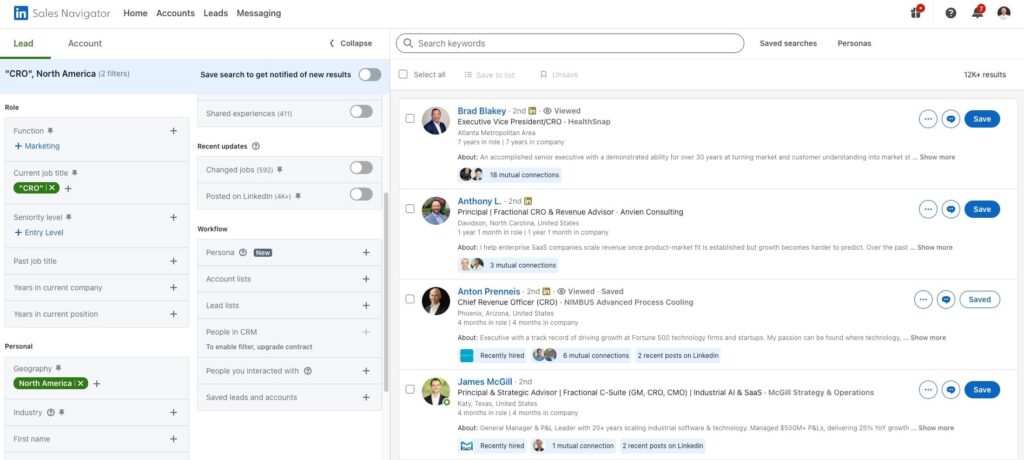
Next, enter your preferred targeted keywords to find desired leads. In this example, we want to find CROs in North America. So, we entered the job title “CRO” and the location “North America” on LinkedIn. The result is over 12,000 leads, as displayed below.
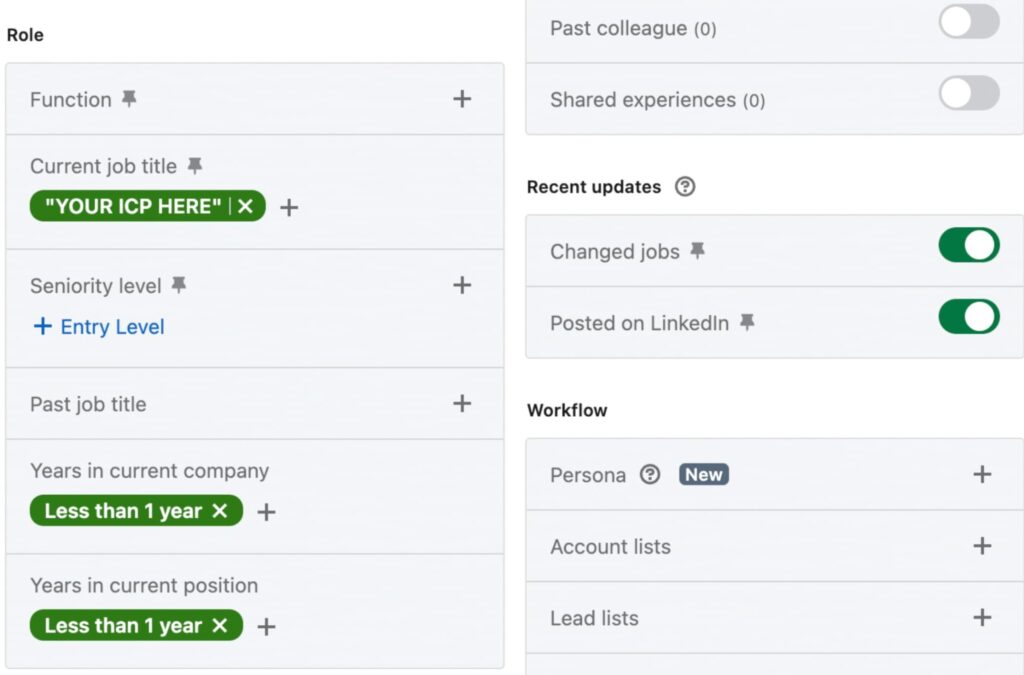
Under the “Recent updates” section, you will see the signal filters. Layer these filters, “Job changes” and “Posted on LinkedIn” on top of the existing demographic filters (e.g., location, industry) to narrow down your lead list. Enter your ICP and set the job title filter to be less than one year.
Also, toggle on the “Changed jobs” and “Posted on LinkedIn” buttons in the filter panel. You’ll have a more precise list you can reach out to.
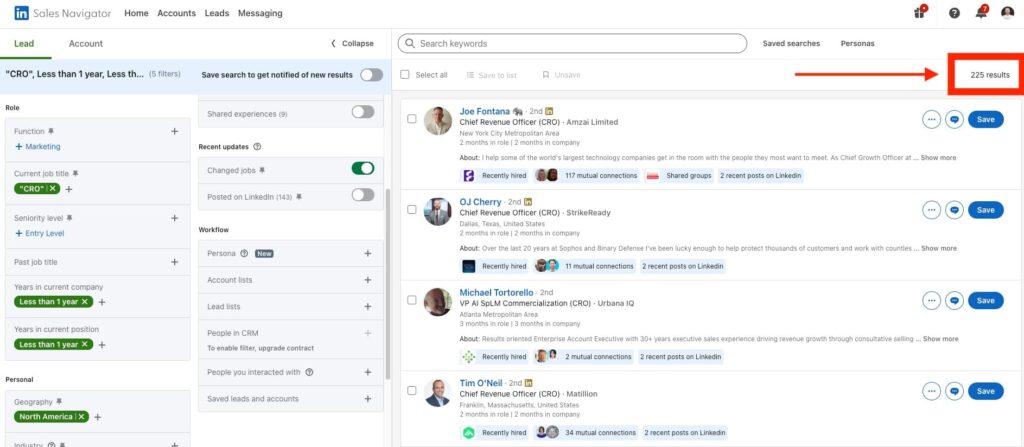
From over 12,000 results, applying these demographic filters (location, job title) and intent signals (job changes, active engagement) reduced the number of CROs to about 200. Having 200 leads who are likely to see and open your message is better than having 12,000+ people who won’t see it.
What to layer on top and when
The two intent filters work best as a narrowing layer applied after your demographic filters are set. Here’s the logic for each layer and when to add it.
- Industry + job title first. Define who you’re reaching before adding timing signals. “CRO in North America” is a starting point. “VP of Sales at SaaS companies with 50–500 employees” is a better one. The tighter your ICP foundation, the more precisely the intent filters do their job.
- Company size shapes buying authority. A new CRO at a 20-person startup has different budget authority than a new CRO at a 400-person Series C. If your deal size requires a minimum budget threshold, filter by headcount before toggling on the intent signals — otherwise you’re reaching the right timing at the wrong company.
- Geography tightens reachability further. If your team runs outreach in specific regions, or if localisation matters for your product, filter by geography before applying intent signals. A list of 200 active, newly-hired CROs in North America is more actionable than 600 globally if your team only covers English-speaking markets.
- Headcount growth as a compounding signal. A company growing at 20%+ over the last six months is actively investing — new hires, new tools, new budget conversations. When you see headcount growth alongside a recent job change at that company, you have two timing signals stacking. Worth filtering for when you want to go narrower.
The practical sequence: industry > job title > seniority > geography > company size > headcount growth (optional) > changed jobs > active on LinkedIn.
Each layer removes noise. The last two are what turn a contact list into a timing list.
And here’s an example we’ve had to make this theory grounded in a real case:
A founder building a list of tech founders in Israel started with a broad Sales Navigator search — thousands of results, most of them either inactive or not in a buying window.
Layering in “changed jobs in the last year” and “posted on LinkedIn in the last 30 days” brought it to 627 leads. Not 627 at random — 627 founders who were both active on the platform and inside a role transition window. That’s the list worth running a campaign against.
The CRO example earlier shows the same logic at a different scale: 12,000 results filtered to ~200 using job title and location as the demographic base, then both intent signals applied on top.
The numbers will vary by ICP and geography. The principle holds consistently: the filtered list outperforms the full list not because it’s smaller, but because everyone on it has cleared two intent bars — fit and timing.
Exporting the list to Expandi
You can export leads from Sales Navigator manually or via an automation tool. Manual export is time-consuming and breaks down fast at any meaningful volume.
Expandi pulls the list directly from your Sales Navigator URL, imports it into a named lead list, and optionally routes it straight into a campaign — without touching LinkedIn’s rate limits.
Exporting leads from Sales Navigator via URL
Once you have your lead list on Sales Navigator, copy the search URL.

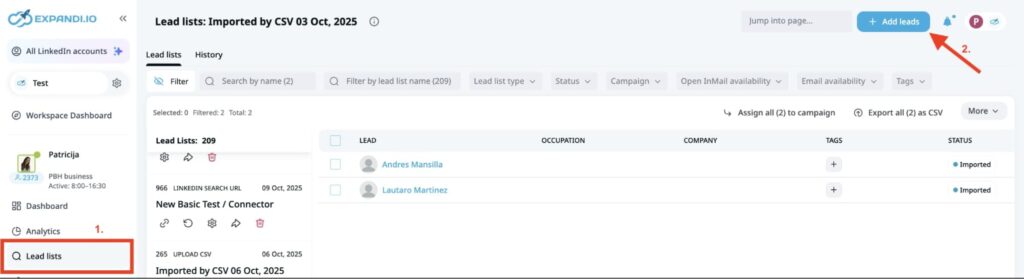
Log in to your Expandi account. From the sidebar of the home page, click on the “Lead list” option. Create a new Sales Navigator list by selecting the “Add leads” button.
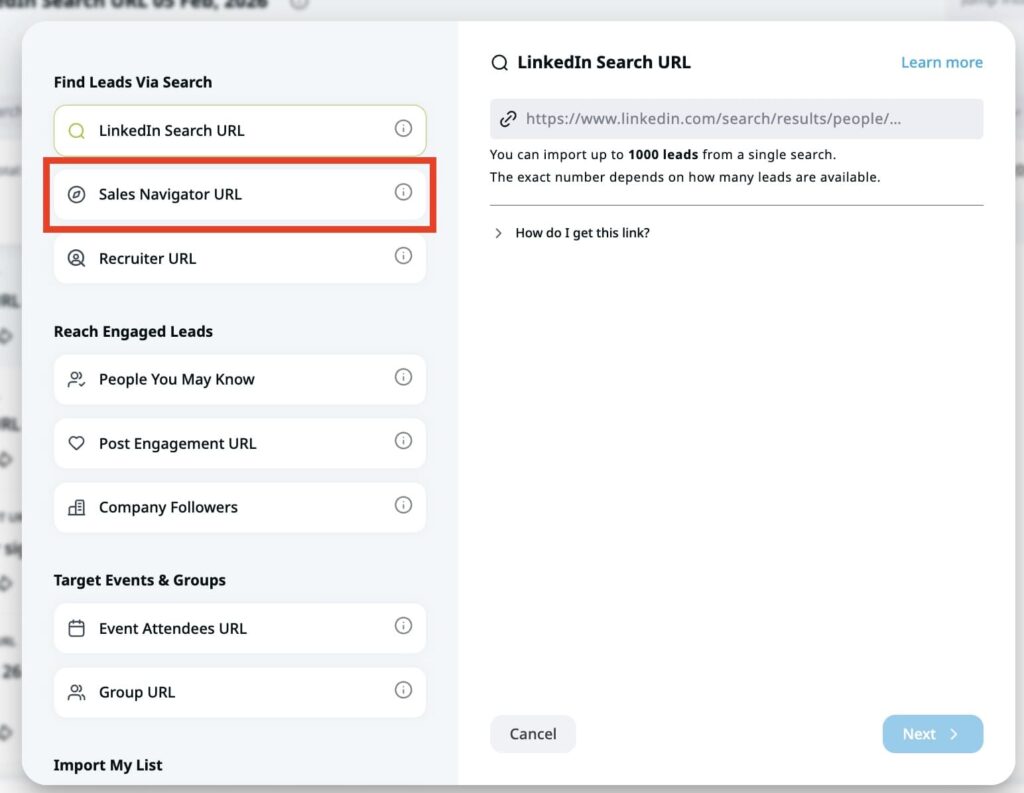
Click “Sales Navigator URL” from the options displayed, and you will see a page where you can paste the link on your right.
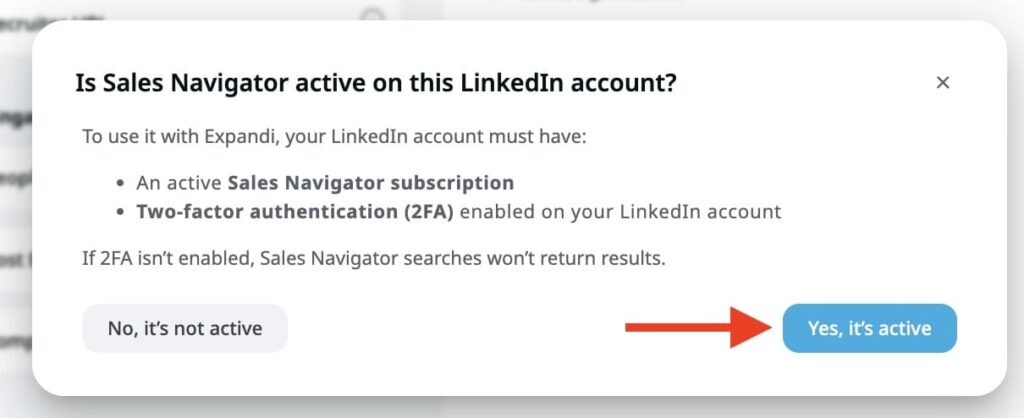
If you’re creating a Sales Navigator lead list in Expandi for the first time, a pop-up will appear to confirm whether you have an active Sales Navigator subscription. It will also check if your two-factor authentication for your LinkedIn account is enabled.
If your answer is yes to both factors, click the “Yes, it’s active” button. Otherwise, you’d have to set up the factors to proceed.
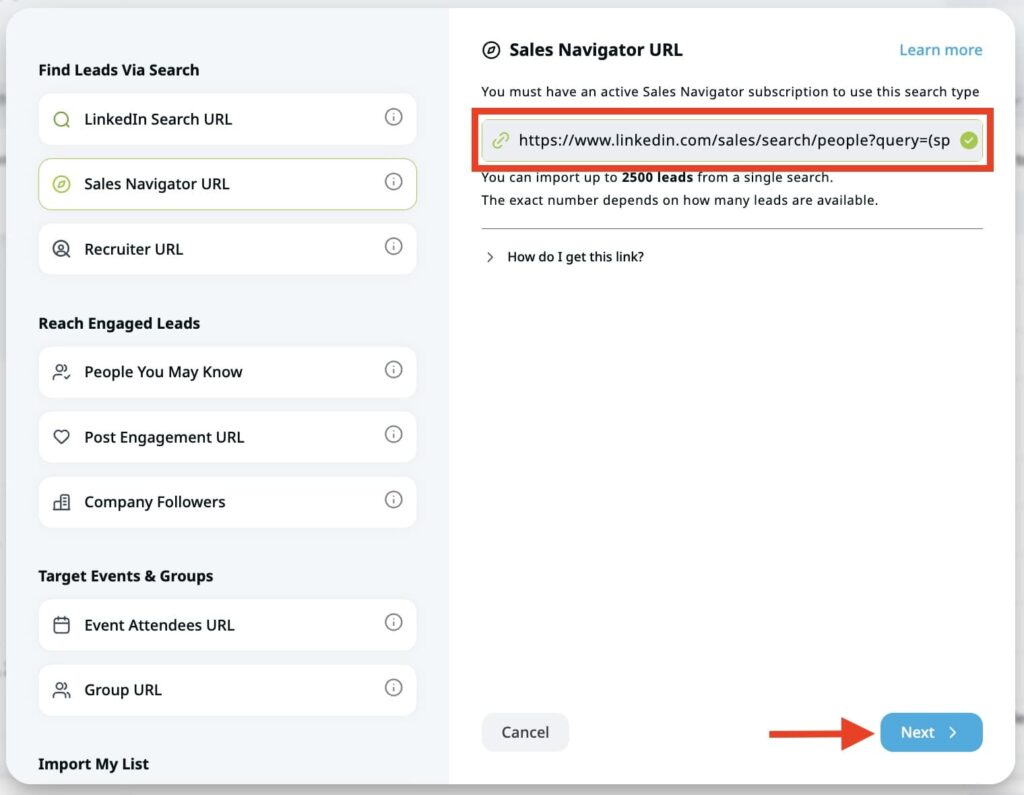
Paste the Sales Navigator URL you copied earlier into the open field and click “Next” to continue.
Give your lead list a name.
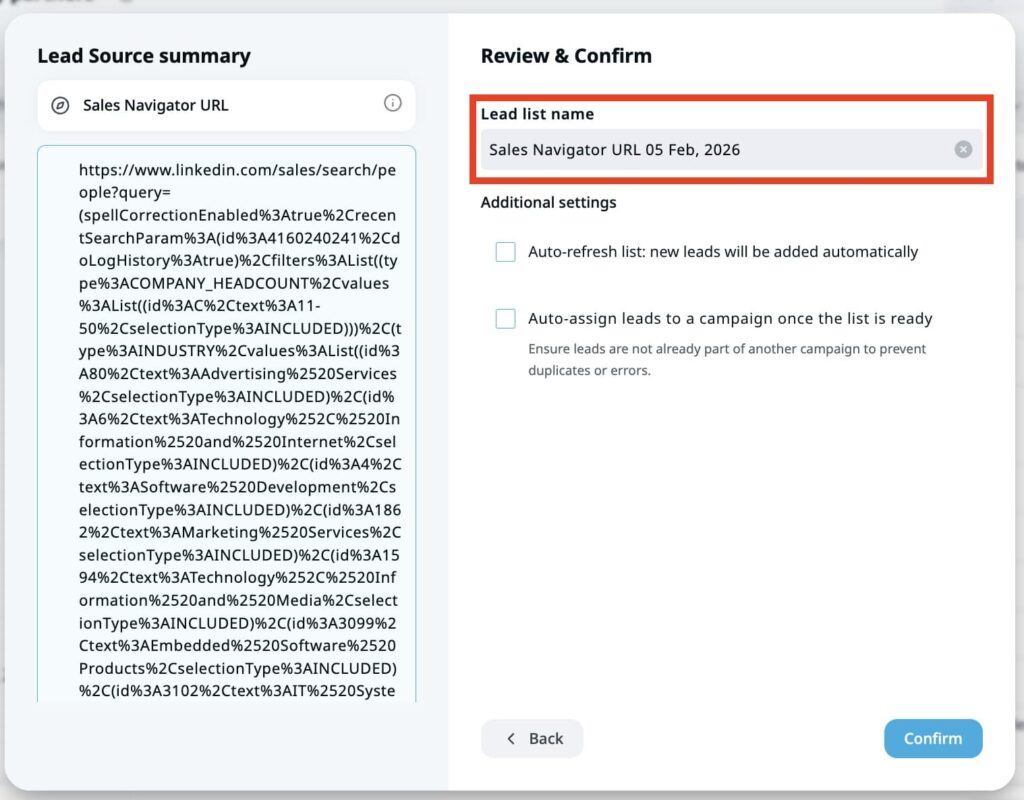
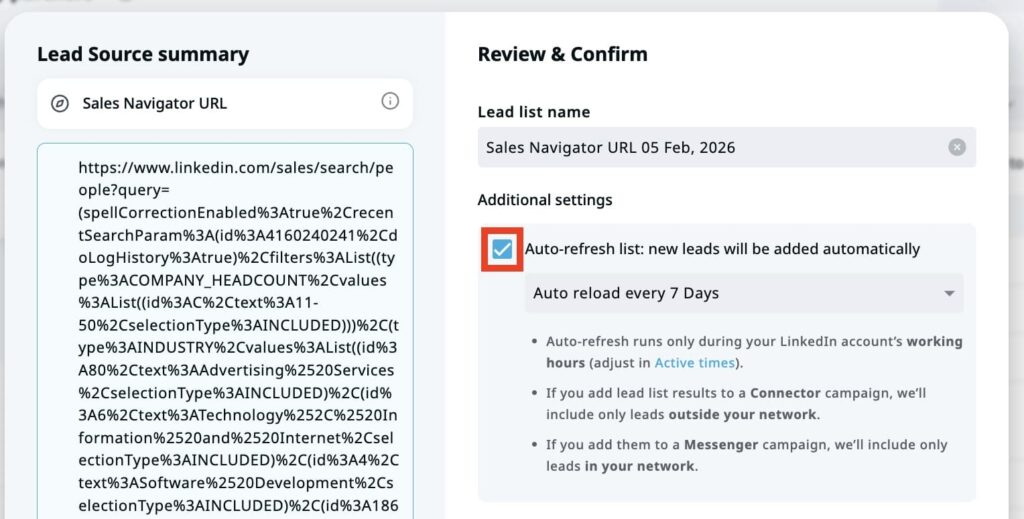
If you’d love Expandi to auto-refresh your list within a specific timeframe, check the box that’s next to the caption, “Auto-refresh list,” and select a specific time you’d want Expandi to update the list. It could be every 24 hours or 7 days. Note that this step is optional; you can leave the box empty.
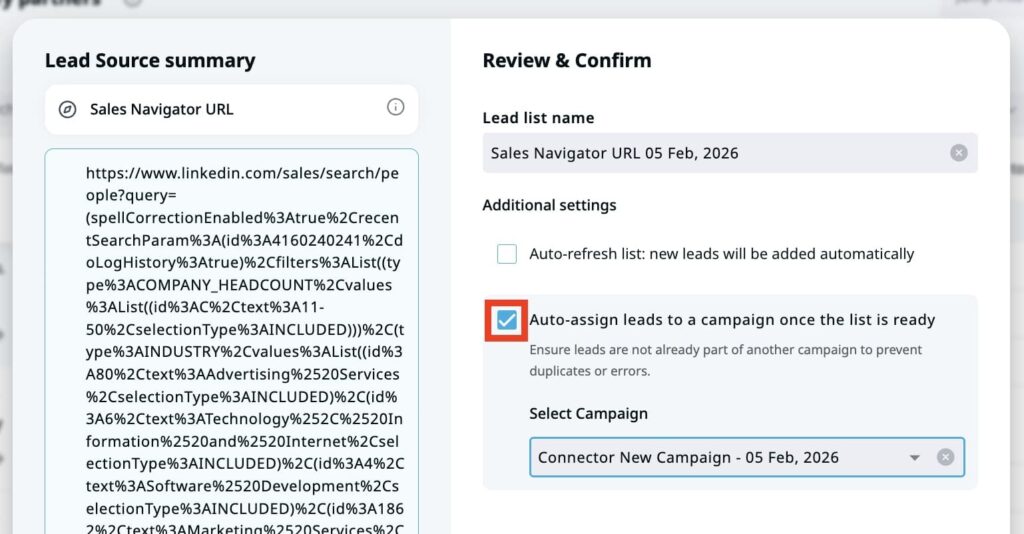
You can also decide whether you want Expandi to automatically add the extracted leads to a campaign. Check the box next to the text, “Auto-assign leads to campaign once the list is ready,” and select the preferred campaign where you’d want the list to be added. This step is also completely optional.
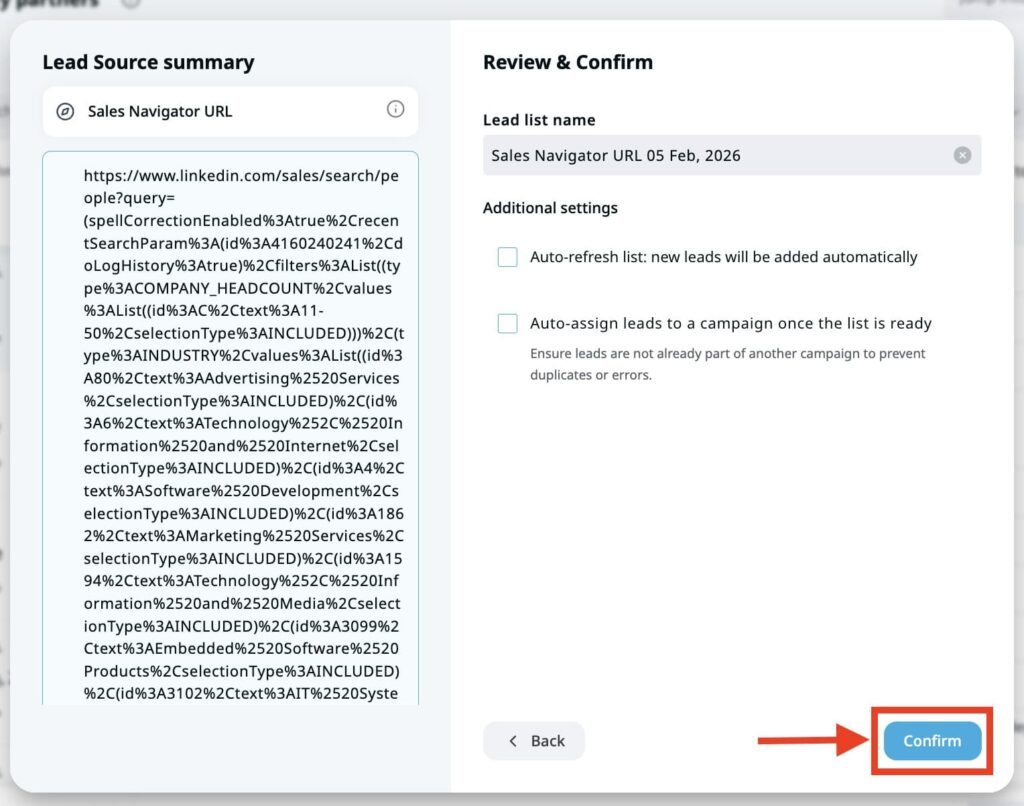
Afterward, click the “Confirm” button to allow Expandi to retrieve the result from Sales Navigator.
Once the list is retrieved from Sales Navigator, you’ll see it on the lead list, where you can further route them to a campaign.
Exporting lead list as a CSV file from Sales Navigator
Once you have your lead list in Expandi, you may want to export it via a CSV file for further use on other platforms. Here’s how it works.
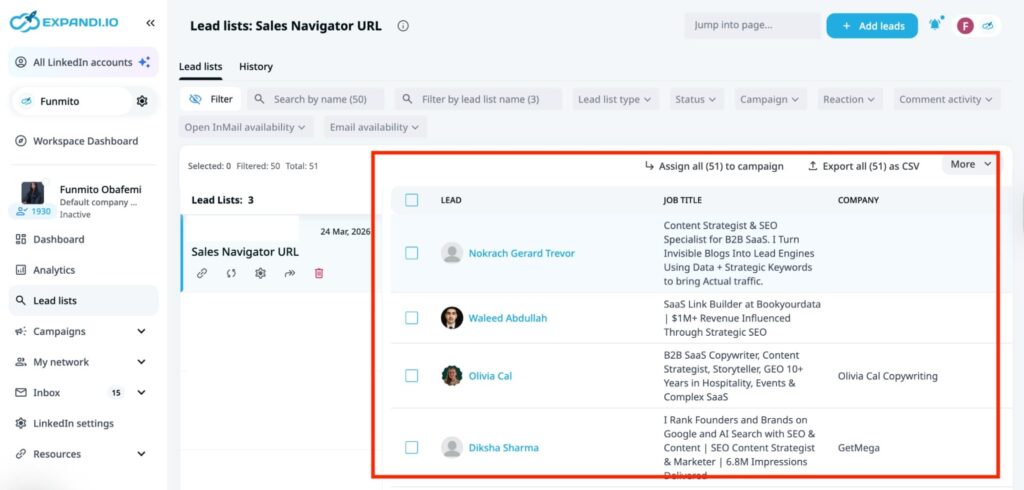
From your Expandi dashboard, select “Lead list” from the side panel on the left side of your screen. Choose the lead list you initially exported from Sales Navigator and select the number of people you want to export, as shown in the image below.
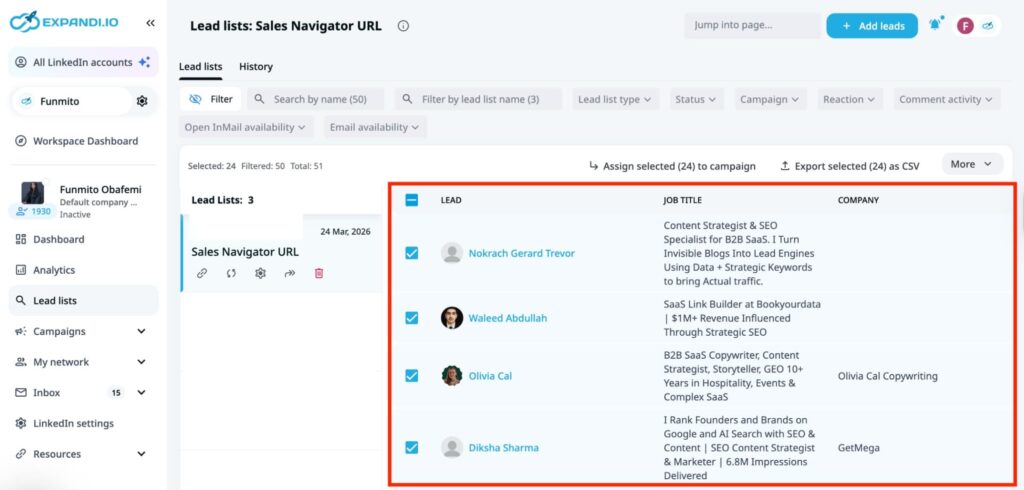
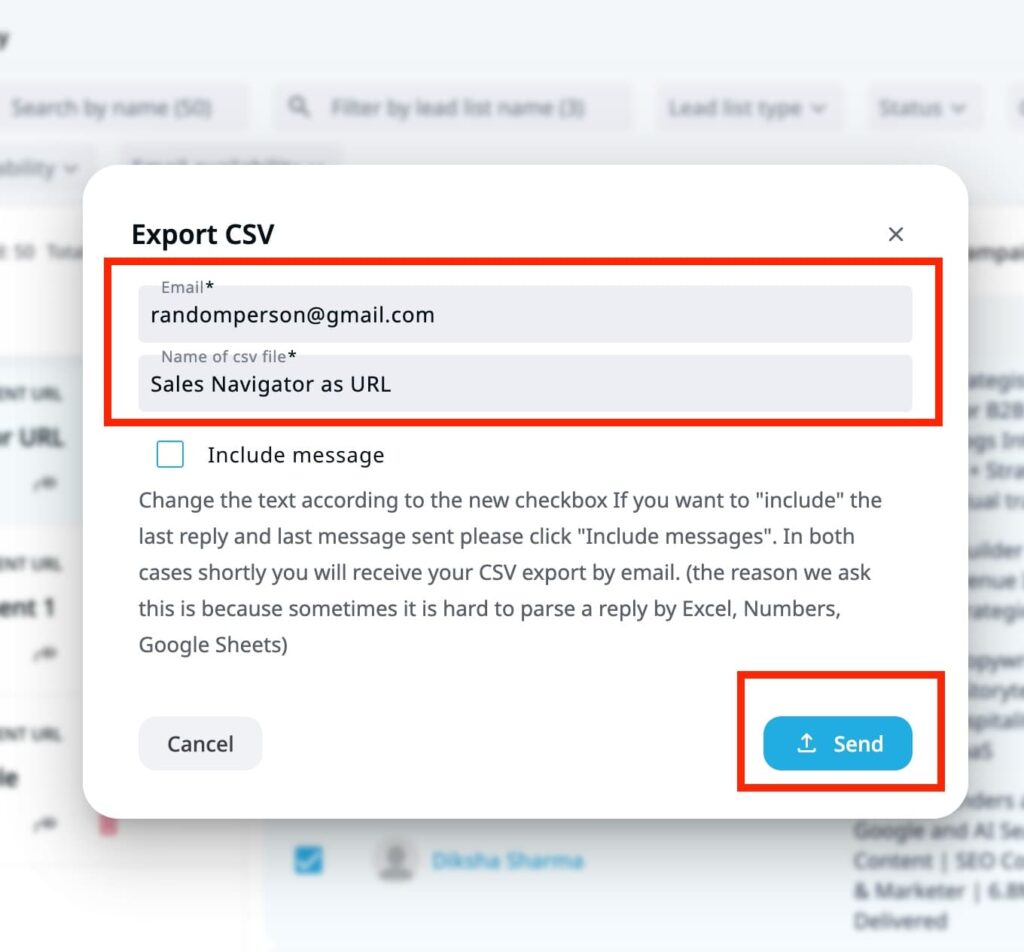
Then, click “Export selected (x) as CSV” to begin the process. A pop-up will appear where you can enter the email address to which you want the CSV file sent. Also, check whether you want to include a message in the file and click “Send.” You’ll receive the CSV file in your inbox.
How to open a conversation with someone who just changed roles
The timing signal is your context, so you should use it. The goal is to acknowledge the transition without making it feel like you scraped their profile. Connect the new role to a specific pressure that role creates, and make the ask easy to answer.
- Connect the role to the problem:
“Congrats on joining [company] — [role] at a [stage] company usually means [specific challenge, e.g. rebuilding the outbound motion] is already on the agenda. Is that where your head is?”
- Acknowledge the evaluation window without stating it explicitly:
“You’re a few months into [company] — that’s usually when the real priorities separate from the noise. Is [pain point] one of the things you’re looking to solve in the first half?”
- Use their LinkedIn activity as the bridge:
“Saw your post on [topic] — that’s exactly the problem we work on. You just joined [company], so the timing might be right. Worth a short conversation?”
- For post-funding roles specifically:
“Congrats on joining [company] post-Series B. That stage usually means [hiring targets / pipeline pressure / stack decisions] move fast. Is [pain point] already on the roadmap?”
- For warm leads who engaged with content:
“Saw you liked our post on [topic] and noticed you just joined [company]. If that’s front of mind in the new role, happy to share what’s working for similar teams.”
The connecting thread: the new role is the reason for the outreach, not just the excuse. Each message connects the timing signal to something that role specifically creates — pressure, evaluation window, stack decisions — rather than using it as a generic congratulations hook.
Export filtered list with Expandi in one click
Every unfiltered list you run a campaign against consumes time, budget, and goodwill with prospects who weren’t ready to hear from you. Applying “changed jobs” and “posted on LinkedIn” on top of your ICP filters removes that waste — not by shrinking your ambition, but by focusing it on the window where outreach actually converts.
Build the list in Sales Navigator. Import it into Expandi in one click. Set up auto-refresh so the list stays current as new leads enter the buying window.
Start your 14-day free trial — no card required.
FAQs about two filters that find high-intent leads
A new executive has roughly 90 days to prove their value, which means they’re actively evaluating tools, reassessing existing vendors, and building or rebuilding their stack. New executives in their first 90 days are 2.5x more likely to purchase new software than peers who are settled into their roles. The filter surfaces them while that window is still open.
Active LinkedIn users respond 40–60% more frequently to LinkedIn outreach than inactive ones, because they’re actually checking the platform. Beyond reachability, what someone is posting about and engaging with tells you what problems are front of mind, which makes your opening message more precise.
Both filters are in the Recent updates section of the Lead filters panel. Toggle on Changed jobs and Posted on LinkedIn to apply them. They work as narrowing layers on top of your demographic filters, not as standalone searches.
Technically yes, but the result will be too broad to be useful. “Changed jobs in the last year” across all of LinkedIn is millions of people. The right approach is to set your ICP foundation first (job title, industry, location, company size) and layer the intent signals on top to isolate who’s ready within that population.
Expandi pulls leads directly from your Sales Navigator URL into a named lead list, respecting LinkedIn’s 2,500-lead-per-pull cap. From there you can manually assign leads to a campaign, or use auto-assign to route them automatically. The auto-refresh setting re-runs the search at your chosen interval and adds new leads who meet your filters, so the list stays current without manual upkeep.
You’ve made it all the way down here, take the final step