How to Build an AI-Assisted LinkedIn Response System With Expandi and N8N
Managing LinkedIn outreach across multiple accounts means one thing will break your results: the reply stage. Not because you’re not getting responses, but you have to respond to all of them fast and add context.
On a human level, this is impossible to do manually at scale. Give 50 replies to 50 different conversations at once, and you’d get tired. That’s even if you remember the context for all of them.
Rely fully on automation tools, on the other hand, and you’ll get boring, generic responses that turn people off. What you need, instead, is a system that automates your LinkedIn responses without compromising on quality.
This guide will show you a step-by-step process on how to build an AI-assisted LinkedIn response system using Expandi and N8N.
The problem with both extremes: you can’t automate everything to save time
If you run a LinkedIn outreach manually, you know the process: open a spreadsheet, look at a lead’s profile, try to write something that doesn’t sound boring, send the message, check your DM every hour, read for context, give a reply, and repeat about 50 times.
An eight-step process that’s tedious and time-consuming. By the time you do this ten times, you get tired, and your messages start sounding robotic. Consequently, the fatigue sets in and you miss out on opportunities.
In a similar vein, you can’t rely on full automation to generate responses for your LinkedIn messages. A Salesforce report revealed that 68% of salespeople agree that generative AI lacks human contextual knowledge. Since these tools rely on their existing training data, they may not give the full context unless you add it.
So, all you get is speed.
Fast, generic auto-replies that fail to connect with your readers, who end up ignoring your messages. At the end, you build no meaningful relationships and ultimately tank your conversion rates.
The solution: the human-in-the-loop AI model explained
The fix isn’t choosing between manual and automated — it’s removing the manual work that doesn’t require human judgment while keeping humans on the decisions that do.
In this system, AI generates the draft; you decide whether to send it. That split matters: HubSpot’s 2024 Sales Trends Report found that 98% of salespeople edit AI-generated content before sending, which means most people already apply judgment at the reply stage. This workflow just removes everything before that moment.
Here’s how it works in practice.
Expandi captures incoming replies and fires the conversation data to n8n. N8n pulls the full thread for context, passes it to OpenAI with a structured prompt, and routes the draft to Slack for review. You approve or edit; Expandi delivers.
The whole loop runs in the background. What you’re left with is a review queue, not an inbox.
Now, here’s the full step-by-step workflow for building an AI-assisted LinkedIn response system with Expandi and n8n.
Step 1: Expandi webhook fires on reply
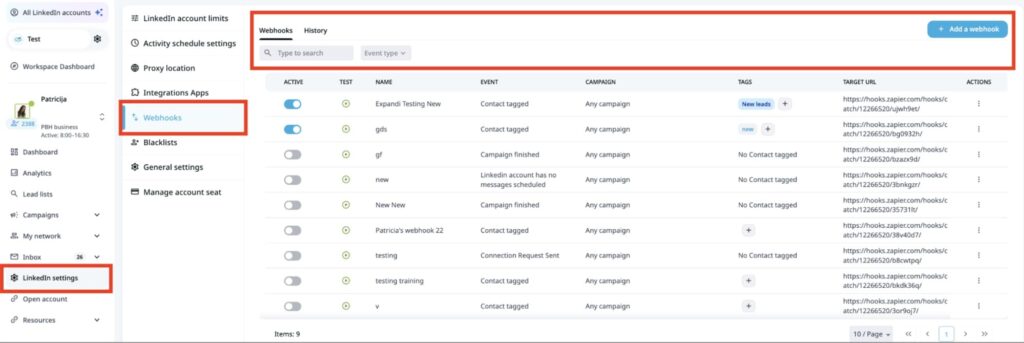
Unlike tools that only automate outbound sequences, Expandi’s webhook fires on inbound replies too, meaning the system reacts to real responses, not just scheduled touchpoints. You can scope it to specific campaigns, so the workflow only activates for the sequences where speed of response actually matters.
When someone replies, Expandi triggers the “Webhook on Reply” event and sends the payload: message content, sender profile, conversation ID, timestamp — directly to n8n. You have two scoping options:
- Responses to LinkedIn campaigns: Filters out random DMs and keeps the workflow focused
- All LinkedIn messages: Captures every conversation, useful if you want full inbox coverage
To complete the setup, grab the webhook URL from n8n and paste it into Expandi’s webhook configuration.
Step 2: N8N receives the webhook payload
Now that Expandi is ready to send data when someone replies to your LinkedIn message, you need a place to receive it.
This is where n8n, a workflow automation tool, appears in the picture. In n8n, you create a webhook node that receives the signal. Basically, it waits for Expandi to send the reply data and captures it.
Here’s how to set up the process:
- Log in to your n8n account and click the + button in the upper-left corner of the screen to display the dashboard.
- From your dashboard, select “Add first step” >> “On webhook call” to display the webhook page.
- Switch the HTTP method from “GET” to “POST” to receive the structured data.
- Copy the production URL and paste it into Expandi’s webhook to complete the node setup from both ends.
Once connected, every reply is sent into n8n as structured data.
So, let’s say you send a LinkedIn message to a prospect, “Hi, are you open to improving your outbound pipeline?” And the prospect replies, “Maybe. It depends on what you’re offering.”
The moment that reply comes in, Expandi detects it and sends it to n8n as usable data. Without this step, that reply just sits in your LinkedIn inbox, waiting for your action.
Step 3: N8N calls OpenAI with conversation context
At this stage, n8n has received the reply, but a single reply doesn’t provide the context to give a good response. To fix this, n8n makes a request back to Expandi for the full conversation to send to OpenAI.
For context, suppose the conversation with your prospects looks like this:
- You: “Hi, are you open to improving your outbound pipeline?”
- Them: “Maybe. It depends on what you’re offering.”
(After a few messages) - Them: “Actually, tell me more.”
If the system sees only the last message, it might respond cautiously and put off the prospect. But if it fetches the full thread, the AI tool understands the context that the person changed their mind and would give a better reply.
To do this, you must configure the HTTP response node inside n8n.
Here’s how it works:
- After the initial Webhook node, create a new node by clicking the + button.
- Search HTTP Request and set up the parameters.
- Leave the Method as “GET” because you’re retrieving data.
- Insert Expandi’s API endpoints for conversations. It should look like this: https://api.expandi.io/conversations/{{ $json.conversationId }}
- Leave Authentication as “None.”
- Toggle on the “Send headers” button to add the API keys from Expandi.
- Leave the remaining parameters, “Query parameters” and “Body.” You don’t need them for this request.
- Test your workflow by clicking “Execute step.”
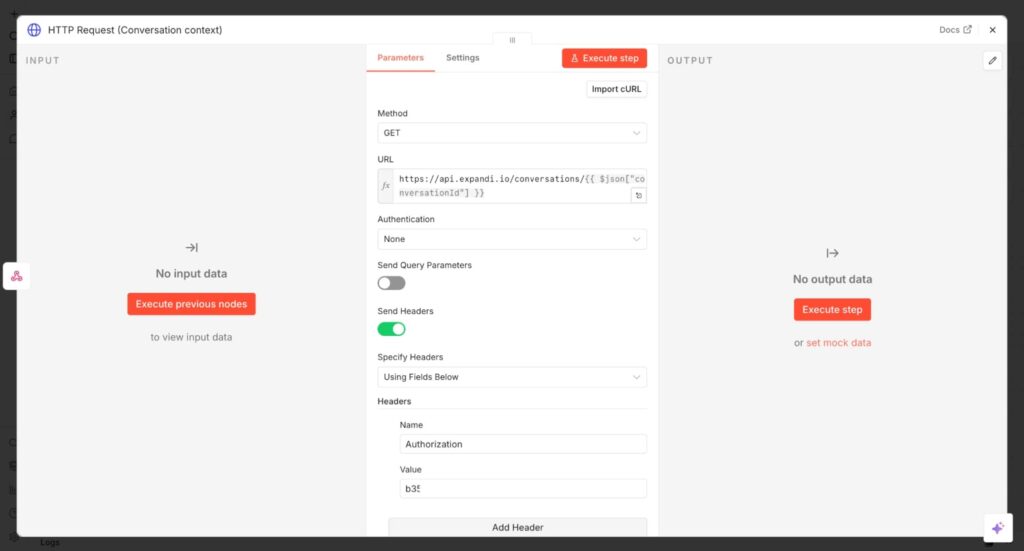
You should see the conversation thread, which includes the sender’s details and a list of messages, on the right side of your screen (Output).
Step 4: AI generates a draft response
Now that n8n has the full conversation, it sends that context to OpenAI to generate a reply. But note that OpenAI doesn’t just craft any random message. You provide the prompt, n8n delivers it, and ChatGPT acts on your instructions.
Let’s say your prospect replies with “Maybe. It depends on what you’re offering.” A weak AI-generated reply could sound like “Thanks for your response. I’d love to provide more information about our services.”
In contrast, a strong AI-generated reply could sound like this: “Got it! What would you like to improve now: lead volume or conversion?”
The difference is in your prompt. A good prompt is human, specific, and engaging. It tells AI what you want, how it should sound, and what it should avoid.
As long as your ChatGPT rules are precise and detailed, it creates a strong draft that’s clear and concise, sounds human, and is full of context. The right draft moves the conversation forward.
That said, here’s how to add a prompt in the n8n workflow.
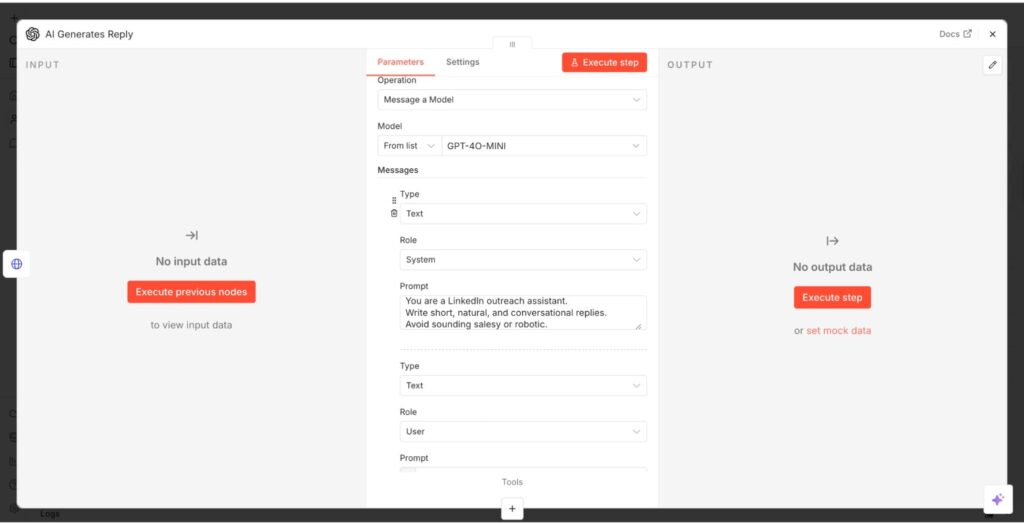
- In your dashboard, click the + button, then search for OpenAI.
- Select it and click “Message a model” to fill in the parameters.
- Start by copying your API key from the OpenAI platform website and pasting in the Credential option.
- Next, select a model like the gpt-4o-mini, which is cost-efficient and fast.
- Add your prompts in the Messages section. You’re adding two messages. First is the system message, which contains your instruction, and the user message, which tells the AI what to respond to.
- Save the node, and the prompt will be a part of your workflow.
In this process, the system reuses the prompt for every Expandi reply, automatically inserting new data.
Step 5: N8N sends the draft to Slack
Once OpenAI generates a reply, n8n doesn’t send it to your prospect immediately. Instead, it sends the draft to Slack for you to review. This is where human oversight comes into play.
Here, you can edit or approve the message before sending it to your prospect.
You can set it up in n8n this way:
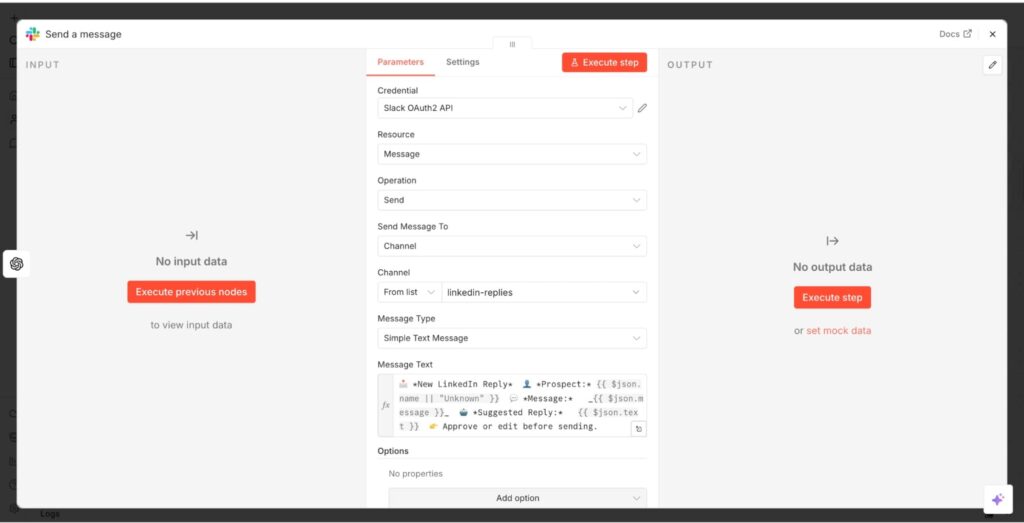
- In your dashboard, click the + button and search for Slack
- Select it and click “Send a message.”
- Then, connect your Slack account to n8n in the Credential section
- Leave the Resource section as “Message” and Operation as “Send.”
- Select whether you want the message to be sent to a channel or your DM.
- If you select Channel, choose the specific channel.
- Afterward, type in your message text and execute the step.
Overall, n8n sends the message to Slack together with the sender context, allowing you to review before responding to leads.
Step 6: Reviewer approves or edits in Slack
Once the draft gets to Slack, a human reviewer makes the final call. This is where automation pauses, and your judgment kicks in.
With a button-based setup, you can click “Approve” directly in Slack. If you’re not satisfied with the draft, you can tweak the message directly in Slack before approving and sending.
The whole workflow runs in the background while you make the call, close the deal, or do other sales tasks. All you need to do is make the decision.
Step 7: N8N sends the approved message via Expandi API
Once you approve the reply, n8n sends it back to Expandi for the final delivery.
Here’s how to set up the final workflow.
- Add the HTTP Request node at the end of your workflow.
- Configure the Methods section to Post.
- Add the URL (Expandi’s message endpoint)
- Add the headers (Expandi’s name and the app’s secret API key)
- Include your conversation ID and message in the Body section.
You should have something that looks like this.
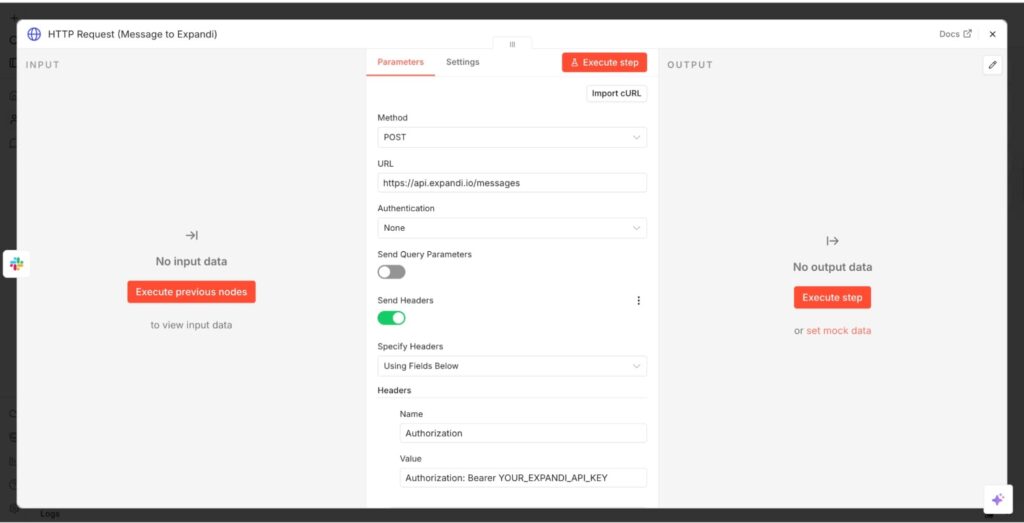
This sends the final message to Expandi via API, allowing the LinkedIn outreach tool to deliver the right contextual response to the appropriate conversation on LinkedIn.
What to prompt the AI with: making sure you create quality replies
The quality of your AI-generated reply relies on how much context you give the AI tool.
If you only feed it the last message you received, you’d get a response to what was said, but it would miss the tone, the history, or the situation that instantly connects with the prospect.
Here’s what to prompt the AI with to get context-rich responses.
- The full conversation thread: Not just the most recent reply. The AI must see the full conversation thread, including what you offered and how the prospects have been responding.
- The prospect’s original message and tone: Is it formal, conversational, or casual? Feeding this into the prompt tells the AI how to write in a way that matches the prospect’s personality.
- Your account’s voice and offer: If you’re managing multiple accounts, each will have a distinct persona, value proposition, and relationship with the client. The AI needs to know which one it’s writing for.
- The stage of the conversation: Is the first reply to a cold outreach message? A follow-up message? AI can only give the right response when you tell it where the conversation sits in the sequence.
- What happens next: End your prompt with a clear outcome. Do you want it to book a call? Keep the conversation warm? Or ask a qualifying question? Without this, the AI becomes directionless.
Here’s a simple prompt example that works.
“You’re an [account/persona]. Here’s the full conversation so far: [thread]. The prospect has just replied with [last message]. We are at a [stage of sequence]. Draft a reply [for the intended next action]. Make it natural, keep it under four sentences, and match the prospect’s tone.
As long as you’re specific in your input, the AI will generate a response that requires less editing. Here are prompt examples you can check out when using ChatGPT for sales.
Setting up the N8N workflow with Expandi, OpenAI, and Slack
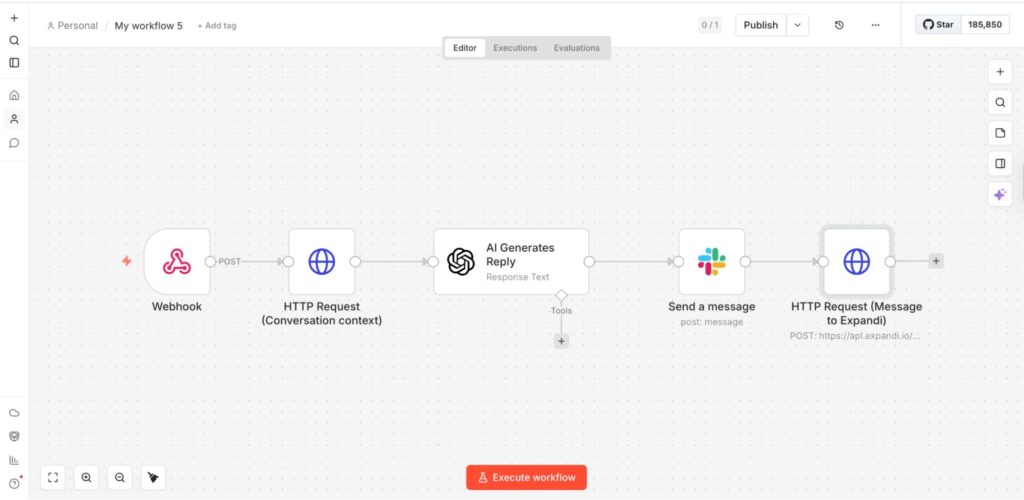
To sum it up, the workflow connects Expandi, n8n, OpenAI, and Slack in a single continuous loop.
When the prospect replies on LinkedIn, Expandi captures the response and sends the data to n8n via a webhook. Then n8n enriches the incoming message by pulling the full conversation history, so the system understands the context.
With the context in place, n8n passes the conversation to OpenAI, where a structured prompt generates a draft response that matches your tone and intent. Instead of automatically sending the reply to the prospect, n8n routes the message to Slack, where you can review it.
This keeps the process fast while giving you control over what gets sent.
Upon approval, n8n sends the final message to Expandi via APi which then delivers to LinkedIn to complete the loop. This is what your workflow should look like below.
Cost estimate: how does this fit your budget?
Before you build the system, know what it costs to run at real volume. Here’s what you’re looking at across two realistic usage levels for n8n and OpenAI API:
N8N, on a self-hosted plan, costs $5 to $15 per month in server costs.
On the N8N cloud, the relevant tier starts at $20 per month.
On the other hand, GPT-4o-mini costs $0.15 per 1M input tokens and $0.60 per 1M output tokens.
Let’s say you get 100 replies per day. Each reply uses a small amount of text going in and the draft coming out. At that volume, your OpenAI cost is less than $1 per month. Your highest cost at this volume is your N8N plan, which brings the total to $6 to $21 per month.
At 500 replies per day, the same token assumption yields a total cost of $3 to $4 per month for using OpenAI. When combined with N8N, your total cost sits at $8 to $24 per month.
The main factor driving up the cost is the token count. Longer conversations mean more tokens per call.
So, trim your prompt to the last three to five messages to keep costs predictable without compromising the quality of your response to your prospect.
Real-world scale
This workflow is built to handle the reality of multi-account LinkedIn outreach, not just a single inbox.
A typical LinkedIn multi-account inbox setup runs 3 to 10 accounts simultaneously, each sending 20 to 50 messages per day.
At the low end that’s 60 replies daily; at the high end, 500. Each one triggers the workflow independently — Expandi fires the webhook, n8n pulls the conversation history, and OpenAI drafts a response scoped to that specific thread.
Because replies are processed in isolation, there’s no risk of context bleeding between conversations.
The safety picture holds at scale too.
Expandi operates within LinkedIn’s usage thresholds and spaces out delivery to mimic natural behaviour. The workflow itself isn’t sending anything, but drafting. Expandi handles the LinkedIn-side interaction, which means you’re not adding the account risk that comes with tools that hit LinkedIn directly via scraping.
Build your LinkedIn response system with Expandi
Managing replies across multiple LinkedIn accounts doesn’t mean falling behind on conversations or losing warm leads to slow responses. Plus, you don’t have to spend hours switching between inboxes or trying to remember the context of each conversation.
With an AI-assisted LinkedIn response system through Expandi and n8n, you can always give context-rich responses to your prospects.
As Expandi catches the reply and fires the conversation details to n8n, the workflow automation tool pulls the context and sends it to OpenAI to draft a personalized response that connects with your prospects.
Want to start the process today with your Expandi webhook? Sign up for a 14-day free trial today!
FAQs about building an AI-assisted LinkedIn response system
No, you don’t need technical experience to build an AI-assisted LinkedIn response system. n8n is a visual workflow builder where you connect nodes by clicking and dragging, not writing code. The only configuration that requires any technical input is pasting in your API keys for Expandi and OpenAI, both of which are found in each platform’s settings page. If you can follow a step-by-step setup guide and copy a URL, you have everything you need to get this running.
The workflow itself never interacts with LinkedIn directly; it operates between Expandi, n8n, OpenAI, and Slack. Expandi handles all LinkedIn-side delivery and is built to stay within LinkedIn’s usage thresholds by spacing out actions to mimic natural human behaviour. As long as you’re not pushing reply volumes that would look unusual for a single user, the system adds no additional risk beyond what Expandi already manages.
Yes. The workflow functions identically whether you’re running one account or ten, since each reply triggers the process independently regardless of how many accounts are connected. For single-account users, the main benefit shifts from inbox consolidation to response quality: you get AI-drafted context-aware replies without the fatigue of writing each one from scratch. It’s worth building even if you never scale beyond one account.
You’ve made it all the way down here, take the final step