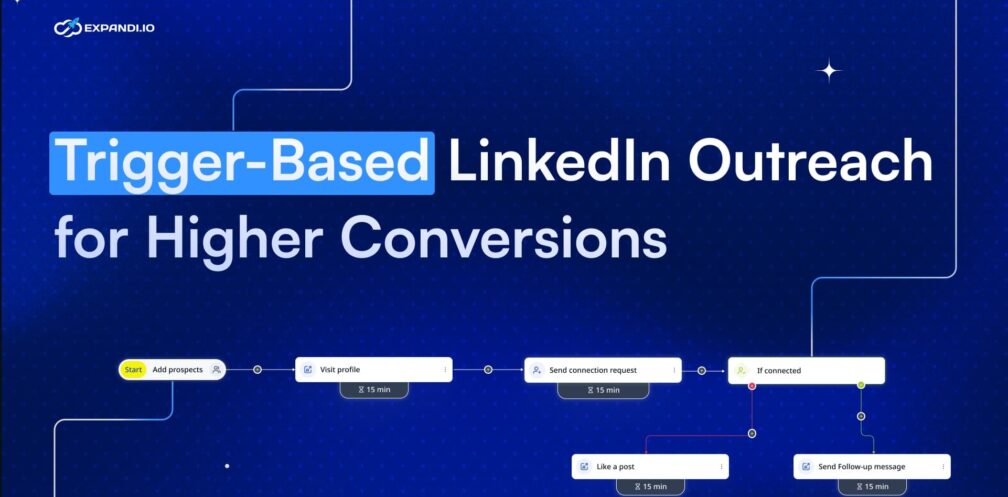
How to Boost LinkedIn Conversions with Trigger-Based Outreach: The Ultimate Framework
Sending more LinkedIn messages doesn’t equal getting more meetings.
That’s because LinkedIn outreach has gotten noisy. Your prospects are drowning in generic “just checking in” messages while you’re struggling with longer buying cycles and ghosted conversations.
You’re not alone, either: Over a third of B2B decision-makers are taking longer to purchase, and 32% of leads go silent without explanation.
But what if, instead of chasing prospects, you could reach them when they’re already showing interest? When you look for and act on behavioral triggers, the result is replies and conversions.
Key Takeaways
- Trigger-based outreach works better because it feels contextual, not based on a set schedule.
- Examples of triggers include: people who visited your profile, leads who engaged with your content, and leads whose intent changes in your CRM.
- When working with triggers, focus on the following to boost LinkedIn conversions:
- Building relationships before outreach
- Segmenting based on behavior not title
- Adding engagement triggers
- Writing outreach templates that match the trigger and intent
- Setting up follow-ups based on how leads respond,
- Tracking what works and why based on data.
How to Boost LinkedIn Conversions with Trigger-Based Outreach: The Ultimate Framework


From cold to contextual: What is trigger-based LinkedIn outreach?
Trigger-based outreach automates LinkedIn messaging based on real engagement signals rather than sending messages on a predetermined schedule.
Instead of broadcasting the same message to everyone on your prospect list, your outreach activates when users take specific actions that indicate interest. For example:
- When someone views your profile, your system can automatically respond with a direct message or follow.
- When a lead engages with your content, you can follow up by referencing that specific post.
- When a prospect’s buying intent data changes in your CRM, you can initiate a LinkedIn conversation.
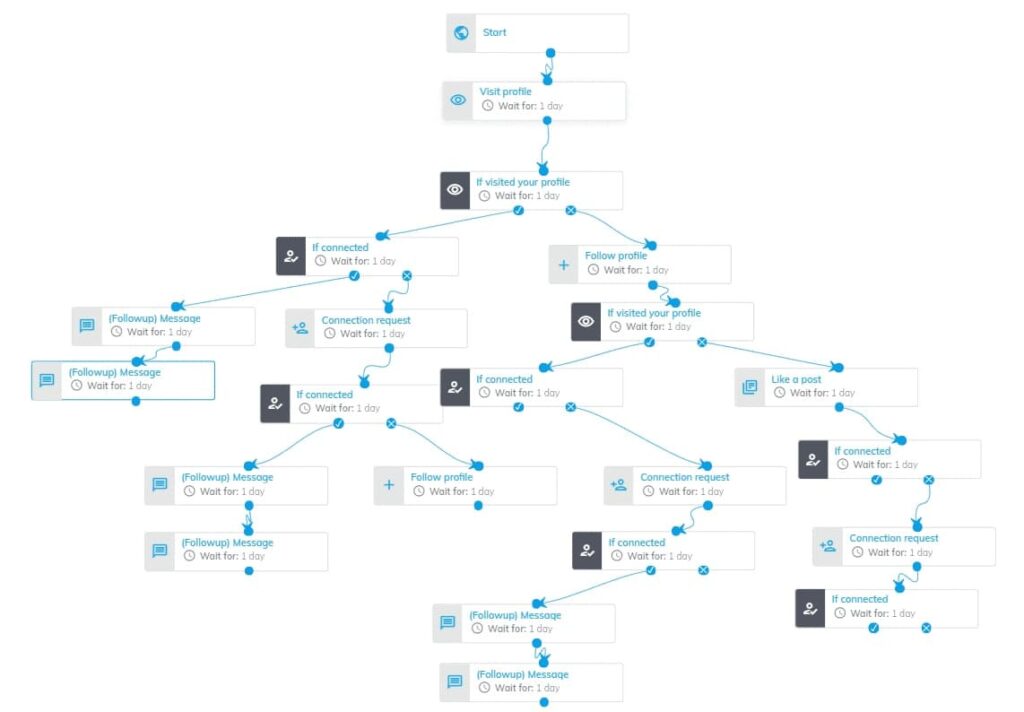
Here’s what it can look like if you’re using a LinkedIn automation tool like Expandi:
Timing changes everything: Why a trigger-based approach converts better
Most LinkedIn outreach fails because it’s essentially cold calling in digital form — interrupting prospects’ days with messages they never asked for, from people they don’t know.

Trigger-based outreach flips this dynamic.
Instead of reaching out randomly and forcing the conversation, you connect with relevant prospects when they’re already engaging with you.
This approach fundamentally changes how your messages are received, helping you add value instead of just adding noise.
And it doesn’t just feel better — it performs better. Expandi users have automated more than 29 million actions within Builder campaigns that leverage the trigger-based strategy, achieving an average 22% connection approval rate and a 7.22% reply rate.
Building your trigger-based LinkedIn campaign: A practical 7-step framework
Let’s explore how you can implement trigger-based outreach step by step, using a combination of LinkedIn growth tactics and Expandi automation.
Step 1: Build a relationship before the outreach
Before you send connection requests or LinkedIn DMs, establish passive touchpoints that make your name recognizable when you reach out directly.
Picture this: Your prospect gets a notification that someone (you) viewed their profile. A couple of days later, they noticed the same person thoughtfully commented on their post about industry challenges.
When you finally send a connection request, you’re no longer a stranger. You’re someone who’s already shown genuine interest.
For example:
Hey {first_name}, I really enjoyed your insights on AI implementation for sales teams in the comments of {mutual_connection}’s post. Would love to connect and exchange ideas on this topic.
Here are some warm-up strategies you could try before starting your outreach campaign:
- Comment meaningfully on their content: Don’t just say, “Great post!” Instead, add value: “Your point about [specific aspect] reminds me of [relevant insight/experience]. I’ve found that [additional perspective] also helps address this challenge.”
- Engage with their comments on others’ posts: This subtle approach shows you share common interests without directly targeting them.
- View their profile strategically: Profile views create a notification that puts you on their radar without requiring any action from them.
These strategies warm up prospects, and they give you crucial insights into which triggers will work best for your specific audience.
Step 2: Audit your ICP’s LinkedIn behavior
Once you’ve created those passive touchpoints and put your name on your prospect’s radar, you need to map out how your audience behaves on LinkedIn.
Why? Because trigger-based outreach is only effective if you’ve set the right triggers.
And those depend entirely on who you’re targeting.
Job titles, industries, and seniority are all valid ways to segment your audience, but these filters are just table stakes. What separates high-performing campaigns from the rest is behavioral relevance — matching your outreach logic to how people use LinkedIn.
Think of it this way:
- A Head of Marketing at a B2B SaaS company might be posting regularly, reacting to peer content, and using LinkedIn to grow their personal brand.
- Meanwhile, another Head of Marketing at a traditional enterprise company might be completely silent — no posts, no likes, just the occasional login.
Same title. Totally different behavior.
Yet many teams treat both the same — using identical sequences, message timing, and follow-up logic — and then wonder why reply rates vary so much.
You don’t just need an ICP. You need a Behavioral ICP.
For instance, your approach might look like:
| ICP segment | Behavior type | Best triggers | Outreach approach |
| C-level execs | Quiet | Profile views, CRM activity | Low-frequency, direct DMs and CRM triggers |
| Marketers (SaaS) | Likes/comments often | Post engagement | Like → Connect → DM referencing post |
| Salespeople (Tech) | Profile views, active | Email opens, LinkedIn visits | Quick CTA to book a chat after a profile visit |
To identify this breakdown for your audience, research the recent activity of your prospects:
- Look at their style: Do they share thought leadership, memes, or nothing at all?
- Test engagement triggers manually: Drop a like or comment — do they notice?
- Use CRM tags or LinkedIn lists to group personas by behavior: Are they “engagers,” “lurkers,” “offline leads,” or another label?
You should start to notice patterns that tell you which triggers actually matter — and, just as importantly, which ones to ignore.
Step 3: Add engagement triggers to your outreach campaign
Once you’ve mapped how your ICP behaves on LinkedIn, it’s time to select the right triggers to act on.
This is where you decide who gets contacted, when, and why. The more relevant the trigger, the higher the chance your outreach feels natural and gets a reply.
Let’s walk through how to set it up in Expandi.
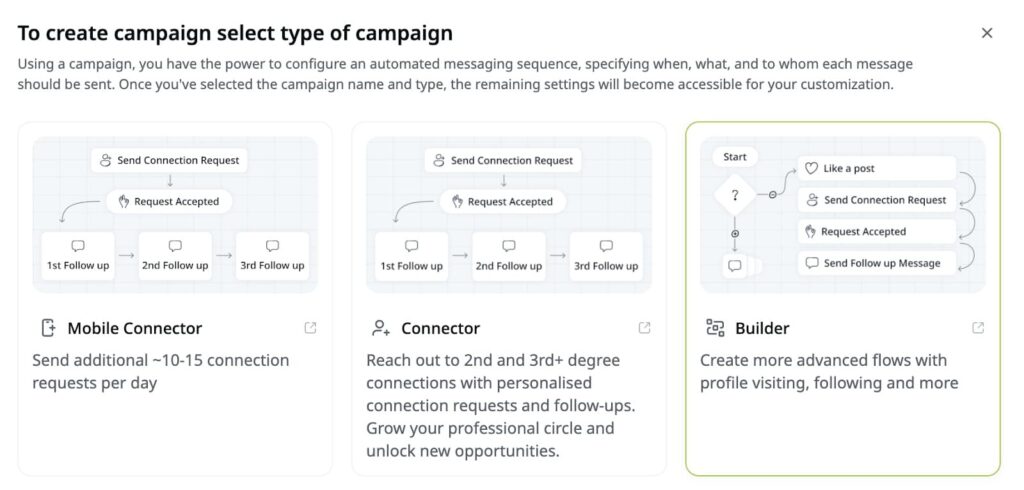
- Click “Create a new campaign” → “Create campaign from scratch.”
- Select Builder.
- Click “Create a blank campaign.”
The Builder campaign type lets you build advanced workflows with triggers, if/then logic, CRM syncs, and multichannel outreach.
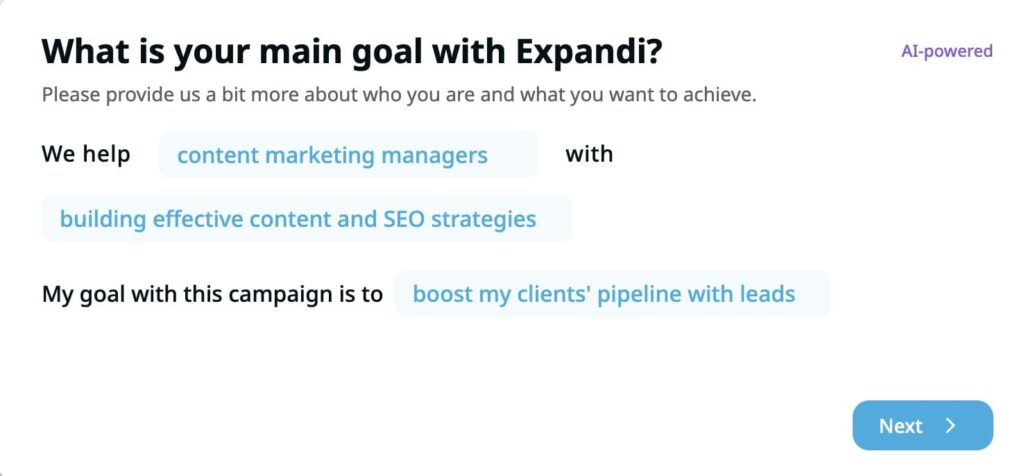
Next, set a goal for the campaign by filling out the fields in the pop-up window: Enter your audience, how you help them, and what you hope to accomplish. This information ensures that Expandi’s AI can analyze your campaign correctly and generate suggestions.
From here, start adding the relevant triggers to define what activity qualifies users to enter your campaign.
You can choose both native LinkedIn signals and external triggers. Here’s what those mean:
Native LinkedIn signals are pulled directly from LinkedIn based on how people interact with you or your content. You can trigger a campaign if a lead:
- Viewed your profile.
- Liked or commented on your post.
- Attended your LinkedIn event.
- Accepted your connection request.
- Followed you.
- Has an open profile (for InMail).
- Was endorsed (by you or someone else).
Here’s how it looks to start the campaign by adding users who visited your profile:

External (webhook) triggers go beyond LinkedIn. They trigger outreach based on off-platform actions like CRM changes and email workflows. For example:
- Email opened: If a lead opens a nurture email in another platform, they can be pushed into a LinkedIn flow.
- Email bounced: If the lead can’t be reached by email, you can automatically switch the channel to LinkedIn.
- CRM score crossed a threshold: If a lead reaches an 80/100 intent score in your CRM, for example, you can push them into Expandi via webhook.
- Form submitted or event registered: You can use these behavioral signals to launch personalized outreach at the right time.
You can easily implement these in Expandi within the same Builder campaign:
- Create a webhook (under LinkedIn Settings → Webhooks).
- Choose your trigger event (e.g., “Contact replied” or “Email opened”).
- Paste the webhook URL from the third-party platform, like your CRM, SmartLead, or Zapier.
- Map the data fields so leads get assigned to the correct campaign.
- Add them to a Builder campaign flow, just like a native trigger.

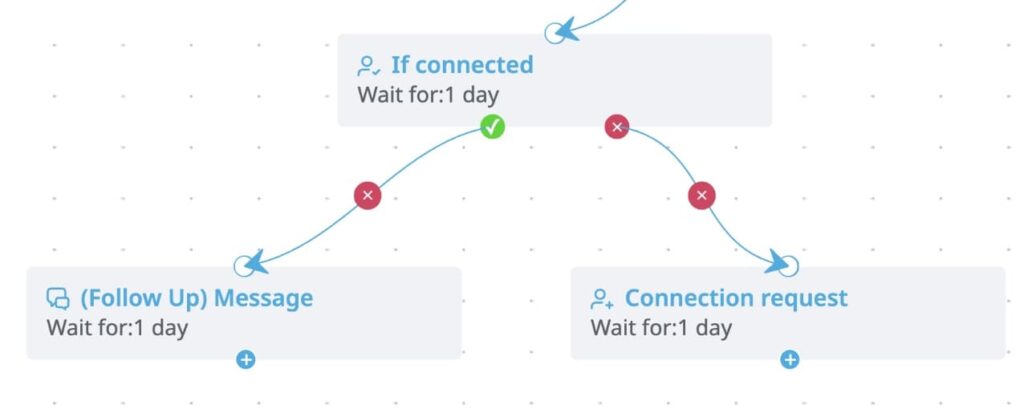
From here, you can add subsequent actions, like sending a connection request or visiting their profile. To build out this conditional logic, use If/Else branches.
For example:
- If they visited your profile → Check whether you’re already connected
- If you’re not connected yet → Send a connection request

Step 4: Qualify and segment leads before you engage
Not every lead that engages with you is the right fit, and chasing the wrong ones slows down your pipeline.
To avoid spending time on the wrong leads, add an extra layer of segmentation based on how closely each user matches your ICP.
Think of it as conditional logic for lead quality.
For example, define one or more focus ICP segments (e.g., “Mid-size SaaS Marketing Leads in North America”), and plan your outreach accordingly:
- If ICP = High-fit → Send personalized message with a case study
- If ICP = Lower-fit → Delay 3 days and send a lighter connection request
- If ICP = Doesn’t match → Tag as “Not ICP” and skip to low-touch sequence
Expandi helps you automate this process without leaving the Campaign Builder.
On your campaign canvas, add a condition after a trigger (like “If visited your profile” or “If connected”).
Select “ICP Filter” from the condition options and choose your ICP definitions (e.g., Location = US, Industry = SaaS, Company Size = 50-250, Job title = CMO).
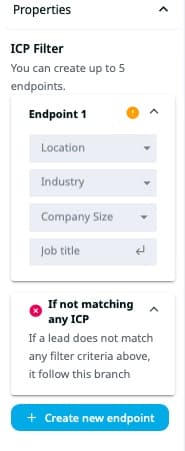
For each ICP path, map a different branch — one for each segment and a fallback or default for non-matching leads.
Route high-fit leads to stronger messages and lower-fit leads to lighter, lower-effort actions.

Step 5: Write messages that match the trigger and intent
Now that your leads are segmented and entering the right flow, you can craft outreach messages that feel relevant.
Your goal here is to make your message contextual to their behavior and aligned with their buyer journey.
Here’s how to think about it:
| Trigger / context | Message angle |
| Viewed your profile | “Hey, noticed you dropped by — were you exploring [topic]?” |
| Liked your post about AI marketing | “Glad the AI marketing tips resonated — curious how you’re applying it?” |
| Attended your webinar | “Saw you joined our webinar — happy to send slides or answer anything.” |
| Opened the email but didn’t reply | “Just looping back — was this still something you’re exploring internally?” |
| ICP = High-fit CMO, SaaS and accepted a connection | “We’ve helped [X] scale inbound demos 2x — thought this [resource] might resonate.” |
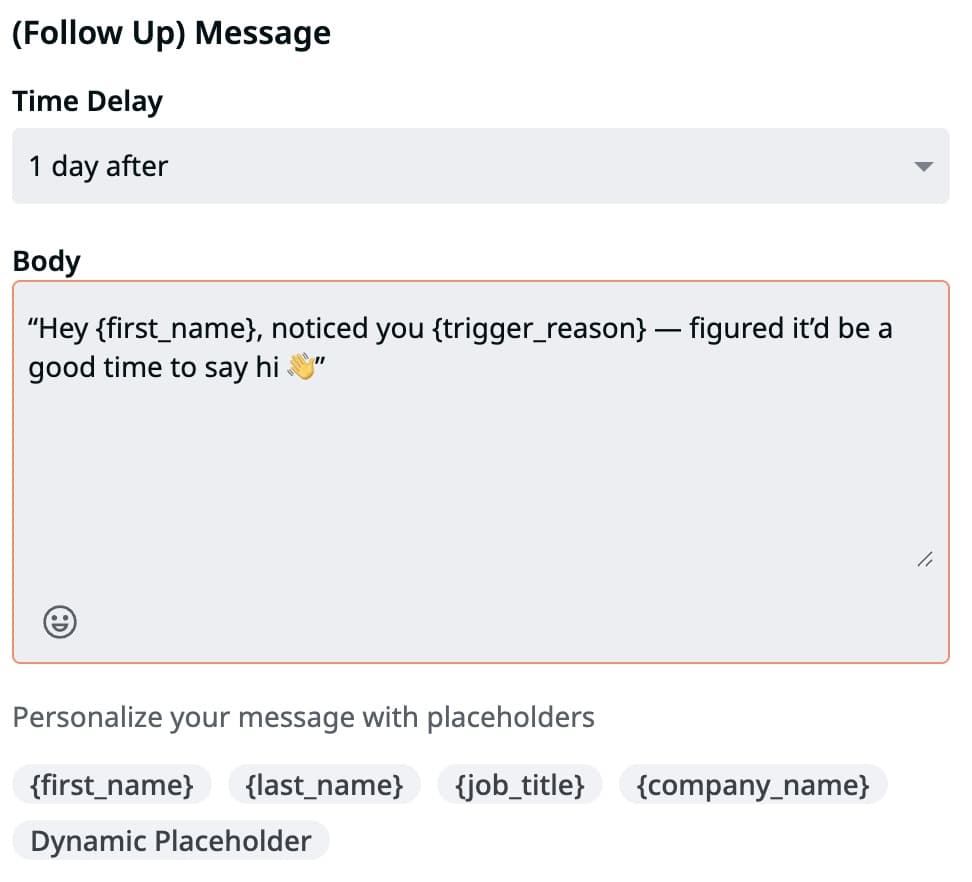
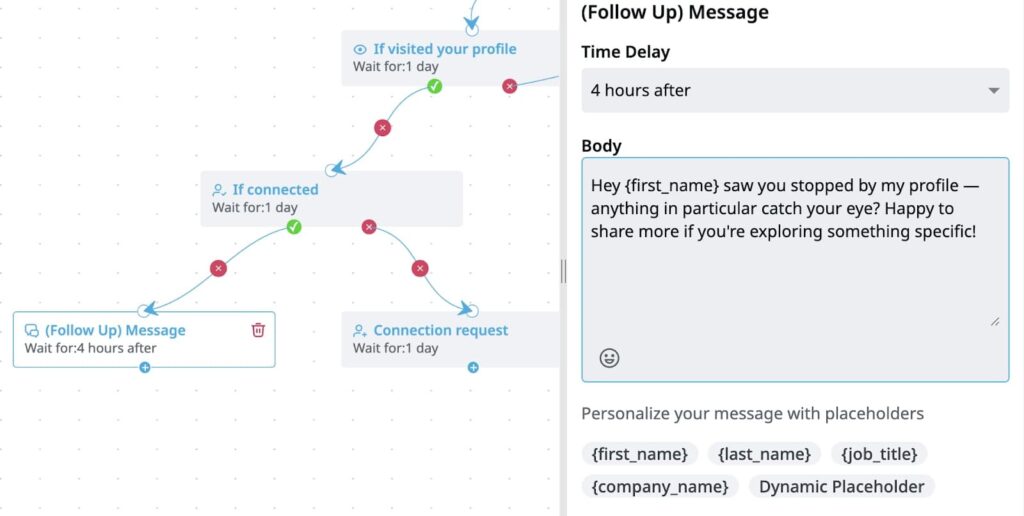
Inside the Builder campaign, click on the + after your condition (e.g., If connected) and choose an action like Send connection request or Follow-up message.
On the right panel, you’ll see the message editor.
You can write your message here and customize it with placeholders like {first_name}, {company_name}, or {job_title}.
But, most importantly, reference the specific trigger that brought each lead into the campaign by adding dynamic placeholders like:
- “Thanks for checking out my profile.”
- “Saw you signed up for the webinar last week.”
Step 6: Set up follow-ups based on how leads respond
What happens after the first message depends on each lead’s response (or lack thereof).
Some users will reply right away. Others will read the message and do nothing. Some won’t even accept your connection request. And a few others will respond days later.
To stay relevant, your follow-up needs to match their behavior — not just fire off after a fixed number of days. Add logic that responds to real actions or inactions after your initial outreach.
Here’s what it might look like:
| Lead behavior | What to do next |
| Didn’t reply after 3 days | Send a lighter follow-up with a softer CTA |
| Didn’t accept your connection | View their profile or like/comment on a post to stay visible |
| Replied and showed positive interest | Trigger a webhook to push them to the CRM |
| Replied but not interested | Tag as a cold lead and pause further outreach |
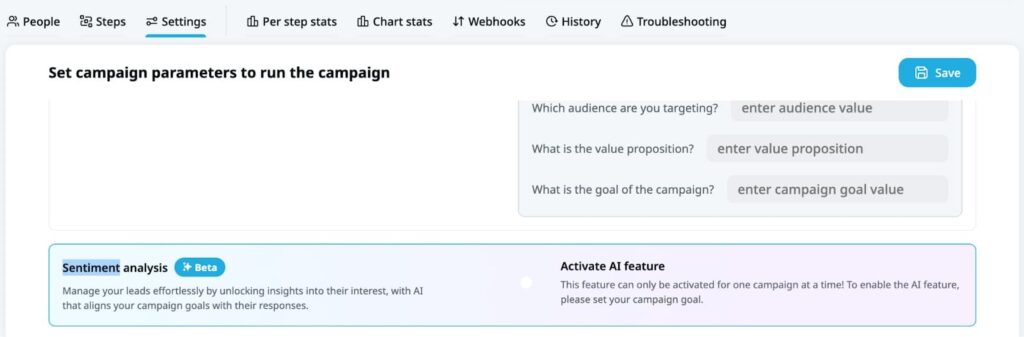
To implement this in Expandi, start by enabling the sentiment logic to unlock sentiment-based branches like “If Interested” or “If Not Interested.”
Go to your campaign’s Settings tab and activate Sentiment Analysis.
This feature lets you build follow-up workflows based on whether the contact is showing positive or negative reactions to your outreach.
Next, go back to your Builder campaign and define the Wait time for each step (e.g., Wait 2–3 days) after you send a message.
Then, add a condition like “If no reply,” “If connection not accepted,” or “If sentiment = interested,” etc., and map the response action accordingly. For example:
| Behavior | Action |
| No reply | Send an alternate message with a different CTA |
| Didn’t accept connection | Like their latest post or revisit their profile |
| Replied with interest (sentiment = Interested) | Like their latest post or revisit their profile |
| Replied but unsure (sentiment = Maybe) | Send a clarifying follow-up or nurture message (e.g., ask about timing, share a resource) |
| Replied and not interested (sentiment = Not Interested) | Tag for retargeting or exit the sequence |
Finally, create relevant messages for each scenario, such as:
- If no reply after 3 days:
“Hi {first_name}, just looping back in case my last note slipped through the cracks. Worth a quick chat this week, or not the right time?”
- If connected but not engaged:
“Appreciate you connecting, {first_name}! Curious what stood out — happy to share more on what we’re working on.”
- If replied with interest:
“Thanks for the response! I’ll send over a few quick ideas that might be relevant, and we can take it from there.”
- If the connection is not accepted after 7 days:
[Trigger] → Like their latest post
[Optional] → End the flow or nudge with another soft-touch action
Step 7: Track what’s working and why
Once your trigger-based flows are live, add regular checks to see how and why people engage with your content and adjust your strategy from there.
For instance, you might find that leads who liked a post reply faster than those who viewed your profile or that certain ICP segments drop off after the first message.
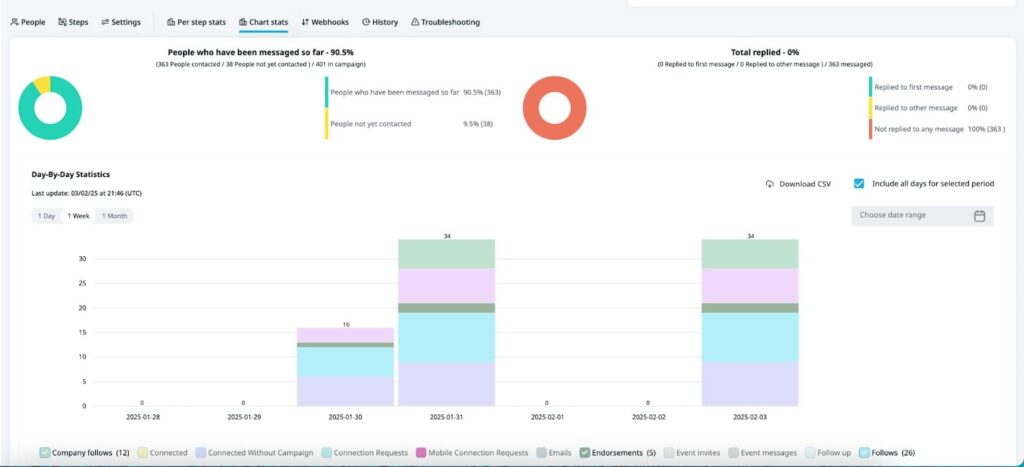
Go to your campaign and check Per Step Stats (which show how each campaign step performs) and Chart Stats tabs (which show visual trends across triggers, paths, and sentiment).
Expandi also breaks down results by trigger type, ICP fit, and sentiment using the Analytics tab, so you can:
- See performance by trigger source (e.g., profile view vs. post like).
- Identify drop-off points across steps.
- Filter replies by sentiment (Interested / Maybe / Not Interested).
- Check how each condition path performs (e.g., “ICP = High Fit” vs. fallback paths).
This helps you pinpoint what triggers lead to actual conversations — and what drives users away.
Over time, this builds a feedback loop so you can refine triggers, adjust timing, and double down on the paths that convert.
Wrapping up: Make your outreach feel like a conversation
Effective trigger-based outreach mirrors how real conversations start: Someone shows interest, and you respond with something relevant and timely.
But to keep it effective (and human), you should avoid a few traps:
- Don’t over-trigger. A single low-effort action (like a profile view) might not be enough to warrant a message on its own. Use it in combination with ICP filters, or wait until multiple signals stack up to show real intent.
- Don’t go generic. If your message doesn’t reflect what the lead did, it breaks the flow. Always connect your content to the behavior.
- Don’t ignore sentiment. Use AI-powered sentiment analysis insights to understand how people react at scale and adjust accordingly. A high reply rate means nothing if the replies are cold.
- Read the room. The same trigger means different things in different contexts. A profile view from a high-fit lead might be worth a soft nudge, while others need more signals before you engage.
When you build campaigns that listen first and respond second, your outreach starts working.
Ready to test this approach? Try it out with Expandi — combine smart triggers, conditional logic, and AI to create flows that feel anything but automated.
You’ve made it all the way down here, take the final step