Ultimate Guide on How to Build the Lead Fulfillment Process in a Lead Generation Agency (Cold Email Edition)
In this (more than) comprehensive guide, we describe a step-by-step process for using cold email to get your clients those leads as predictably as possible and automating everything that makes sense to automate.
Believe it or not, there is something more difficult than signing clients to your newly founded lead-gen agency.
The hint is in the name – generating leads.
Simply put, you don’t make money if you don’t generate leads.
There are a number of ways in which you can generate leads, depending on your specialization, the size of the companies that are being targeted and the size of your clients’ companies. These will all determine which channels you will use to generate leads for them.
For the most part, at least these days, lead-gen agencies focus on email, LinkedIn, or both.
Since the fulfillment process is different for each of these (and we didn’t even include cold calling), it’s a good idea to cover them one by one.
In this guide, we will focus on lead generation that is exclusively done by email and we will show you how to set up a cold email-oriented lead gen process that is predictable, adaptable, scalable and as automated as possible (otherwise, you will need dozens of people working on just one client).
Preparation Stage
First and foremost, we gotta talk tech.
Yeah, (almost) no one likes that part, but it’s essential for automating everything feasible down the line.
Plus, when you do it one or two times, things get easier. Also, you can always get a tech person to do this for you (if your agency can afford it).
Perhaps you have a lead-gen buddy who’s done this before – they’ll probably help you out.
The reason we have to go over this first is that you will be doing this for each of your clients and you cannot do anything else (well enough) until you get this right.
A bit of a warning – it might get boring, but once you start playing with this stuff, a lot of things get much clearer and you’ll be surprised at how many new ideas come flooding in.
But enough with the intro, let the tech stuff commence!
The internal lead-gen agency tech stack
Before we get into the tech setup you will need to do for each client, you have to build your internal, operational tech stack.
By doing so, you ensure that you have all your data at your (and your clients’) fingertips, that automation is utilized to its full potential, and that you can easily scale as your client list starts to grow.
For now, here is just an overview of the stack that we have found the optimal one:
- Airtable – CRM
- Google Apps – Single source for data/meetings/calendars/etc.
- Apollo – Lead prospecting
- Enrich IQ – Apollo scraping
- SmartLead – Email Automation
- Postman and Zapier – automating reporting
- Cleansify – Data (email) verification
However, the best way to approach this is “chronologically”. In other words, we will let you know how to build a lead-fulfilment machine step-by-step.
Please, keep in mind that this is just an overview of the process and that there are innumerable ways in which you can build on it and make it more effective and time-efficient as you go along.
CRM Settings
Your CRM is going to be the central part of your system and there is no shortage of options out there – ClickUp, HubSpot, Pipedrive or any of the 667 (“only” 146 if you narrow it down to CRMs for small businesses) CRM tools listed on G2.
Of course, some of them are better than others, but perhaps the biggest factor is your personal preferences.
Our choice, interestingly, is Airtable.
Why interestingly?
Well, interestingly because it is actually not one of those 667 CRMs listed on G2. It is technically a project management/collaboration tool, but its versatility allows you to create your own CRM within it.
Why Airtable?
For a few reasons:
- A fantastically versatile and customizable solution that lets you build a CRM and a full-fledged lead-gen system that will work for you.
- Great automation options, saving both you and your client time on collaboration, especially once you start booking leads for them, but before, as well.
- Familiar UI which resembles spreadsheets (at least in the grid view), something that we’re all used to.
- Customizable View options, it is easy to set up and modify the way in which your clients can see stuff that is important to them or requires actions from their side.
- Potential to build an entire tech stack as you become an advanced and especially an expert user
Where to start?
First of all, you will want to create a table for all of your clients.
This is the “blank” table in Airtable.
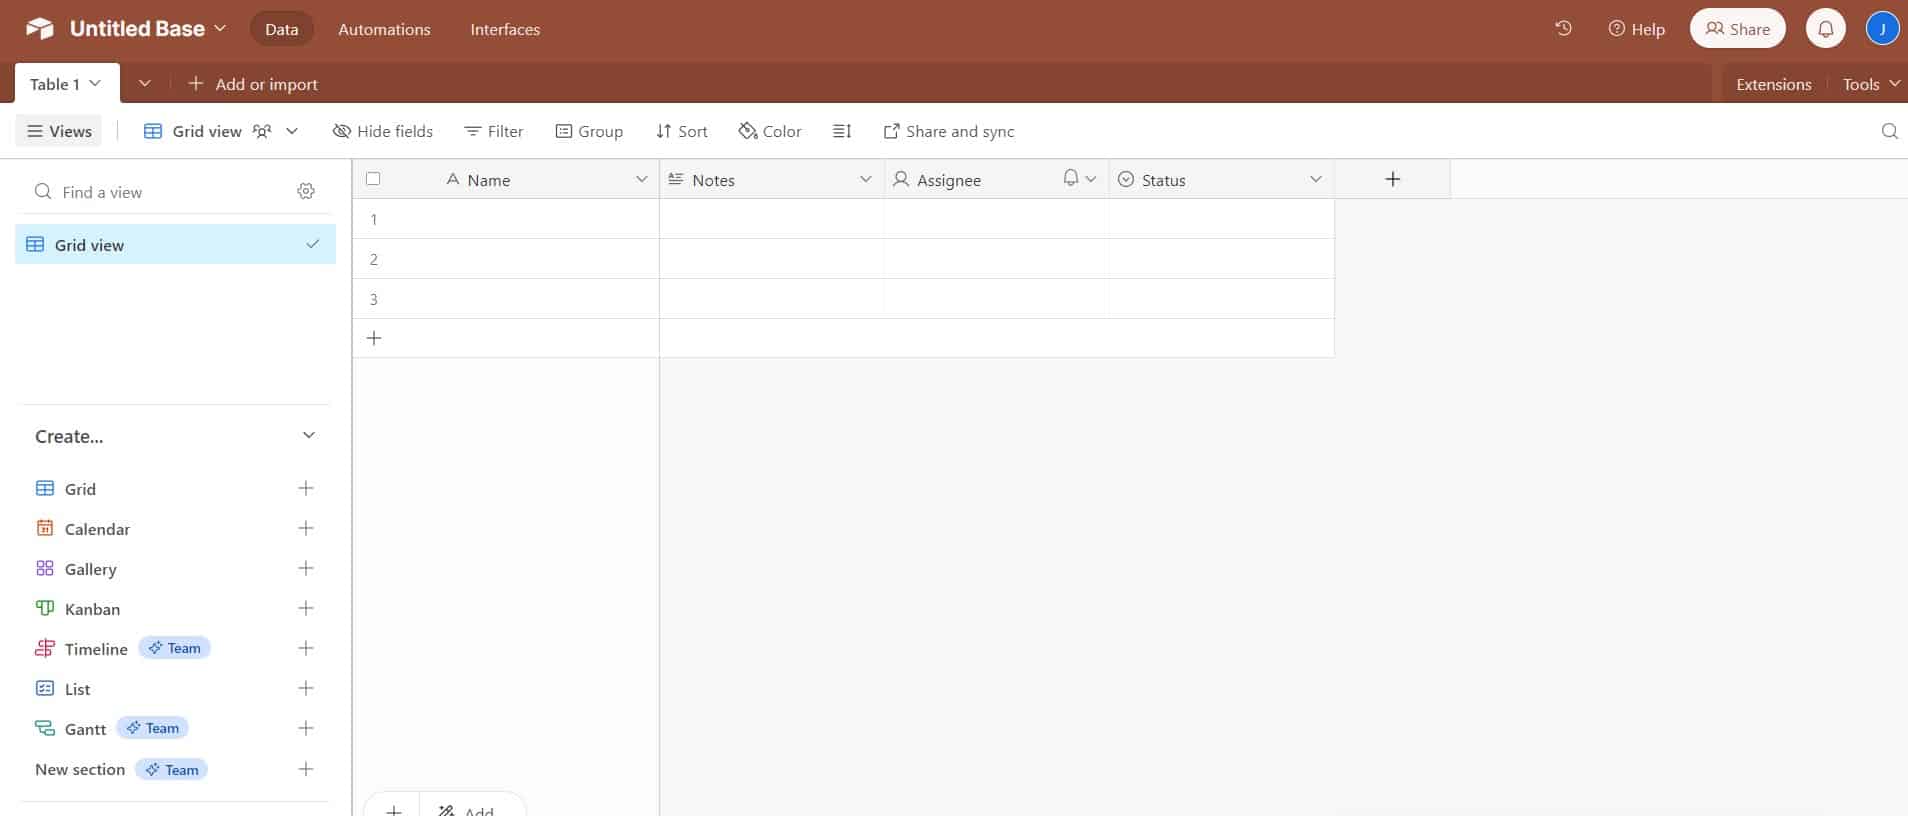
You will start off by determining what data is important for you when clients are in question.
Firstly, you will want to remove the predetermined fields such as Notes, Assignees and Status.
Once you’ve done that, you can start adding data that is important to you. For the majority of lead-gen agencies, this will include stuff like:
- Name – your contact at the client company
- Email – their email
- Phone number – the number where you can reach them
- Company– the name of the company
- Status – where you are in terms of your collaboration – are you onboarding them at the moment, do they need to approve the lead list, the email copy, where are you in the process of setting up their tech, etc.
Of course, you can add as many fields or Tables as make sense for you. For instance, a good idea is to create a separate Table for Companies where you can also keep additional data that might be important for you – like quick links to the contracts, invoices or other documentation that you keep for each company.
But we’re getting ahead of ourselves.
Let’s start with the very basics.
For most lead-gen agencies, in terms of collaboration, the contact person from the client’s side is usually more important than the company itself.
This is why for the Clients (our main) table, we will use the contact’s name as the primary field.
We will add their contact email and phone number as appropriate types of fields, leaving you with something like this:
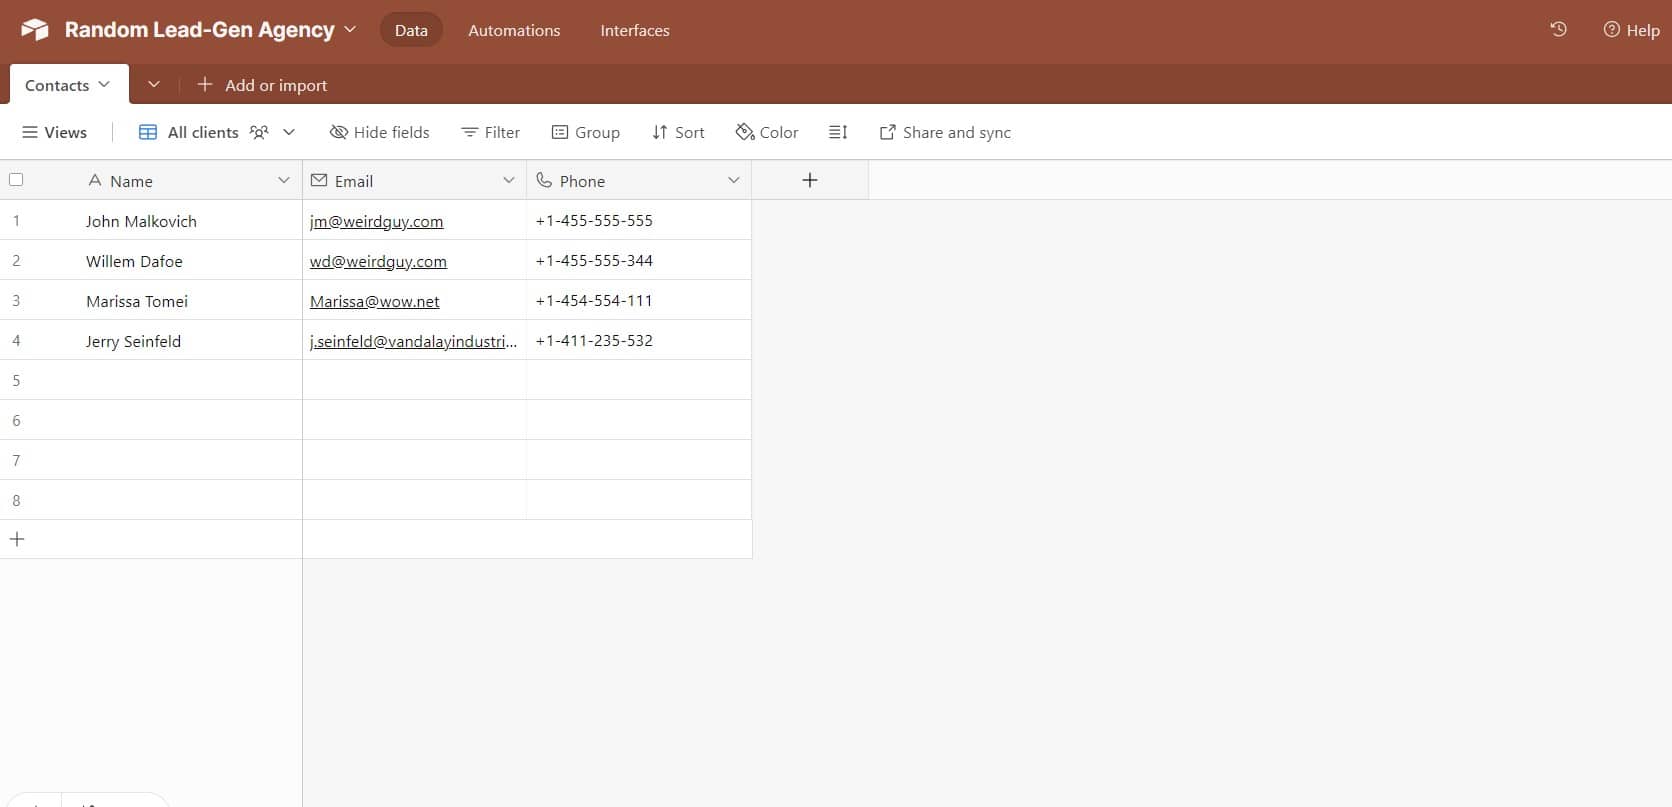
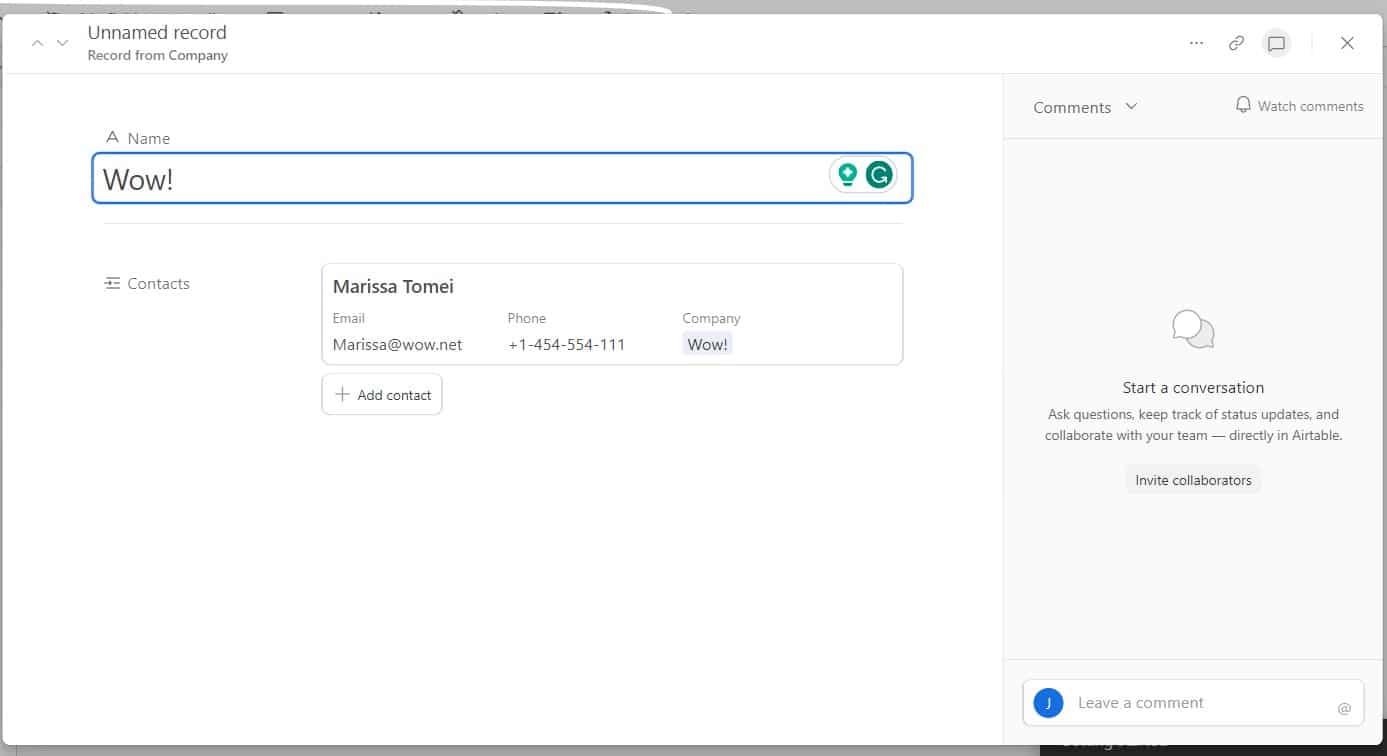
As you can see from their emails, Mr. Malkovich and Mr. Daffoe work at the same company, the importance of which will become obvious soon.
(Also, Ms Tomei’s number isn’t real)
Creating a Company Table
When creating the Company field, however, we will do something different. We will link this field to another table – the Company table.
You do this by selecting Link to another record as a field type and then Create a New Table and naming it Company.
Now, you have your second table:

You can now start adding Companies either in the new Table or by filling in the appropriate fields in the Clients Table. It doesn’t matter because the two tables are connected and every change you make in one will be reflected in the other.
This is how it looks if you want to add a new company to the Clients table (we’ve already done Mr. Malkovich and Mr. Daffoe.
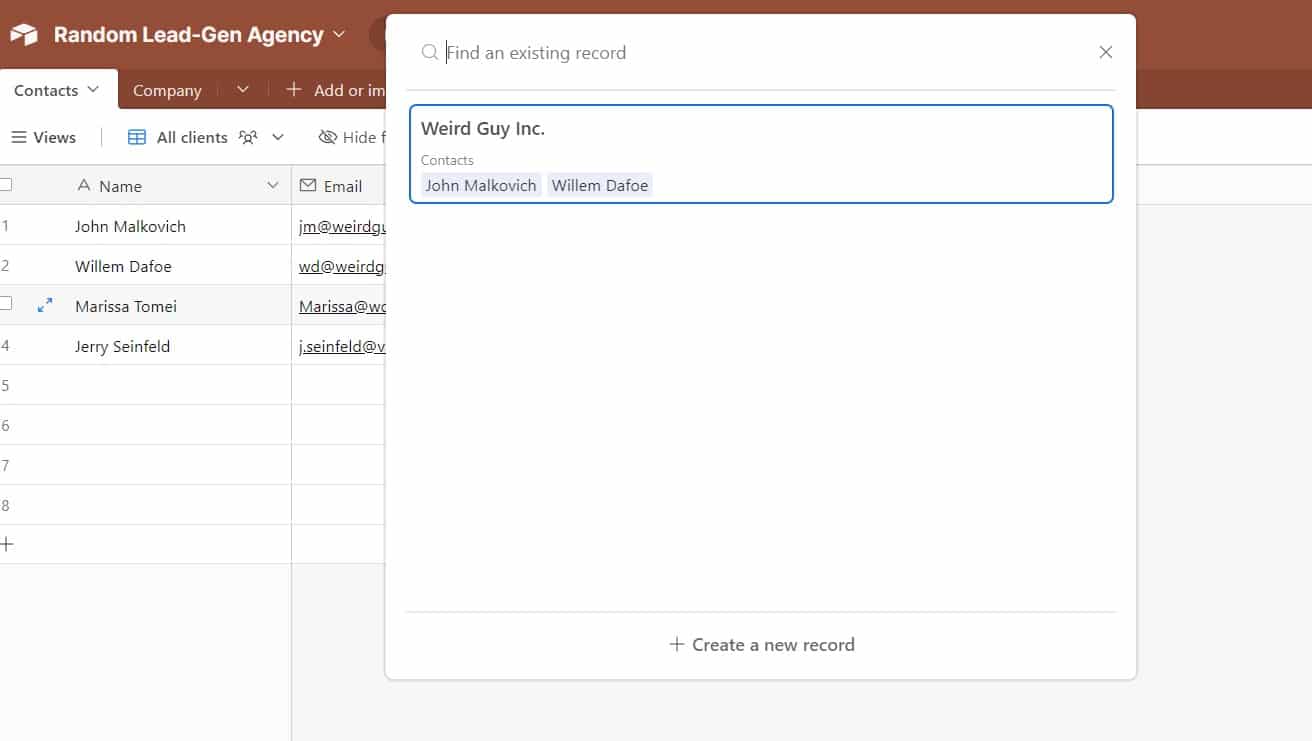
We are now adding Ms Tomei’s company, btw. You click on Create a new record and enter the name of the company.
This will automatically add Ms. Tomei’s company to the Company table.
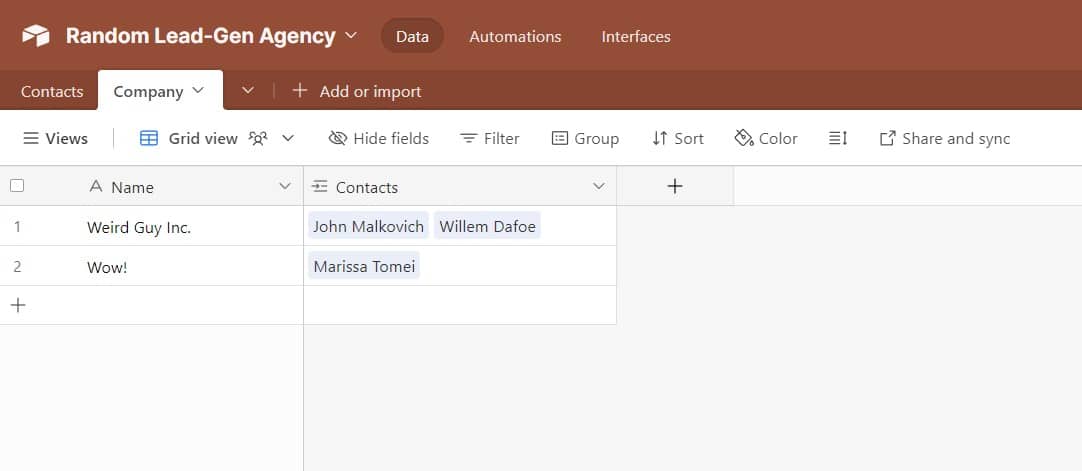
You can also do it the other way around by adding a company in the Company table, as we’ll do for Jerry.

In the Clients table, you will see that Jerry was assigned to the same company.
The reason why we’re doing this is that you can make your Company table a great repository of data on various companies and the work you’re doing for them. For example, you can add the Contract field as a URL field and then add links to your contracts.
This way, if you make any changes to the contract, you can rest assured that Airtable will pull the latest version.
We don’t want this to become an Airtable tutorial, so we will just show you another reason why we chose this particular tool.
Starting Off With Automation
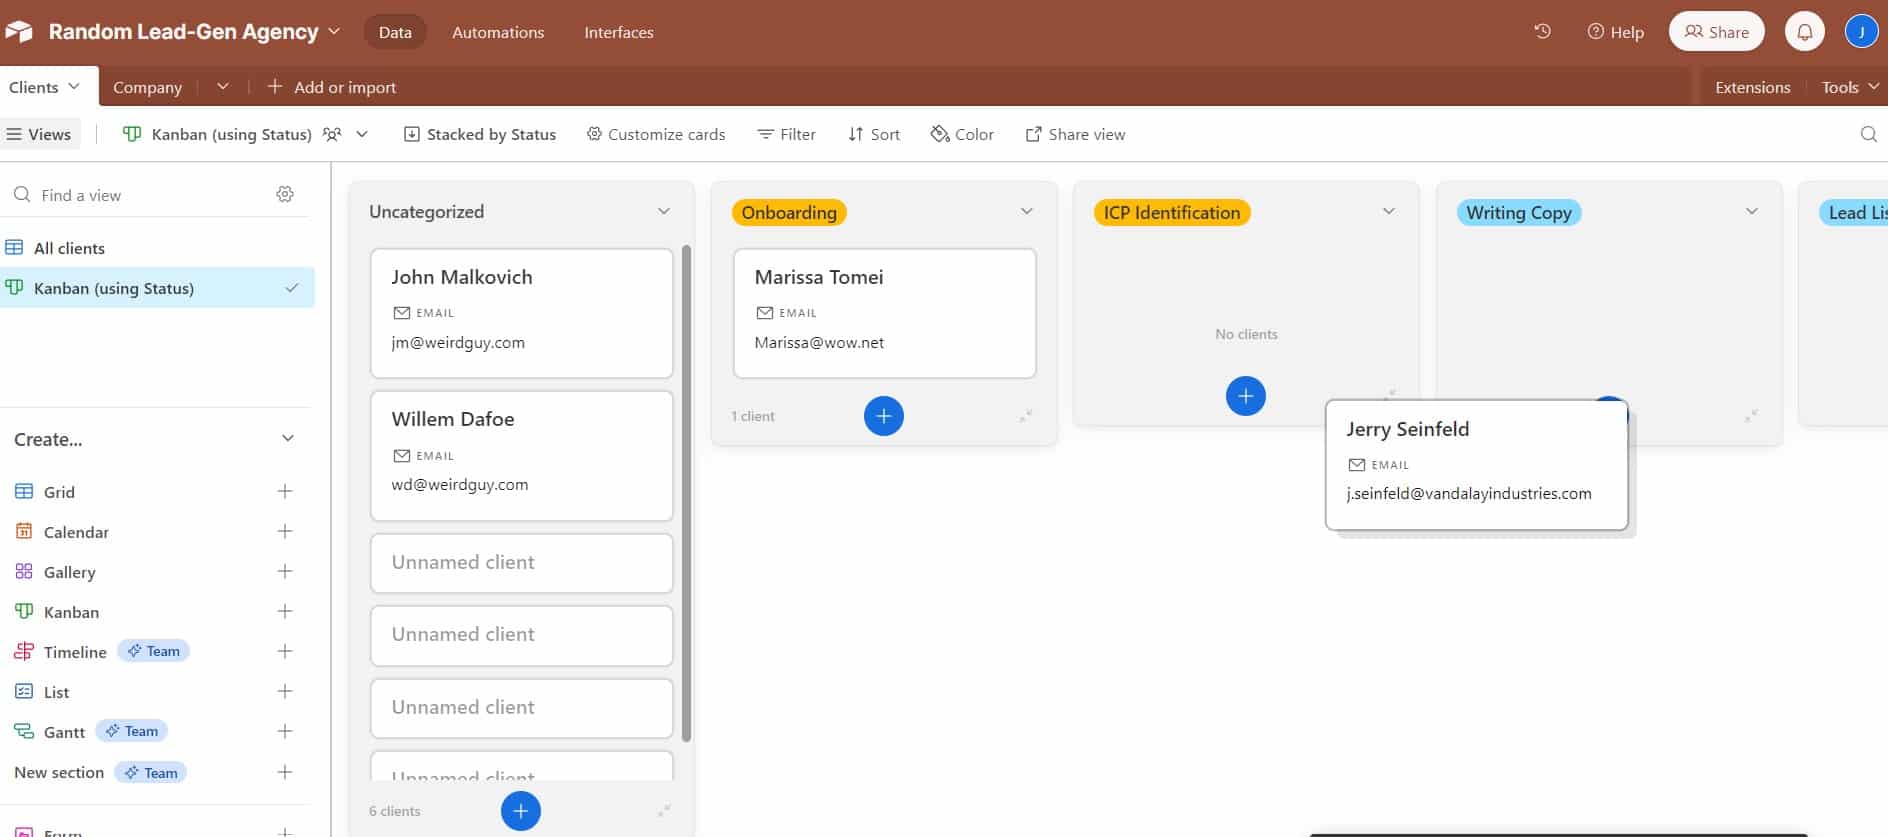
Let’s create a new field and call it Status. We’ll make it a Single select field. As possible selections, we will add steps that you might use for your workflow:
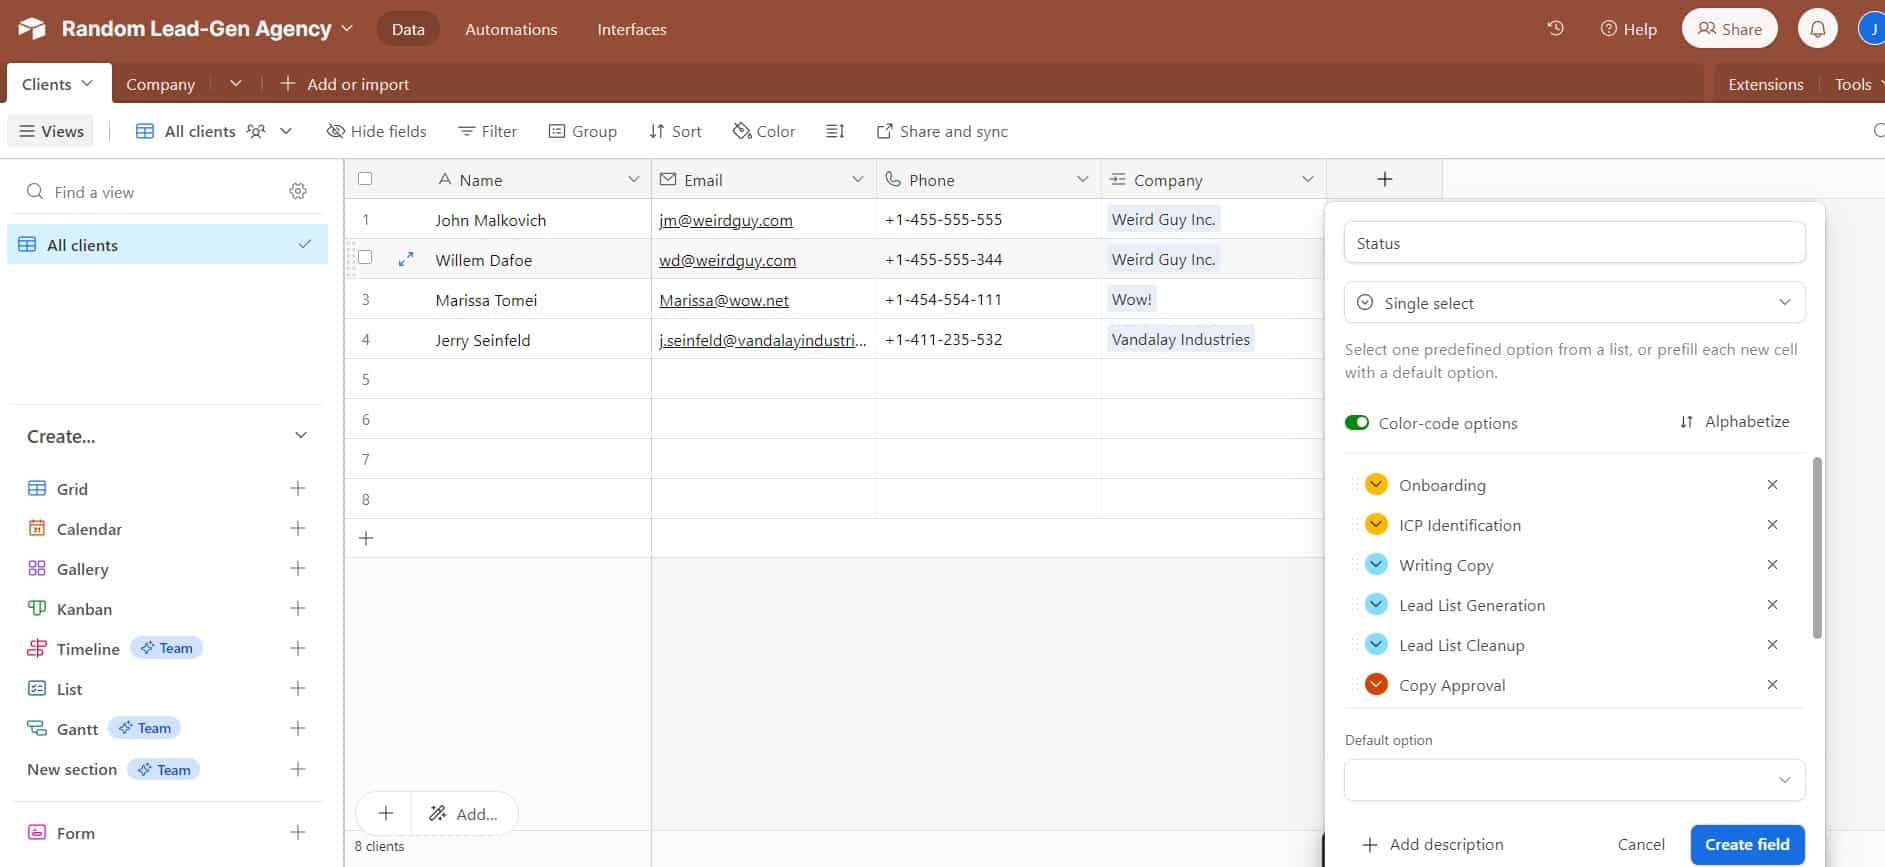
We’ve even color-coded the various steps – yellow for collaborative, blue for stuff that we do and dark orange for stuff that the client has to do.
If you go to edit the field, you can even let Airtable automatically create a Kanban view based on the status of each client.
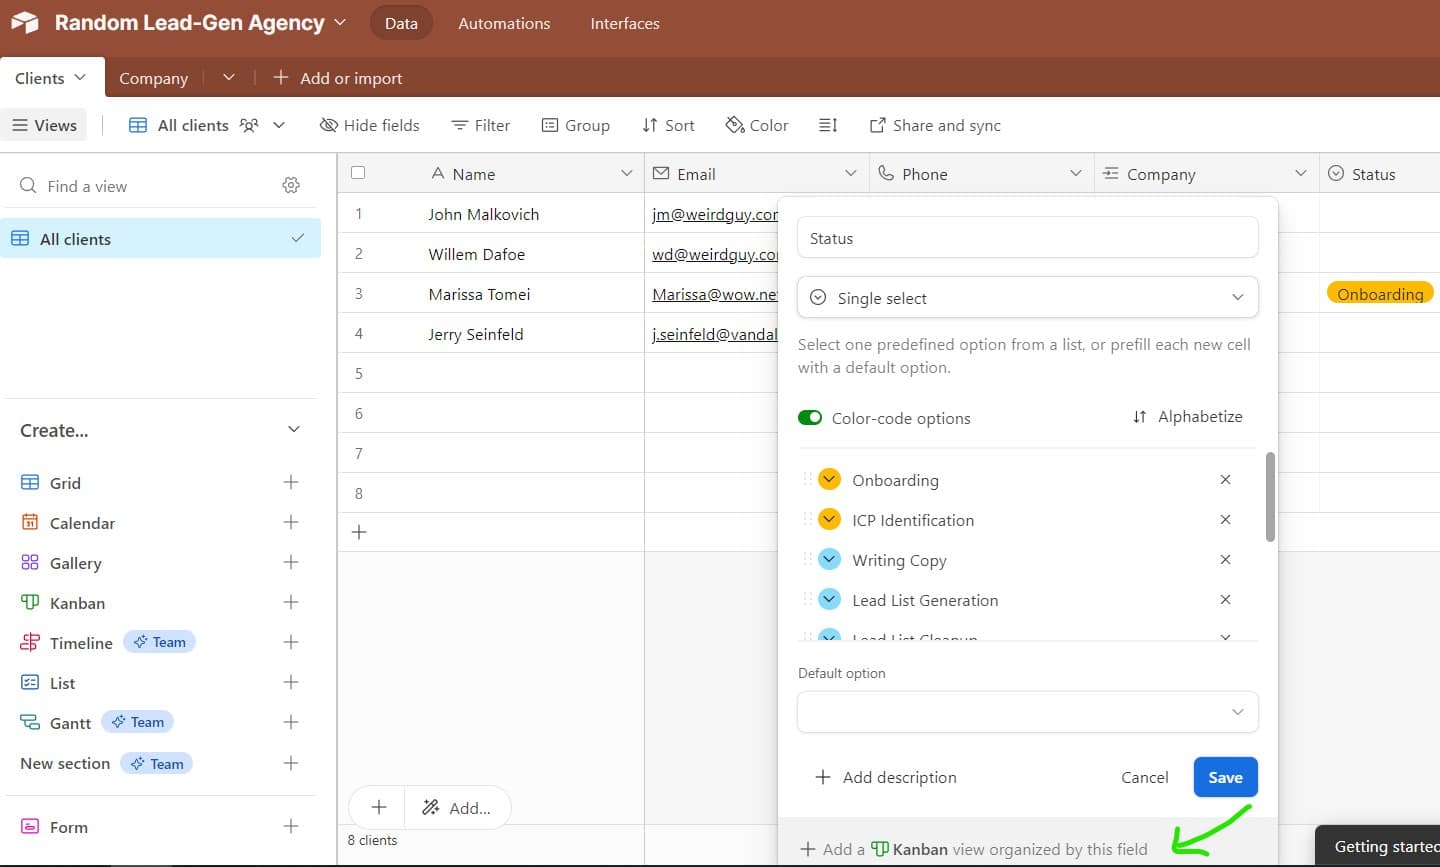
This view gives you a great overview of where your clients are at any given moment.
The best thing is that Airtable allows you to create separate automation for all of these phases, where you and/or your client will be notified if they have something to do.
For a start, you will want to integrate it with Gmail and Slack.
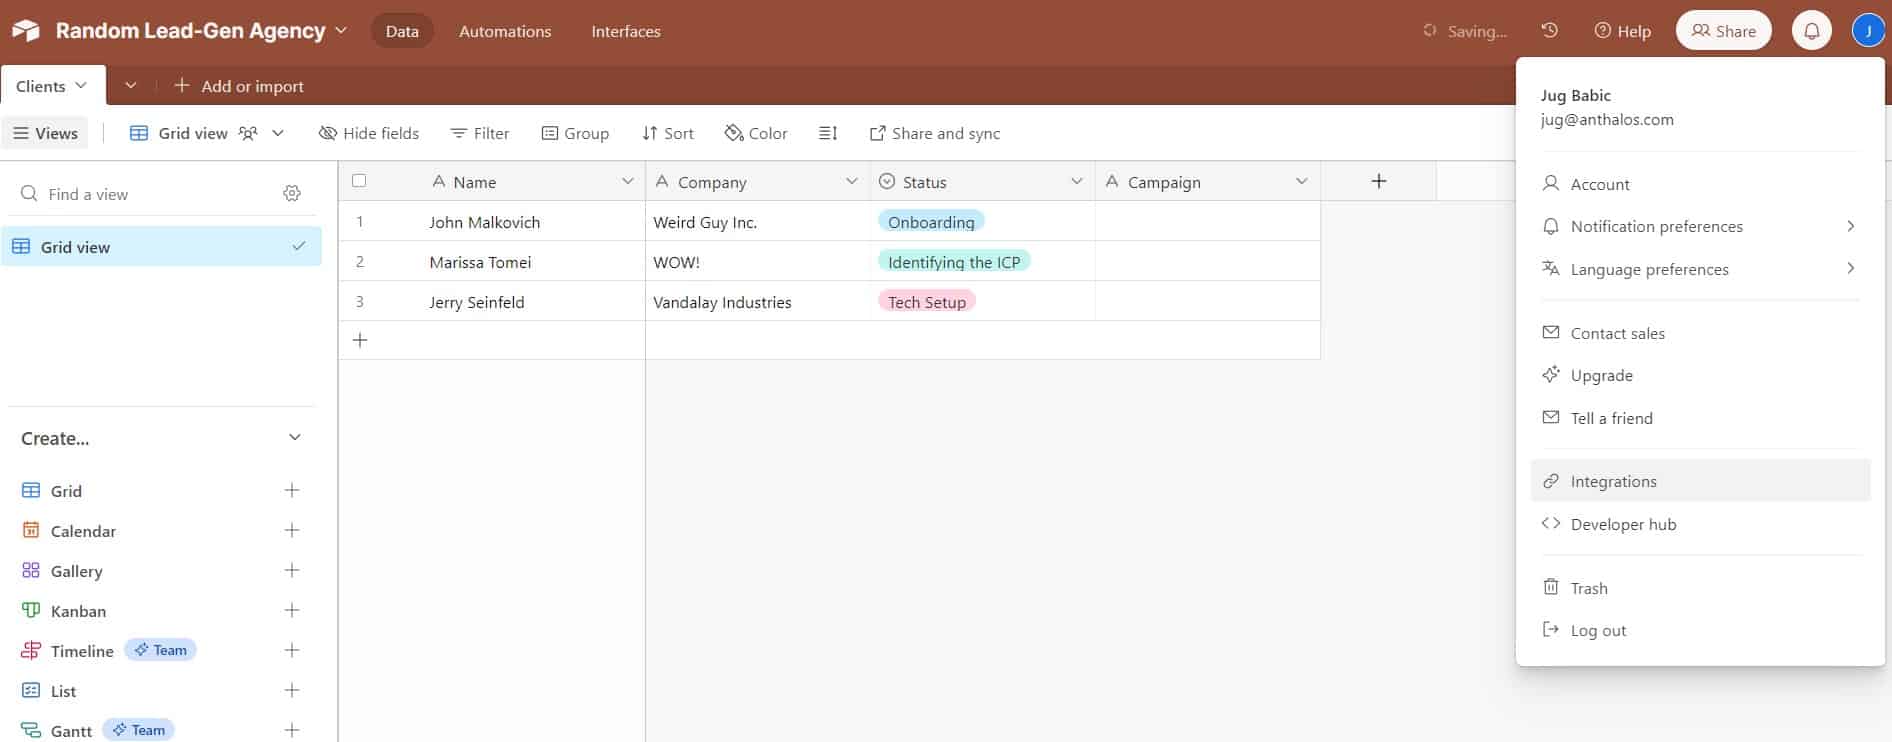
First, click on your account button in the top right corner and click on Integrations:
On the next screen, you will see the option to Connect a new account. When you click on it, you will be given a choice of apps – including Gmail and Slack.
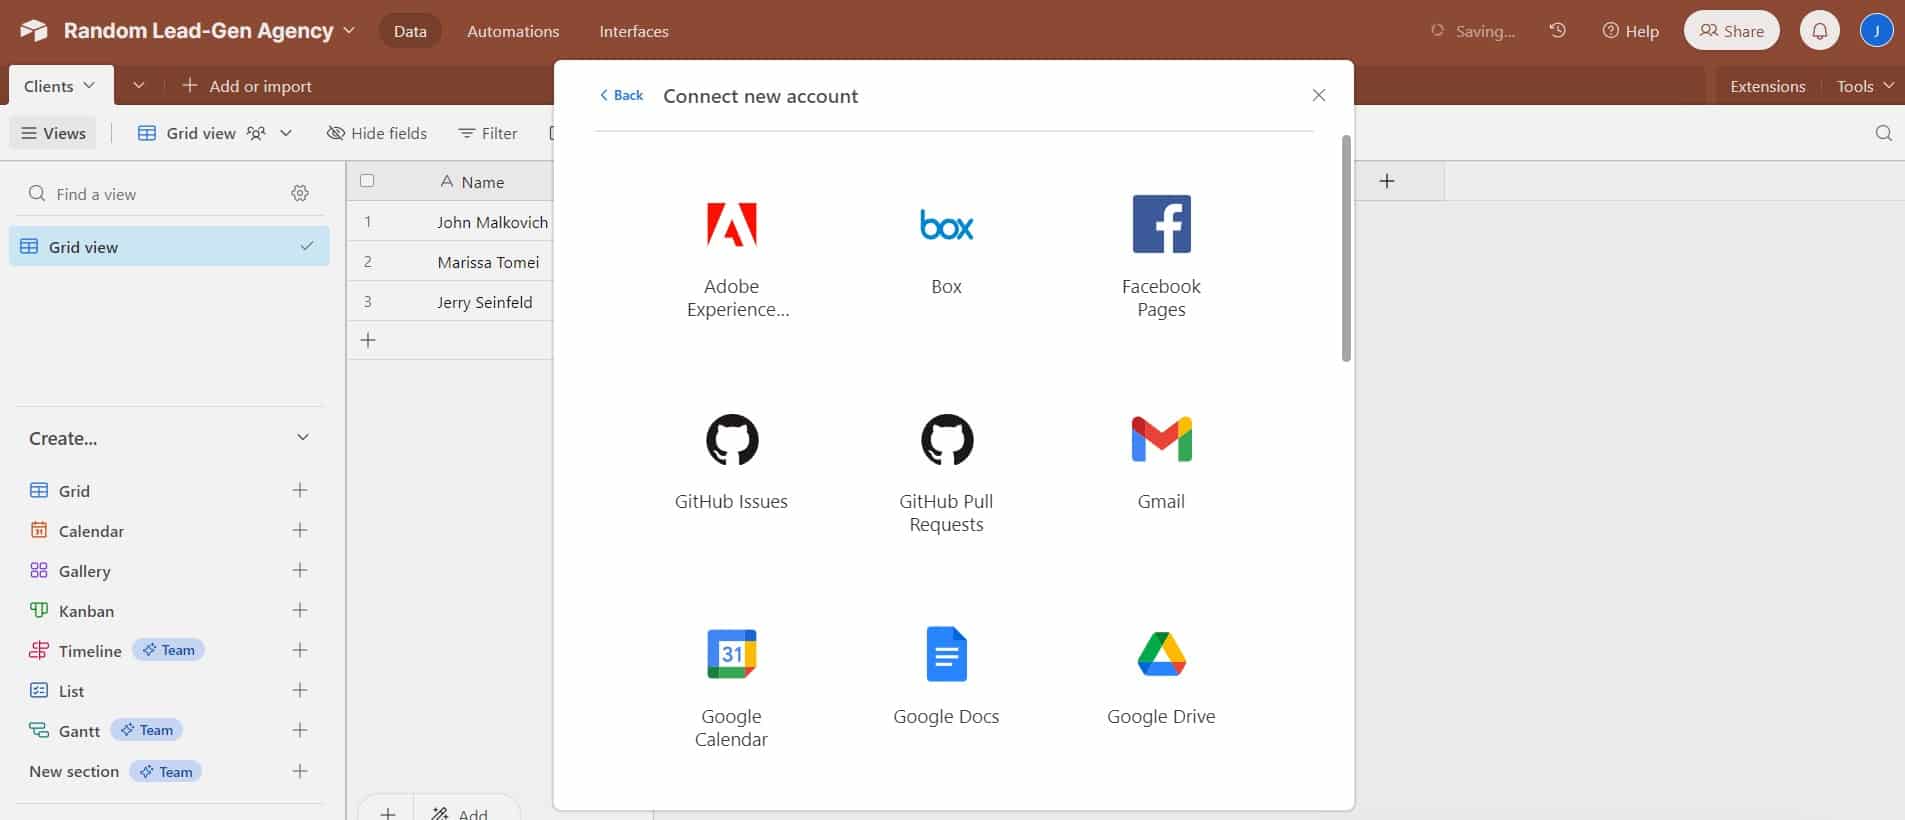
Connecting them is quite straightforward, but make sure that you are connecting the accounts that you will use for communication with your individual clients.
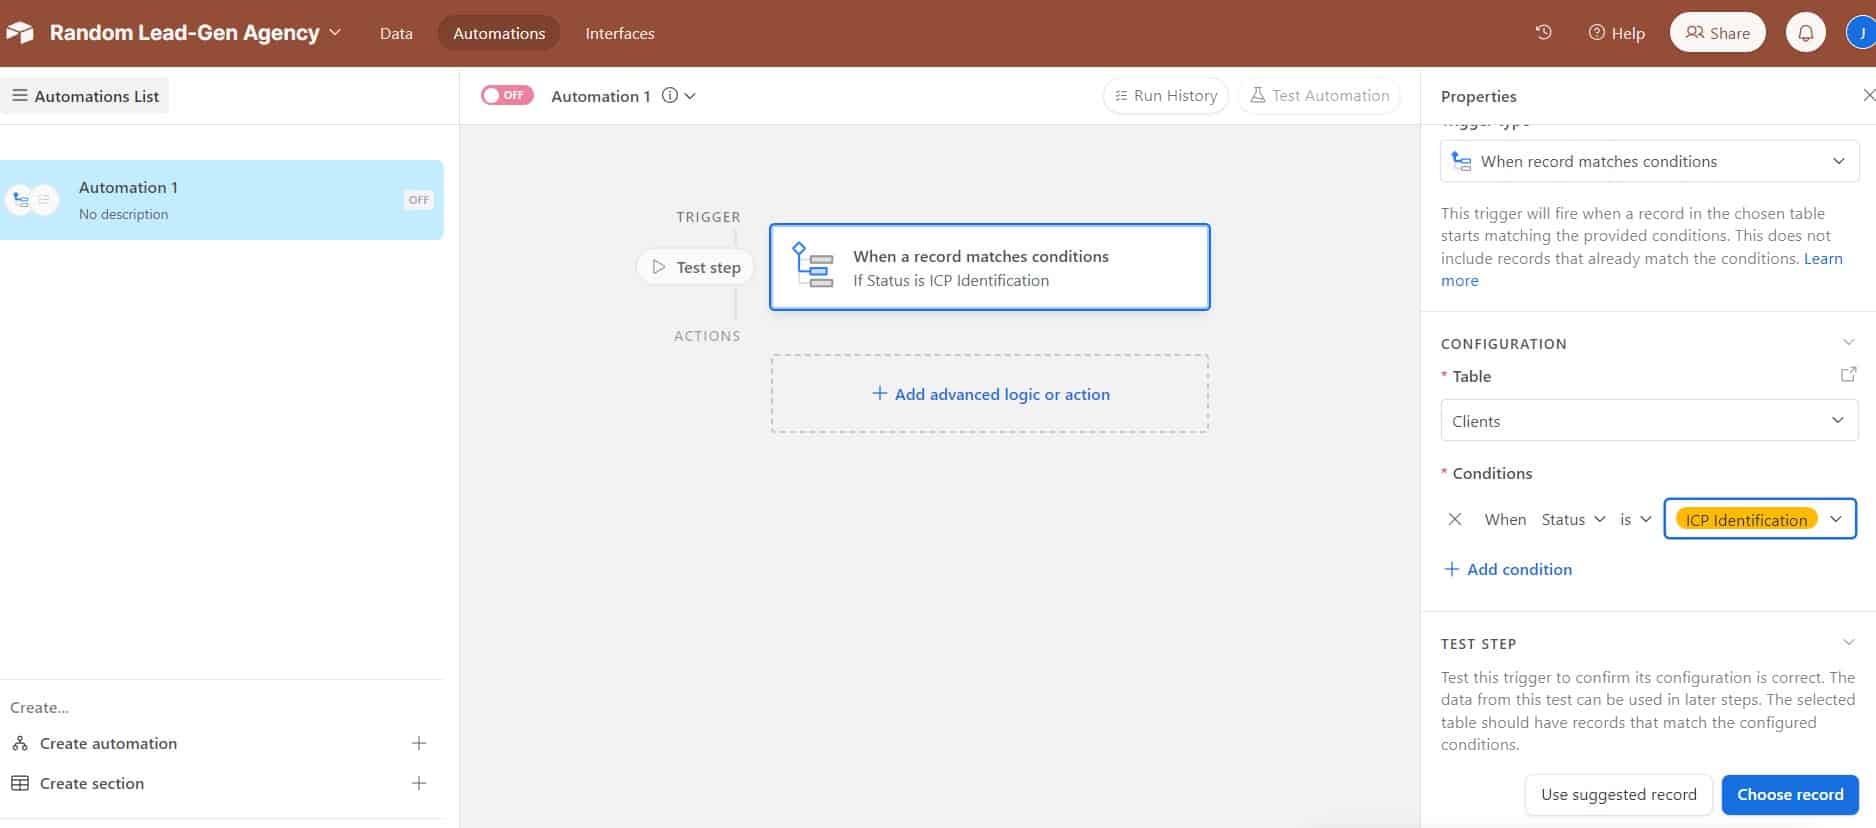
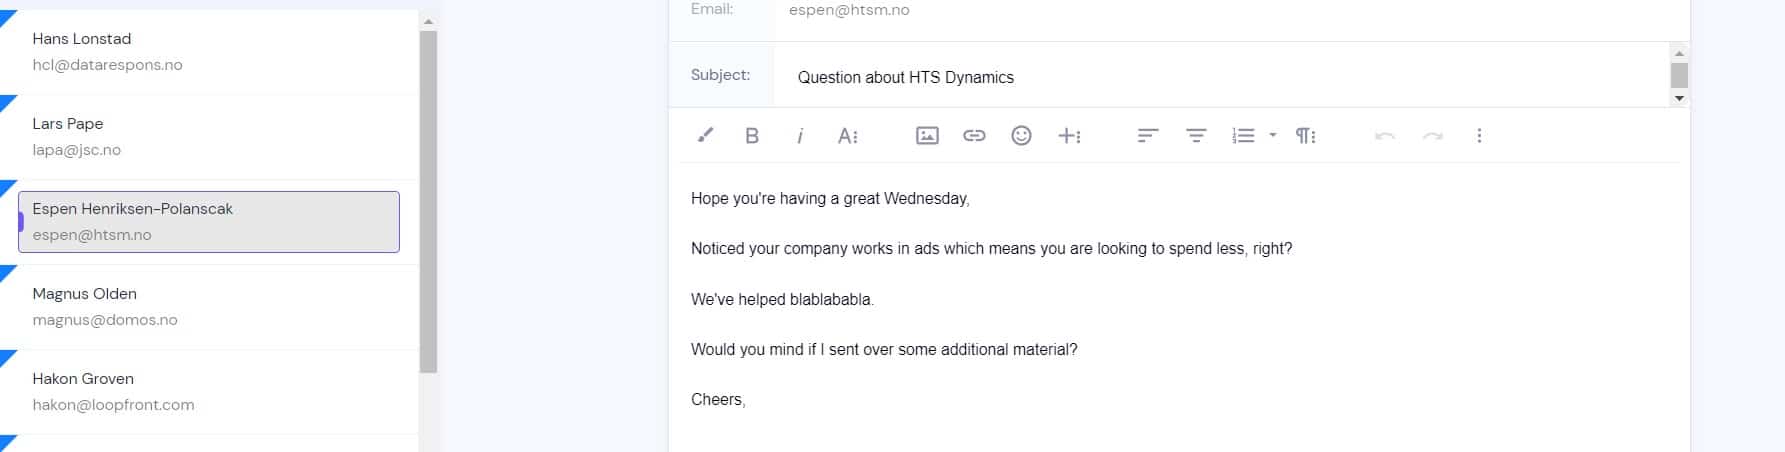
Now, let’s create an automation where every time a client gets to the ICP Identification phase, they automatically get an email from you where you invite them to a session.
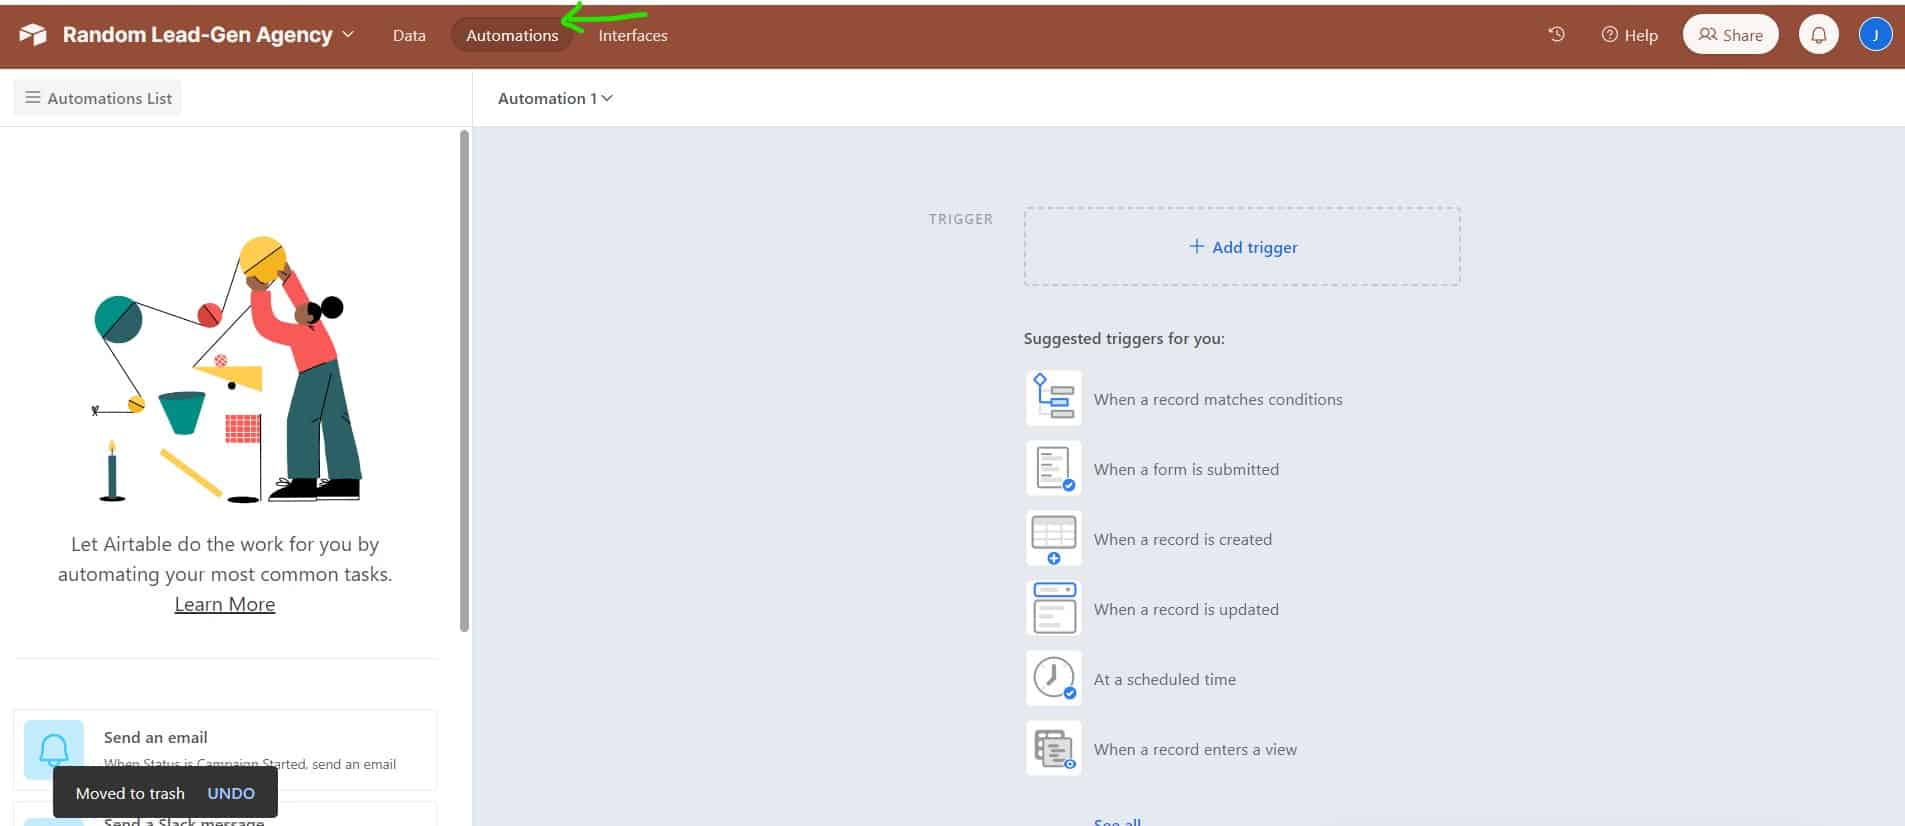
First, we go to the automation tab:
We choose a trigger – in our case – Status being ICP Identification
And then, we add the action, in our case, sending an email. You actually write the email in Airtable!
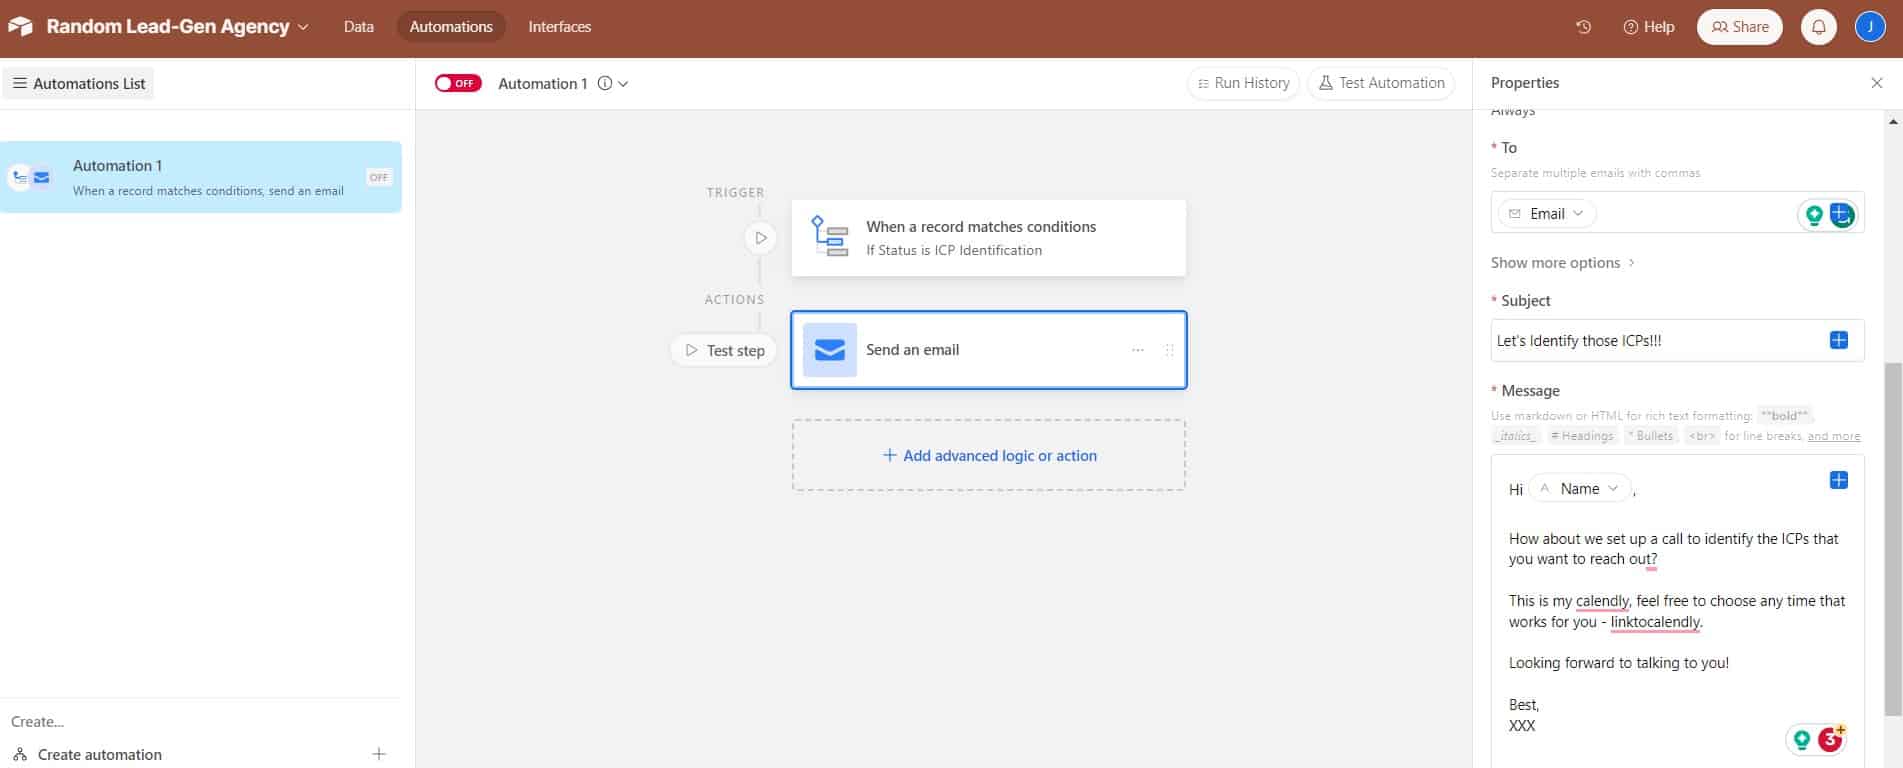
And that’s it. Every time clients get that status, they will receive an email inviting them for an ICP identification session.
As you can guess, this can be perfect for phases such as copy approval, where your client is immediately informed that you have some email sequences copy that you want them to approve before you start sending.
Additionally, if you have different people in your company who write copy or do the tech stuff, you can set up automations to inform them as well.
Finally, you can just as easily set up automatic notifications for Slack.
And believe us, this is just the tiny, tiny, tiny tip of the iceberg that is Airtable.
But enough about Airtable. Let’s move on!
Identifying the Client’s ICP and BPs
Without an Ideal Customer Persona (ICP), you cannot do your job as a lead-gen agency.
This is probably a good place to say a thing or two about the distinction between ICPs and buyer personas (BPs).
Namely, by identifying your (or your client’s) ICP you are zeroing in on the type of the companies they wish to work with, while a buyer persona helps you identify the people at those companies who will be targeted with your messaging.
While this distinction is useful in many cases, especially if you are targeting larger accounts with many decision-makers, for the purposes of our guide, we will refer to them simply as ICPs, as the majority of lead gen agencies will most often contact only one person per company.
There are a number of ways you can do this with your clients, and in the section about basic Airtable setup, we mentioned setting up an ICP discussion.
However, there is another step you can add before the actual call – sending them an ICP Targeting Table to fill out.
Here are a few examples of one way of doing it:
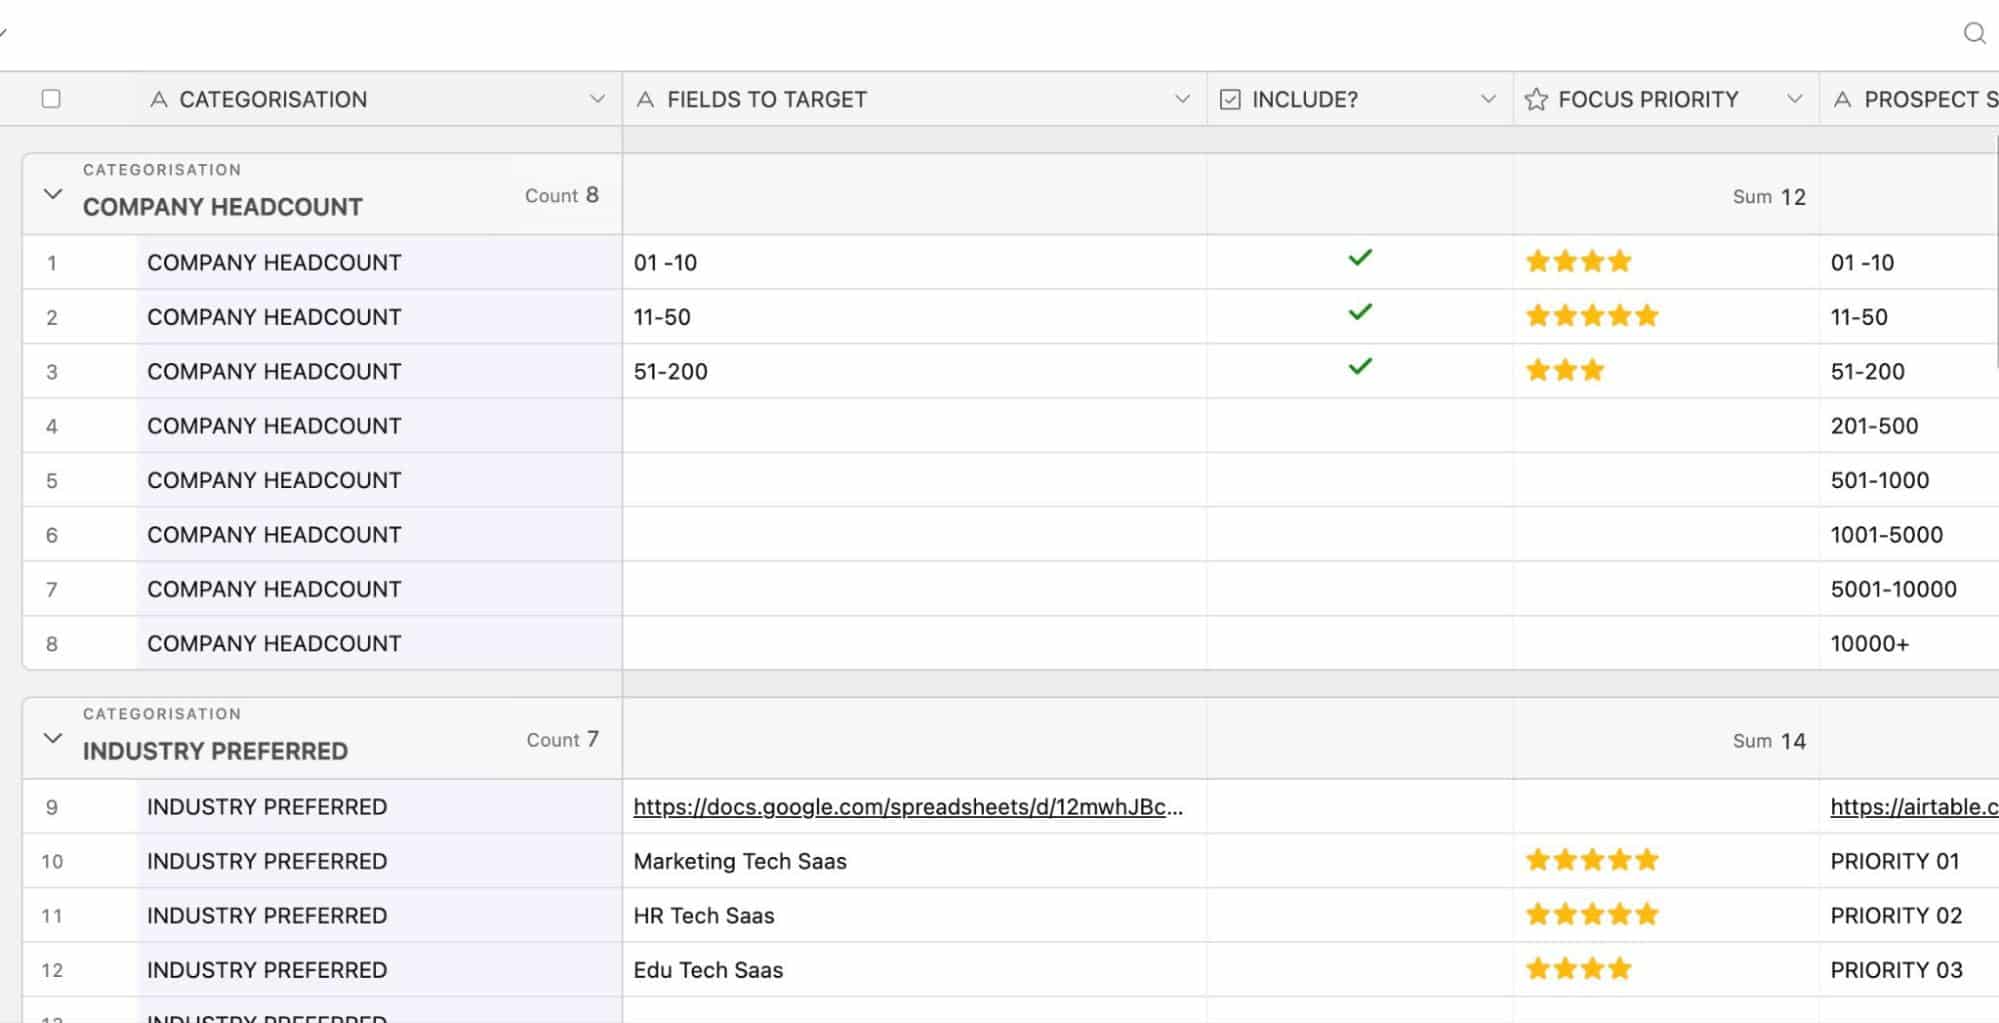
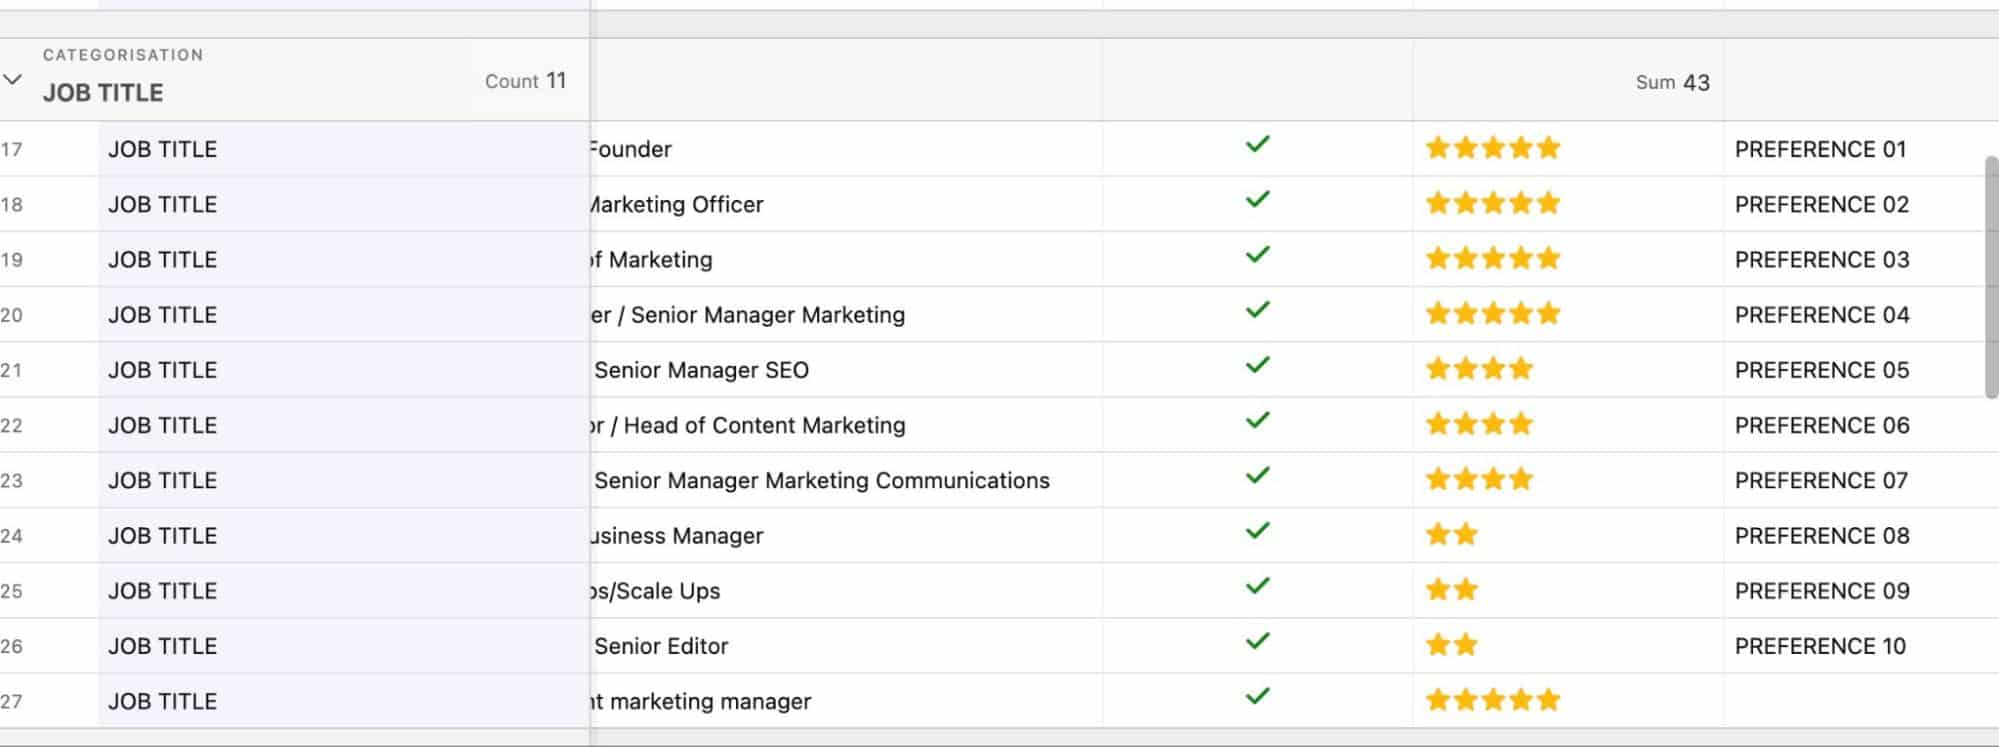
Alternatively, you can build an ICP Targeting survey in Typeform to make it less of a chore for the user, but in any case, this will give you a rough idea of the market they wish to address.
Once again, using Airtable’s automation feature, you can automate the sending of these tables/surveys and, as the clients send them back, automate the notifications for your team to review the new documents.
That being said, more often than not, the clients still need a bit of help with this and that is exactly the reason why you want to include a face-to-face call as part of your ICP Identification process.
This call should have 3 goals:
- Educating your client about the importance of precise ICP targeting
- Collaboratively analyzing the ICP targeting you had them do
- Finding ways to be more realistic/precise/innovative with ICPs
You must collaborate with your client to nail those ICPs, as they will influence everything you do from there on.
For instance, the first words out of your client’s mouth at the initial ICP call are, “Our ICP is everyone in the world.”
You cannot work with something like that.
There is a good chance that you will need to educate your client on the Total Addressable Market, as well as guide them towards narrowing down their ICP from “everyone in the world” to something like “CMOs at US-based companies with 10-100 employees that already use an ABM tool”
Figuring out ICPs is a science and there is simply no way we could fit an entire guide on it in this guide.
Let common sense guide you.
- What problem is the client’s product/service solving?
- What kind of companies (startups, mid-sized companies, enterprises) have benefitted from their product/service in the past?
- How big are the companies that they want to target?
- Which part of the world is the most suitable for their product/service? (e.g. they might be too expensive for companies in South Asia or Eastern Europe)
- What titles in a given company are the most likely to be interested in their product/service? (C-suite, VPs, Managers, Consultants, etc.)
These are just some questions that will lead you to one or two ICPs you want to start with. (Anything more and you are overcomplicating things)
By the end of it, you should have at least the majority of the questions answered.
In combination with the quantitative approach (using ICP targeting tables and/or surveys), these answers will enable you to do proper lead prospecting down the line.
Estimating the Numbers and Setting Real Goals
One of the fundamental aspects of building a lead list and doing much of the stuff we will cover later is spending some time doing the math.
It’s not complex math, but it’s still math.
Namely, not all accounts are the same and there are more than a few factors that will determine how good your lead fulfillment process will be.
First and foremost, how many interested leads/booked meetings have you committed to getting for your client every month?
It doesn’t even have to be a number required by the client – it might be the number of meetings that will enable you to make money.
Let’s say it’s 20. That’s our starting number.
How many leads must you reach out to bring in those 20 leads?
In the words of every SEO expert on the face of the Earth – “it depends”.
It depends on a multitude of factors:
- What is your client selling? – There are products and services for which lead fulfillment is notoriously difficult. For example, Managed Services Providers, outsourced software development, and SaaS products in a saturated market (think accounting software).
- What does their ICP look like? – Some people are just more difficult to engage than others, like tech people, senior levels at large companies, and the like.
- What is the total addressable and contactable market? – People from some countries are more likely to engage with cold emails than those from others, especially if you plan to do it in English (e.g. reaching out to people in France in English can be a disheartening experience).
These factors are the highest possible view — you could go into innumerable details that complicate things.
Luckily, there are some industry standards that you can use to approximate. It is also always a good idea to check out lead-gen content or talk to lead-gen people who might have insights on what you can expect.
Maybe you have past experience with that particular kind of account?
For the purposes of our hypothetical account, let’s say that you will need to reach out to 3,000 people to bring in those 20 leads. (for most accounts, 3,000 is the sweet spot unless the ICP is a particularly tricky one).
You’ll learn why 3,000 soon.
In any case, it’s 3,000.
Now, you do not want to send more than 20 emails per day from a single email account. That’s 100 per week.
As we said, three accounts per domain are 300 per week from a single domain.
To send out 3,000 emails per week, you will need 10 domains for your client.
Setting Up Email Outreach Infrastructure
Are you ready for some email domain and account setup?
Hope you are.
Depending on the client and a whole bunch of factors, there is a chance you will have to set up quite a few domains and addresses for their campaigns.
Unless you’ve been in a coma for the last year or so, you’ve probably heard (and read) that deliverability is the key to successful lead generation.
Your cold emails need to get into those inboxes and the only way to achieve this is to maximize deliverability.
How do you do that?
By doing A LOT of domain and email address optimization.
First of all, since there is always a chance that a domain might get blocked, you will never be sending cold emails from the client’s primary domain and associated addresses.
Instead, you will be purchasing domains similar to their main one. For a client whose website’s domain is example.com, you will be buying domains such as:
- Example.net
- Getexample.com
- Tryexample.com
- Getexample.net
- Tryexample.net
- Example.biz
- Example.io
- Getexample.io
(You will learn how many each client will need later in the guide.)
Of course, you will redirect all those domains to your main one – example.com so that if someone tries to visit the domains from the email addresses, they go to your website.
We did a search on how to do it so you don’t have to.
You get the idea.
Next, you will set up Google Workspaces for each of those domains and open three email addresses for each. Not 2, not 4 or 16, but three.
Why 3?
At the moment, most cold email experts agree that everything over three is cutting it a bit too close for comfort. In other words, Google might frown on it and you don’t want that.
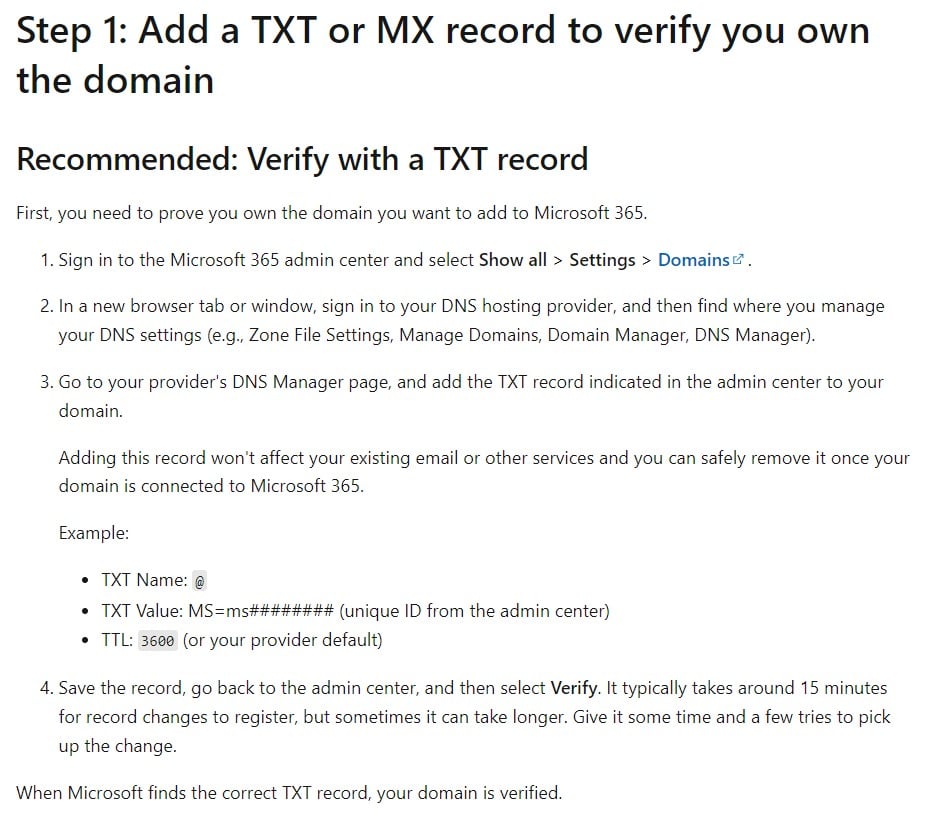
Now is the time to set up and activate MX records, SPF, DKIM and DMARC for the different domains.
These are essential because they will maximize the deliverability rate of your emails and that is half of the job, really.
If you have a tech person in your agency, feel free to skip the following part of the guide.
Setting up MX Records
For Gmail: Log in to the Google Admin console and navigate to ‘Domains’. Select your domain and choose ‘Set up Google MX Records’.
Add new MX records as per Google’s instructions. This typically involves logging into your DNS provider’s control panel and adding each MX record provided by Google.

Next step:
For Outlook: The process is similar but follows Microsoft’s guidelines for MX records. Access your DNS provider’s panel and add the MX records provided by Microsoft 365.
Then:
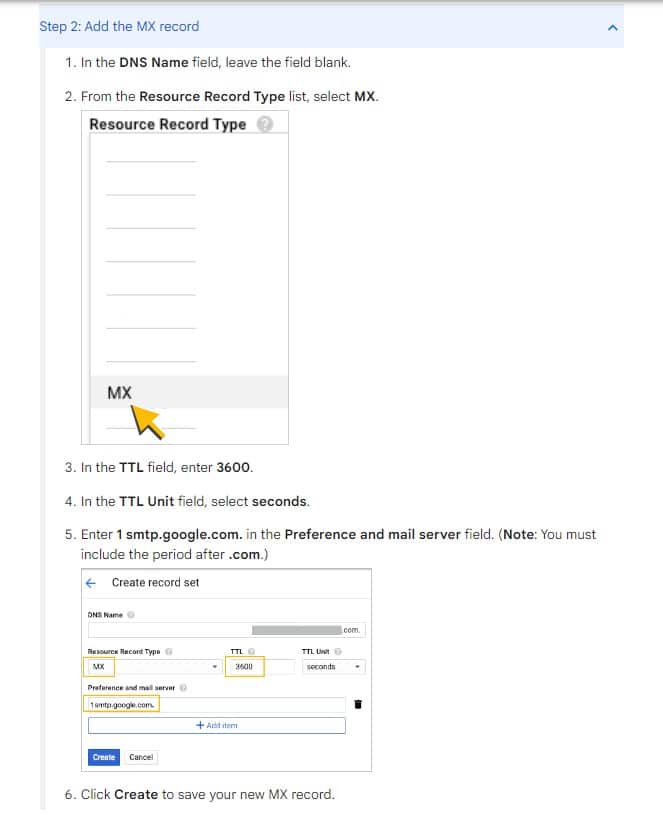
There is a possibility you will need to add the MX record:

Of course, since this is Microsoft we are talking about, there are additional notes you need to be aware of:
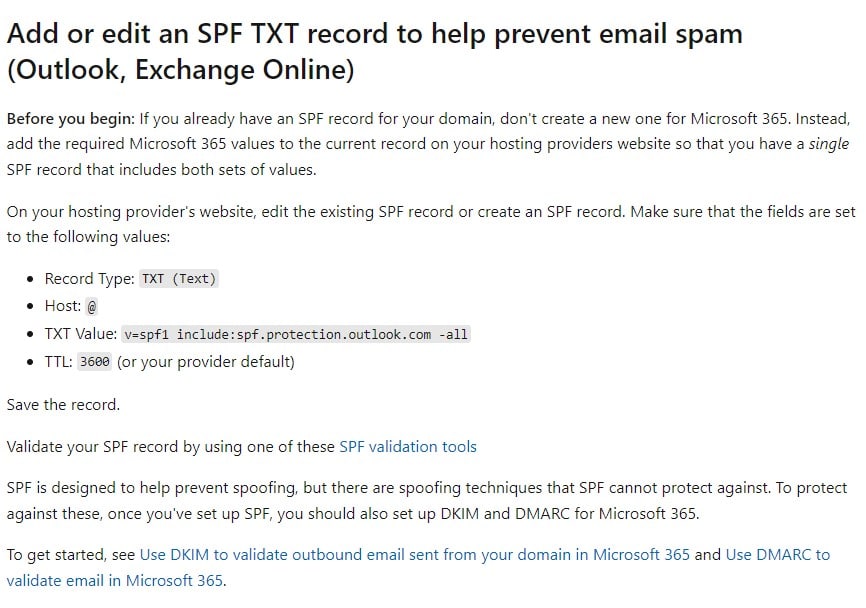
Activating SPF
SPF (Sender Policy Framework) is essential for email authentication, helping to prevent spam and email spoofing.
To set up an SPF record, log in to your domain’s DNS management panel. Then:
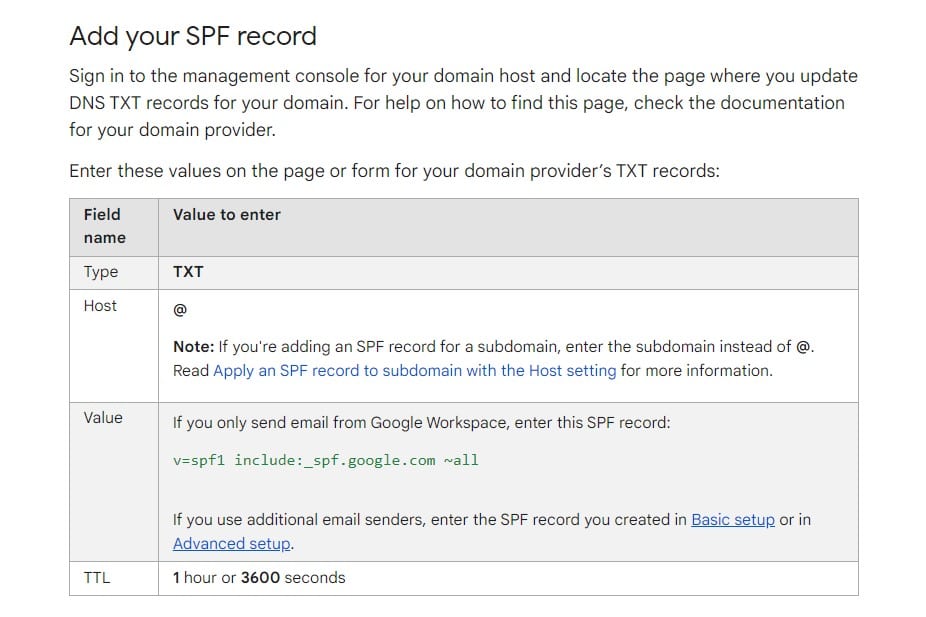
An example SPF record might look like “v=spf1 ip4:123.456.78.90 include:_spf.google.com ~all”.
For MS Outlook, you need to do the following:
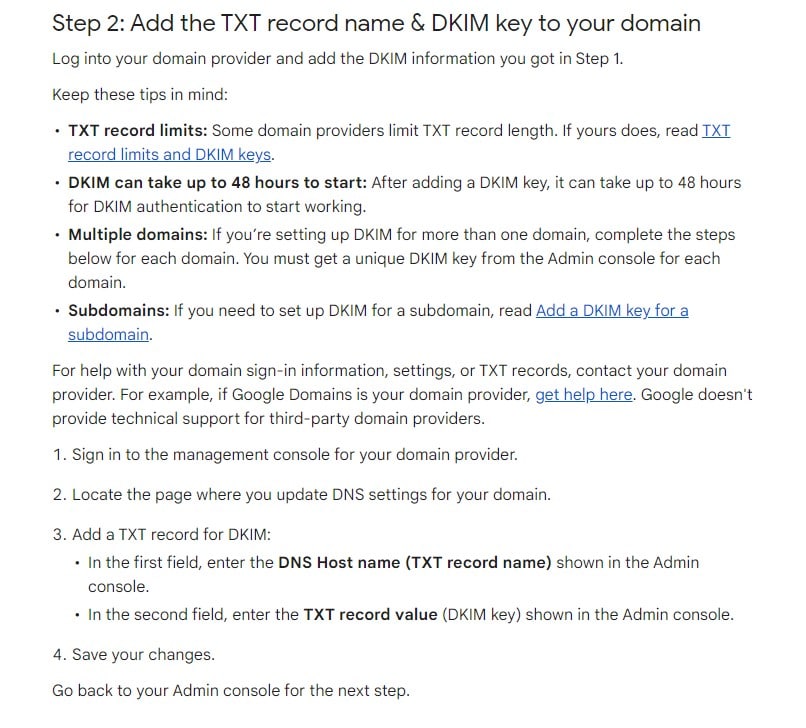
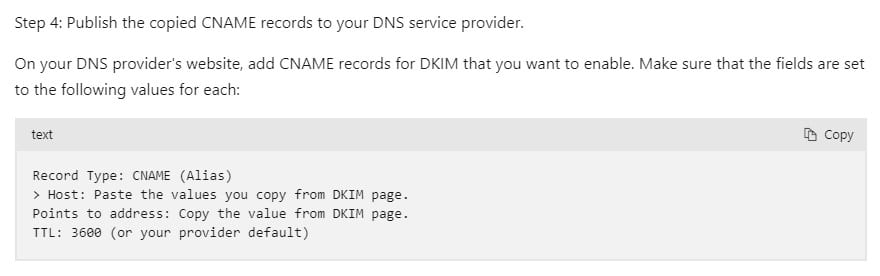
Turning on DKIM for the client’s domains
DKIM stands for DomainKeys Identified Mail and provides additional confirmation that your emails are sent from the domains they are sent from. In turn, this further helps the deliverability of your emails.
First of all, you will need to get your DKIM key in the Admin Console:
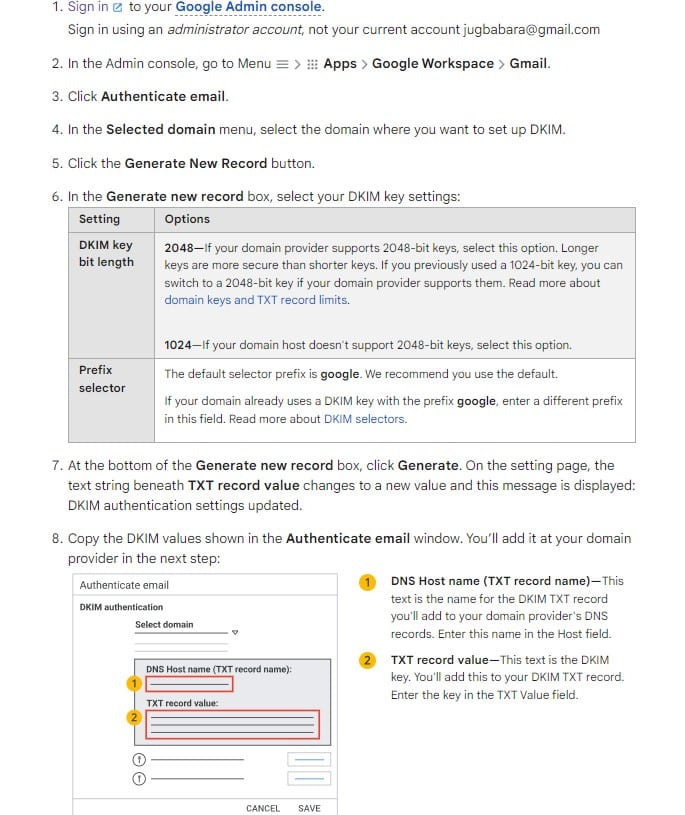
Next, you will have to log in into your domain provider and go through the following steps:
Next, you will want to make sure that DKIM signing is turned on:
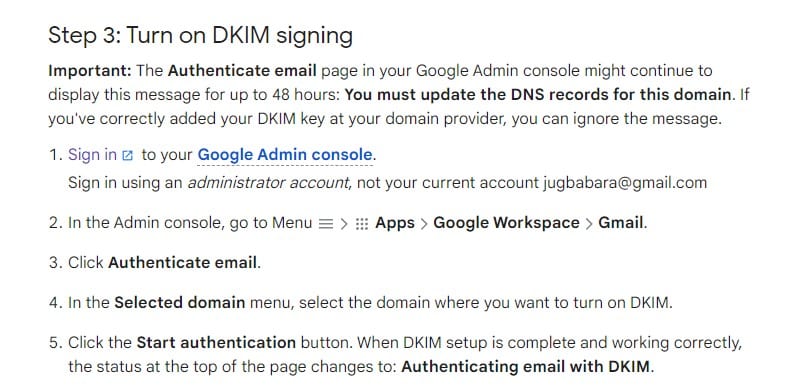
If you really want to make sure DKIM is turned on, you will have to verify it:
By the way, don’t worry, we’ll let you know how to check this a bit later.
Microsoft, once again, makes things a bit more complicated:
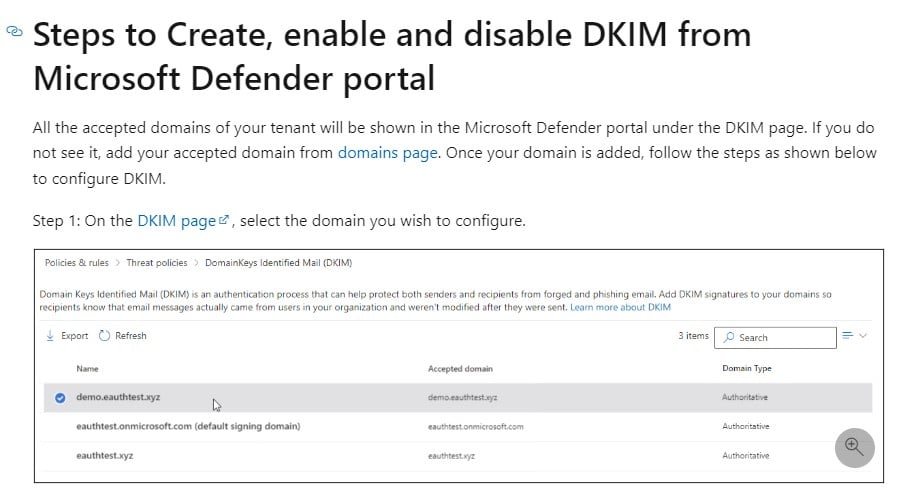
Then:
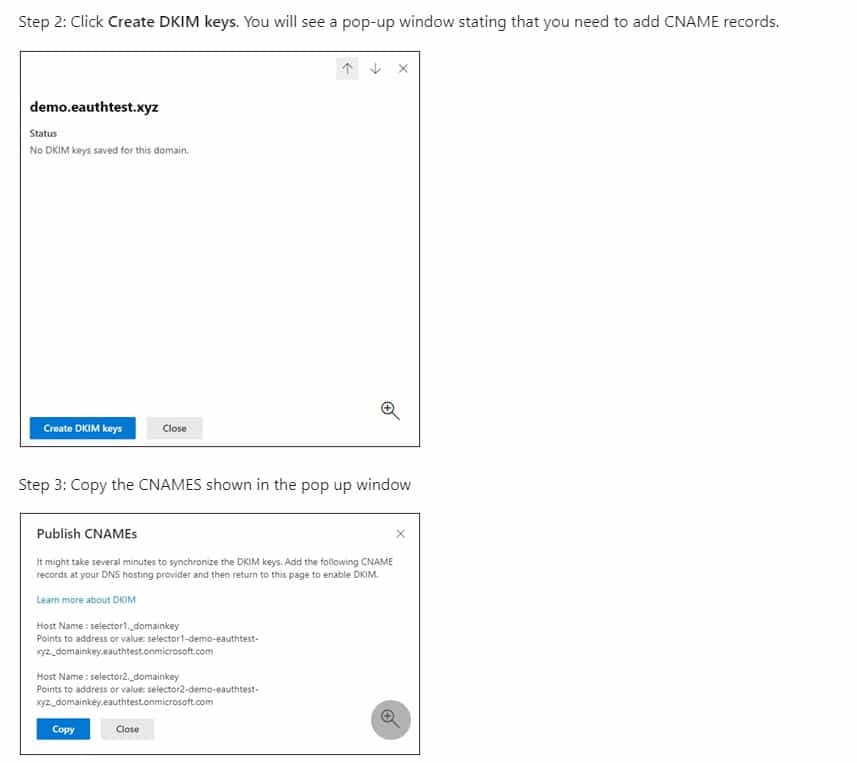
Next:
And, finally:

Only one more acronym to cover!
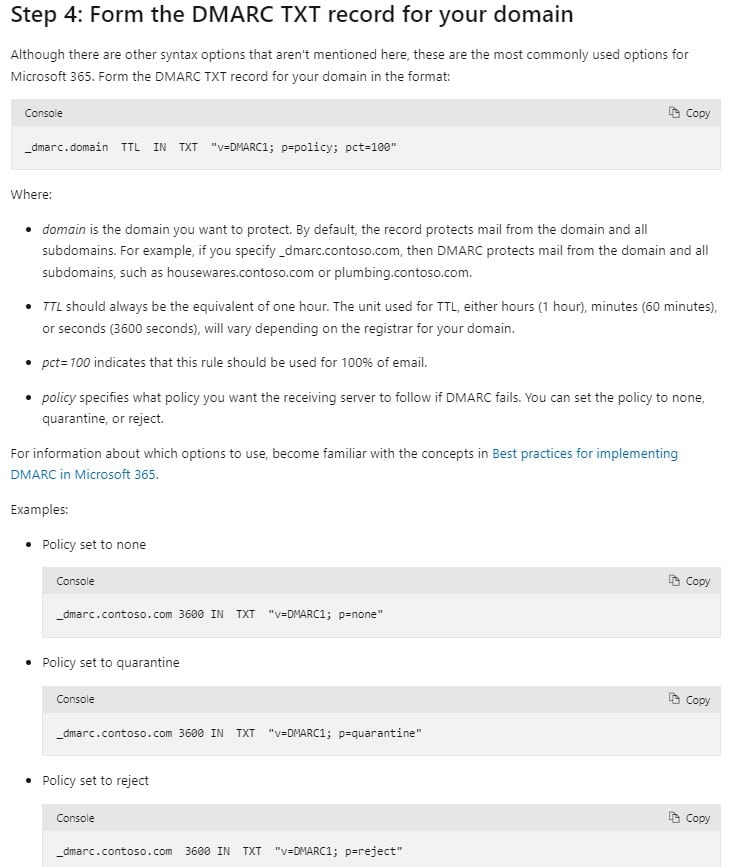
Adding your DMARC records
Generate a DMARC record using a service like EasyDMARC, especially since you’ll be dealing with multiple domains.
Start with the DMARC policy set to “none” for monitoring mode.
Publish the DMARC record in your DNS settings.
Log into your domain registrar, add a new TXT record, and input the DMARC record. Name the record as _dmarc.yourdomain.com. Like this:
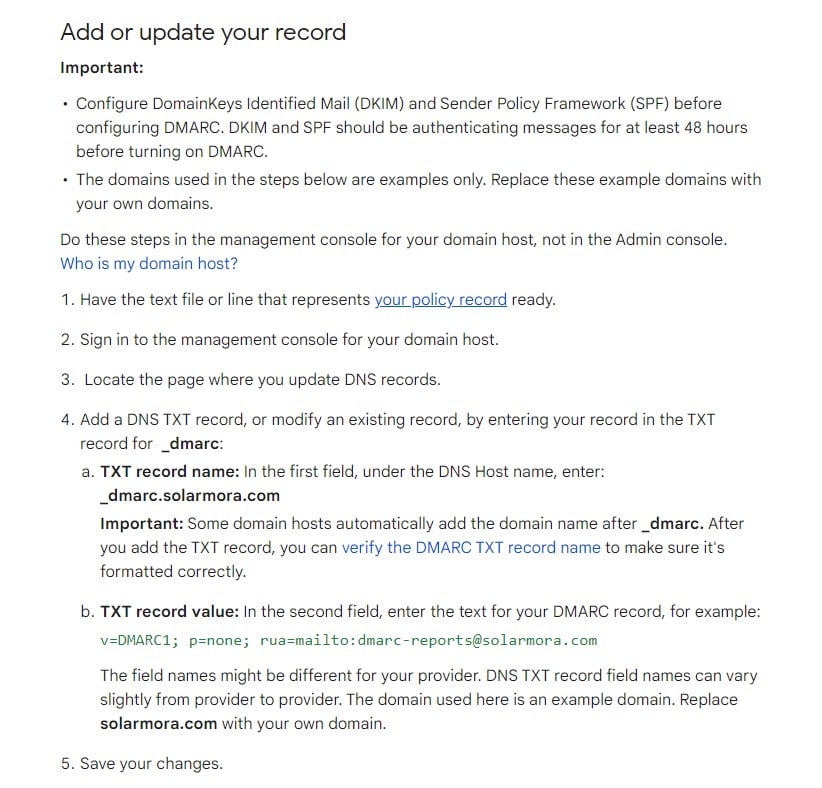
Regularly monitor DMARC reports to adjust settings. Transition the policy from “none” to “quarantine” and eventually to “reject” based on the monitoring results, enhancing email security and minimizing spoofing risks.
You can find more details on Google’s DMARC best practices at this link.
Another thing we’d recommend is to use Google’s Postmaster, which will provide you with additional data and advice on improving your email practices.
For Outlook, you also first form the DMARC key:
From there on, the procedure is the same as with Gmail. If you’re interested in learning more, you can find the info at this link.
Everything working so far?
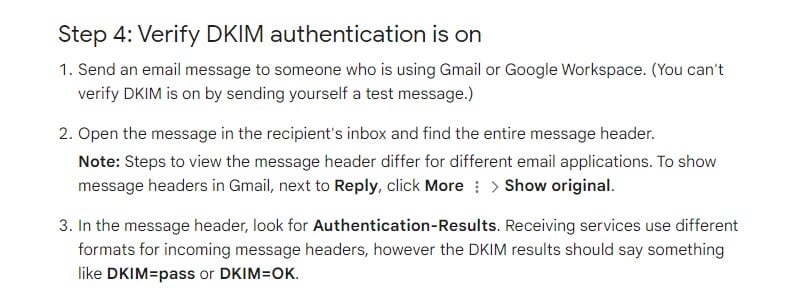
The easiest way to check if you’ve covered all the bases so far is to send a test email from one of your client’s new domains to a random email account that you own.
Then, when you open it, you click on the three little dots on the right and choose “Show original”, like so:
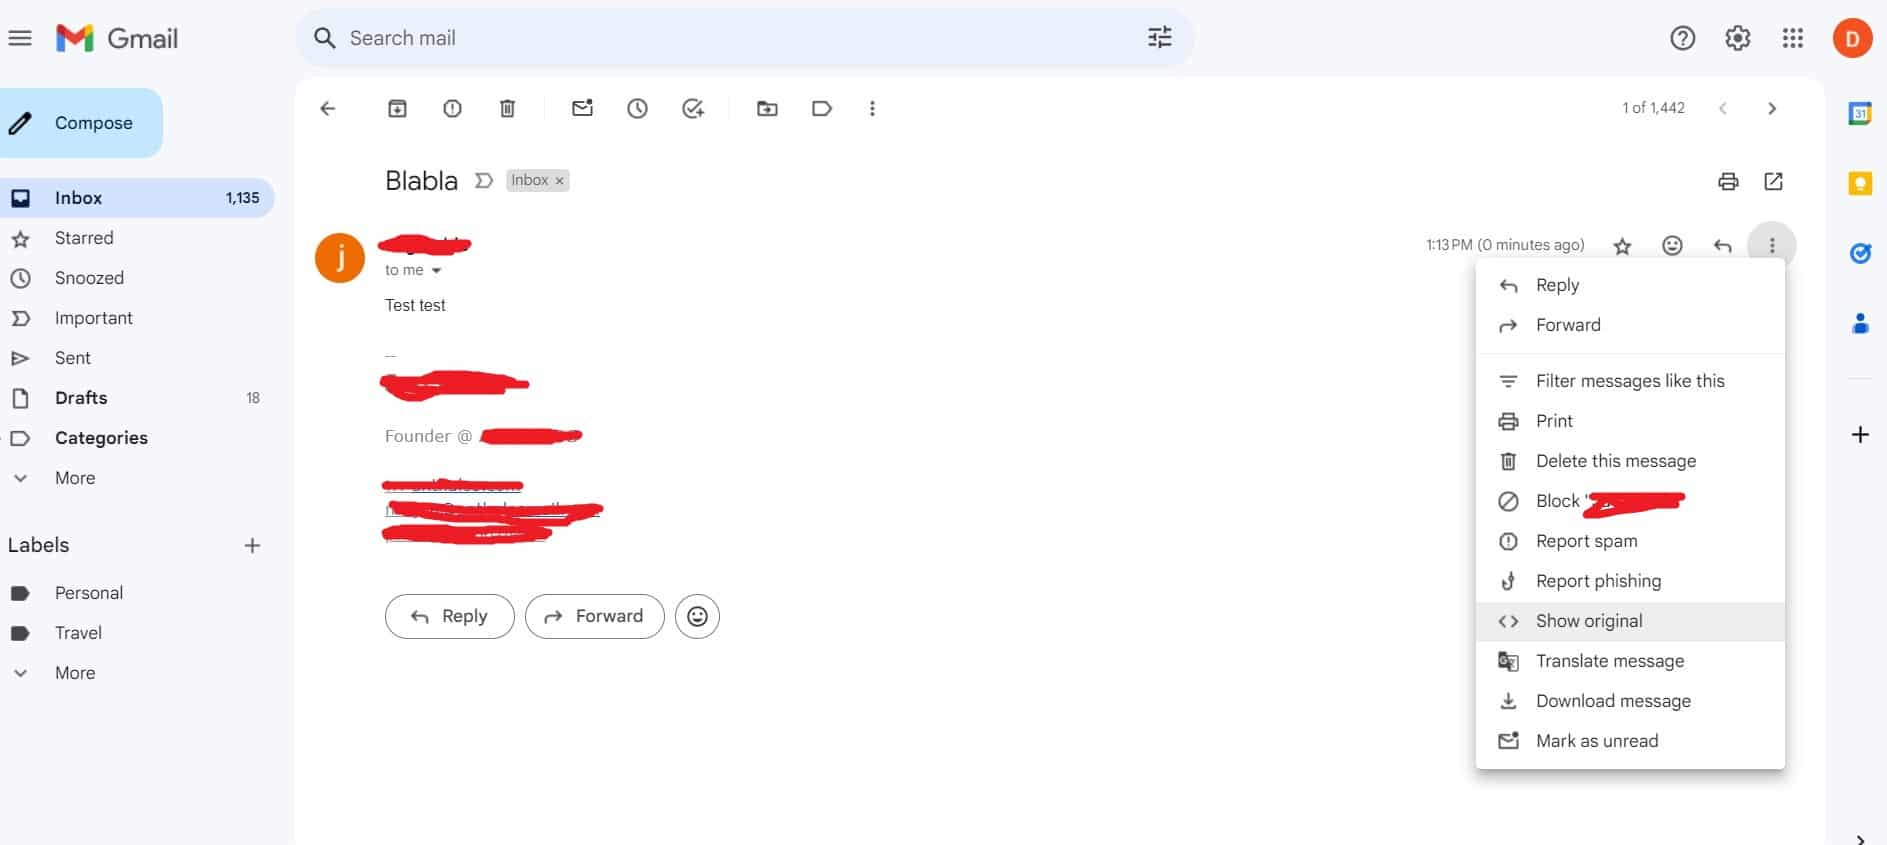
In a new tab, you will see something like this:
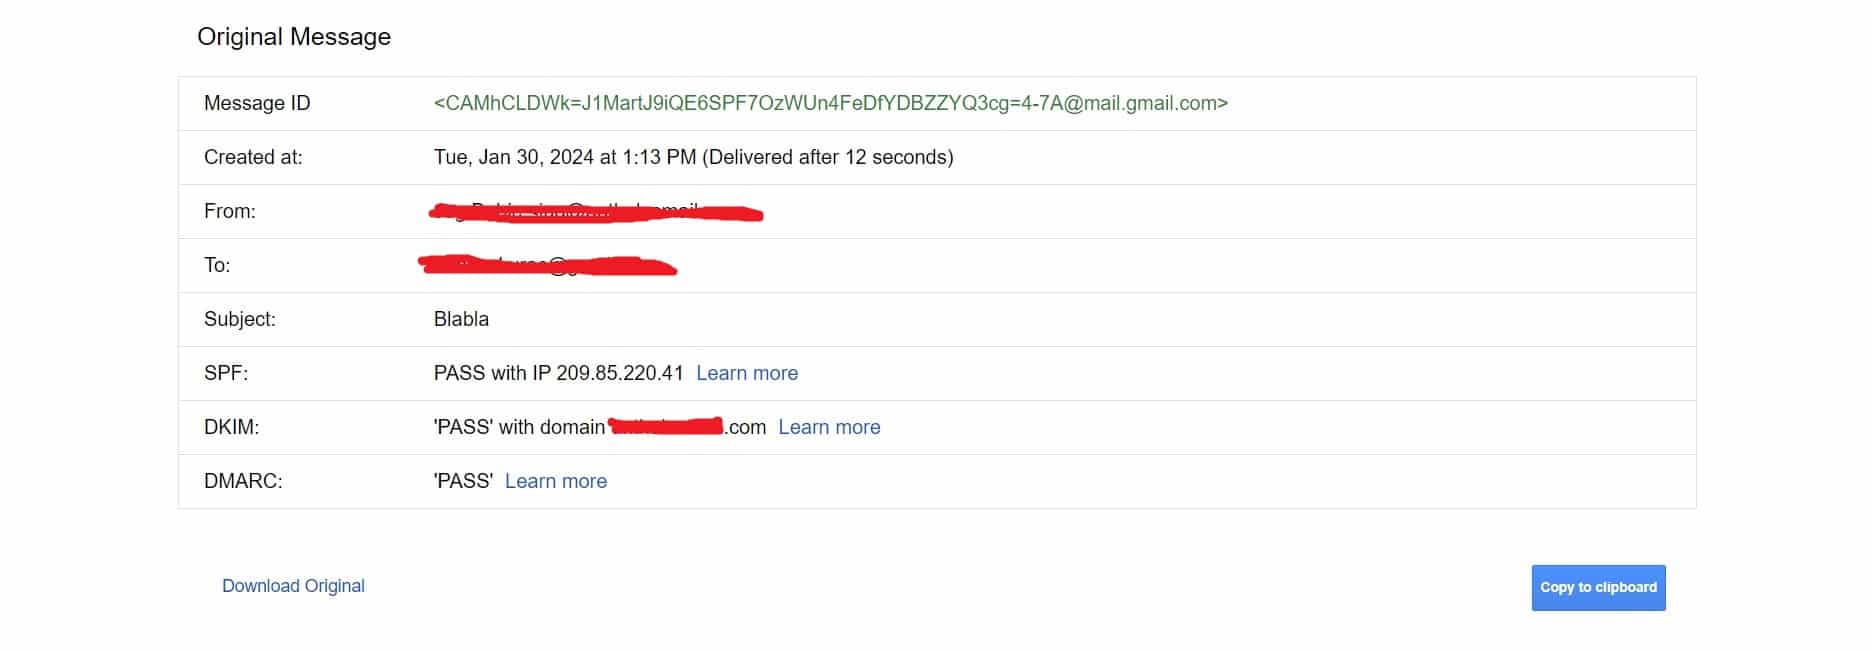
As you can see, SPF, DKIM and DMARC all have PASS next to them. (PASS is good)
Setting up a custom tracking domain (part 1)
Finally, you will also need to set up a custom tracking domain. It’s a domain that you set up to replace the default tracking domain provided by your email service provider or emailing platform (in our case Smartlead).
This reduces the chances of your cold emails landing in spam as you are not tracking from the same domain thousands of other people use (and often spamming unashamedly).
This is particularly important if you plan on tracking email opens and clicks. (We don’t want to get into the whole should you or shouldn’t you debate here)
By the way, you can find it in the same place where we were checking the SPF, DKIM and DMARC setups only when you scroll all the way down (you’ll recognize the section by “3D” being the prominent part of it). It looks like this:

We had to edit some of the info, but you would have seen that the domain we were tracking matched the domain from which the email was sent.
Since this is something that is done in the tool that you use to send your email campaigns, we will revisit this a bit later.
Master Inbox
You will also choose one domain with only one email address, which will act as the Master Inbox for the client.
No cold emails will be sent from this domain and it will be exclusively used for replies.
Namely, you will forward ALL of the replies from any email addresses from any of the domains you use for a single client to their Master Inbox.
You will then exclusively answer to every reply ONLY from that Master Inbox address.
This way, you can rest assured that it will never be reported or flagged as spam.
Plus, it will make it much easier to label and organize the replies you get across the various domains.
For instance, you can add tags for the different types of replies you get from leads, such as Replied, Interested, Negative, Unsubscribe, Call Booked, etc.
As soon as you’re done with all the acronym stuff (and we’re done!), you have to start warming up those domains. Even before you start prospecting for leads, since it takes at least 15 days to warm up a domain.
In essence, you will be sending emails from all those domains to other people who use the tool (and vice versa) and thus “simulate” healthy domains whose emails don’t end up in spam, get opened and replied (depending on how you set it up).
Initial SmartLead setup
For the purposes of being objective, there are other tools that you can use for warming up your emails and eventually sending the campaigns, but SmartLead provides, in our opinion, the best bang for the buck.
The first thing to do is to add email accounts that you will be using for your client.
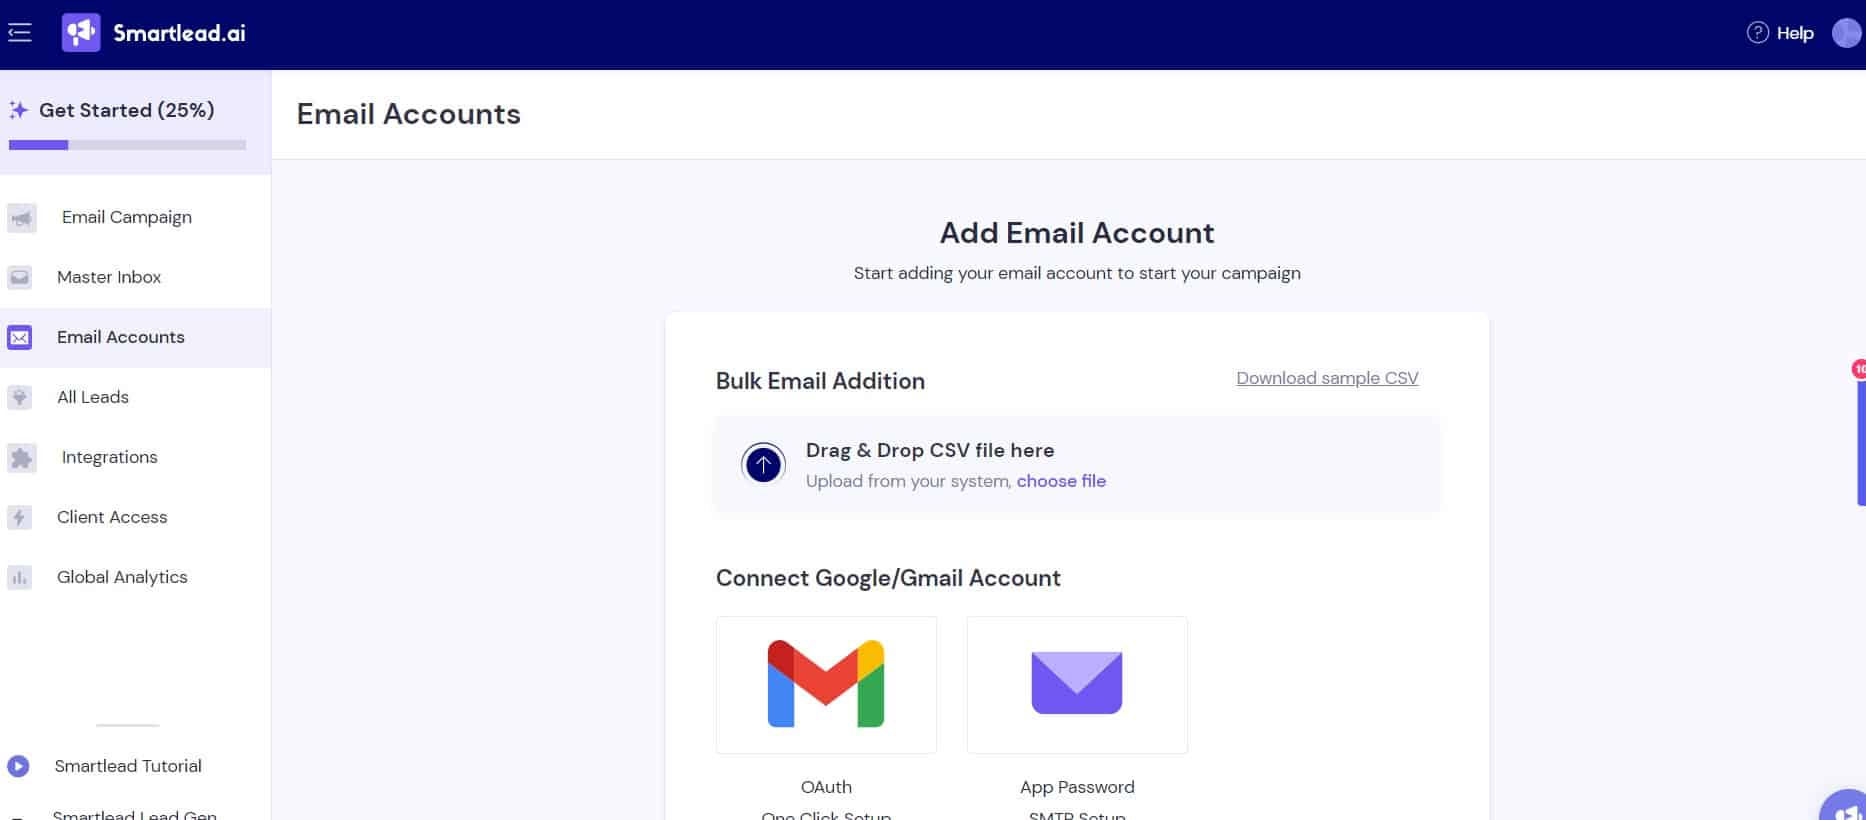
They do such a good job of explaining how to do it that we would be basically retelling you the whole thing. So, we won’t – here’s their step-by-step guide.
It is a pretty straightforward process and they even have an option for bulk uploading email accounts.
(While we’re linking to the SmartLead help center, you can also check out their advice about the acronyms from above.)
A few things to keep in mind at this point:
- There is an option to specify a different Reply-to email address when adding email accounts. This is where you will add the Master Inbox we discussed earlier (not to be confused with Smartlead’s own Master Inbox, which is a feature). In order to be able to do that, you first need to add that Master Inbox account.
- You will see the option to specify the Client for which a particular email account is used. We suggest you use that option as it will help you keep track of things in Smartlead.
- This is also where we circle back to setting up a custom tracking domain. Once again, the good people from Smartlead have done a great job and we’d just be parroting their words. They even included a video in their guide to help you do it.
You’ll actually find this to be a theme in our dealing with Smartlead, since they’ve done a great job of explaining stuff.
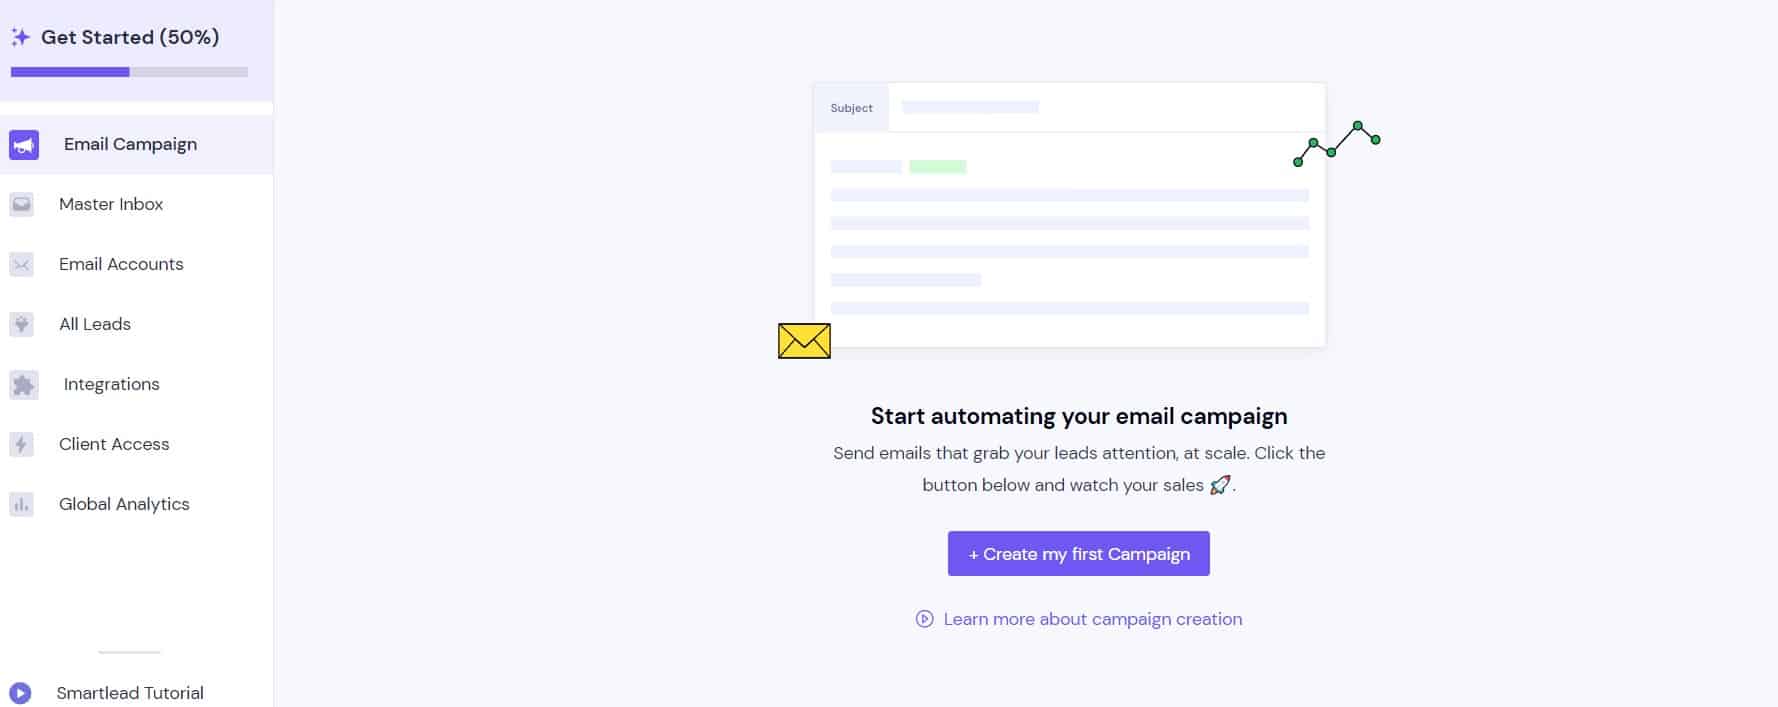
Of course, we will take you through creating your first campaign here as well, just to give you an idea of how to do it.
Once you’ve added the accounts for your client, it’s time to start warming up the accounts. In the sidebar, click on Email Accounts and then find the Warm Up tab.
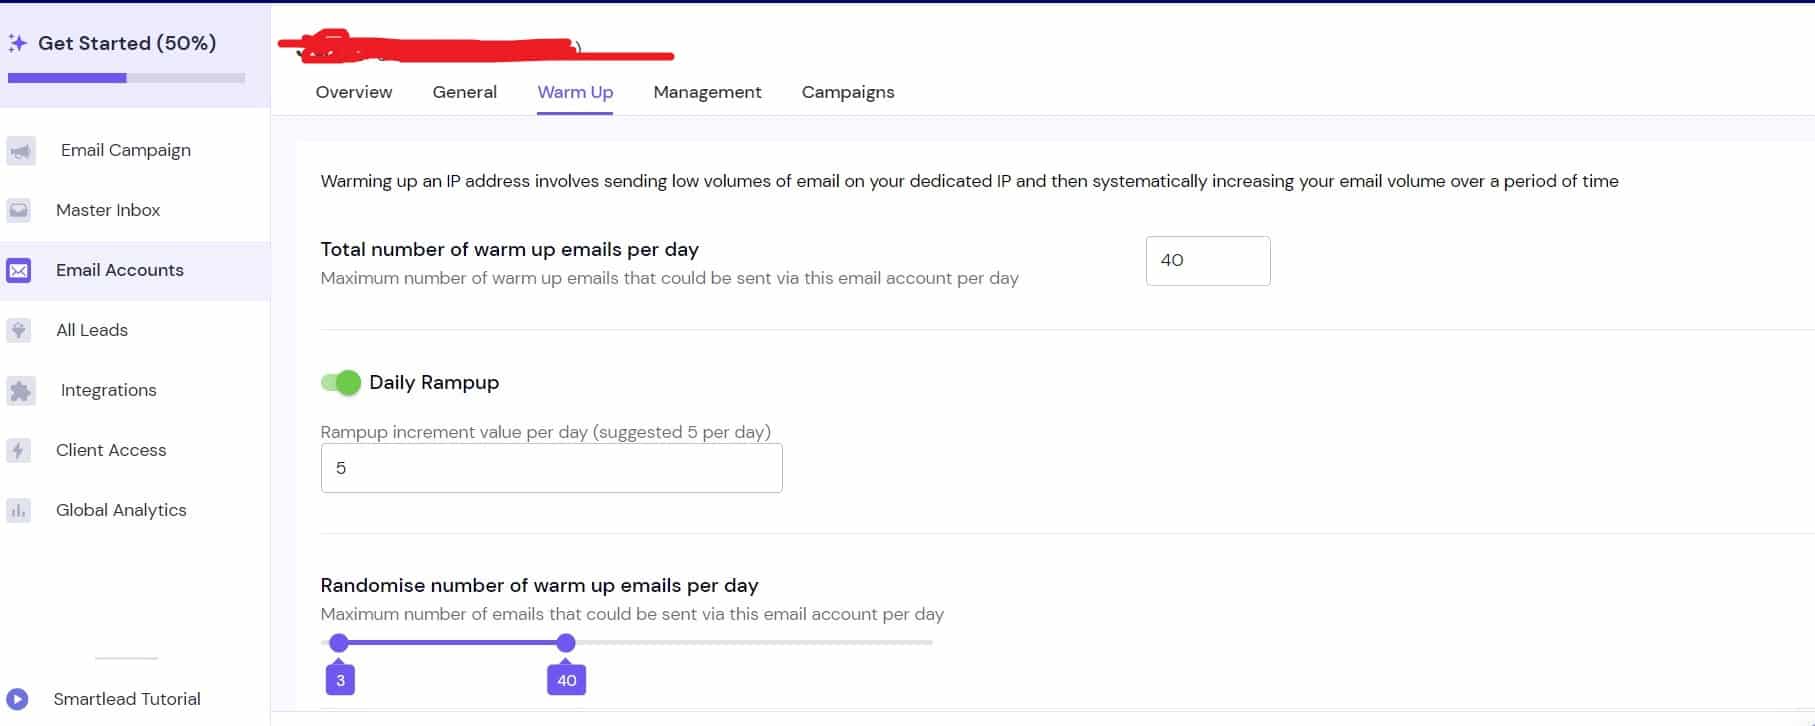
Usually, their default settings are perfectly okay and there’s no need to overthink it.
Lead prospecting
As the domains are warming up, it is time to find the people you will be sending emails to. In other words, it is time to start prospecting for leads.
By now, you will have your client’s ICP(s) narrowed down as much as possible and it is time to use those characteristics as filters in your prospecting.
There is a number of tools that people use such as ZoomInfo, GetProspect or RocketReach, but Apollo is our tool of choice at the moment.
They have a massive database, great filtering options, and a bunch of advanced features that can come in handy, such as Buyer Intent and other Signals that can help you build more proactive campaigns if need be.
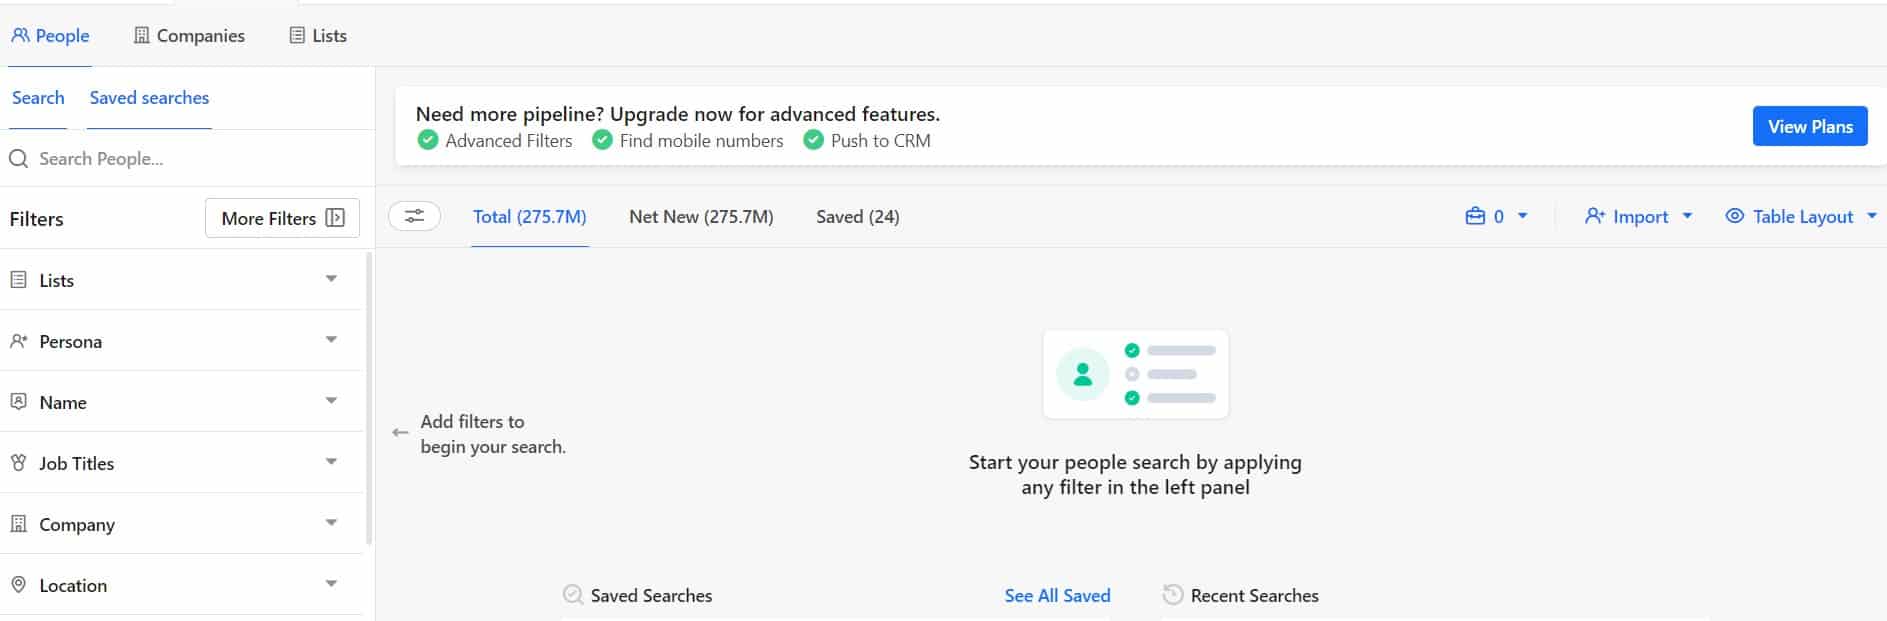
Once you create your account in Apollo, go to the Search tab and the People:
On the next page, you will see a ton of filters on the sidebar on the left and they are your bread and butter at this point.
For example, your ICP are marketing leaders in banking, accounting or financial companies of up to 100 people who are based in the United States or the European Union. Your search will look like this:
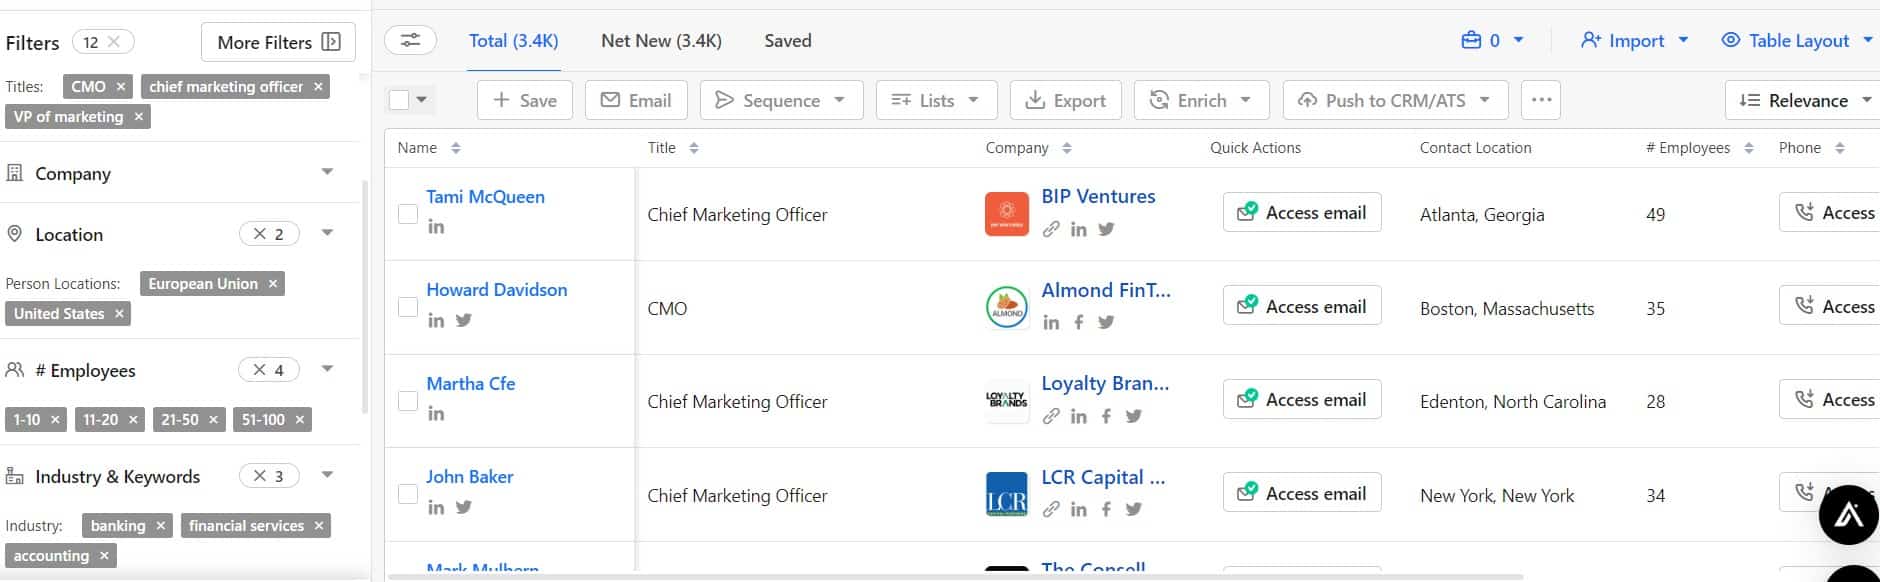
As you can see, Apollo found 3.4K leads.
Since Apollo can get quite expensive and allows you to export only 25 contacts and their emails on the Free Plan, you might want to use something like Enrich IQ. The tool is very simple to use and can significantly reduce costs.
You just copy the URL of your search in Apollo into the tool, specify how many leads you want to scrape (atm, the price is $20 for 4,000 leads) and give them the email you want the results sent to and that’s it. Within minutes, you will get an email with the results of your Apollo search without having to spend (a lot of) money on Apollo itself.
You can check out this video to see the tool in action.
Next, you need to double-verify that the emails Apollo provided are valid. Oftentimes, more than 50% or even 70% of the emails are not valid.
In short, you’ll get all your domains destroyed within three days without double verification.
There are a bunch of tools that verify emails – we like Cleansify.ai. It is not too expensive and we’ve never had any problems with emails that they verified.
Eventually, you will have your 3,000-strong list of leads (segmented and complete with their titles, company sizes, industries and whatnot), the domains and the email accounts, and your messaging suggestions.
It is time to send all of these to the client for approval.
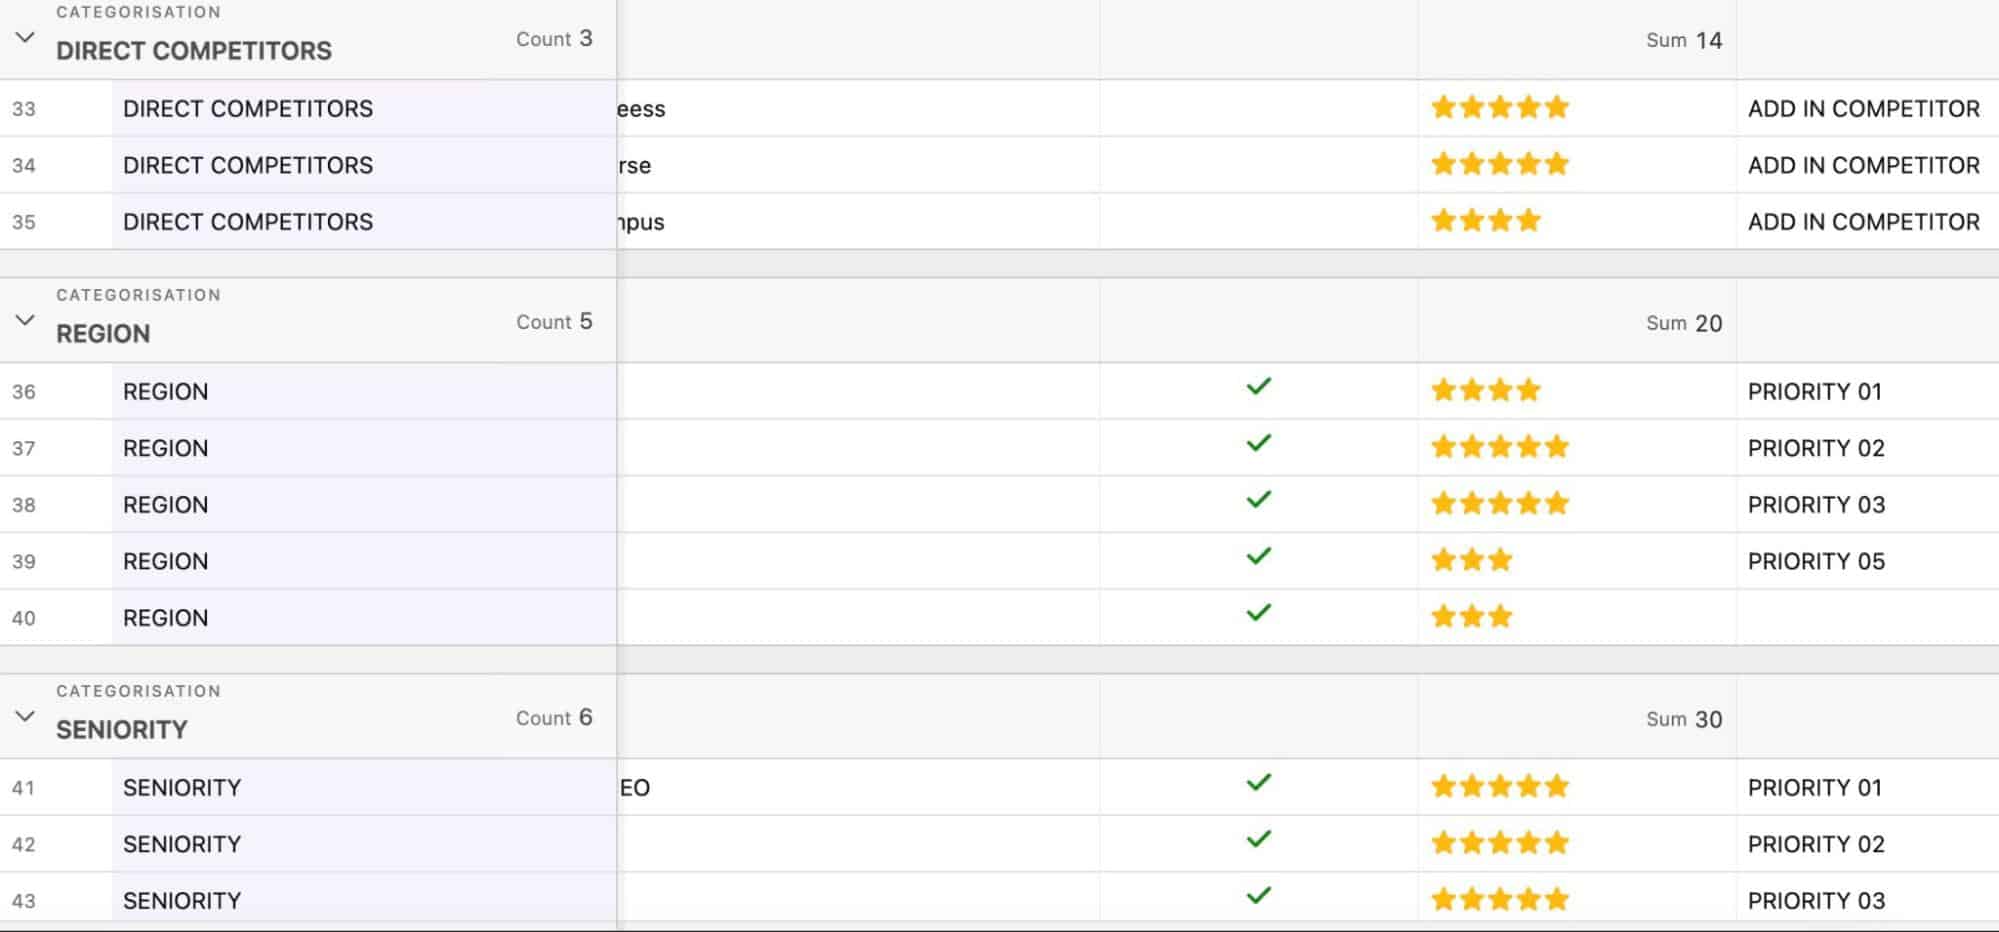
You can also ask the client to review the leads and score them using their own scoring system (based on their priorities).
Writing Copy for Campaigns
Sending out the same exact campaign to all 3,000 of our hypothetical leads would be insanity.
Instead, you use six different campaigns within each you will test your copy, your CTAs, your angles, your language (informal vs. informal), and variations of the ICP (e.g. more or less senior).
Why 6?
Well, that gives you 500 leads per campaign and that’s the minimum number of leads that can be used as a data sample. Anything under 500 and we’re talking about a sample size that is too small, with too many possibilities for skewed and, therefore, useless data.
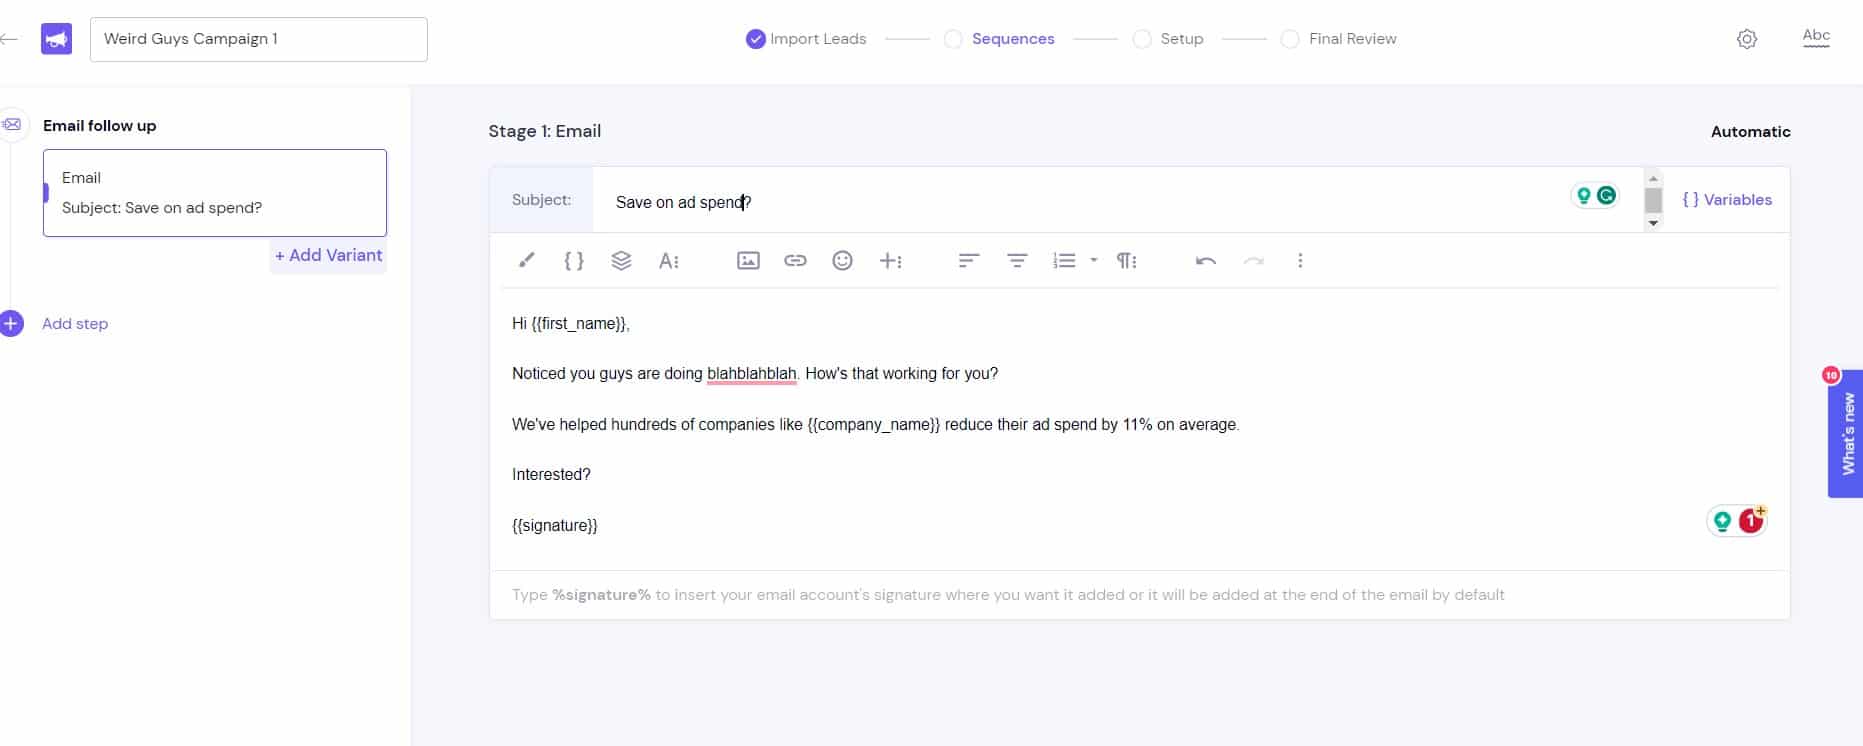
Here’s our suggestion for what one of those six campaigns could look like:
- Three steps per sequence – some people swear by more, but this allows for shorter run rates – two weeks ideally
- Version A – short Subject, short Email copy, Short CTA
- Version B – longer Subject, longer Copy, different CTA
- Versions C and D – the same as A and B, only with added spintax (we will cover this a bit later)
- Versions E and F – the same approach as with A and B, but with a different angle (e.g. adding value vs illuminating pains)
The best thing is that you’re still left with five more 500-people campaigns to test stuff in more detail, to test even more angles or follow-ups, or to reach out to a different variant of ICP.
This is where you really get creative.
Collaborate with your client on angles, offer positioning, adding value in follow-up emails, etc.
This is the fun part.
But, remember, analyze results constantly and vigilantly. Your setup will provide you with all kinds of data.
Don’t be afraid to act on that data – if a particular variant is performing dramatically better than others, switch all of them to that one; if some variants are duds, scrap them mercilessly.
Track, analyze, adapt.
It goes without saying that you will want to get your email sequences copy approved by the client before you start sending out the emails.
Setting Up Campaigns
Once the client signs off on the leads (the segmentation and (potentially) scoring included) and the messaging, it’s time to set up the campaigns in Smartlead.
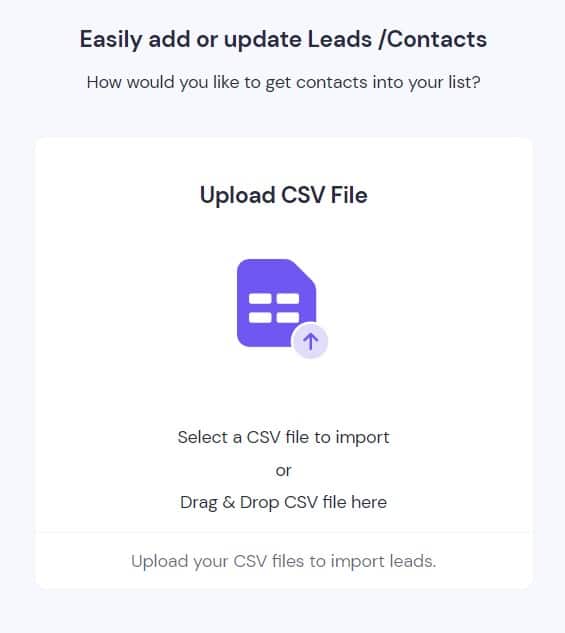
The next step is to add the .csv file with leads.
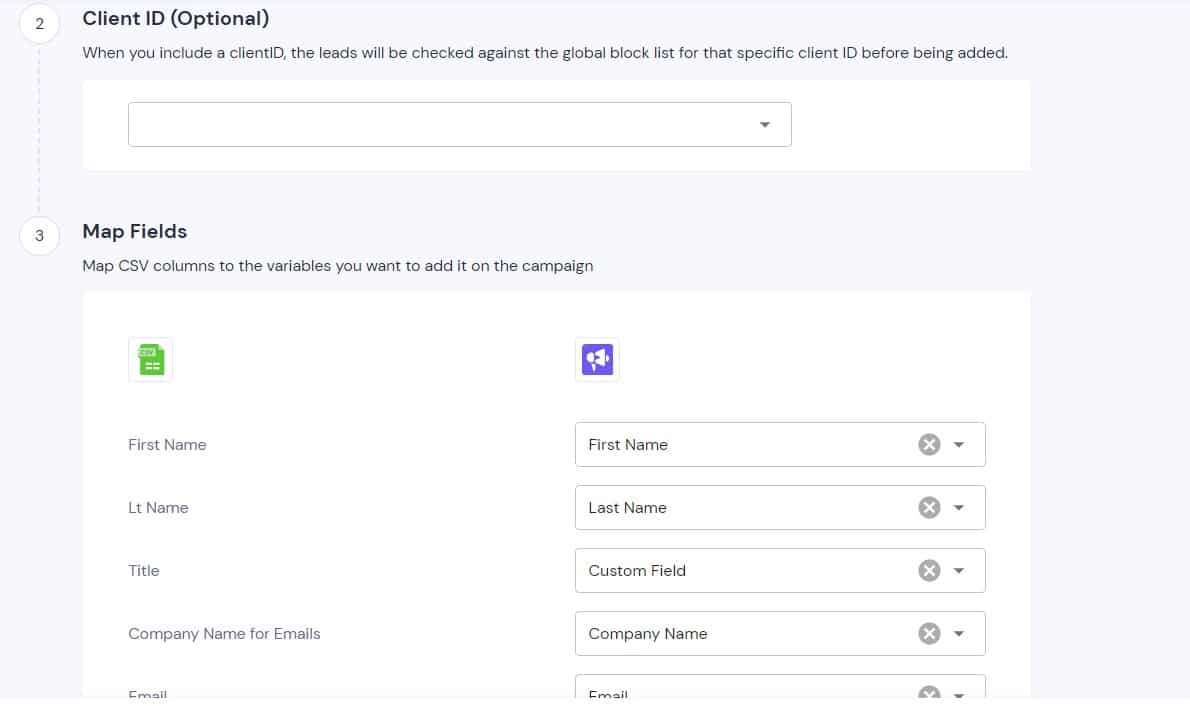
On the next screen you must pair up the data from your .csv file with the variables that Smartlead uses. Also, you can specify the client for which this campaign is running.
Once you’ve done that, it’s time to start building sequences (according to the copy we discussed earlier).
Variant 1
Next, you just add variants where it says Add Variant
Variant 2

You get the picture.
One thing we wanted to cover here is the use of spintax. Spintax is basically the tool itself coming up with combinations of variations of different words and parts of the email to make the emails as different as possible.
This is what it looks like as you’re writing it:
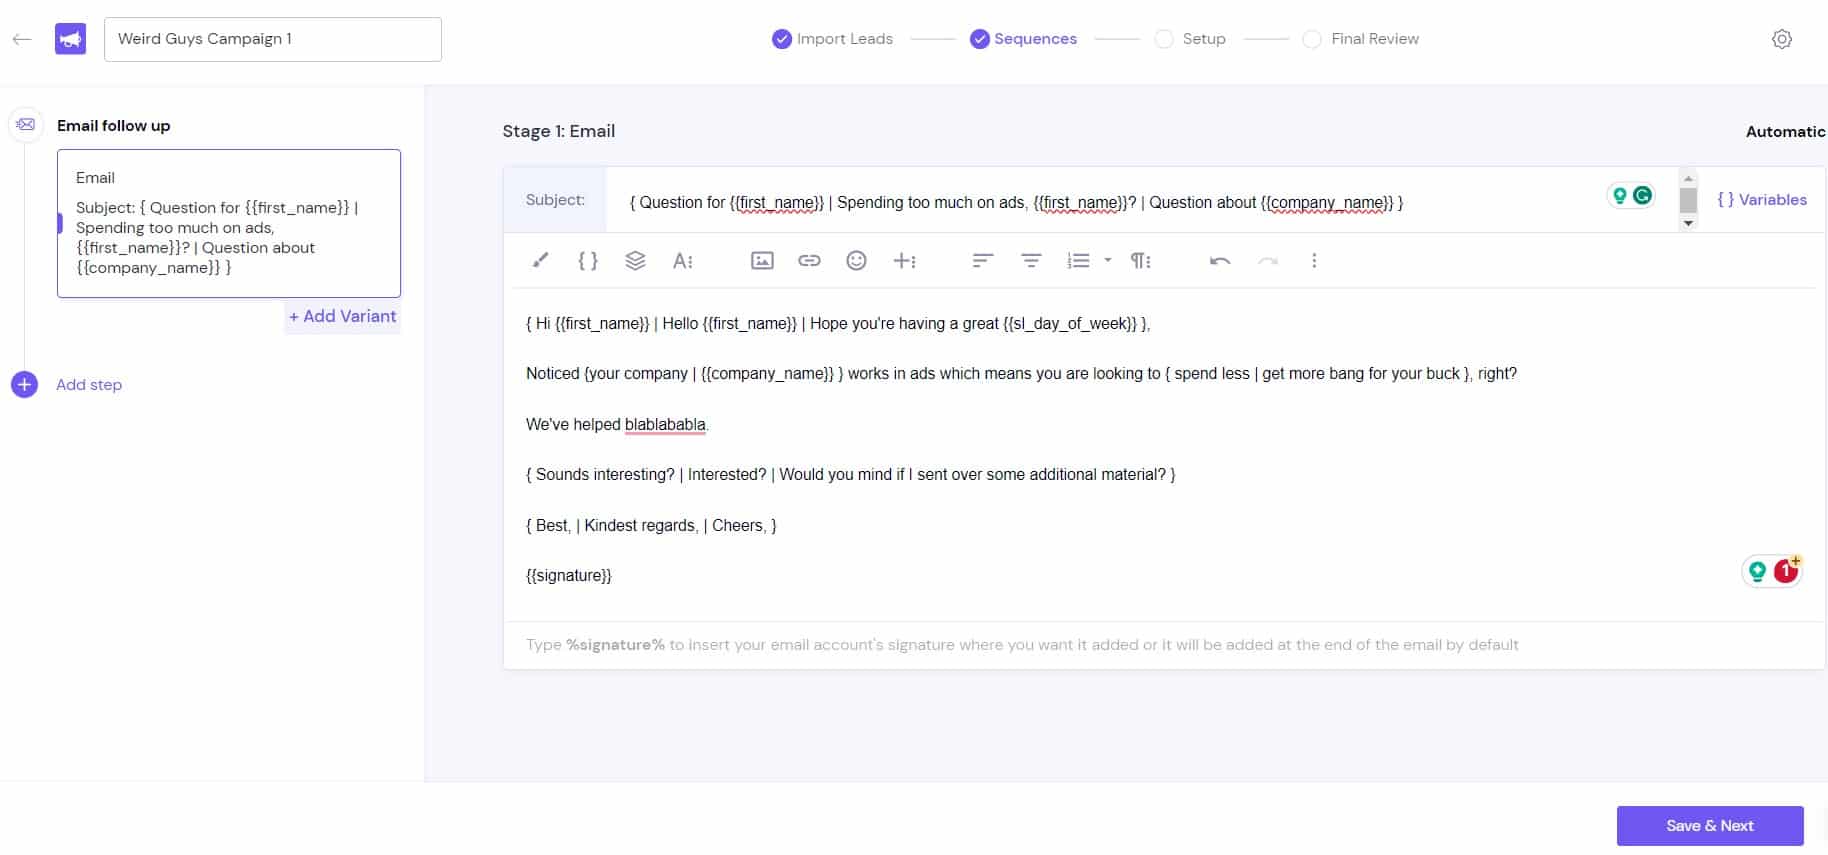
When you click on Save & Next (and once you’ve set the sender emails and everything else, it will show you that the emails that use spintax are randomly generated by combining the various variables.
For example:
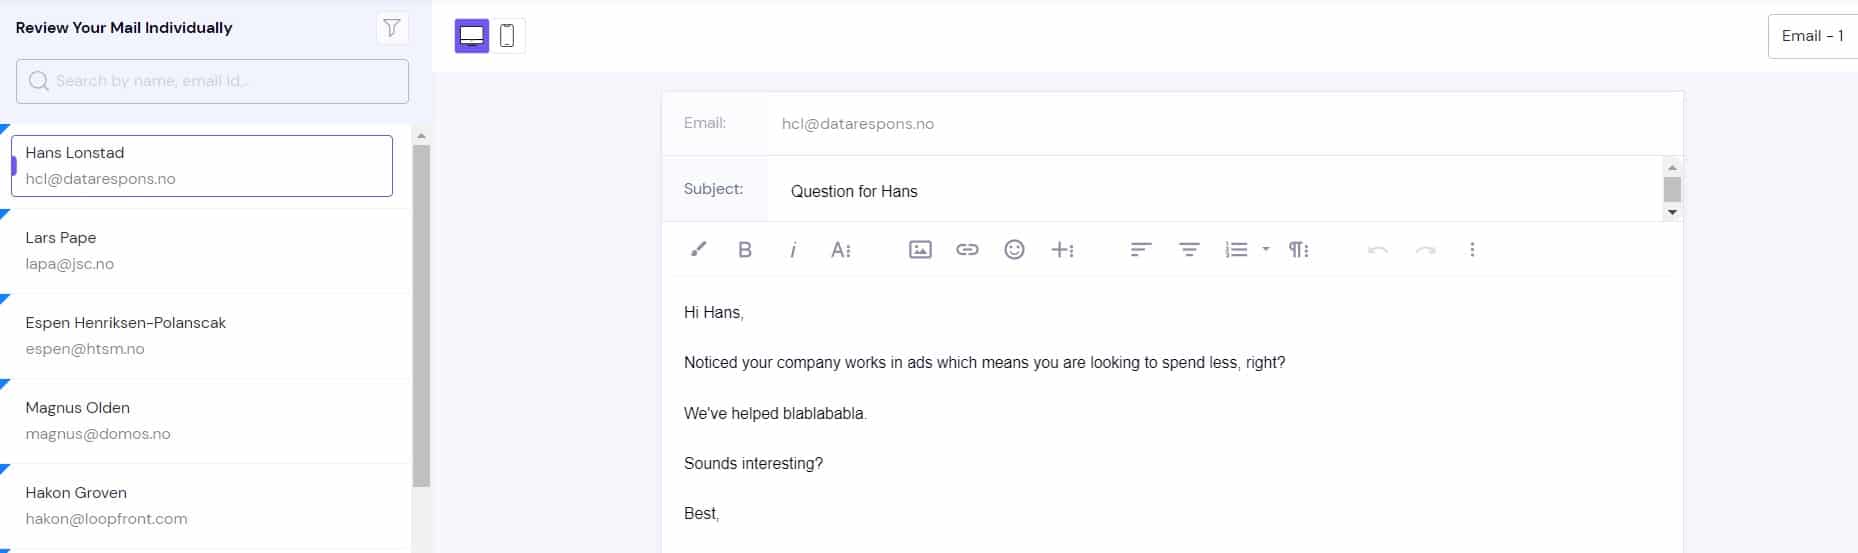
and
You will then add the sending accounts from which you want this campaign to run, as well as what days and times you want the emails to go out.
And then you start the campaign.
Managing Replies
One of the best things about Smartlead is that you can see all of the replies coming from any of the leads in any of your campaigns in the Master Inbox.
This, conveniently, brings us full circle back to Airtable.
Namely, you want to make sure that no reply goes ignored and this is where our CRM comes into the picture again.
All you need to do is create another table in Airtable, called Leads.
We’ve done a really barebones one just to give you an idea of what you can do.
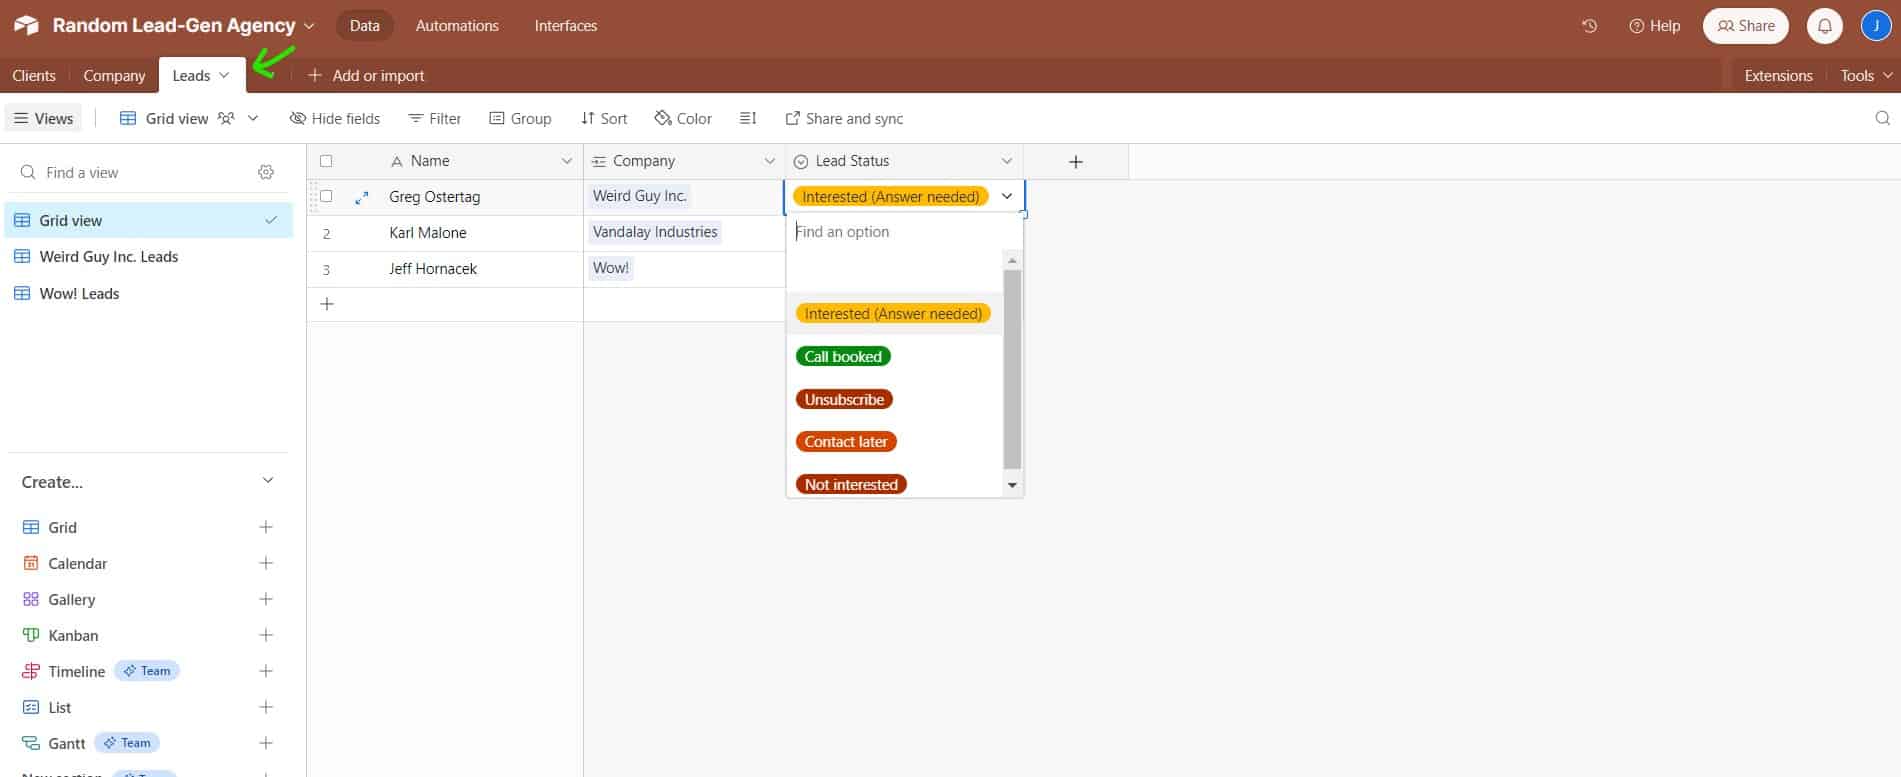
As you can see, we’ve connected leads with the Company field from the Clients table. This allows us to create different views for each client (like we did for Weird Guys Inc. and Wow!).
This will help you keep stuff organized and also show individual clients only their fulfilled leads.
You’ve also probably noticed that we made the Lead Status field a Single select one where you can choose what kind of a response you got from leads.
We want to do this because we want to send email or Slack notifications to the right people – whether they are on the client side or one of your people (for example when you need to add a lead to the Unsubscribed list (you don’t want to send emails to people who asked to unsubscribe)). Once again, we will use Airtable automations to do this.
This way, you can ensure that all the replies get the attention they require as quickly as possible.
Reporting
In addition to ensuring that every response is acted upon, there is also the matter of reporting. Namely, your clients will want to know exactly what you’ve been doing and how their campaigns are progressing.
Depending on how you wish to approach it, there are two ways you can go about this.
The first way is purely manual and it can be perfect if your lead gen agency is still in its infancy and you wish to do everything manually.
One of the reasons why chose Smartlead is that it provides you with a comprehensive overview of how each of your campaigns is doing.
For example, this screen will be more than sufficient for the majority of your clients:
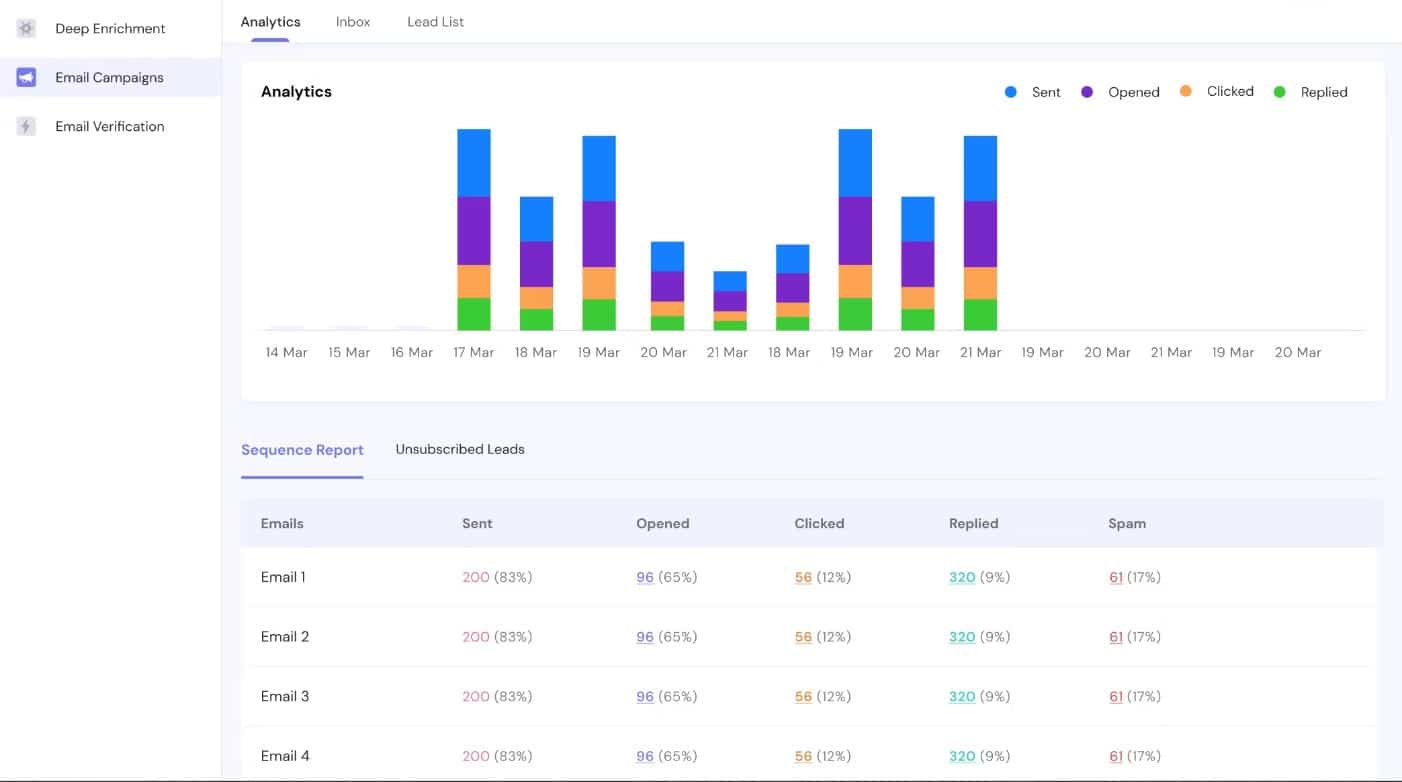
It will show you how many emails have been sent and opened; how many people clicked on any given link included in the email and how many responded to any of the emails in your campaign.
For most lead-gen agencies, presenting these to their clients every two weeks will be enough to paint a picture of how their campaigns are going and whether there is a need to change up something.
Once you get more clients and you start finding ti difficult to do all of this manually, Smartlead provides a wealth of options to automate fetching data and pushing it further down your pipeline.
As we are talking advanced features here, you should familiarize yourself with smartly.readme.io – your go-to resource for API data management. This platform will serve as your central hub for accessing and manipulating lead data.
Once again, there is little that we could add to Smartlead’s quick guide to this.
Preparing for API Integration
Before diving into automation, download Postman. This invaluable tool allows you to test API requests effortlessly, ensuring smooth integration into your automation workflows later. Remember, you don’t need programming skills to follow these steps, making it accessible to all.
Simplifying Data Collection
Your main objective is to gather campaign data and categorise lead responses effectively. Create a Google Sheet named “Analytics Sheet” for this purpose, with columns for lead name, email, and category. This setup is basic but can be expanded as needed.
Fetching Data with APIs
Navigate to the Fetch Lead Categories endpoint to start collecting data. Use Postman to send a request to this URL, incorporating your API key for authentication. This process retrieves all necessary lead category data.
Next, focus on fetching campaign statistics by campaign ID. This step is crucial for isolating leads based on their interactions (e.g., replied, unsubscribed). Concentrate on responses to filter leads effectively.
Integrating with Zapier for Automation
Transitioning the data into your Google Sheets manually is impractical. Here’s where Zapier comes into play. Set up Zapier to automate the data transfer from your collected API data directly into your Google Sheet. Start with a trigger, schedule the automation (e.g., daily at midnight), and use the fetched data to populate your sheet.
Organising Data and Reporting
With your data in Google Sheets, you can now segment leads by category (interested, not interested, meeting booked, etc.). This segmentation allows for targeted follow-ups and more personalised engagement strategies.
Advanced Reporting Techniques
To enhance your reporting, consider filtering leads to only include those marked as ‘interested’ or those who have requested meetings. Utilise graphs within Google Sheets for a visual representation of your campaign’s success, facilitating easier analysis and strategic planning.
Closing word
And there you have it.
A guide that describes a rock-solid lead fulfillment process that is as predictable as humanly possible and easily replicated.
It all starts with setting up the internal tech stack that will allow you to scale your operations to accommodate as many clients as you can sign.
Next, it is time to build up a structured approach to lead generation that requires as little manual work as possible and that can be easily replicated across various industries, company sizes and target markets.
From there on, it’s pure lead generation at its purest and most interesting – prospecting, scoring, segmenting and messaging.
It may not be the sexiest guide in the world, but it gets things done.
And gets them done repeatedly, which is the key.
Of course, there are innumerable ways in which you can modify this process add more data and automated stuff, but you have a life and this guide is enough to get you started.


You’ve made it all the way down here, take the final step