AI Hyper-Personalized Messages Are Live on Expandi
Pull up the last ten connection requests you sent on LinkedIn.
How many sound like they were actually written for that specific person? Not “personalized” because you plugged in their first name and company but actually unique messages that reference something real from their profile, their recent activity, or their specific situation.
If you’re honest, probably none of them.
That’s not your fault. This is just how LinkedIn automation has worked since the beginning. You write a template, add some variables like {first_name} and {company_name}, send it to a hundred people, and hope a few of them respond. Templates work to some degree, but they’re becoming increasingly obvious to prospects who’ve now seen that exact structure dozens of times.
Your prospects can immediately tell when they’re getting a templated message. They’ve seen the same “Hey {first_name}, I noticed you work at {company_name}” opener fifty times this month, and they know you didn’t actually notice anything; you just ran a search, scraped profiles, and blasted the same pitch to everyone who matched your filters.
When they can tell it’s automated, they ignore it.
So you try to fix it with more placeholders, five template versions, rotating variations and twenty minutes per campaign, trying to make automation feel less automated.
But you’re still fundamentally working with templates where every person gets the same basic message structure with the same hooks, same value prop and same call to action.
Because there’s a ceiling to how personalized a template can actually be.
Until now, that ceiling was just the cost of doing outbound at scale. Volume meant sacrificing personalization and true personalization meant sacrificing volume by spending hours writing custom messages one by one.
What if you didn’t have to choose?
What if every single person in your campaign got a message that was actually written for them? Not “personalized” with their name plugged into slots but actually unique messages with different structure, different angle, different specifics pulled from their actual LinkedIn profile.
That’s what Expandi’s AI Hyper-personalization does. In this article, you’ll learn:
- How template fatigue is actively burning your brand (not just hurting reply rates)
- What makes AI-generated messages different from template variations
- How to set up AI Hyper-personalization in your campaigns
- Why this approach beats external tools like ChatGPT for outreach
- Real examples of prompts that generate high-converting messages
Let’s start with why templates are broken.
The Real Cost of Template Fatigue (And Why It’s Getting Worse)
The biggest problem isn’t that template-based outreach has become ineffective, but that it is now also actively burning your brand.
Picture a VP of Sales scrolling LinkedIn this week. On Monday, she gets hit with: “Hi {first_name}, noticed {company_name} is hiring SDRs. Most companies struggle with {pain_point}…” On Wednesday, another vendor messages her using the identical pattern. By Friday, when your perfectly crafted message lands in her inbox with the same {variable} + {variable} + {pain_point} format, she doesn’t even finish reading it. She files your entire product category under “automated spam I can safely ignore.”
This creates a compounding problem most teams miss completely. You don’t compete against your own past campaigns or even your direct competitors anymore. You compete against every single company running the same automation playbook, and LinkedIn automation tools have democratized outbound so completely that your prospects now receive dozens of these templated messages every week.
They pattern-match the structure before they read past your opening line.The data backs this up: personalized connection requests get a 45% acceptance rate on average, while generic templates get just 15%. So your message might be well-written, your offer might be relevant, but none of that matters if the structure screams “templated outreach” before they read past the first line.
Some teams try to solve this by getting creative with their templates. They test GIF openers, embed video thumbnails, lead with memes, flip to question-based hooks that sound more conversational.
This works for maybe two weeks. Then every other company copies the new format and prospects learn to ignore that pattern too.
All in all, you can’t out-template the template problem because the format itself is broken.
What AI Hyper-Personalization Actually Does
This is where Expandi’s AI hyper-personalization comes in and changes the entire template-based outreach model.
Instead of writing a template and plugging in variables, you write a short set of instructions that tells the AI what kind of message to create. Then Expandi combines that prompt with everything it knows about the prospect including their job title, company details, work experience, what they wrote in their About section, recent posts, whether they’ve visited your profile or engaged with your content.
AI generates a completely unique message for that specific person. This is not a template with different names swapped in but an actual original message written for them.
Here’s what that looks like in practice.
You write a prompt:
“Write a connection request mentioning something specific from their profile or recent activity. Keep it casual and conversational, not salesy. Under 200 characters.”
Expandi pulls up Prospect 1’s LinkedIn profile and sees they recently posted about moving upmarket, their company just announced a Series B raise, and they worked at Salesforce before their current role.
AI generates:
“Saw your post about moving upmarket – dealt with similar challenges at my last company. Would be curious to hear how you’re approaching it at [Company].”
Then Expandi reads Prospect 2’s profile, which shows completely different context. They just changed jobs three weeks ago and posted about joining a fast-growing startup in a different industry.
AI writes something totally different:
“Congrats on the new role at [Company] – saw you just joined from [Previous Company]. We work with a lot of teams in that growth stage. Open to connecting?”
It’s the same campaign, same prompt, but two completely different messages because the AI actually reads what makes each prospect unique and writes accordingly.
That’s what real AI-powered personalization looks like at scale. You still automate the outreach process, but you stop sending the same message structure to everyone.
How to Set Up AI Hyper-Personalization in Expandi (Complete Walkthrough)
This takes about 15 minutes the first time. After that, you can set up new campaigns in under 5 minutes.
Step 1: Create a New Builder Campaign
Log into Expandi. Go to your dashboard.
Click “Campaigns” in the left sidebar, then “Create Campaign.”
You’ll see three campaign types:
- Connector Campaign (basic connection requests only)
- Builder Campaign (full sequences with multiple steps)
- Inbound Campaign (for leads who engage with your content)
Select “Builder Campaign.” AI Hyper-personalization only works in Builder and Inbound campaigns, not Connector campaigns.
Give your campaign a name. Something descriptive like “Q1 SaaS Founders Outreach” so you can find it later.
Click “Create.”
Step 2: Build Your Campaign Sequence
You’re now in the campaign builder. This is where you add all the steps in your outreach sequence.
Click “Add Action” to start building.
You’ll see options like:
- View Profile
- Follow Profile
- Visit Company Page
- Like Post
- Send Connection Request
- Send Message
- Send InMail
For this example, let’s build a simple sequence:
- View Profile (optional warmup)
- Send Connection Request (with AI Hyper-personalization)
- Wait 2 days
- Send Follow-up Message (with AI Hyper-personalization)
Add “View Profile” first if you want to warm up leads before connecting. This is optional but can improve acceptance rates.
Add “Send Connection Request” next.
Add a “Wait” step (set it to 2 days).
Add “Send Message” for your follow-up.
Step 3: Configure Your Connection Request Step
Click on the “Send Connection Request” action in your sequence.
The Properties panel appears on the right side of the screen.
You’ll see two sections:
- Message mode toggle (Classic vs. AI Hyper-personalization)
- Message field
Important: By default, it’s set to “Classic” mode. This is where you’d normally write a template.
Click the toggle to switch to “AI Hyper-personalization” mode.
The interface changes completely. Instead of a regular message box, you now see:
- “Prompt message body” field (275 character max)
- “Test sample message” button below it
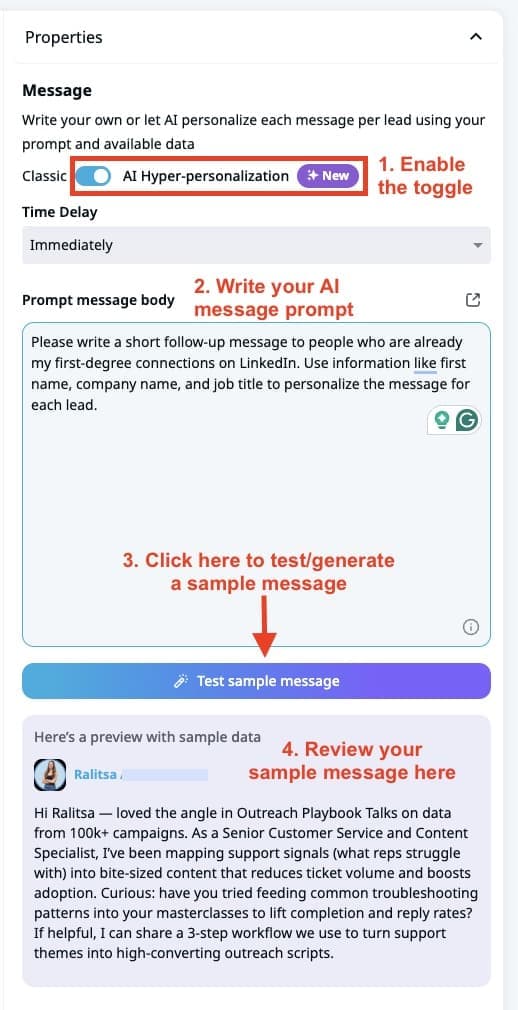
Step 4: Write Your AI Prompt
Click inside the “Prompt message body” field to start writing.
As soon as you click, two dropdown menus appear above the field:
- Placeholders (left dropdown)
- Lead input data (right dropdown)
These let you tell AI what data to pull for each lead.
Writing your prompt:
Think of this as instructions for AI where you’re basically telling AI what kind of message to write. Example prompt for connection requests: “Reference something specific from their profile or recent activity. Keep it casual and curious, not salesy.”
Now add data points AI should use.
Step 5: Add Placeholders (Optional)
Click the “Placeholders” dropdown.
You’ll see standard options like:
- {first_name}
- {last_name}
- {company_name}
- {job_title}
- {location}
- Any custom placeholders you’ve created
Select what you want to include. Each placeholder you select gets inserted into your prompt at your cursor position.
Example prompt with placeholders:
“Reference something from their profile or recent activity at {company_name}. Mention their role as {job_title} if relevant. Casual tone.”
Important note about placeholders: If you use custom placeholders, make sure the data exists on your Placeholders page in Expandi. Go to Settings → Placeholders to check. If a lead doesn’t have that placeholder value, AI won’t be able to use it.
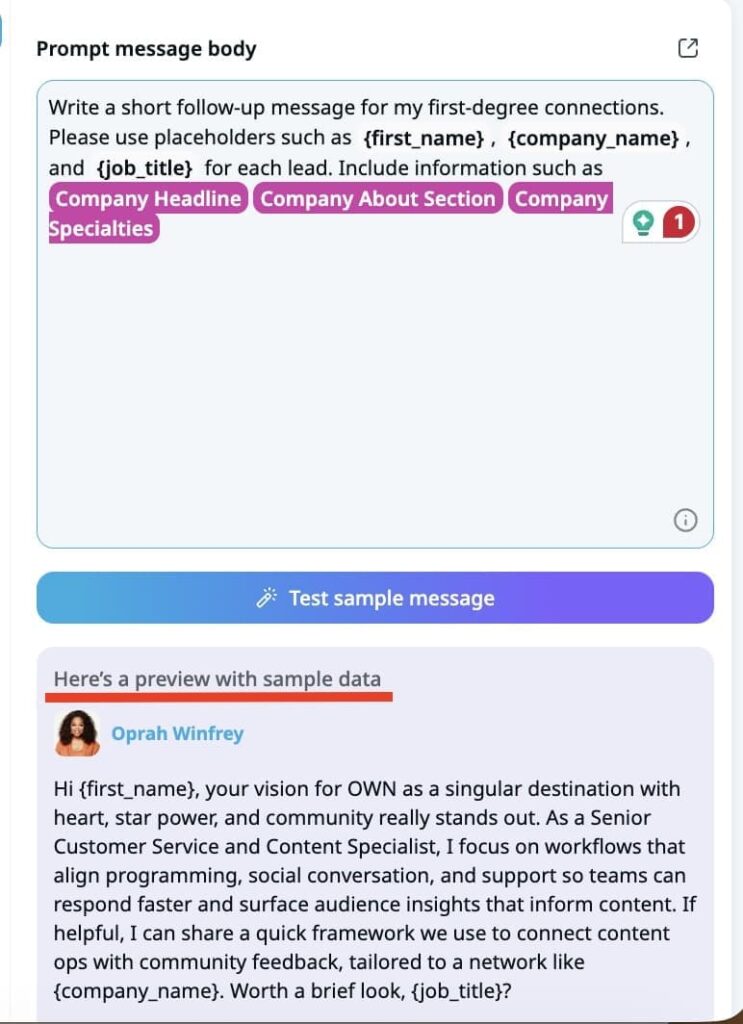
Step 6: Add Lead Input Data (This Is Where It Gets Powerful)
Click the “Lead input data” dropdown.
You’ll see options for richer profile data:
- Company about section
- Company specialties
- Lead headline
- Lead about section
- Type of signal (if using signal-based triggers)
These pull information directly from the lead’s LinkedIn profile when AI generates the message.
Click “Company about section” to add it.
Your prompt might now look like:
“Reference their role at {company_name} and mention something from {company_about_section}. Keep it casual.”
When AI processes this, it reads the entire “About” section from that company’s LinkedIn page and pulls something specific to reference.
Example of what gets pulled:
Company About section says: “We help healthcare providers automate patient scheduling and reduce no-shows by 40%.”
AI might generate: “Saw you’re at HealthTech Solutions – automating patient scheduling is tough. Curious how you’re tackling the no-show problem.”
It’s not just plugging in the about section verbatim. It’s reading it and referencing it naturally.
Step 7: Expand the Prompt Window (Optional But Helpful)
If you’re writing a longer prompt or want more space, click the maximize icon in the top right corner of the prompt field.
This opens a larger window where you can write and edit more comfortably.
Click “Done” when finished to go back to the normal view.
Step 8: Test Your Prompt (Critical Step)
Before launching to real leads, you need to see what AI actually generates.
Click “Test sample message” button below your prompt.
Expandi pulls one of 10 sample LinkedIn profiles from its database and generates a message using your prompt.
You’ll see:
- Sample profile photo
- Sample name (clickable – opens their LinkedIn profile if you want to verify the data AI used)
- The generated message with all placeholders filled in
Read the message. Does it sound natural? Is the tone right? Too formal? Too casual? Too long?
Click “Test sample message” again. You’ll get a completely different output using a different sample profile.
Generate 10-15 samples. Look for patterns:
- Are messages too generic? (AI isn’t pulling specific enough details, adjust your prompt to be more specific)
- Are messages too similar? (You might need more variety in your prompt instructions)
- Are messages awkwardly phrased? (Simplify your prompt; shorter instructions work better)
- Do messages feel salesy? (Add “don’t pitch” or “sound genuinely curious” to your prompt)
Step 9: Adjust Your Prompt Based on Test Results
If you don’t like what you’re seeing, change the prompt.
Examples of adjustments:
If messages are too generic: Before: “Reference their profile.” After: “Reference something specific from their recent posts or their company’s about section. Be detailed.”
If messages are too formal: Before: “Mention their role and company.” After: “Keep it casual. Mention what they do but don’t sound corporate.”
If messages are too long: Before: No length guidance. After: “Keep it under 150 characters. Short and punchy.”
Make changes, click “Test sample message” again, repeat until you’re happy.
Step 10: Save Your Connection Request Step
If you’re happy with your test samples, click on “Save” at the bottom of the Properties panel.
Your AI prompt is now saved for this step.
Step 11: Set Up Your Follow-Up Message (Same Process)
Click on the “Send Message” action in your sequence (the follow-up after connection acceptance).
Properties panel opens on the right.
Toggle from “Classic” to “AI Hyper-personalization.”
Write a new prompt for follow-ups. This should be different from your connection request prompt.
Example follow-up prompt: “They accepted my connection. Thank them briefly. Share a quick insight related to their work at {company_name}. Ask a thoughtful question. Conversational tone.”
Pro tip for follow-ups: If you’re using signal-based triggers (like profile visits or post engagement), add “Type of signal” from the Lead input data dropdown.
This lets AI reference the signal naturally.
Example output if they visited your profile: “Thanks for connecting. Saw we crossed paths on LinkedIn earlier – figured I’d reach out directly. Quick question about how you’re handling [relevant topic]…”
This sounds way better than a generic follow-up.
Test this prompt the same way. Generate 10+ samples and adjust until it feels right and save it once you’re happy.
Step 12: Configure InMails (If Using Them)
If you’re using Open InMail in your sequence, the setup is slightly different.
Click on the “Open InMail” step.
Toggle to AI Hyper-personalization mode.
Important: AI only generates the InMail body. You have to write the subject line manually.
There’s a separate field at the top for “Subject.” Fill that in yourself.
Then write your prompt for the InMail body in the “Prompt message body” field.
Example InMail prompt:
“Mention their background at {previous_company} and how it connects to what they’re doing now at {current_company}. Reference a specific challenge in {industry}. Offer a concrete example of how we’ve helped similar companies. Professional but not stiff.”
Test this again and save it once you’re happy.
Step 14: Add Your Leads to the Campaign
Now your sequence is built with AI Hyper-personalization enabled for each messaging step.
It’s now time to add leads.
Click “Add Leads” at the top of the campaign builder.
You have several options:
Option 1: LinkedIn Search
- Click “Search LinkedIn”
- Run your search filters (job title, location, company size, etc.)
- Select leads from results
- Add to campaign
Option 2: Upload CSV
- Click “Upload CSV”
- Map your CSV columns to Expandi fields
- Make sure you have data for any custom placeholders you’re using
- Upload
Option 3: Use Signals
- If you’ve set up signal tracking (profile visitors, post engagers, company page visitors), click “Add from Signals”
- Select which signal source
- Add those leads
Important: If you’re using custom placeholders or specific lead input data fields in your prompts, make sure that data exists for your leads. Otherwise AI will generate more generic messages.
Step 15: Review Campaign Settings
Before activating, check your campaign settings.
Click “Settings” at the top of the campaign builder.
Set your daily limits:
- Connection requests per day (recommended: 20-50 depending on account age)
- Messages per day (recommended: 30-70)
Set your working hours:
- When should Expandi run actions? (recommended: Monday-Friday, 8 AM – 6 PM in lead’s timezone)
Set timezone:
- Default or per-lead timezone
Step 16: Activate Your Campaign
If everything looks good, click “Activate” in the top right corner.
Campaign status changes from “Draft” to “Active.”
Expandi starts processing leads based on your daily limits and schedule.
As each lead gets processed:
- Expandi pulls their LinkedIn profile data
- AI reads their profile information
- AI generates a unique message using your prompt + their data
- Message gets sent
Every single lead gets a different message written specifically for them.
Step 17: Monitor Performance (First 48 Hours)
Don’t just activate and forget.
Check back after the first 50-100 actions.
Go to “Campaign Stats” to see:
- Connection acceptance rate
- Message reply rate
- Any errors or issues
If acceptance rates are lower than expected (under 25%), something might be off:
- Your targeting could be too broad
- Your prompt might be generating messages that are too salesy
- Your LinkedIn profile might not look trustworthy
If rates are good (30%+ acceptance), let it run.
Step 18: Adjust Prompts Based on Real Performance
After a week, review actual conversations.
Go to “Inbox” in Expandi and read replies.
Look for patterns:
- Are people responding positively?
- Are they confused about why you’re reaching out?
- Are they asking questions that suggest your message wasn’t clear?
If you’re getting good engagement, don’t change anything.
If engagement is weak, revisit your prompts. Maybe they’re too vague or too direct. Test new variations.
Step 19: Scale Across Multiple Campaigns
Once you’ve nailed a prompt that works, copy it to other campaigns.
Create a new Builder campaign for a different audience (different industry, different role, different geography).
Use the same prompt structure, but AI will personalize based on each new audience’s profile data.
Example:
Same prompt:
“Reference their role at {company_name} and something from their recent activity. Casual tone.”
For SaaS founders:
AI might generate: “Saw you’re building at StartupX – noticed your post about scaling product-led growth. Curious how you’re thinking about that.”
For healthcare executives:
AI might generate: “Leading ops at MedTech Corp – saw you’re focused on patient experience. Curious how you’re approaching that in this regulatory environment.”
These are the same instructions, but with completely different outputs based on who’s receiving it.
Our Favorite Prompts (And What They Actually Generate)
These are prompts that we’ve seen consistently perform well across different industries and audiences. You can use them as-is or adapt them to your style.
Prompt 1: The Curious Connector
Prompt:
“Reference something specific from their recent activity or profile. Sound genuinely curious, not salesy. Keep it conversational.”
What it pulls:
- Recent posts they’ve made
- Profile headline
- Company about section
- Previous work experience
Example outputs:
For a VP of Sales who posted about quota attainment:
“Saw your post about hitting 127% of quota last quarter – that’s solid. Curious what changed in your process to get there.”
For a marketing director at a Series B startup:
“Noticed you joined DataFlow right after their Series B. Moving into a scaling company at that stage is interesting timing. How’s the transition been?”
Why this works: It doesn’t pitch anything. Just shows you actually looked at their profile and asked a real question.
Prompt 2: The Industry Insider
Prompt:
“Mention something relevant about {company_name} or their industry. Reference {company_about_section} if useful. Position yourself as someone who understands their space. Casual tone.”
What it pulls:
- Company name
- Company about section
- Company specialties
- Job title
Example outputs:
For a CFO at a logistics company:
“SupplyChain Solutions handling last-mile delivery optimization – that’s a nightmare to get right. Most companies underestimate how complex the routing becomes at scale. How are you thinking about that?”
For an ops leader at a healthcare SaaS company:
“Healthcare compliance plus SaaS velocity – that’s a brutal combo. Most teams I talk to struggle with keeping up feature releases while staying HIPAA compliant. How’s MedTech handling that?”
Why this works: You sound like you actually know their industry and aren’t just name-dropping buzzwords, but showing real familiarity with their challenges.
Prompt 3: The Signal Acknowledger (For Follow-Ups After Profile Visits)
Prompt:
“They visited my profile. Acknowledge we crossed paths without being weird about it. Offer something helpful related to their role at {company_name}. Keep it light.”
What it pulls:
- Type of signal (profile visit)
- Company name
- Job title
- Lead headline
Example outputs:
For a sales director who visited your profile:
“Saw we crossed paths on LinkedIn earlier this week. Figured I’d reach out – been working with a few sales teams lately on their outbound motion. Happy to share what’s working if useful.”
For a CMO who checked you out:
“Noticed you stopped by my profile. I’m guessing you’re evaluating tools for demand gen – most CMOs I talk to are right now. Want to compare notes on what’s actually moving the needle?”
Why this works: Acknowledges the signal without making it awkward and offers value instead of immediately pitching.
Prompt 4: The Post Engager (For Follow-Ups After They Liked/Commented)
Prompt:
“They engaged with my post about [topic]. Reference that naturally. Tie it to something relevant about their work at {company_name}. Ask a thoughtful follow-up question.”
What it pulls:
- Type of signal (post engagement)
- Company name
- Job title
- Company specialties
Example outputs:
For someone who liked a post about pipeline generation:
“Saw you liked the post about pipeline gen strategies. RevOps at CloudScale probably means you’re dealing with that constantly. What’s your take on signal-based outreach vs. traditional cold outreach?”
For someone who commented on a post about AI in sales:
“Appreciate the comment on the AI sales tools post. Your point about implementation being harder than adoption is spot on. How’s HealthTech thinking about rolling out AI for your reps?”
Why this works: It’s a natural continuation of a conversation they already started by engaging and doesn’t feel forced.
Prompt 5: The Warm Introduction (For 2nd-Degree Connections)
Prompt:
“Mention we have mutual connections. Reference something specific from their profile or {company_about_section}. Sound like someone they’d want to know, not someone selling them something.”
What it pulls:
- Mutual connections (if visible)
- Company about section
- Job title
- Lead about section
Example outputs:
For someone connected to your existing client:
“Saw we both know Sarah Chen – small world. Noticed you’re tackling sales automation at TechFlow. Most teams I talk to in this space are figuring out the AI piece right now. How’s that going for you?”
For someone with multiple mutual connections:
“Looks like we run in similar circles – mutual connections with Mike and Jessica. Saw you’re leading growth at StartupCo. Curious how you’re thinking about outbound in this market.”
Why this works: Mutual connections build immediate trust, and the message feels less cold because there’s shared context.
Prompt 6: The Company Transition Note (For People Who Recently Changed Jobs)
Prompt:
“They recently changed companies. Mention both {previous_company} and {current_company}. Sound curious about the move, not nosy. Keep it brief.”
What it pulls:
- Previous company
- Current company
- Job title
- Start date at current company
Example outputs:
For someone who left a big enterprise for a startup:
“Saw you made the jump from Oracle to StartupX. Big company to early-stage is a big shift. What convinced you to make the move?”
For someone who switched industries:
“Healthcare to fintech – interesting pivot. Most people I talk to don’t jump industries at the director level. What made FinTech Labs the right move?”
Why this works: Career transitions are natural conversation starters because people like talking about why they made a change.
How to Use These Prompts
Don’t just copy-paste these prompts; adapt them to your voice and your audience.
Test each prompt with the “Test sample message” button 10+ times before launching.
Watch for:
- Does the tone match how you actually talk?
- Are the questions too vague or too specific?
- Do messages feel forced or natural?
Adjust wording until it feels right. Then launch and monitor performance.
If a prompt consistently gets good acceptance or reply rates, stick with it. If not, try a different one from this list or write your own.
What Makes Expandi’s Approach Different
You might be thinking: “I can just use ChatGPT to write my messages.”
Sure, you can, and lots of people already do that. But when you try to scale personalized outreach using external AI tools, you run into problems that kill your workflow.
You lose context in translation
When you manually feed data to ChatGPT, you’re copying fields one by one – job title here, company description there, maybe a recent post if you dig for it. But you lose context in that process. You completely miss nuance from their profile like connections between their previous role and current position, patterns in their recent activity, and most importantly, intent signals if they exist.
Expandi’s AI has direct access to full LinkedIn profile data, which means it reads everything at once and makes connections you’d miss when you’re manually copying fields into a prompt.
Character limits break your workflow
LinkedIn has strict limits on message length. Connection requests cap at 300 characters, and some accounts get restricted to 200. Messages have limits too.
If you generate messages in ChatGPT, you’re constantly hitting “message too long” errors. Then you’re editing them down, which ruins the flow, or you start adding “keep it under 200 characters” to every ChatGPT prompt, hoping it actually listens which half the time it doesn’t.
Expandi handles this automatically, which means your connection requests always stay under 200 characters because the system enforces it. You don’t get stuck with manual editing or pasting messages that are too long and having to start over.
You can’t leverage behavioral signals
If someone visited your profile before you reached out, that changes the message you should send. When you’re generating messages externally, you don’t have access to that signal data. Expandi campaigns can include signal-based triggers like profile visits, company page visits, and post engagement, which means when AI generates a message for someone who came in via a signal, it knows that context and references it naturally.
“Saw you stopped by my profile earlier – figured I’d reach out directly.”
“Noticed you liked the post about [topic] – thought you might find this relevant.”
You can’t do that when you’re generating messages outside the platform.
It creates a workflow nightmare
Even if you set up a process with Clay or Make or Zapier to automate ChatGPT generation and feed it back into your outreach tool, you’re maintaining a multi-step integration that breaks constantly, needs monitoring, adds latency, and costs you money across multiple subscriptions.
Expandi does all of this natively within one tool, which means you don’t need to maintain complex integrations or pay for multiple platforms just to generate personalized messages.
The AI doesn’t understand LinkedIn’s rules
ChatGPT doesn’t know that some LinkedIn accounts can’t send personalized connection requests over 200 characters, or that InMails need separate subject lines, or that follow-up messages should reference the connection acceptance.
Expandi’s AI is built specifically for LinkedIn outreach, which means it understands the context of each message type and adjusts accordingly without you having to explain LinkedIn’s quirks in every prompt.
You can’t test at scale
With ChatGPT, you generate one message, check it, maybe tweak the prompt, and generate another. You’re testing one message at a time, which makes it hard to spot patterns or inconsistencies.
With Expandi, you click “Test sample message” and instantly see 10 different outputs using real LinkedIn profiles. You can spot patterns fast, adjust your prompt once, and test again. You iterate way faster when you’re testing against actual profile data instead of hypothetical examples.
Dos and Don’ts for AI Hyper-Personalization
Do: Keep Prompts Simple and Direct
Don’t overcomplicate your instructions because AI works better with clear, straightforward prompts.
Good:
“Reference their recent post or profile. Casual tone. Under 200 characters.”
Bad:
“Write an engaging, thoughtful connection request that references their professional background while also mentioning industry trends and establishing credibility without being too salesy but still showing value and expertise.”
The second prompt confuses AI, which means you’ll get inconsistent, overly complex messages that don’t sound natural.
Do: Use Lead Input Data Strategically
Don’t dump every available data field into your prompt, just pick one or two that actually matter for your specific use case.
If you’re targeting people who recently changed jobs, use “current company” and “previous company” in your prompt. If you’re targeting specific industries, use “company specialties.” If you’re following up after a signal, use “type of signal” to reference that context.
More data doesn’t always mean better messages, so you need to be strategic about what you include.
Do: Test Before Launching
Always generate 10+ sample messages before you activate a campaign so you can spot issues early.
You should look for messages that sound too generic, which means AI didn’t pull specific details from the profile. You should also check for messages that run too long or read awkwardly, and watch for tone mismatches where the message sounds too formal when you wanted casual, or vice versa.
Fix issues in the prompt, test again, and repeat until you’re seeing consistent quality across all sample outputs.
Don’t: Set It and Forget It
You need to check campaign performance weekly at minimum to catch any drops in engagement.
If your acceptance rate drops, your prompt might need adjusting because markets change and messaging that worked last month might feel stale now. Best practice is to refresh your prompts every 4-6 weeks, even if performance looks good, because this keeps your outreach from getting predictable to prospects who see similar patterns across multiple vendors.
Don’t: Use This for Every Campaign Type
AI hyper-personalization works best for cold outreach where personalization actually matters and helps you stand out.
If you’re messaging existing customers or warm leads who already know you, a simple template works fine. You don’t need AI generating unique messages for people who are already engaged with your company. Save the AI firepower for cold campaigns where breaking through noise is critical to getting a response.
Do: Match Your Prompt to Your ICP
Different audiences need different messaging approaches, which means you should adjust your prompts based on who you’re targeting.
C-level executives respond well to brief, high-level, strategic communication because they don’t have time for long messages. Individual contributors are more comfortable with detailed, tactical messages that are specific to their day-to-day work. Technical buyers prefer product-specific or technical details they actually care about, not high-level business value propositions.
You need to adjust your prompts based on which audience you’re reaching out to.
Don’t: Pitch in Connection Requests
The biggest mistake people make with AI prompts is writing instructions that lead to pitches instead of conversations.
Bad prompt:
“Mention our solution and how it helps companies like {company_name}.”
This generates salesy connection requests that get ignored because prospects can smell the pitch before they finish reading the first sentence.
Good prompt:
“Reference something from their profile. Sound curious, not salesy.”
You should save the pitch for follow-ups after they’ve accepted your connection request and you’ve built some rapport.
FAQs About AI Hyper-Personalization
It depends entirely on your prompt. Generic instructions produce generic-sounding messages but specific prompts that match your actual voice produce good-quality messages that sound like you.
Test your samples before you launch. If they sound robotic, adjust your prompt to be more conversational. You can add phrases like “keep it casual” or “sound like a real person, not a sales bot.”
No. Messages generate and send automatically as the campaign runs, which is why testing matters so much.
Generate 20+ samples before launch so you know what quality to expect. If you need manual approval for every message, AI hyper-personalization isn’t the right fit for your workflow.
AI defaults to more general messaging based on whatever data it can access.
If someone’s LinkedIn profile looks sparse – no About section, no recent activity, minimal company info – the generated message will be less specific. That’s why targeting matters. You should go after leads with complete profiles and recent activity for best results.
Yes. AI generates the InMail body for you.
But you still write the subject line manually. AI doesn’t generate subjects for InMails, just the message body.
Absolutely. That’s where it shines.
If someone visits your profile, you can include “type of signal” in your prompt and AI will reference that naturally in the message.
Example output: “Saw we crossed paths on LinkedIn earlier this week. Figured I’d reach out directly…”
It sounds way better than a template that says “I noticed you visited my profile,” which feels creepy.
No. AI hyper-personalization comes included in your Expandi subscription.
You don’t pay per message or per AI call. It’s part of the platform.
AI fixes messaging quality, but it can’t fix bad targeting.
If you’re reaching out to people way outside your ICP, even perfectly personalized messages won’t help you get better results.
Check these things:
• Are you targeting the right list?
• Does your LinkedIn profile look optimized and trustworthy?
• Are you sending too many requests too fast?
AI improves message quality but it doesn’t fix foundational campaign issues.
Yes. Toggle back to “Classic” mode anytime.
Your template and AI prompt get saved separately. Switching modes restores whatever you had in each, so you’re not locked into AI if it’s not working for your use case.
Expandi uses 10 sample LinkedIn profiles for testing.
Each time you click “Test sample message,” it randomly pulls one of these profiles and generates a message. This gives you variety in testing without needing to add real leads to your campaign first.
Yes, and you should if it’s working.
The same prompt applied to different audiences generates different messages because AI personalizes based on each lead’s actual profile data. A prompt that works for SaaS founders will generate completely different messages when you use it for healthcare executives, even though the instructions stay identical.
275 characters for the prompt itself.
So keep it concise. Shorter prompts usually produce better results anyway.
Only if their recent posts show up on their profile and you’ve included instructions in your prompt to reference recent activity.
AI doesn’t automatically scan every post someone has ever made. It looks at what’s currently visible on their profile page.
Not directly in the interface, but you can verify by checking the lead’s LinkedIn profile yourself.
If a message references something specific, you can look at their profile to see where AI pulled that information from.
AI generates messages in real-time when Expandi processes each lead in your campaign.
If someone updates their profile between when you added them to the campaign and when the message actually sends, AI will use the updated data.
You can, but it’s overkill.
AI hyper-personalization gets built for cold outreach where you need to break through noise with personalization. For warm leads who already know you, a simple personalized template works fine. Save the AI firepower for cold campaigns.
Stop Letting Templates Kill Your Pipeline
If you’re still running template-based campaigns, you’re fighting an uphill battle you don’t need to fight.
Your prospects are getting dozens of templated messages every week, which means they’ve learned to pattern-match and ignore them before they finish reading the first line. Your connection acceptance rates are dropping because prospects recognize the {first_name} + {pain_point} structure instantly. Your reply rates are tanking because even when people accept, they know you’re running automation. You’re burning through leads faster than you’re booking calls, and the problem compounds as more teams copy the same playbook.
AI hyper-personalization changes that dynamic completely.
When you use AI to generate messages, every person gets something unique that’s actually written for them based on their specific profile, recent activity, and context. You’re not plugging variables into a template anymore, you’re automating the research and writing process while keeping the output genuinely personalized.
This means you maintain quality while you scale volume. You cut out the multi-tool workflow chaos where you’re managing ChatGPT, Clay, and your outreach platform separately. You stop sounding like everyone else in their inbox because your messages don’t follow the same predictable structure they’ve seen 30 times this month.
Expandi’s AI hyper-personalization is live right now, which means if you’re already running campaigns, you can turn this on today and see the difference immediately.
Ready to stop competing against every other template in your prospect’s inbox? Try Expandi free for 7 days.


You’ve made it all the way down here, take the final step