Webhook VS API: Unlocking The Power Of Expandi Webhooks
At its core, both webhooks and APIs (Application Programming Interface) help different software systems interact and communicate with each other.
Whether you’re making a website, an app, or simply trying to integrate two of your marketing tools, no doubt, these names might have come up.
While they’re clearly difference, both of them are involved in digital communication, marketing, and play a vital role in how your tools interact with each other.
In a nutshell, here’s the main difference in between webhook vs API:
- API is something you call to do a certain action.
- A webhook is something that calls to you to let you know something.
Without getting too complicated, both webhooks and API are important in automation, app functionality, and sharing data or other information between your tools.
So, if you’re wondering what the difference is practically speaking, and when and how to use each, here’s what we’ll cover:
- What’s the difference between webhooks and APIs?
- Webhooks vs APIs: When to use each and overview.
- Getting started with Expandi webhook triggers (step-by-step and use cases)
- Explaining Expandi reversed webhooks API
Webhooks VS API (Application Programming Interface): What’s The Difference Between The Two?
As mentioned above, webhooks and API operate a bit differently.
Here’s how:
- A webhook is a user-defined HTTP callback that’s triggered automatically when a defined event or action happens. An HTTP callback is like an automatic notification from one website to another when something specific happens. For example, if you make a payment on a website, an HTTP callback can notify another service about this payment. It can update your account or send you a receipt.
- An API uses a more direct approach and allows different software systems to communicate with each other. In it, applications make requests to each other to receive a response.
So, in short, a webhook pushes data to other applications.
A webhook is like a restaurant server who automatically brings you a dish whenever it’s ready, without you having to ask for it.
For example, you order a special dessert that the kitchen will prepare whenever they have the ingredients. Then, the server will come to your table and deliver the dessert as soon as it’s done.
While an API pulls data upon request.
In the same example, an API is like a menu in a restaurant. It provides a list of dishes you can order, along with a description of each dish. When you make an order (make an API call), the kitchen (the system you’re interacting with), prepares and serves it to you.
Now that you know how this works, let’s take a look at some real-life examples and use cases instead.
What is a webhook and how does it work?
Here’s a real-life scenario that makes Webhooks worth it.
Let’s say you have a lead generation form on your website where potential customers can fill in their contact information. And you want to receive a notification in your company’s Slack channel every time someone submits this form.
So, whenever a user fills in your lead generation form on your website, a webhook automatically sends the form data to your Slack channel #sales-leads. The sales team then receives a real-time notification with the details of the new lead, allowing them to take action after.
What is an API and how does it work?
Now, here’s how APIs work.
Imagine you have a sales CRM system that needs to retrieve customer information for an external database.
Instead of storing all the customer data locally, your CRM uses an API to fetch the data.
Then, when a salesperson needs information on a customer, the CRM makes an API call to the external database, requesting the customer’s details.
This way, the CRM provides up-to-date customer information without having to store and manage all the data itself.
For a detailed overview, see our guide on how to integrate your CRM and LinkedIn.
Webhooks VS API: When To Use Each? Advantages Of Each
Both webhooks and APIs are crucial in communication, app cross-functionality, and sharing data between your tech stack.
Choosing between them depends on whether you need a real-time notification (webhooks) or on-demand data requests (APIs).
So, you’d use webhooks for instant updates and APIs for retrieving or sending data as needed.
When to use webhooks
- Real-time notifications: Use webhooks when you need real-time notifications for specific events. Such as form submissions, payment processing, or social media mentions.
- Efficiency: Webhooks are more efficient for instant updates because they only send data when an event occurs, reducing the need for constant polling.
- Automation: You can use webhooks to automate workflows by triggering specific actions automatically when certain events happen. Such as sending a welcome email whenever a new user signs up.
When to use APIs:
- Data requests: Use APIs when you need to request specific data or perform actions on demand. Such as retrieving customer information, booking travel arrangements, or updating records.
- Flexibility: APIs offer more flexibility because they allow you to make various requests and get different types of data based on your needs.
- Integration: Use APIs to integrate different software systems enabling them to communicate and share data seamlessly. Such as connecting your CRM with an email marketing platform for targeted outreach smart campaigns.
Now that you know how webhooks and APIs work, below, we’re going to cover how you can use them in the context of sales automation.
By the end of the guide, you’ll know how to implement webhook automation in your outreach campaigns, with live examples, and why all this matters.
Getting Started With Expandi Webhooks Triggers
Expandi is a LinkedIn and email outreach automation tool for sales teams and agencies.
So, if you’re looking to integrate outreach and booking meetings on autopilot with the rest of your tech stack, this section is for you.
For the sections we’re about to cover, we’ll be using Expandi and Zapier (uses publicly accessible APIs to automate tasks between two or more apps).
Don’t worry though, both of these tools offer a free trial (7 days for Expandi, 14 days for Zapier).
So, you can follow along without paying a cent. And then, you can launch lead generation campaigns with Expandi. As long as you land one client, the trial will more than pay for itself.
Below, we’re also going to cover a few different use cases for the magic of webhooks in your campaign.
So, you can claim the free trials and follow along.
Or see what the end result looks like below, and then claim the trials to level up your outreach.
How do Expandi webhook triggers work?
Let’s say you are using Expandi to automate your LinkedIn outreach campaigns.
You want to be notified in real time whenever someone responds to one of your messages.
When a LinkedIn user replies to your message, the webhook will automatically send the reply data to your configured endpoint.
The endpoint processes the data and sends you a real-time notification (for example on Slack).
Then, the relevant person from your sales team can follow up accordingly.
If you’re working with multiple SDRs and appointment setters, this can be especially helpful, as you wouldn’t have to notify your team members manually. Everyone is on the same page and you don’t have to open LinkedIn to see how the conversation is going.
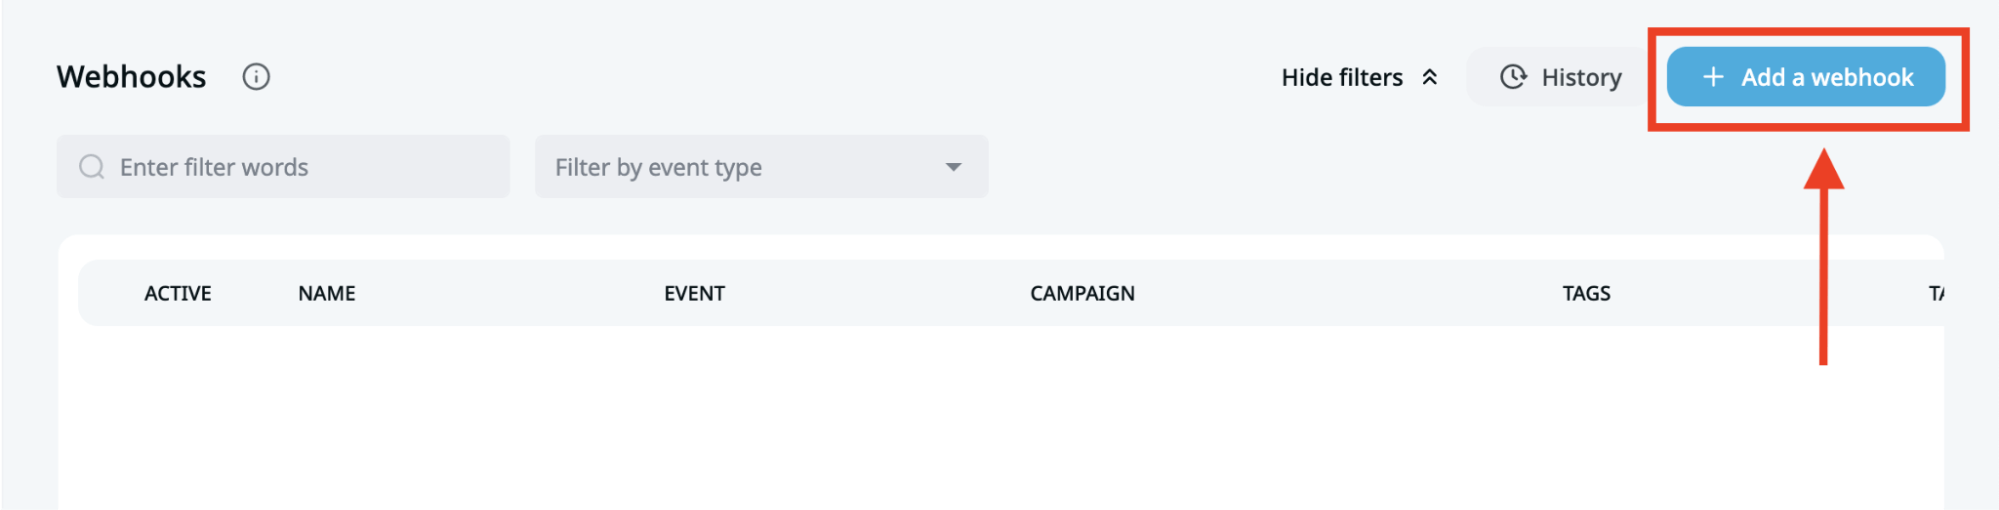
Here’s how to set this up:
- In Expandi, click on LinkedIn Settings and then Webhooks
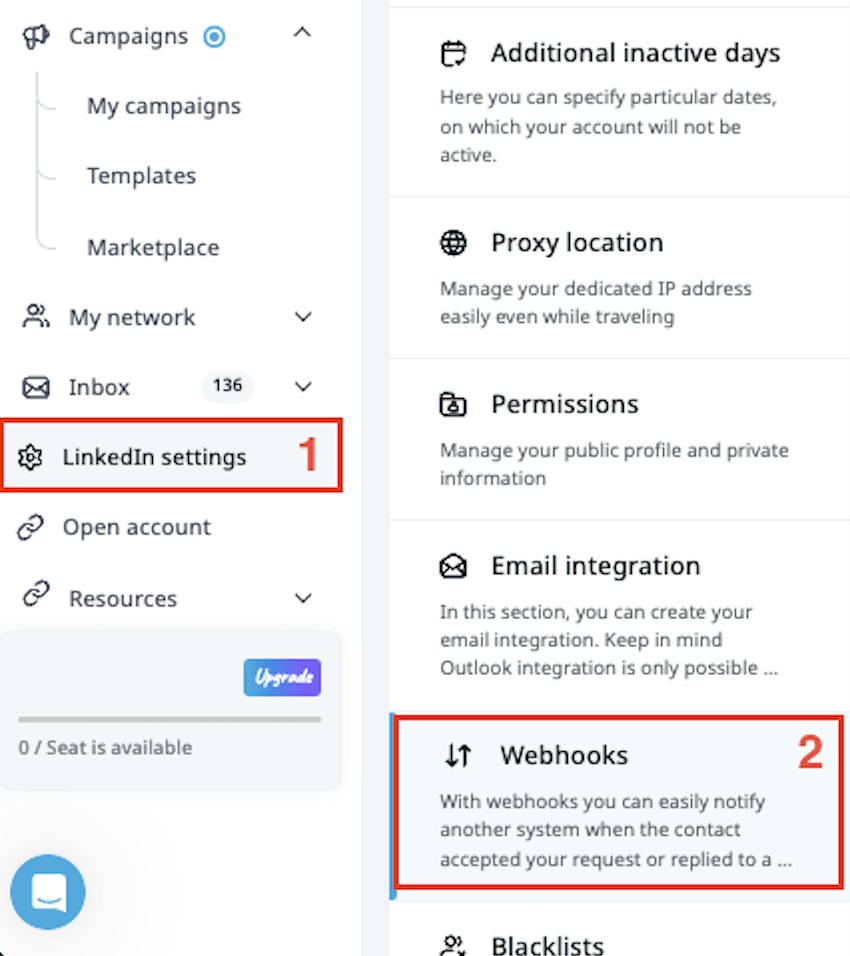
- Select Add a webhook.
- Click on The event, upon which the webhook should be triggered field.
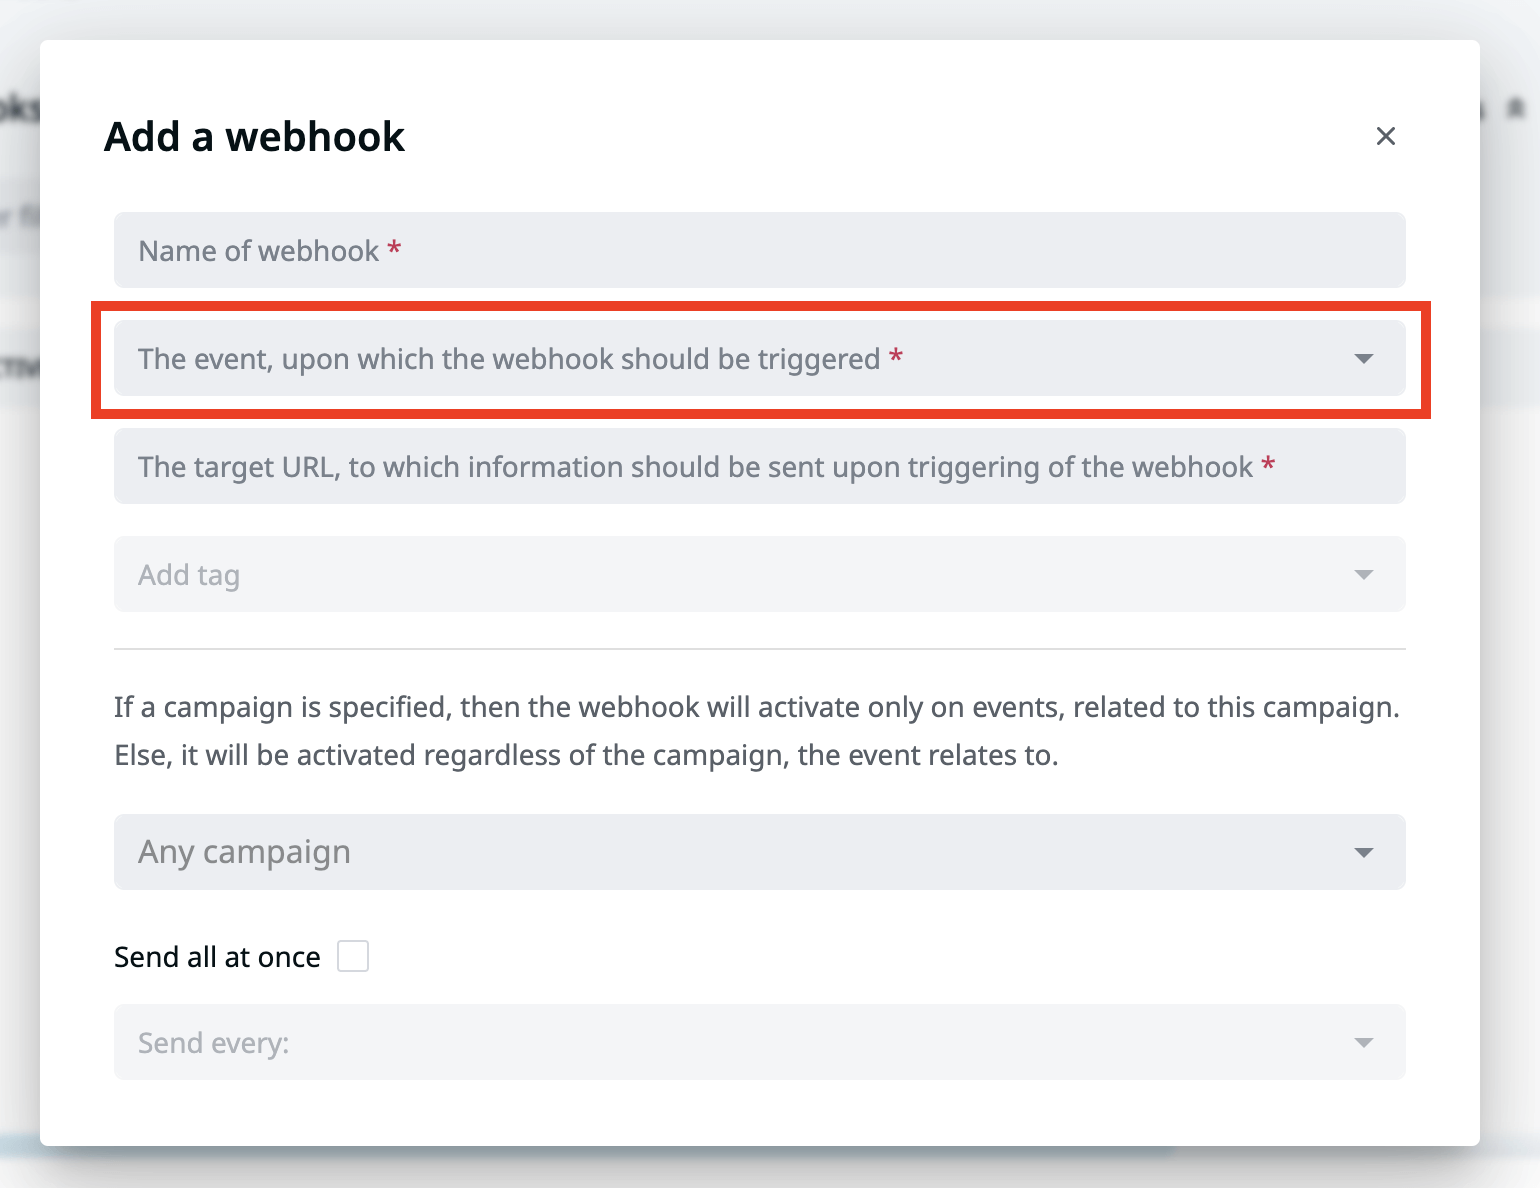
- Now the possible options for webhooks events will appear. You can scroll down to see all of them.
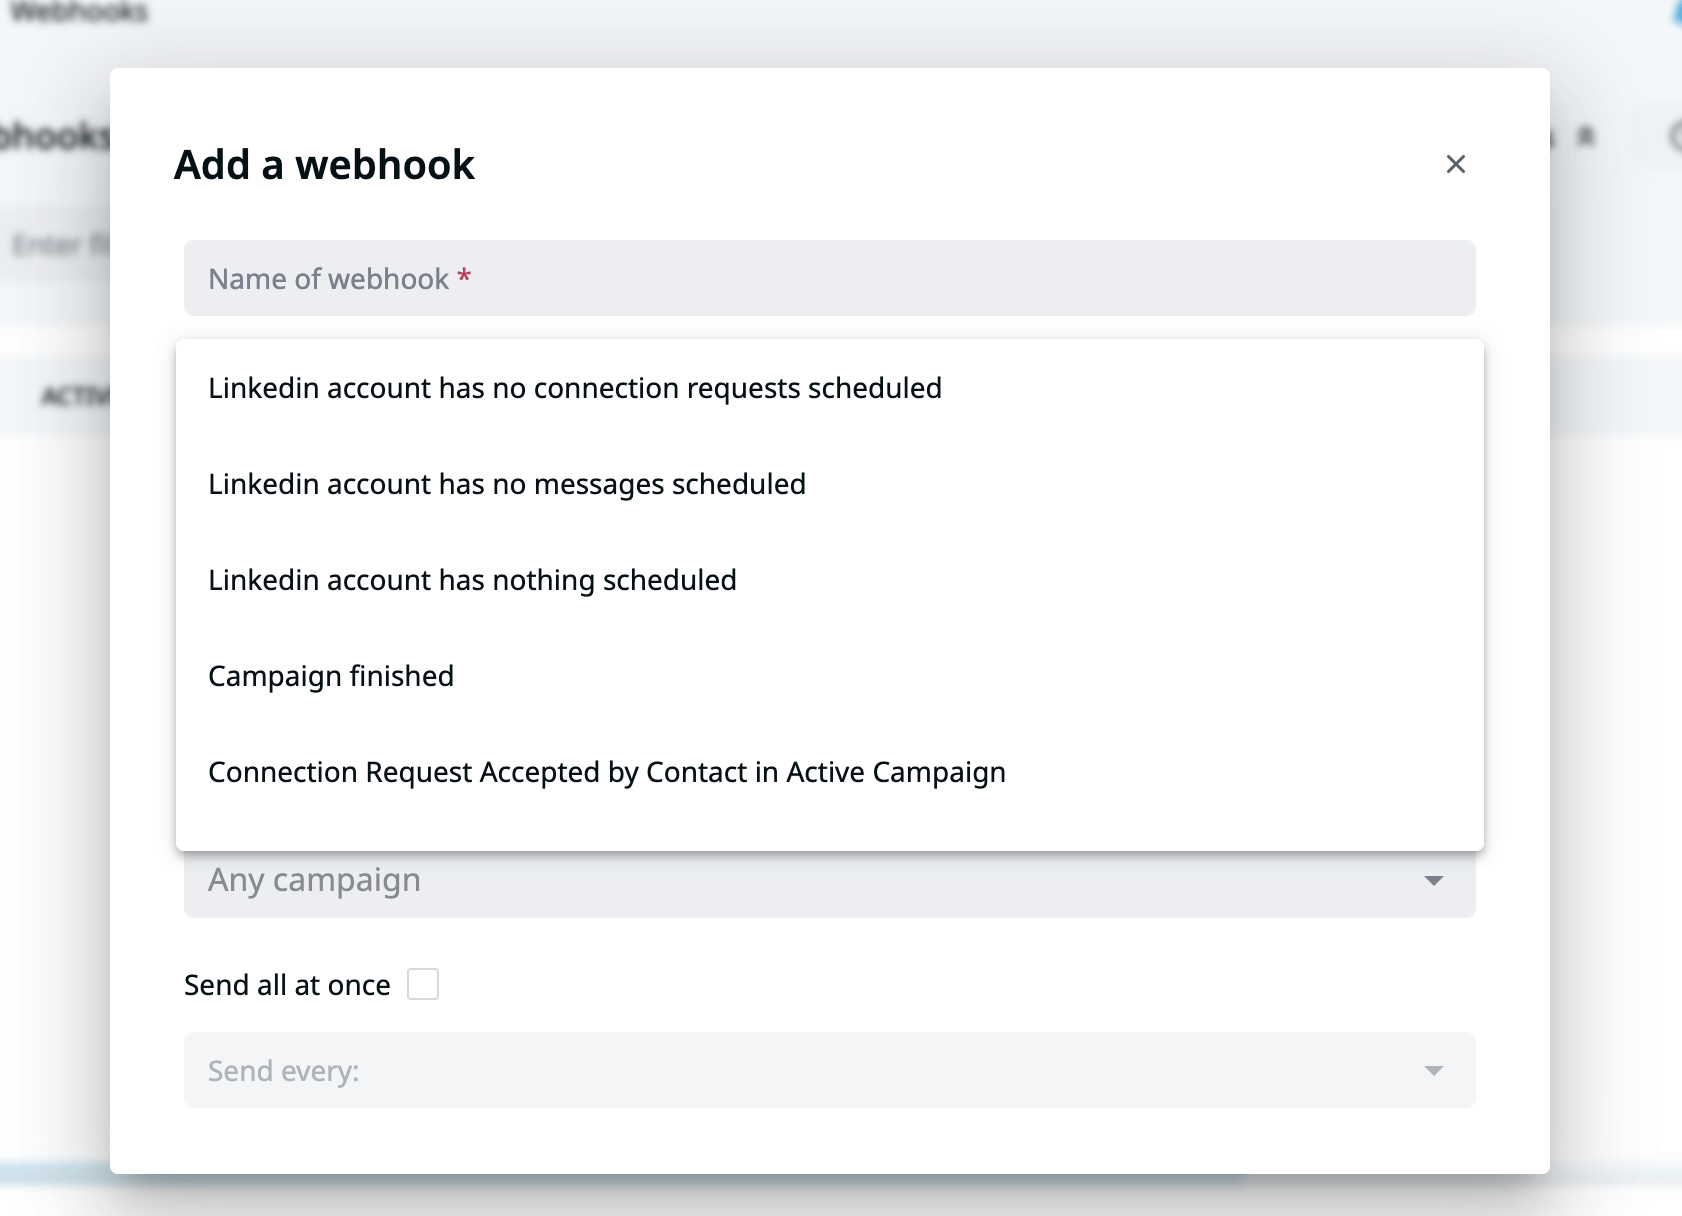
Here’s the full list of webhooks events you can set up:
- LinkedIn account has no connection requests scheduled
A notification will be sent that there are no more upcoming connection requests on the campaign.
- LinkedIn account has no messages scheduled
A notification will be sent to the webhook that all messages from the campaign are sent.
- LinkedIn account has nothing scheduled
A notification will be sent to the webhook that there are no more upcoming tasks.
- Campaign finished
A notification will be sent to the webhook that the campaign is finished for the lead and both messages and connection requests are sent.
- Connection request accepted by contact in active campaign
All the contacts that accepted the connection request in the active campaign (or campaigns) will be sent to the webhook.
- Contact replied to campaign message
All the contacts that replied to the message on the campaign will be sent to the webhook.
- Company follow sent
You followed their company on LinkedIn.
- Contact tagged
Whenever you tag a contact on a campaign, the contact’s information will be sent to the webhook.
- Contact disconnected
All contacts that removed the connection on the campaign will be sent to the webhook.
- Email bounced
If the contact received an email in the previous step of the campaign.
- Email clicked
If contacts have already clicked on links in the email you sent in the previous steps of the campaign.
- Email opened
If contacts have already opened the email you sent in the previous steps of the campaign.
- Email sent
If email was sent to the lead.
- Endorsement sent
If the skill was endorsed for the leads in the campaign.
- Contact replied first time since start
All contacts that replied to the messages from the start of the campaign will be sent to the webhook.
- Follow sent
If you followed their profile on LinkedIn.
- Message sent
All contacts that received a message from the campaign will be sent to the webhook.
- Connection request accepted
All contacts that accepted the connection request from the campaign (active or inactive) will be sent to the webhook.
- Post liked
If you liked their post.
- Contact replied
Whenever a contact replies to your message, the contact’s information will be sent to the webhook.
- Connection request sent
All contacts that received a connection request from the campaign will be sent to the webhook.
- Contact revoked
All contacts that declined the connection request in the campaign or that were withdrawn in my requests section on Expandi will be sent to the webhook.
- Visit sent
If you visited their LinkedIn profile in the campaign.
Let’s take a real-life use case for the following webhooks:
- Connection request accepted by contact in active campaign.
- Contact replied to campaign message.
You have a list of ideal clients you want to reach, connect with, and nurture. You also want to keep your CRM updated with each stage the leads are at in terms of messaging and status.
You can then configure an Expandi webhook that to send connection requests and message data to your CRM’s API endpoint.
This way, you can automatically update your CRM with the latest LinkedIn interactions. Ensuring your sales team has up-to-date information without manual data entry.
Another use case.
Let’s say you want to be notified when a LinkedIn outreach campaign has been fully executed in Expandi, including all connection requests and messages.
You’d simply set up an Expandi webhook to send a notification when a campaign is finished, based on the Campaign finished webhook.
PS – Looking to take your LinkedIn outreach to the next level?
Check out our guide on LinkedIn outreach using GPT!
Making a Webhook with Zapier from Expandi to send data to your CRM
Here, we’ll cover how to create a webhook from Expandi through Zapier to push (send) data from Expandi to your CRM (e.g. HubSpot).
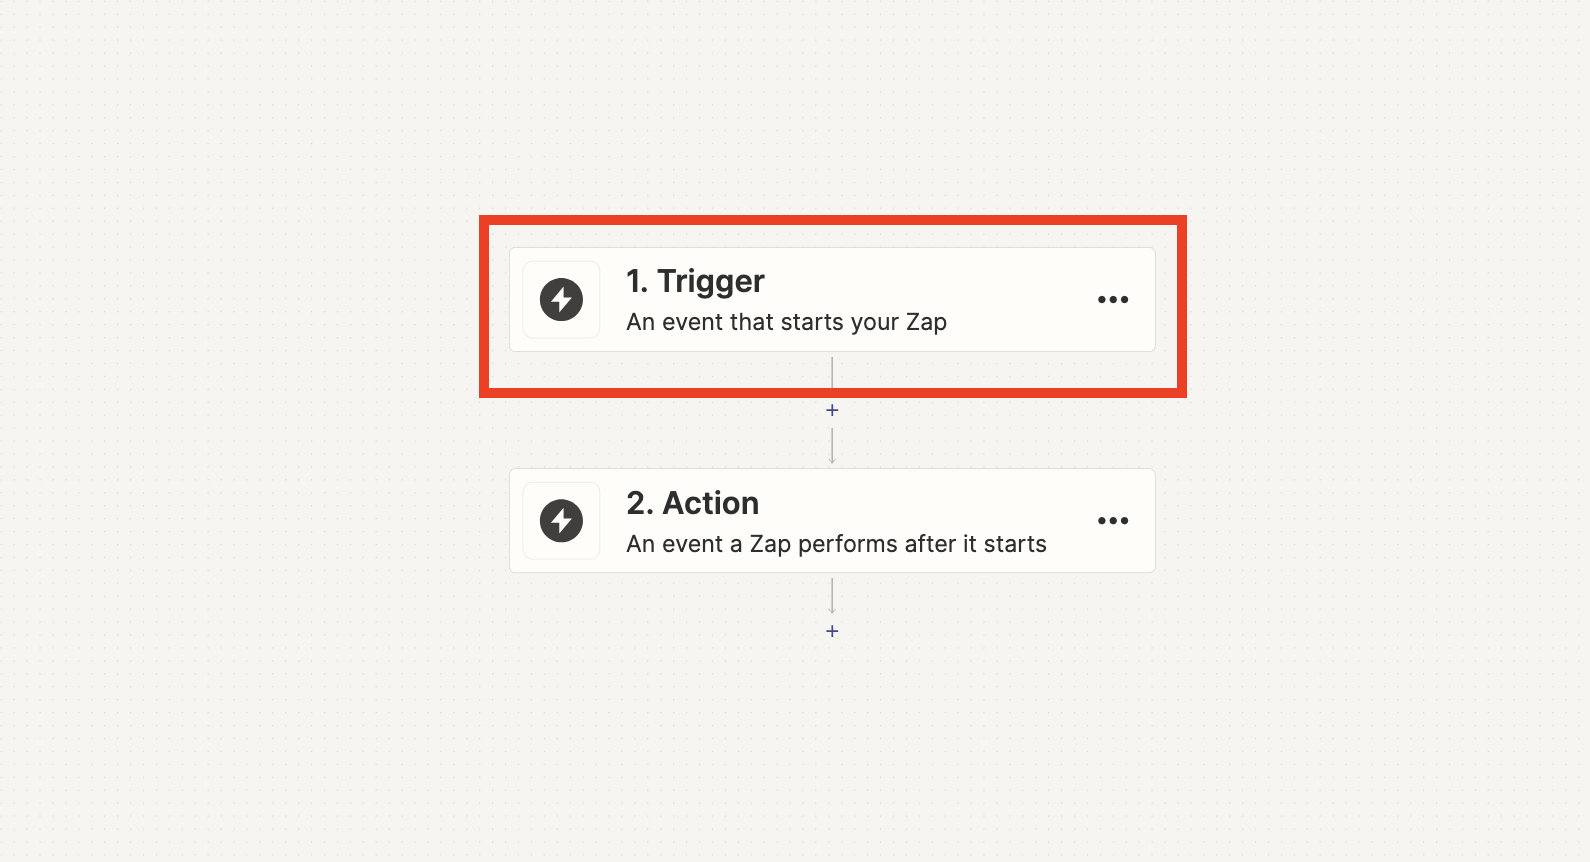
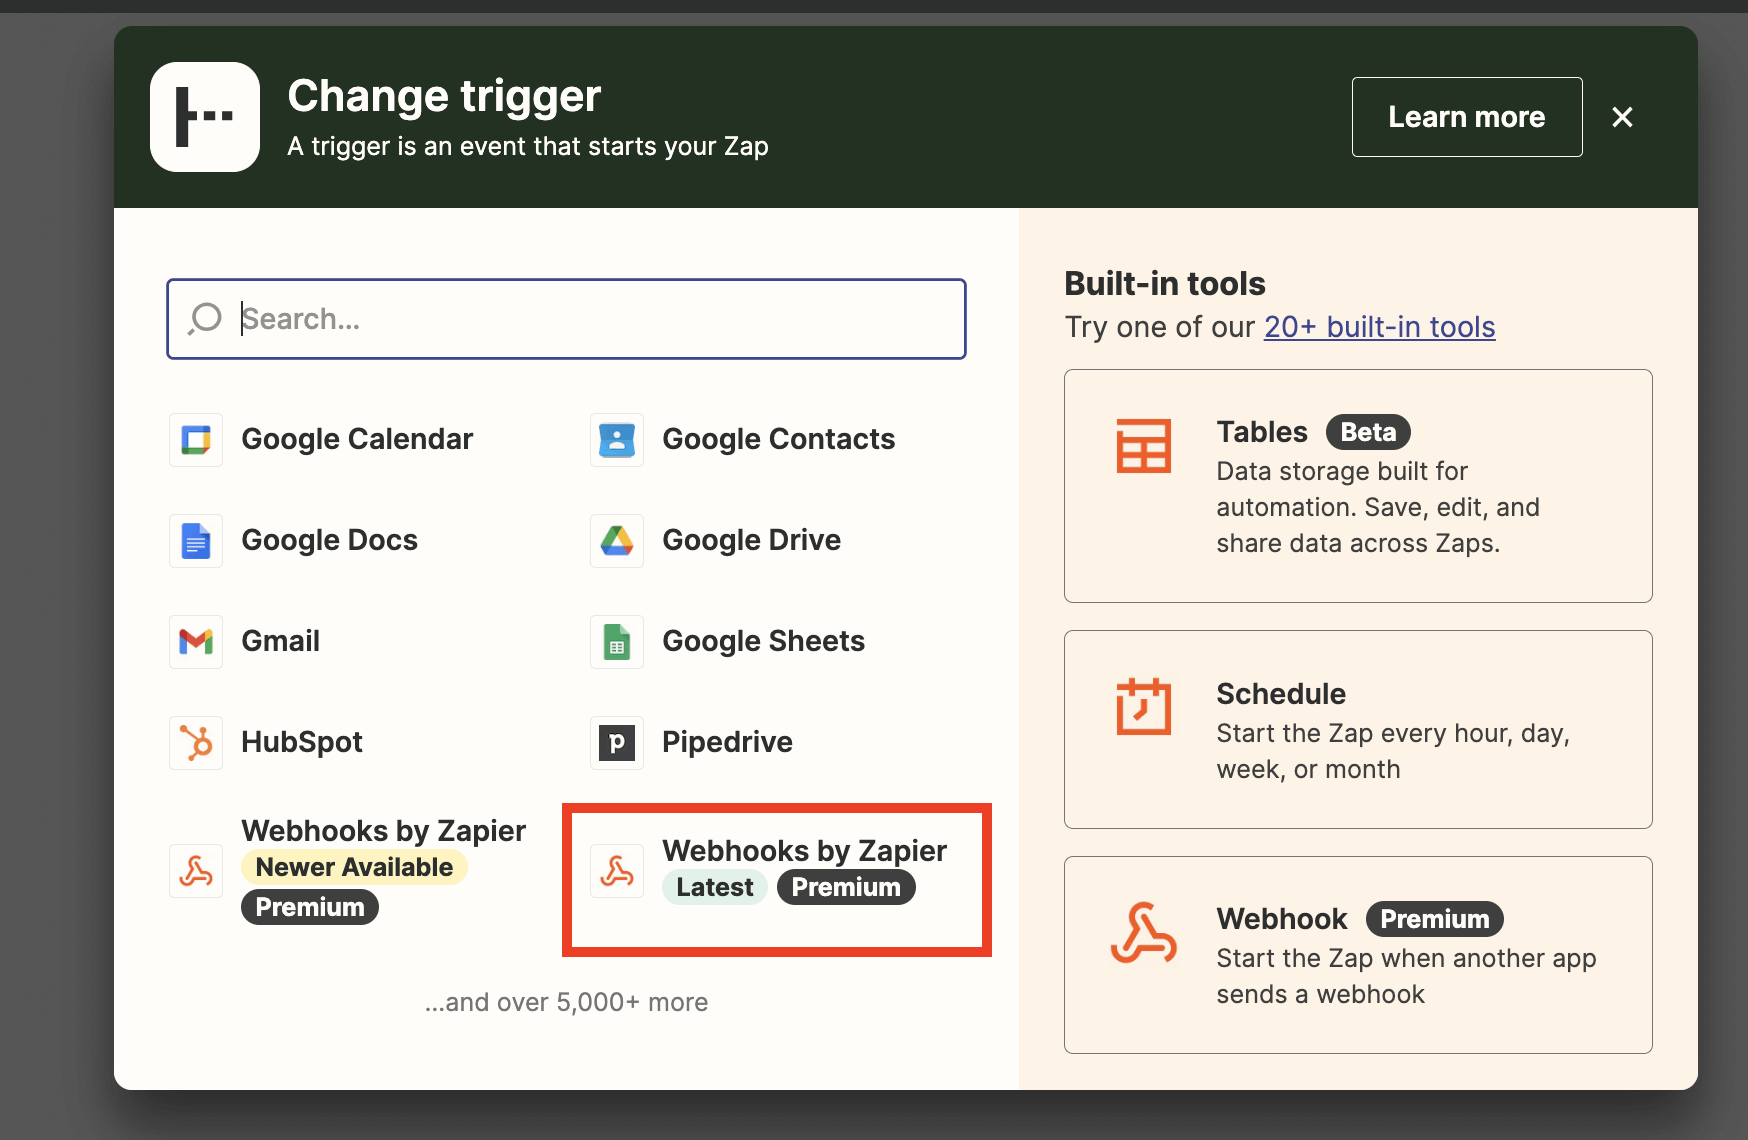
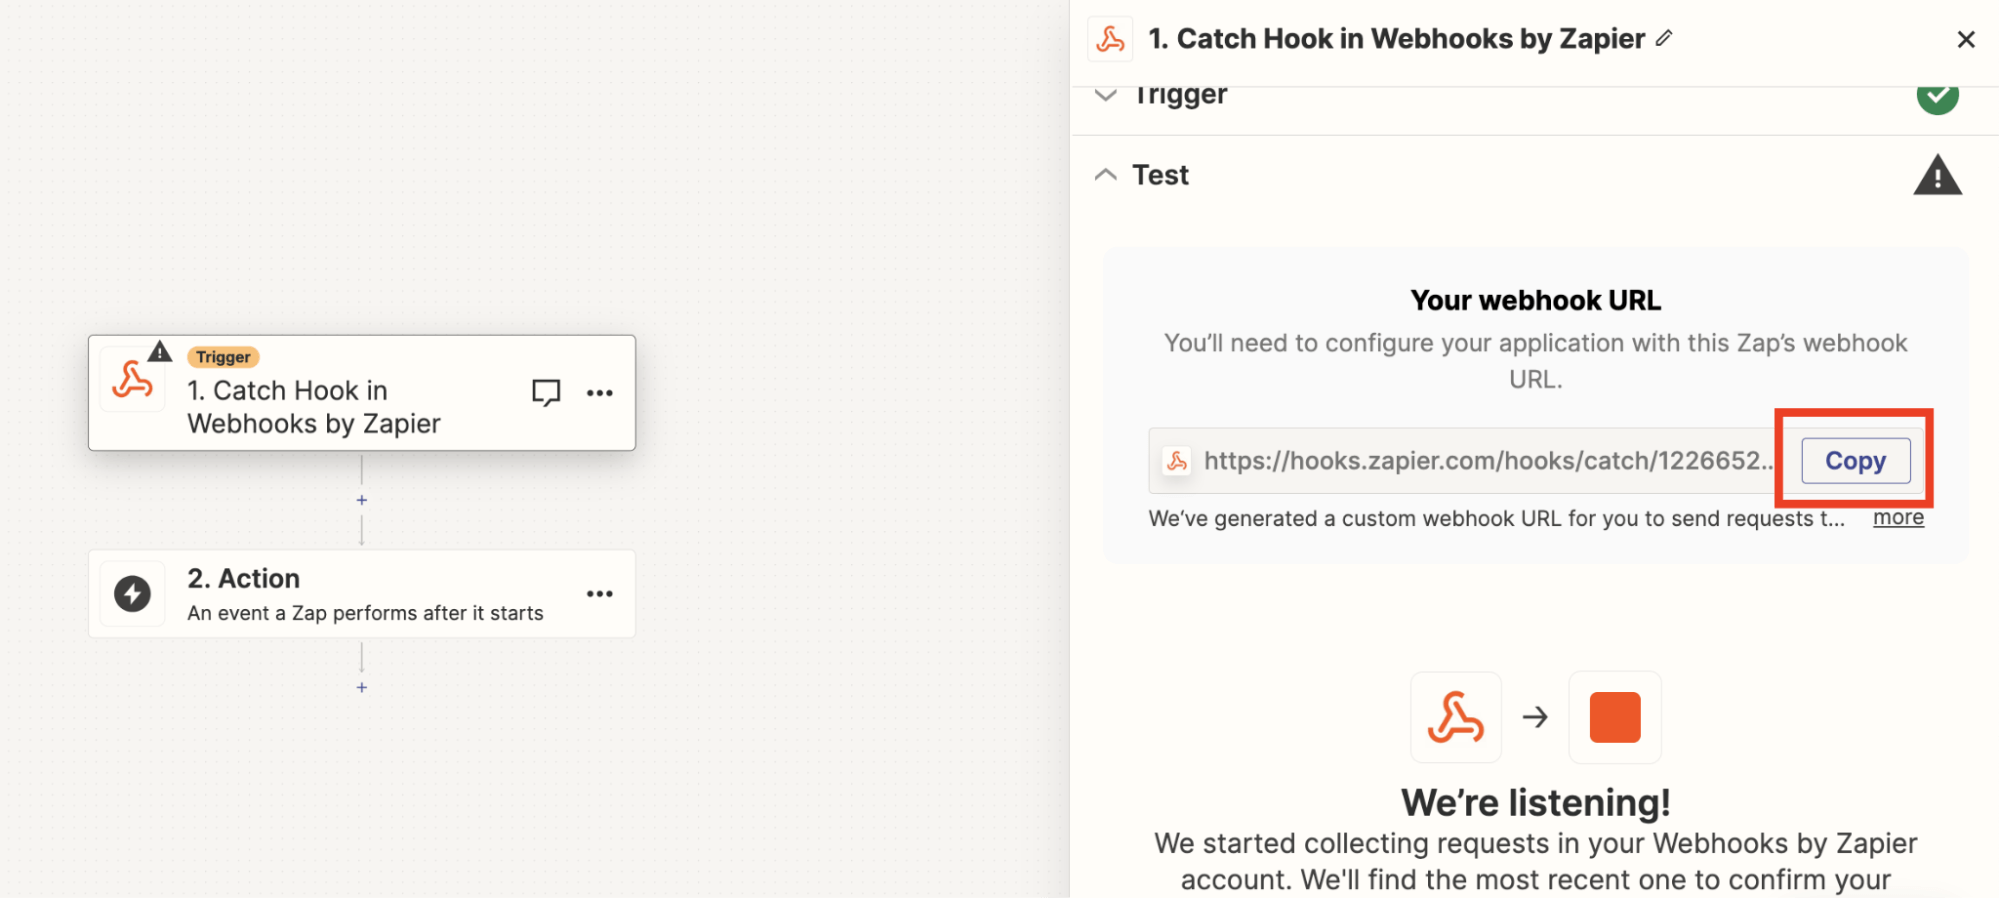
- Log into Zapier and click Create a Zap. Then, click on Trigger.
- Select Webhooks by Zapier.
- Choose Catch Hook as the event and Continue.
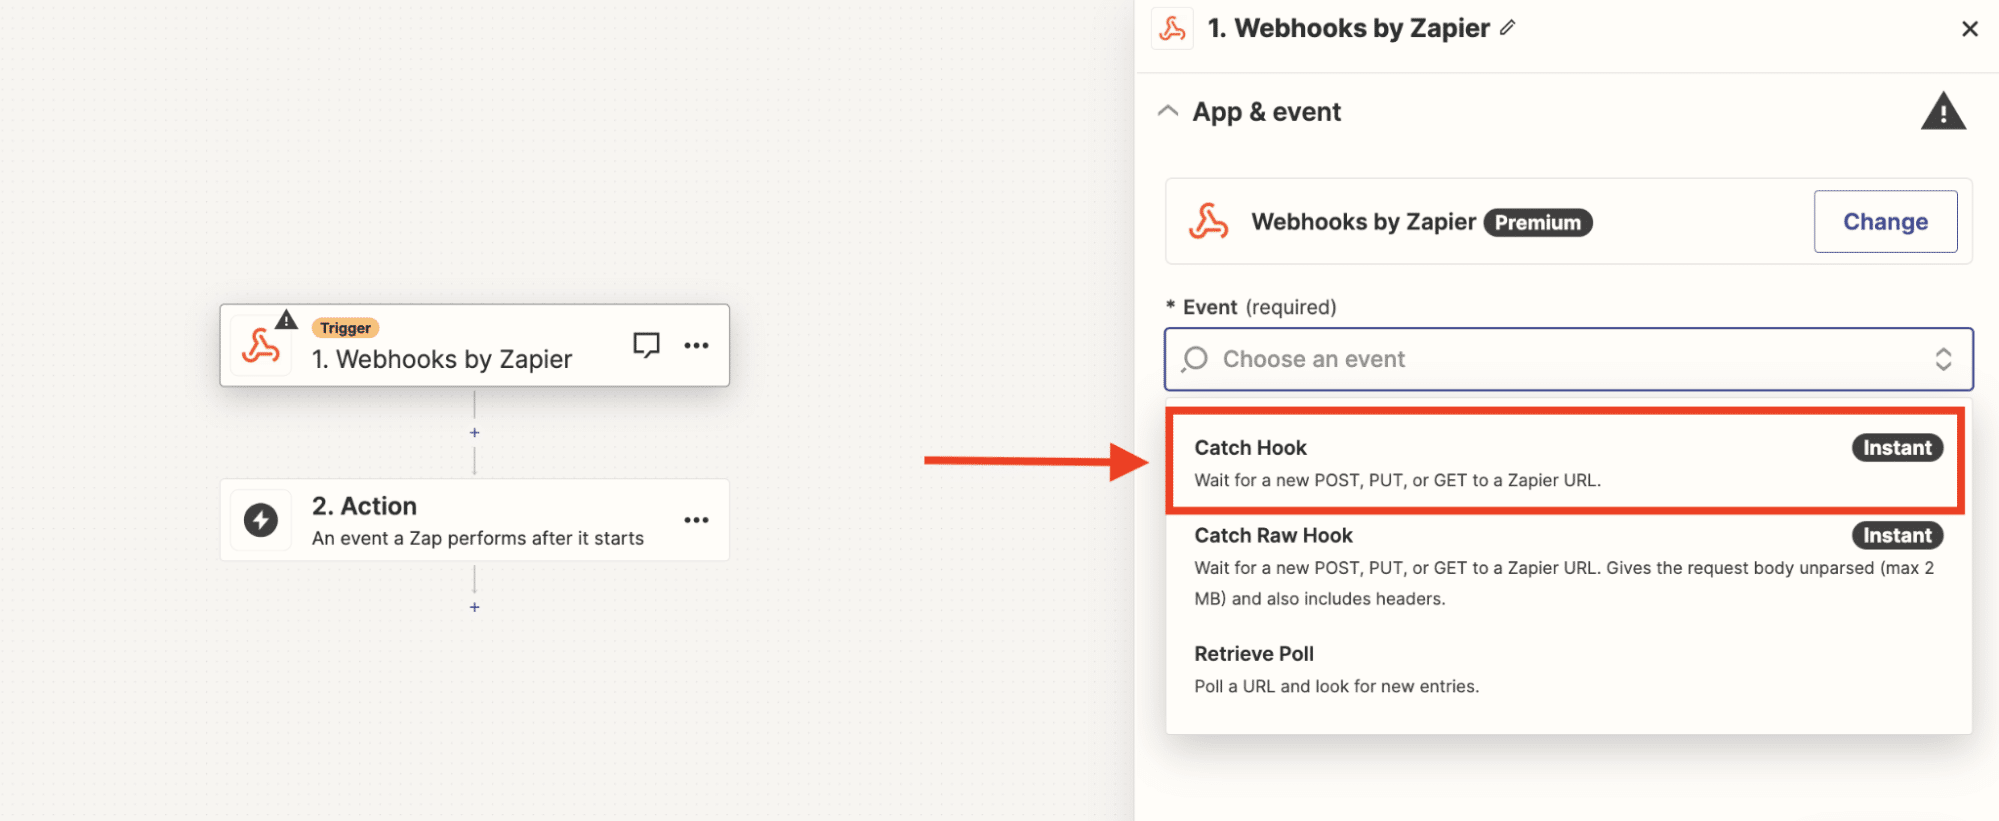
- Copy the URL here and go back to Expandi.
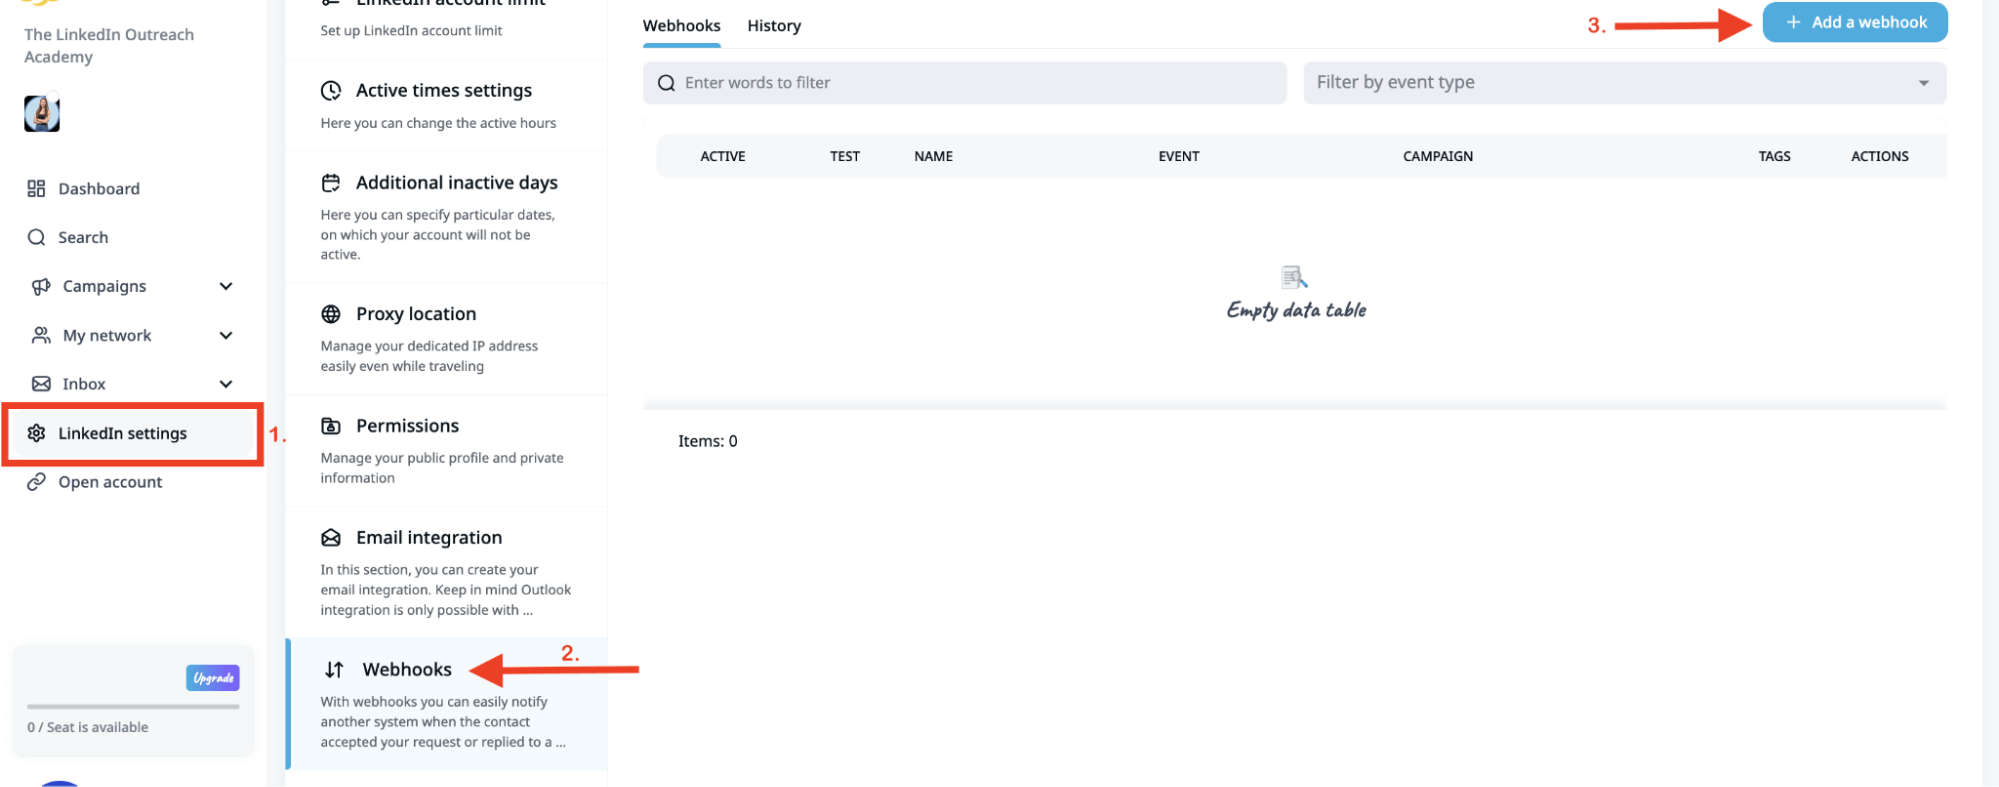
- Go to the LinkedIn settings on the sidebar menu on Expandi, click on the Webhooks option and select the Add a webhook button.
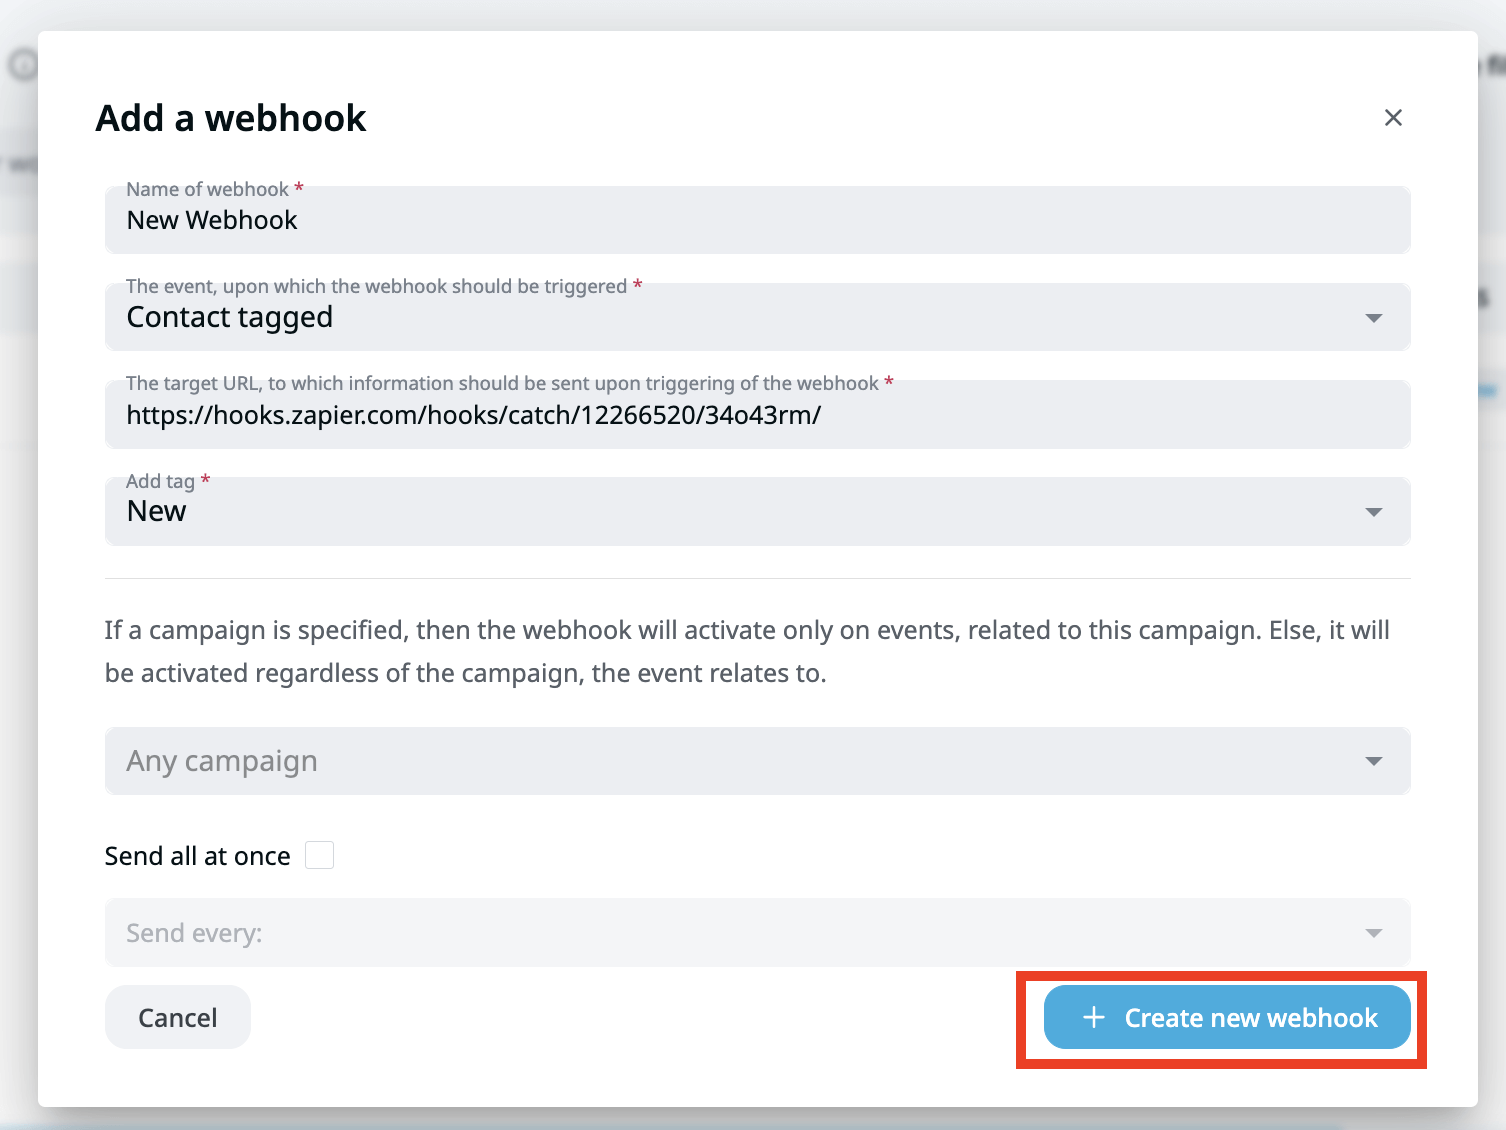
- Here, fill in the form and make sure you select the event, upon which the webhook should be triggered. See the full list of events above in this article or within the dropdown form in this section of Expandi. Then click Create new webhook
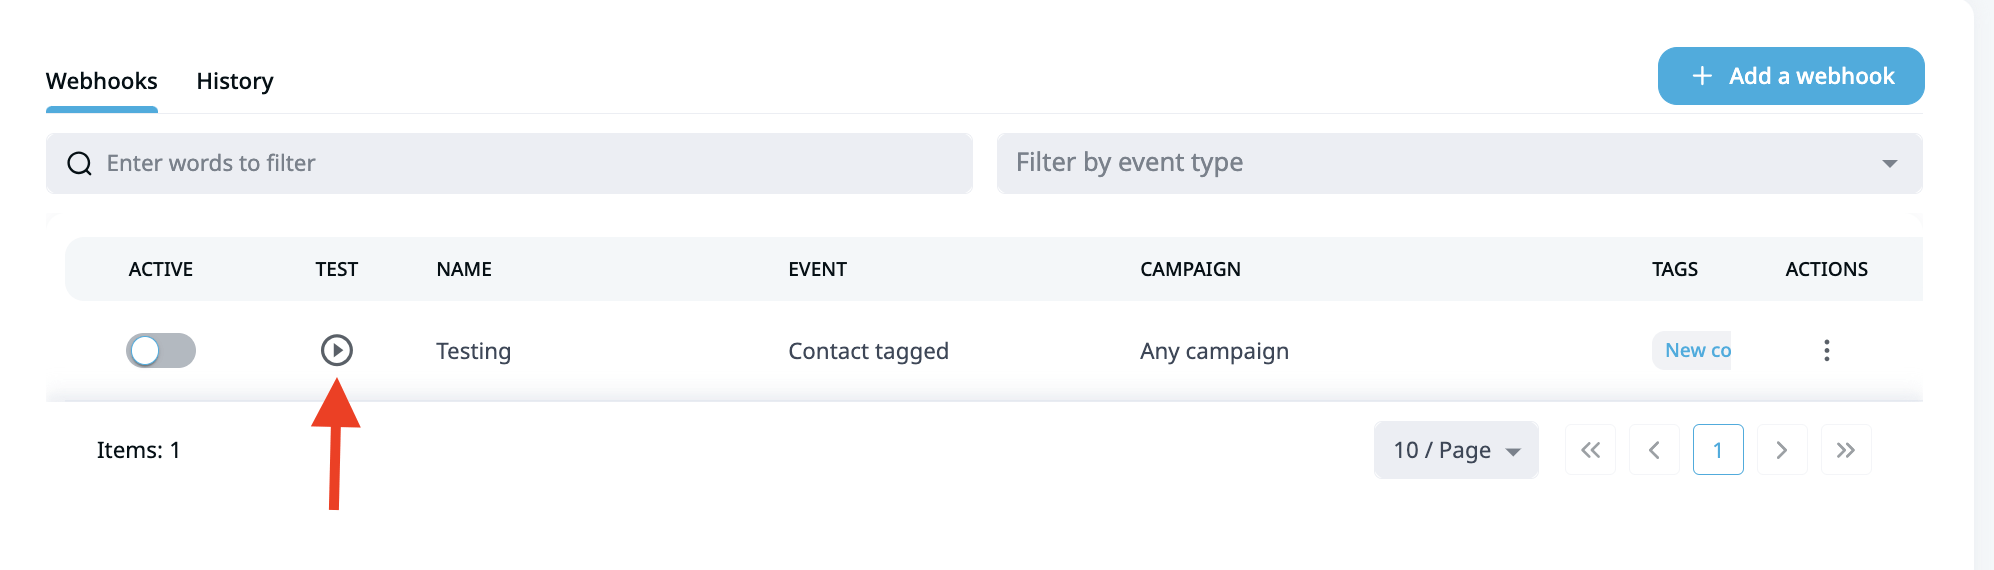
- Now test the webhook by clicking on the Test icon on Expandi and then clicking on the Test button on Zapier:
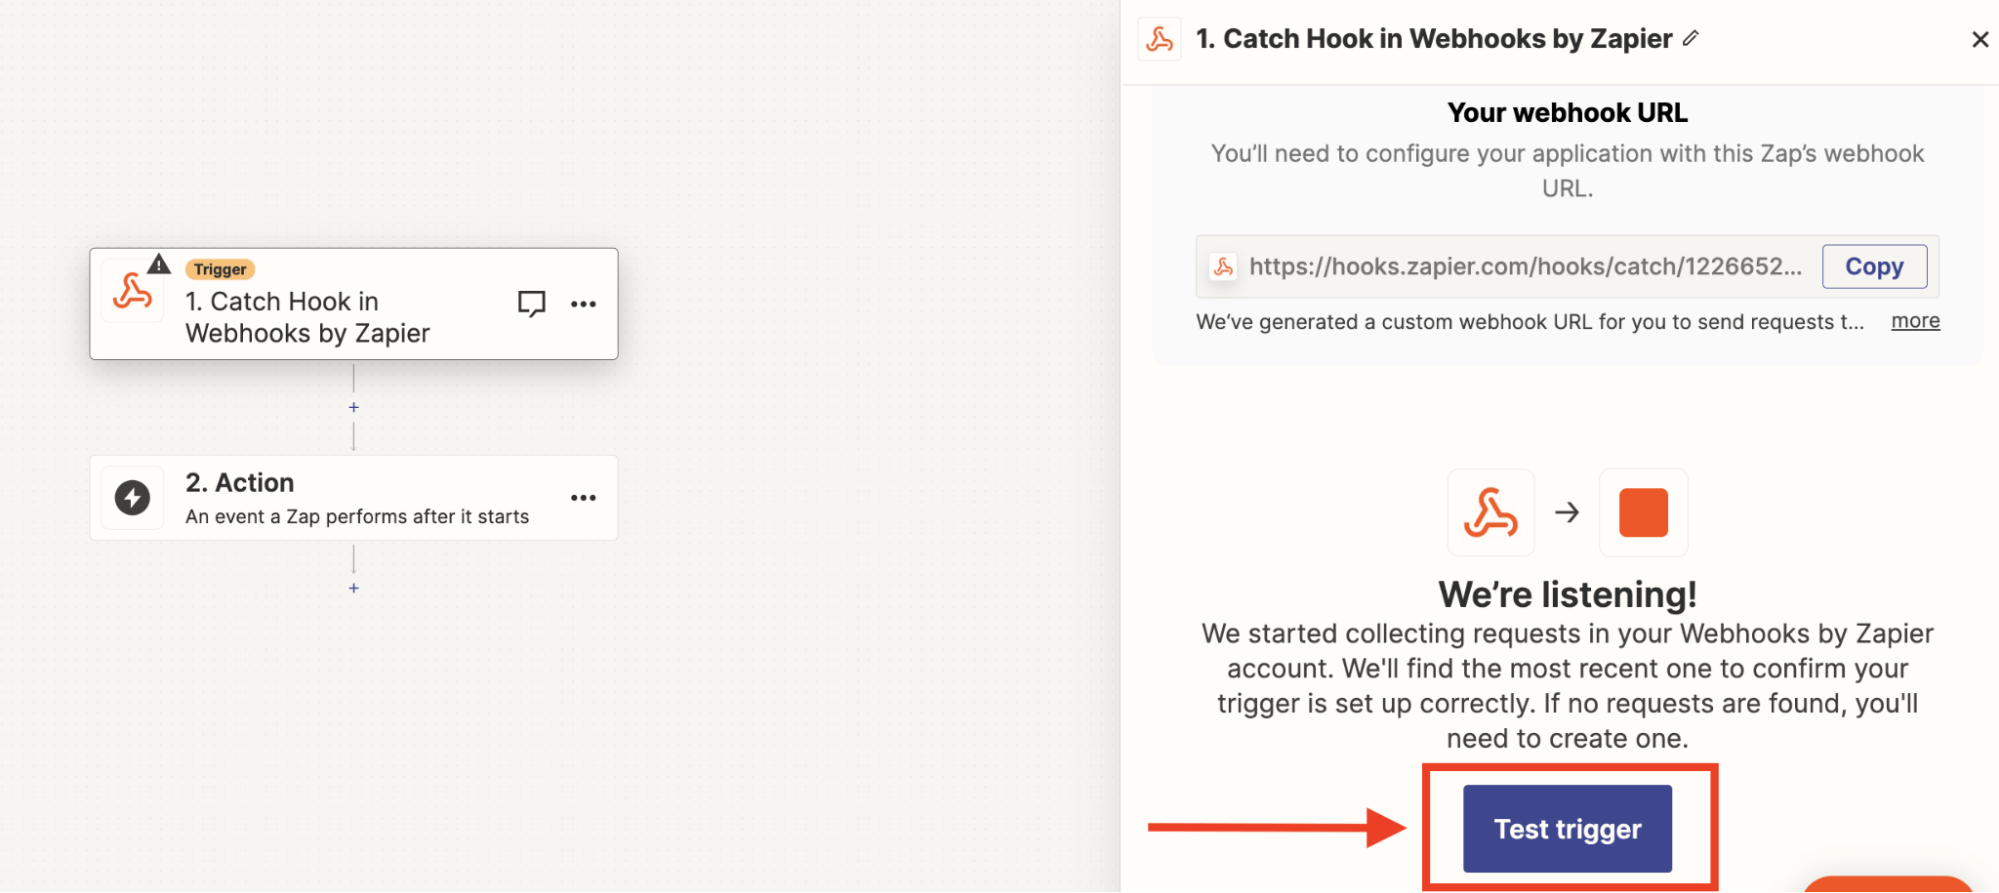
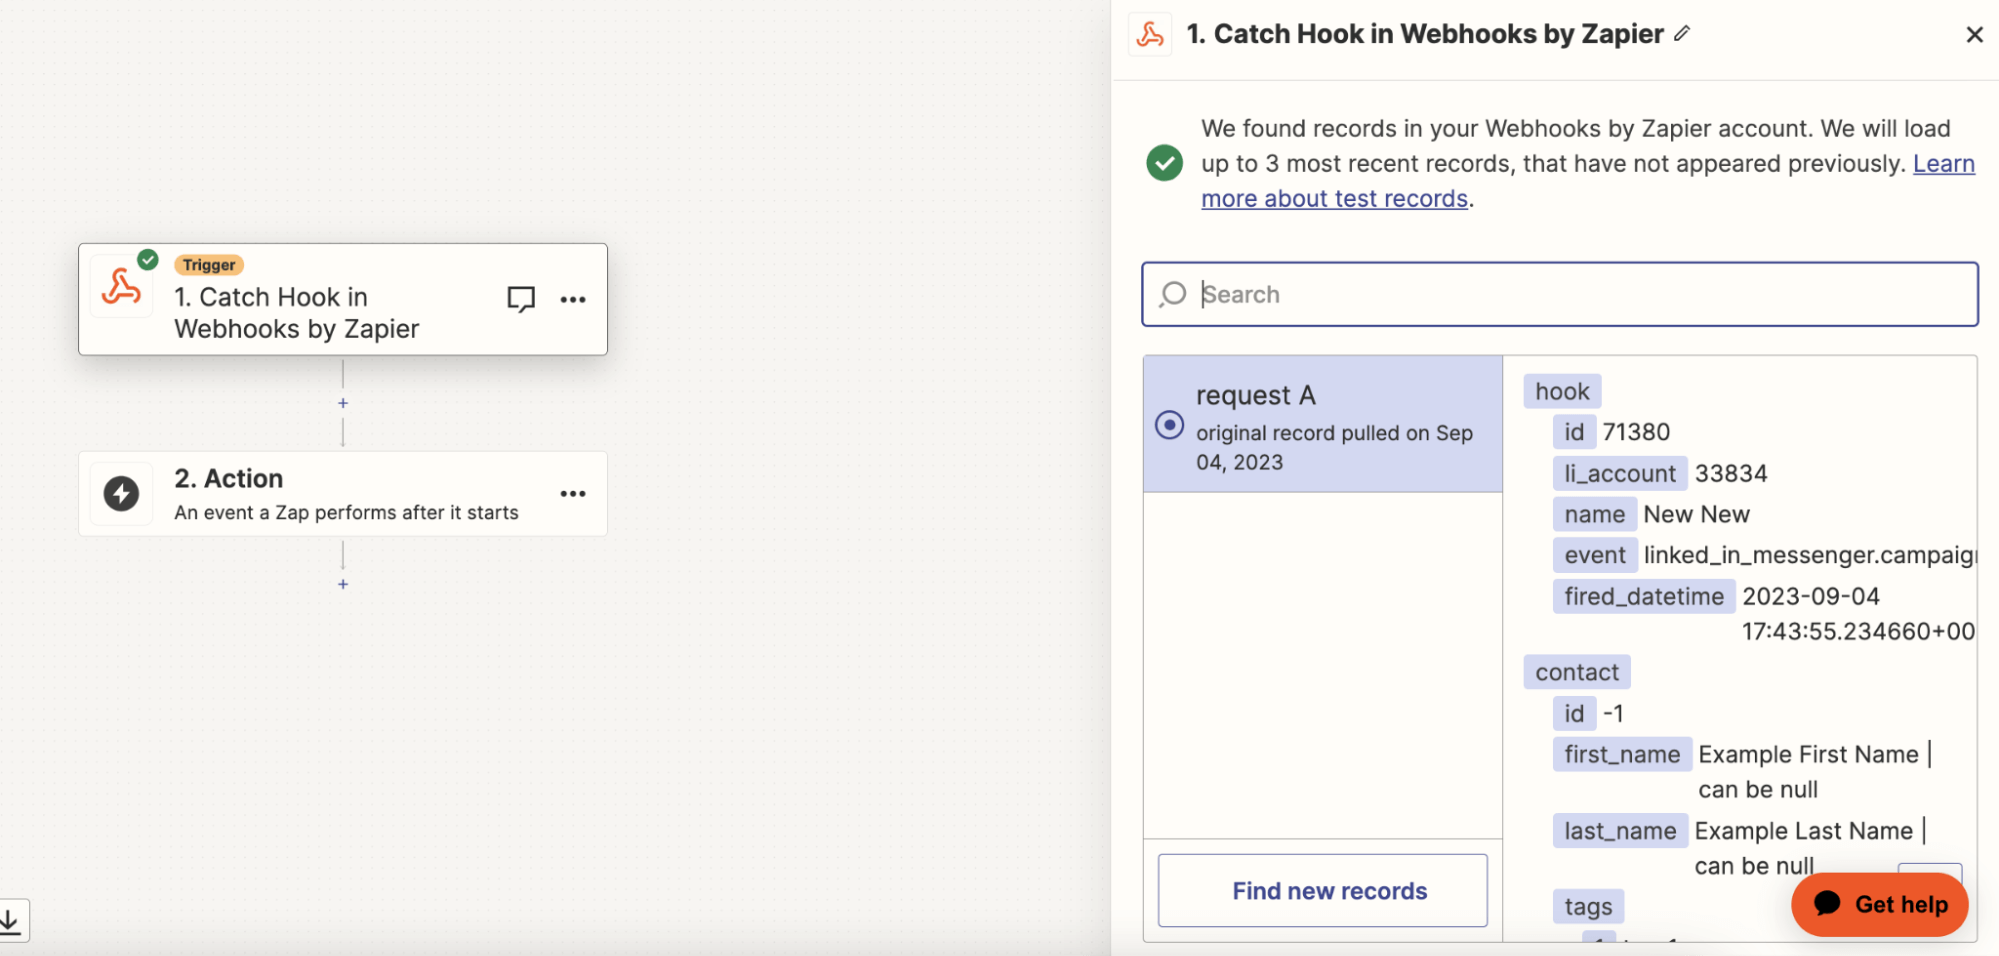
- If everything is correct, the webhook will be successfully tested and you can see the example data on Zapier:
- You can also check it in the webhook History section in Expandi.
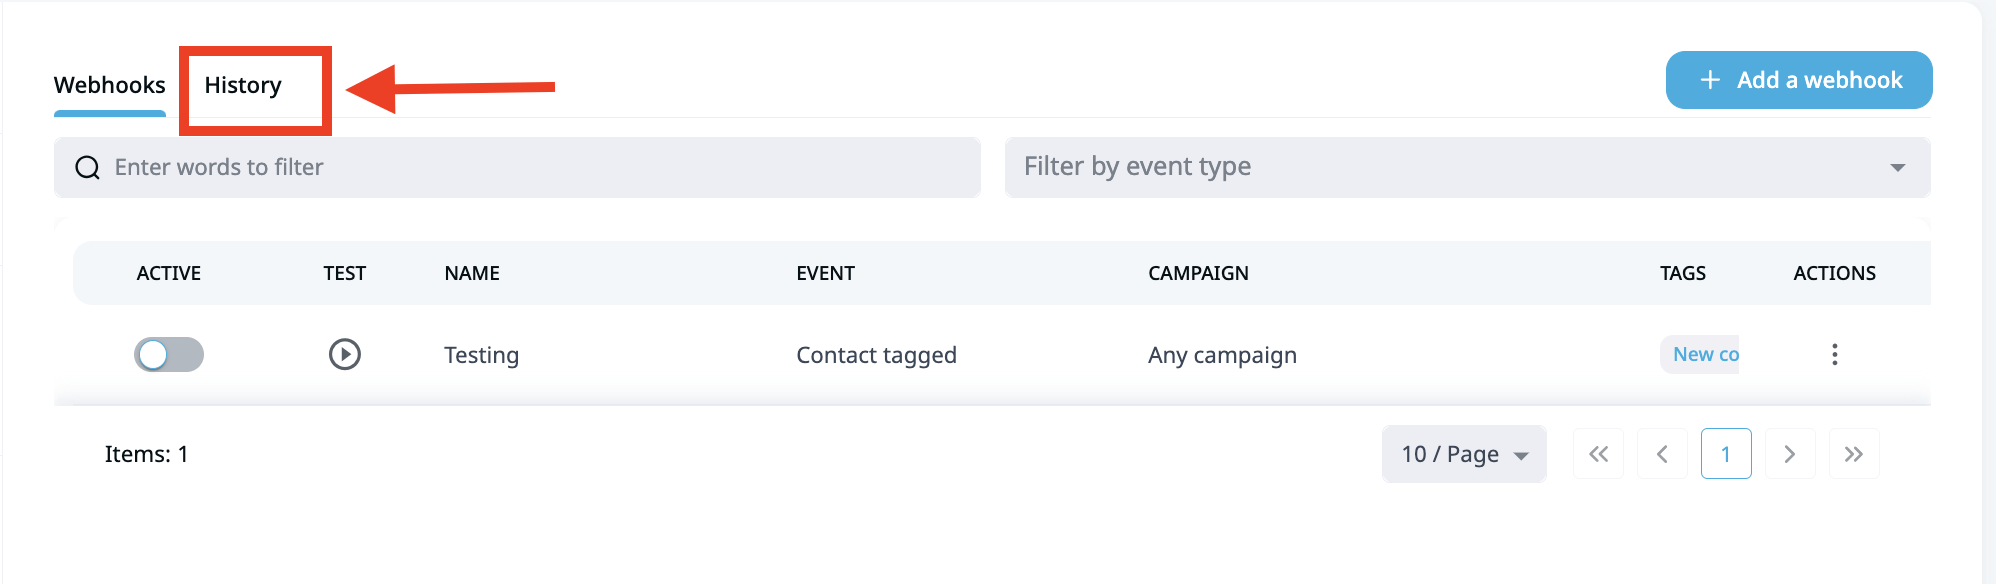
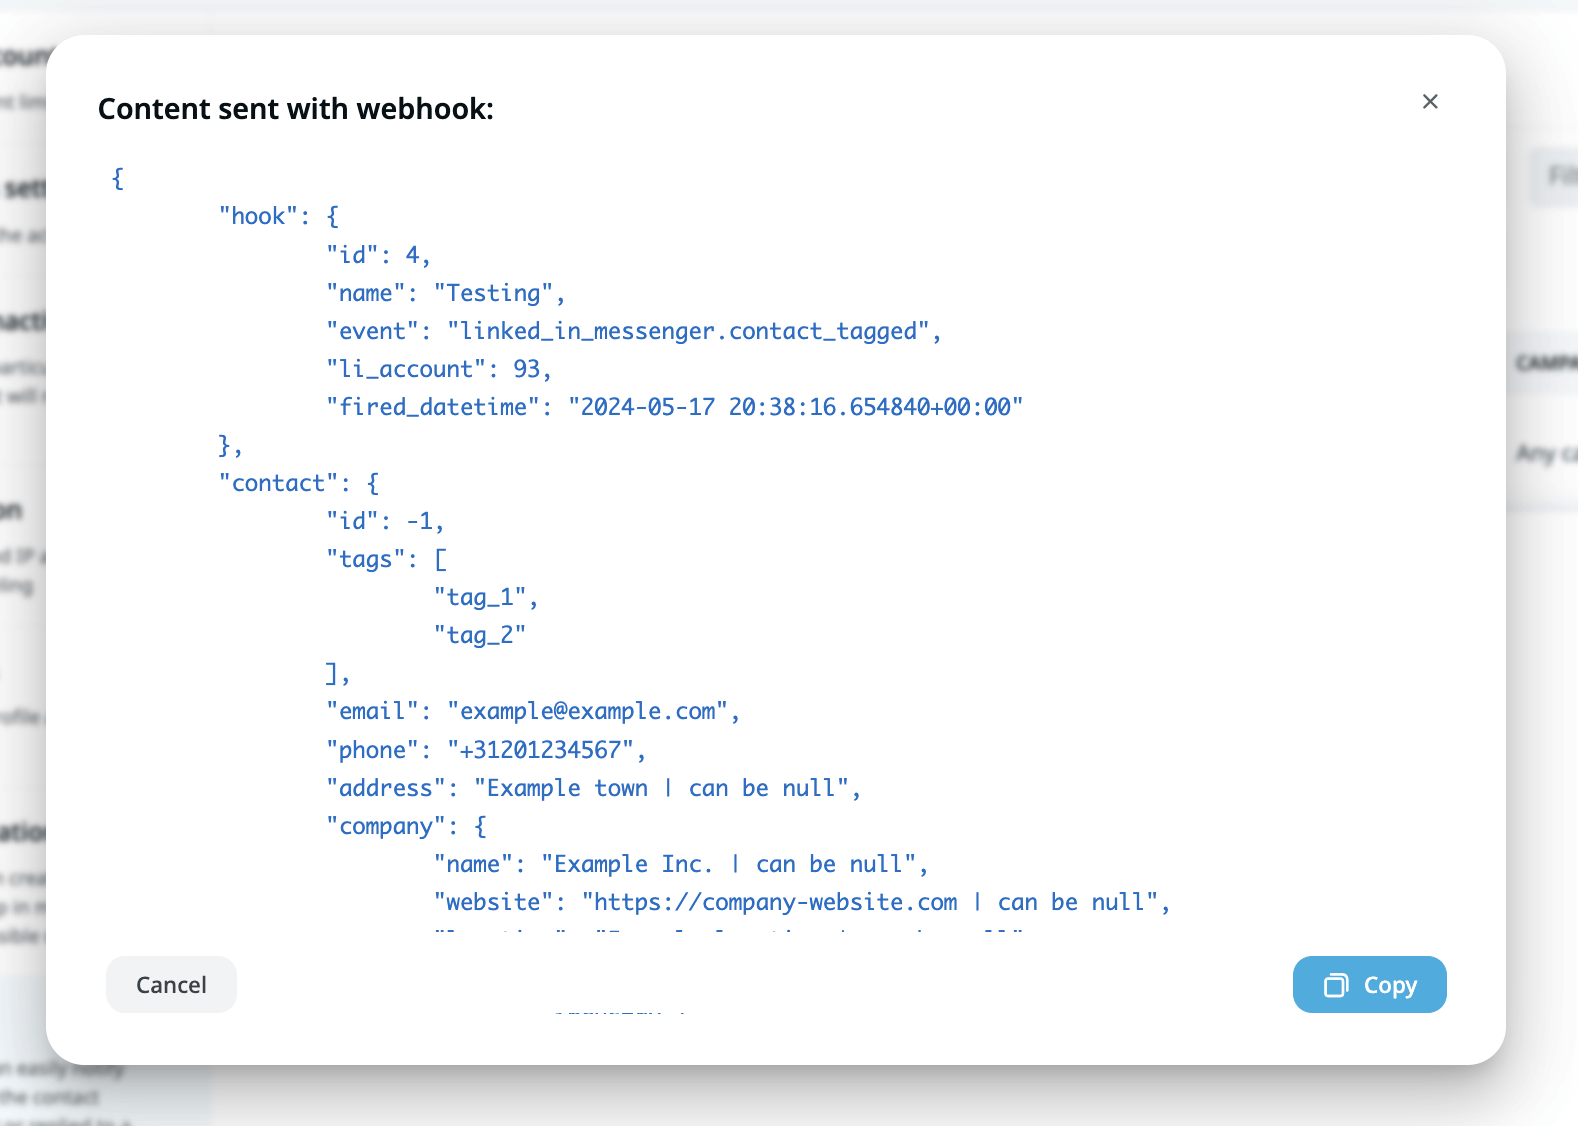
- In the History tab, you can see your example webhook that triggered after the test was initiated.
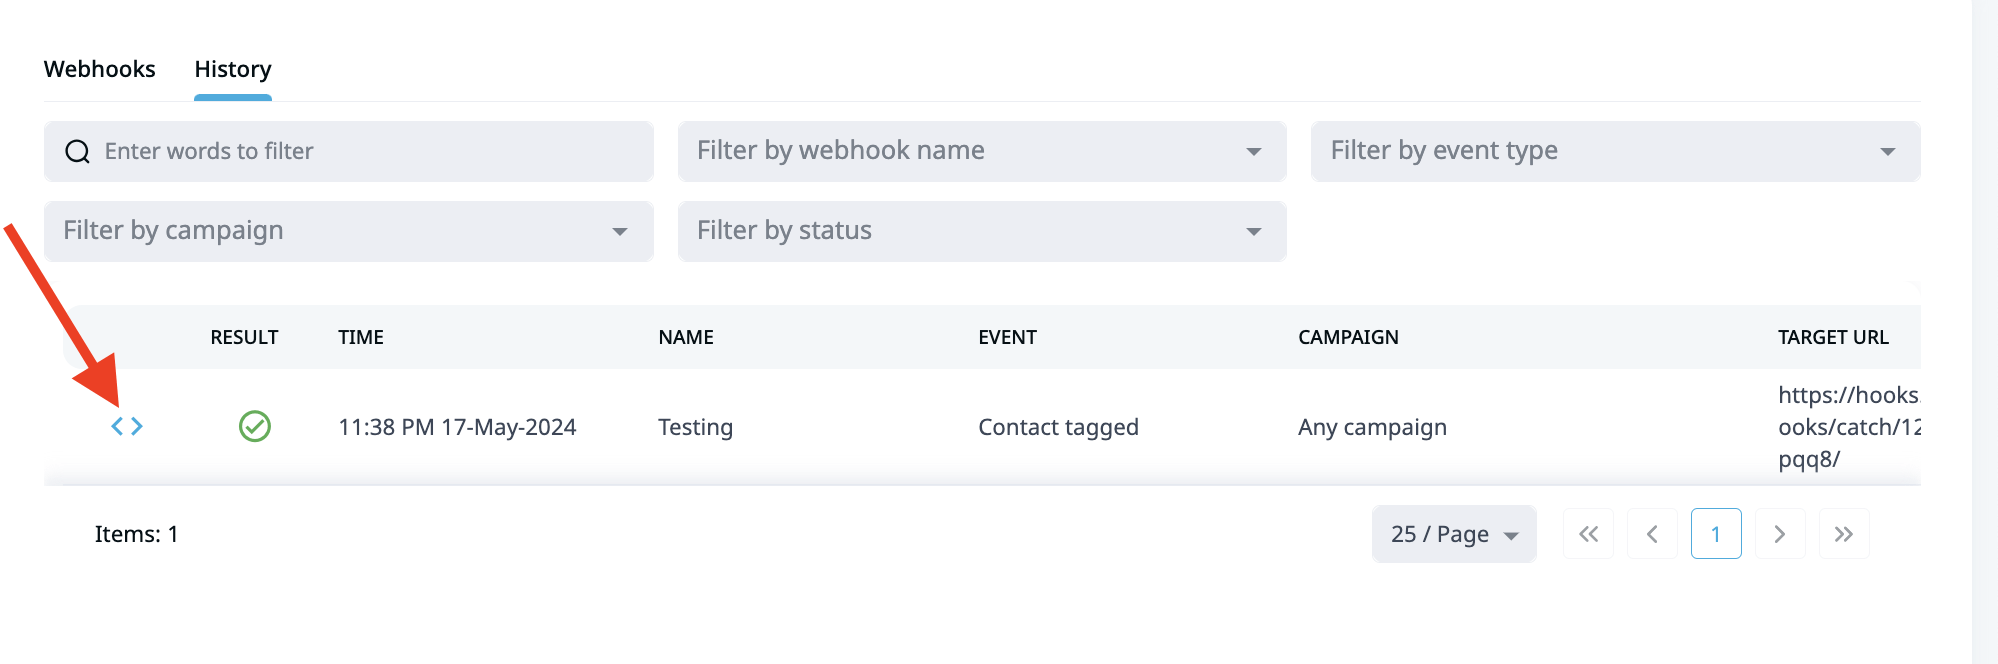
Here’s the example data that was sent with the webhook, if everything has been set up correctly.
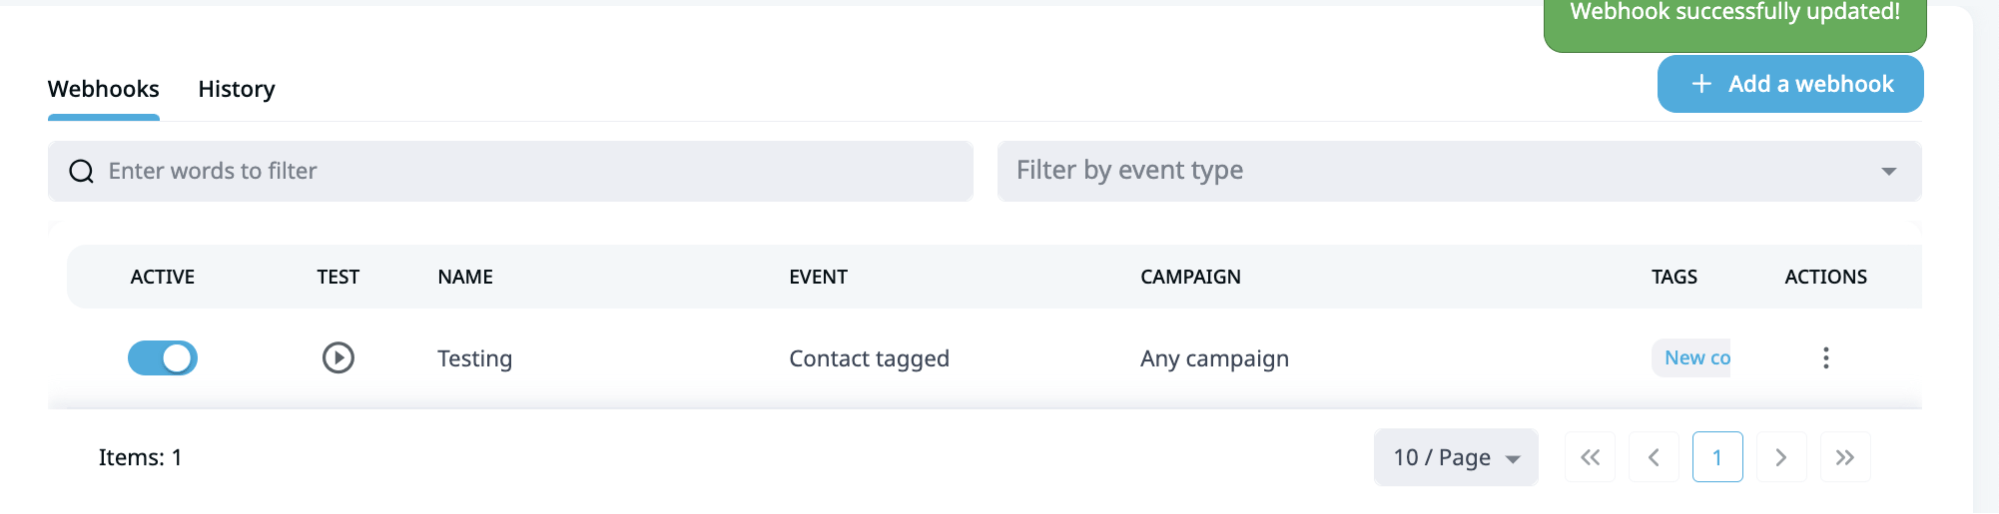
Finally, if you are satisfied with the test results, you can now activate your webhook by clicking on the toggle. If the toggle turns blue, it means the webhook has been successfully activated.
Expandi Reversed Webhooks API
First things first, what is a reversed webhook exactly?
A “reversed webhook” is a concept where the usual flow of a webhook is inverted.
Instead of the server pushing data to a client when an event occurs, the client initiates the request to the server at specific intervals to pull updates or data.
The best way to explain this is with an example.
Let’s say you have a CRM system that needs to stay updated with customer data from an external source.
Instead of waiting for the external service to push updates to your CRM (traditional webhook), your CRM periodically checks the external service for updates (reversed webhook).
How do reversed webhooks work in Expandi?
If Expandi uses webhooks for sending data to somewhere outside of the system a reversed webhook would be the equivalent of sending data from outside of the system to the system.
Using the reversed webhook, you can either add people to the campaign, pause, or resume them in the campaign.
Let’s take a look at how and some real use cases.
Now, there are a few different ways to approach this.
Below, we’ll cover how to add people to a campaign with Postman (platform for streamlining collaboration and API usage) and Zapier. Then, some more real examples you can use with this in mind.
How to add people to an Expandi campaign using a reversed webhook with Postman
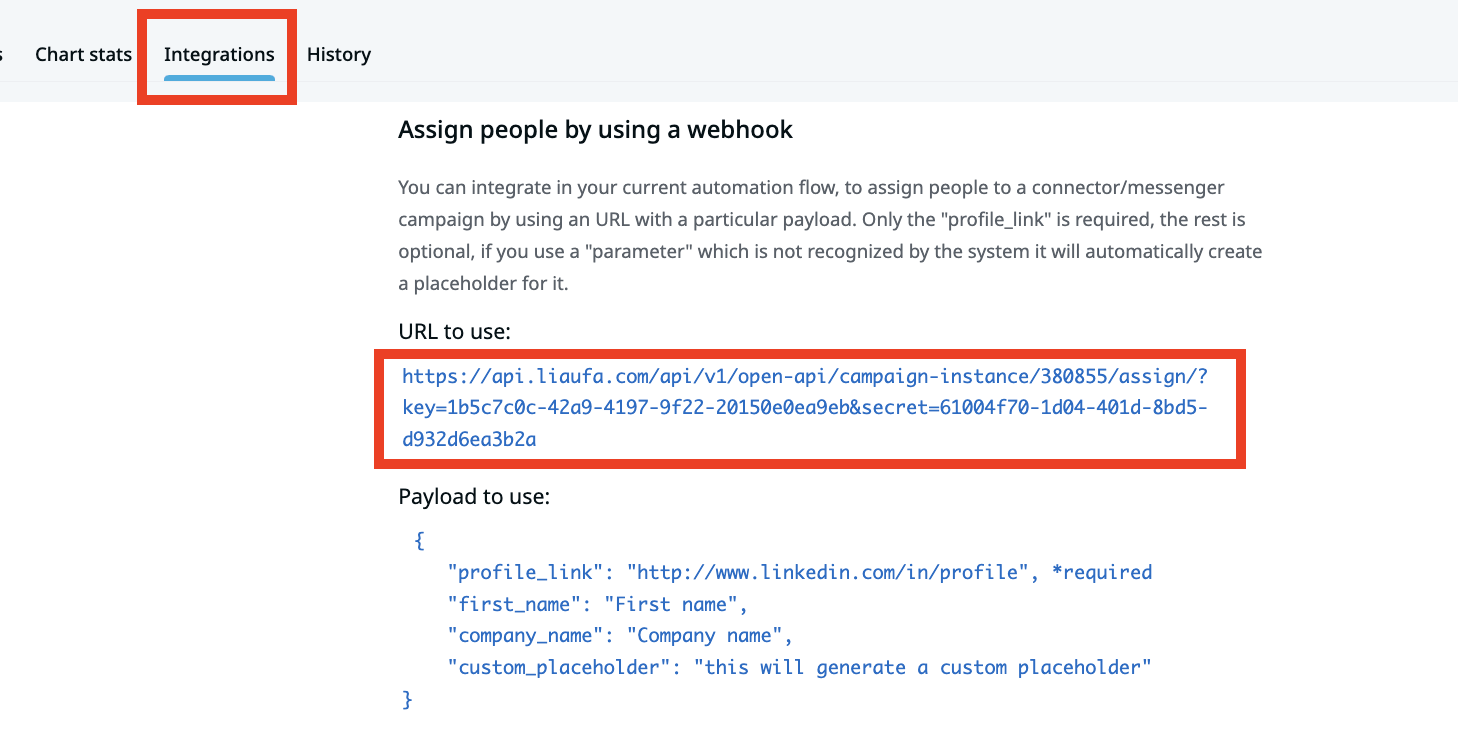
- First, create a new campaign in Expandi and go to the integrations tab within.
- Here, copy the URL to use.
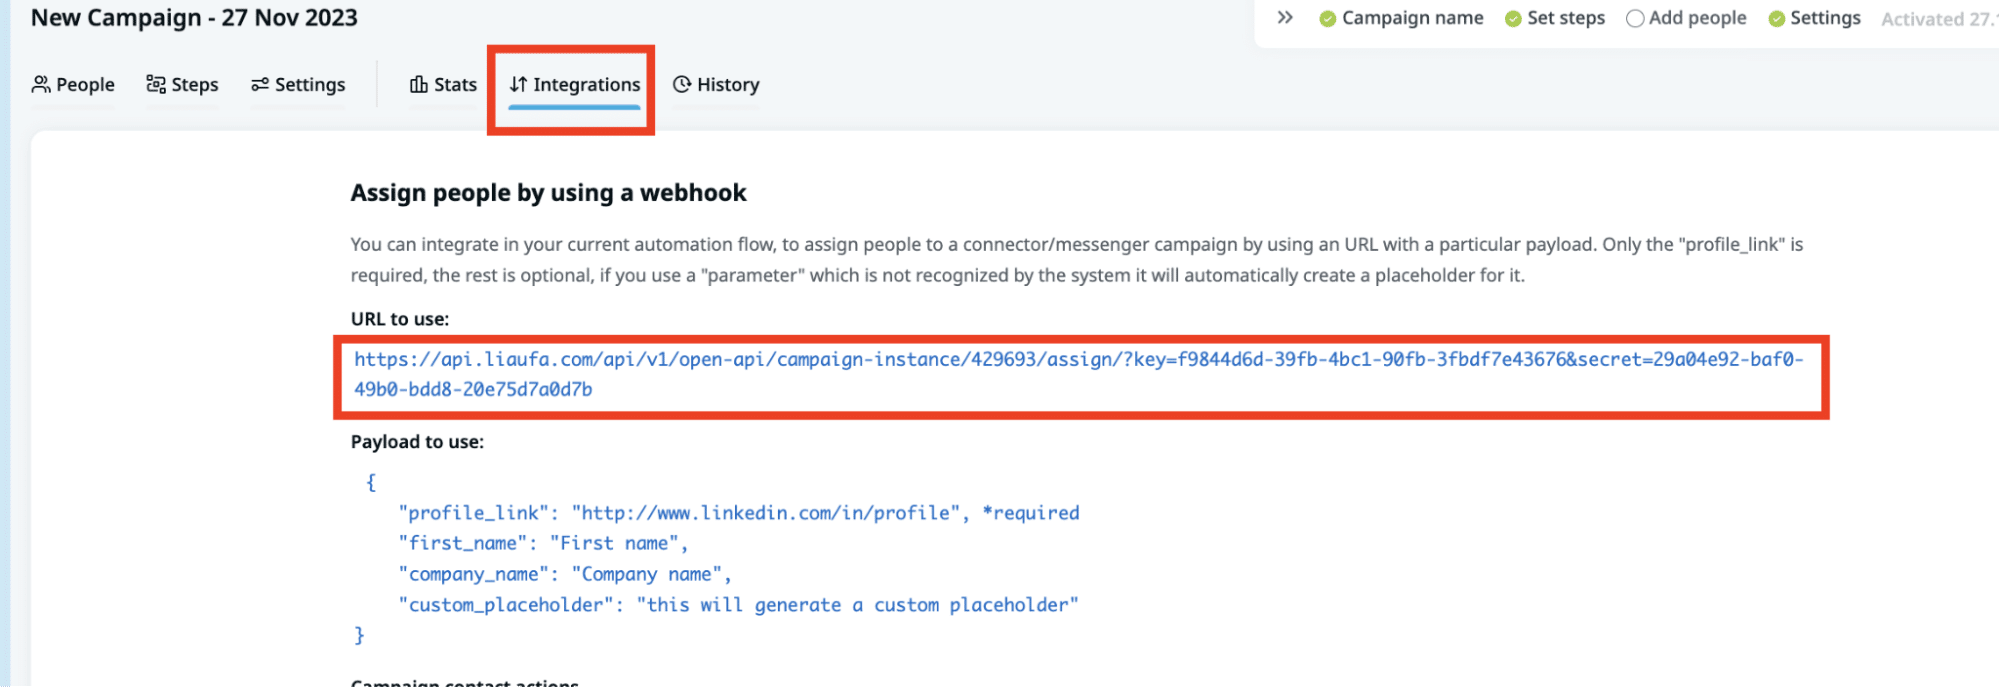
- This URL is where you’ll push your data to. Here’s an example with Postman, which you can get started with for free. Once there, you need to create a new workspace.
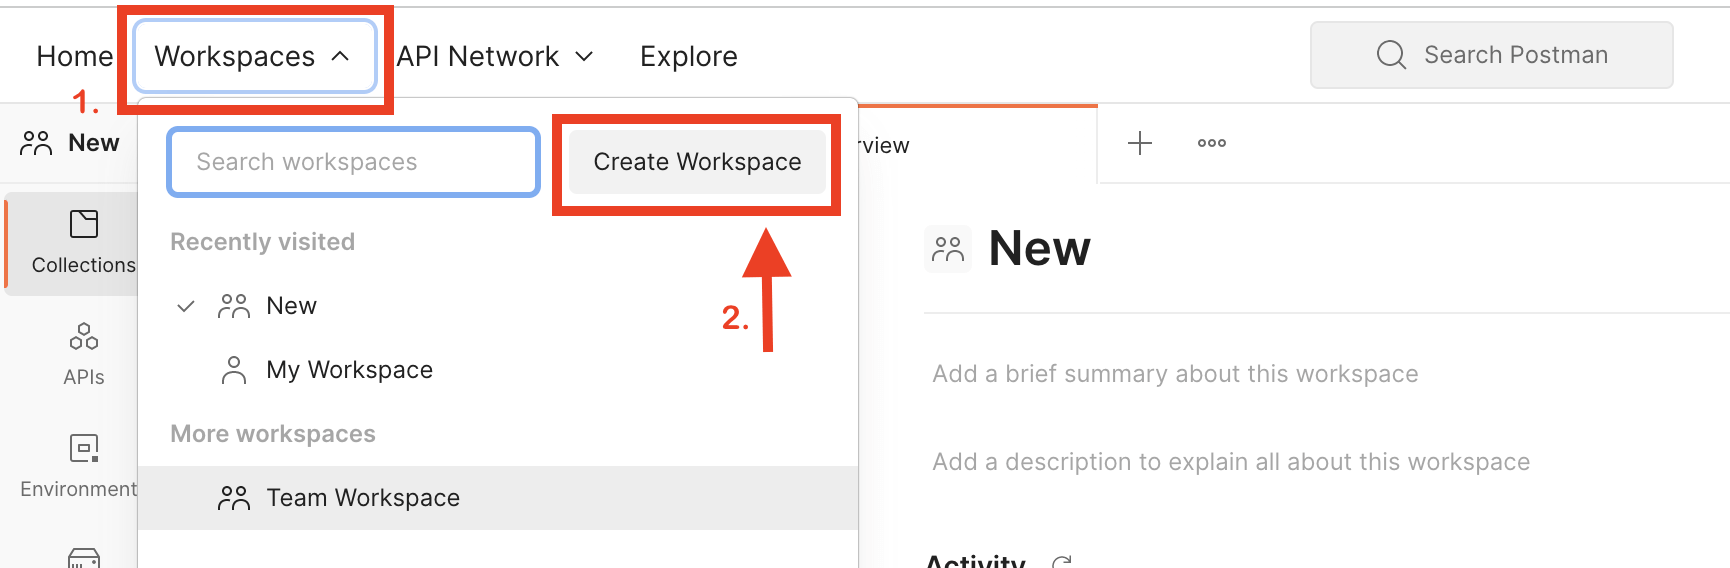
- Click on the + icon and the Untitled Request Tab will appear.
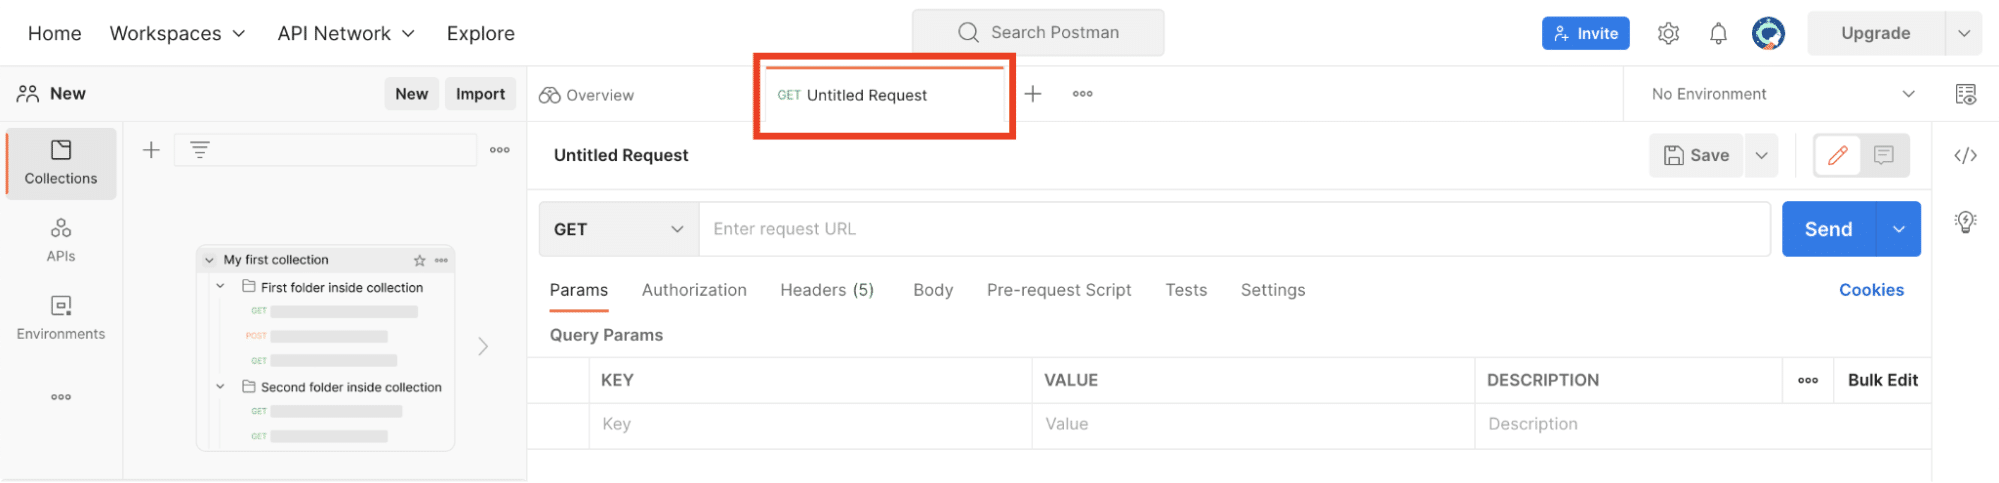
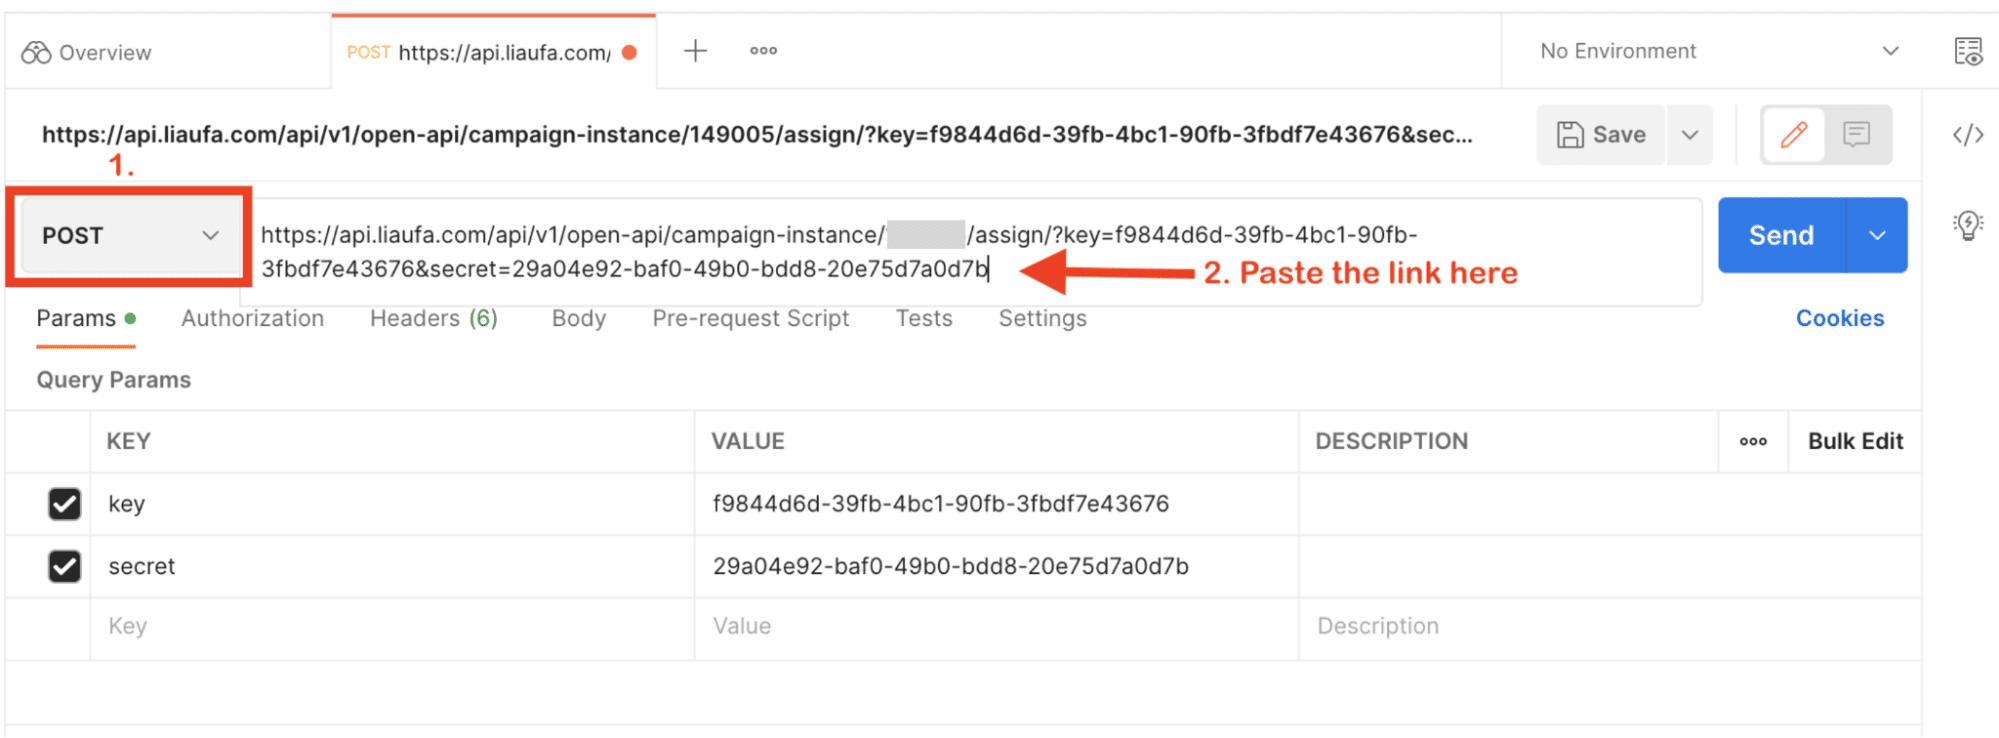
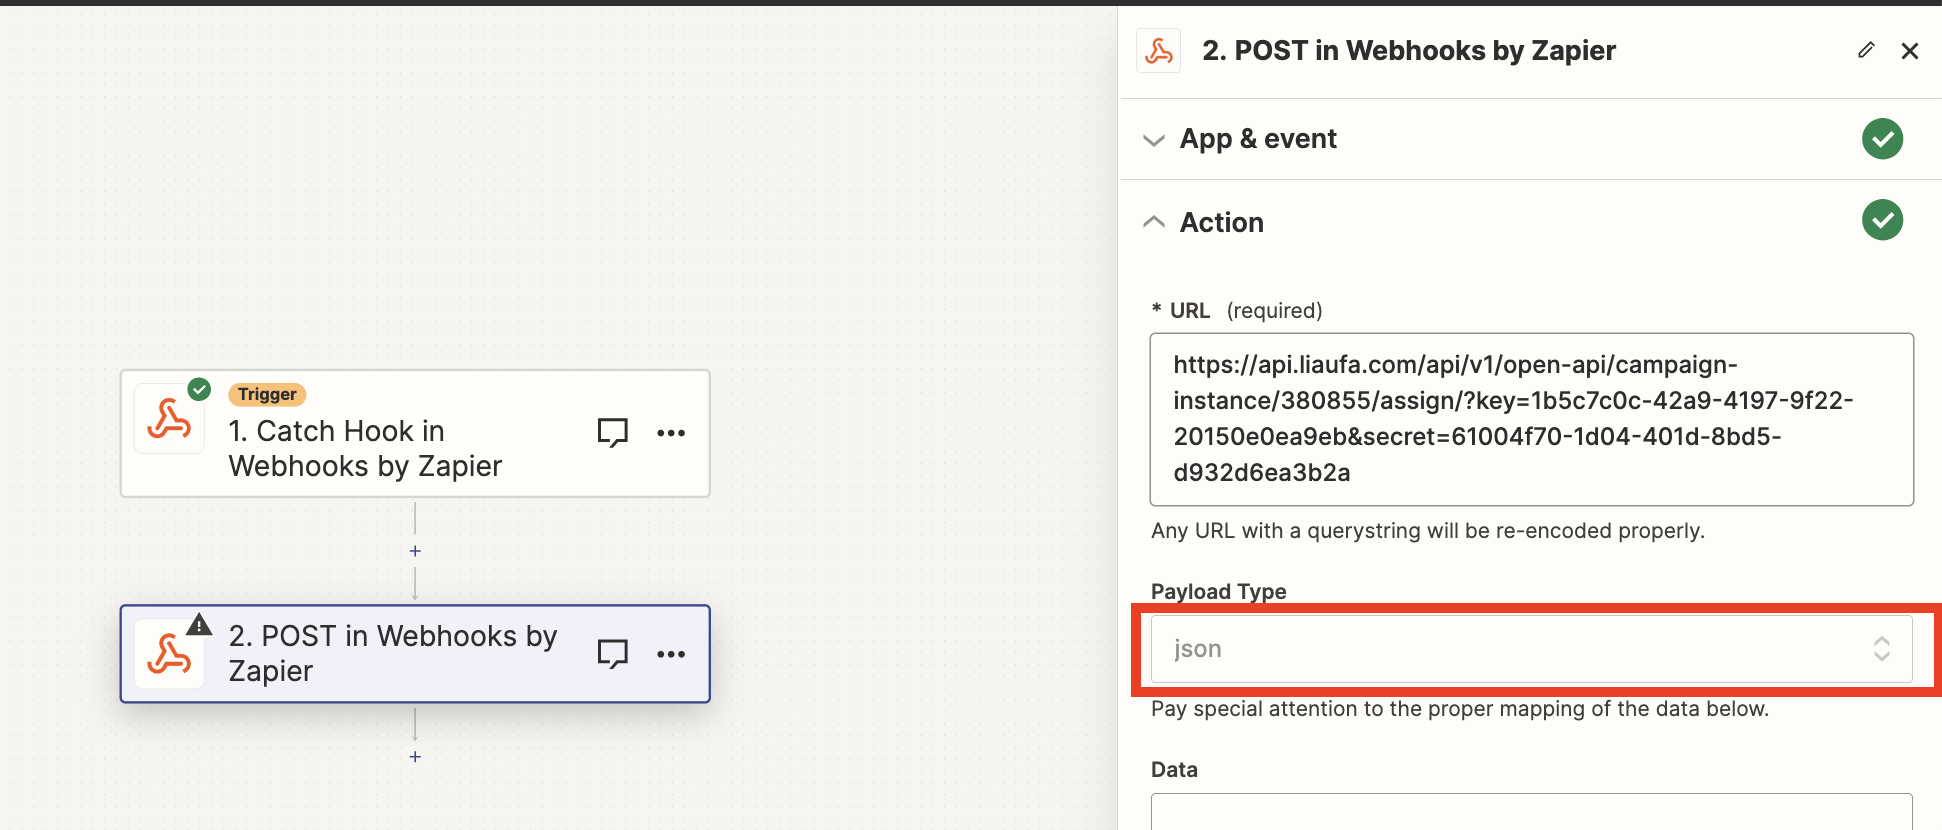
- To create the integration click on GET and select POST, then paste the URL that you copied from the campaign to the text field next to POST
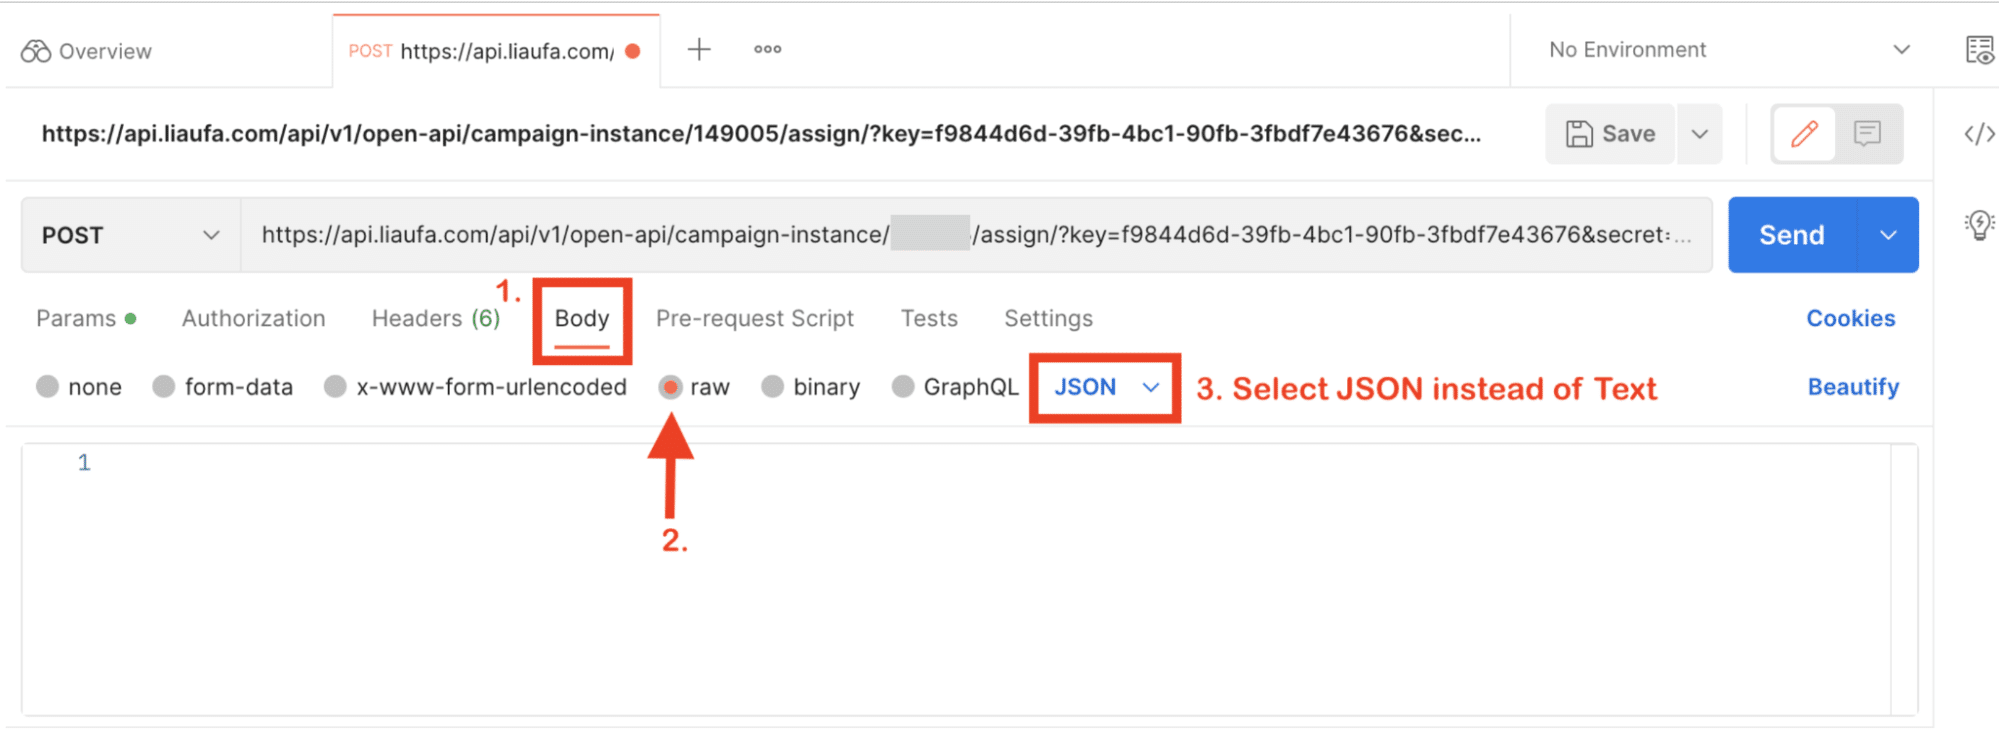
- Once done, press on Body and select Raw, then change the Text option to JSON.
- Enter the bracket { next to the number one and press Enter, in the second line enter “profile_link“: “the profile link of the lead you wish to add to the campaign” and press SEND.
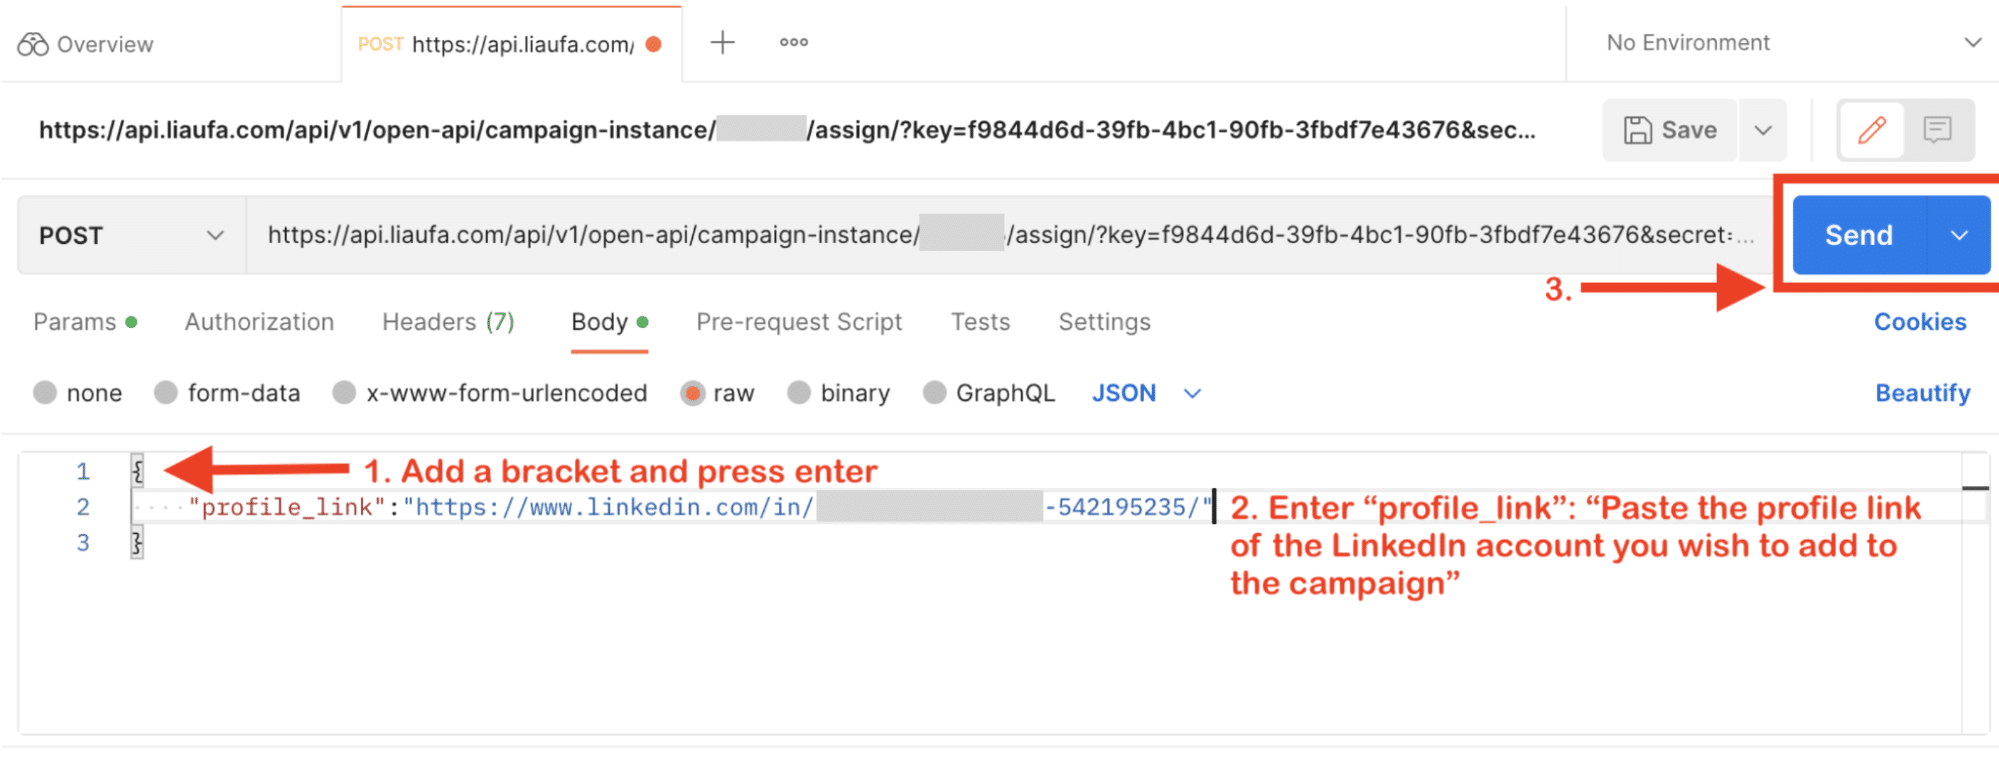
- Once it’s done, you will see the message that the lead was added to the campaign, just like the one below.
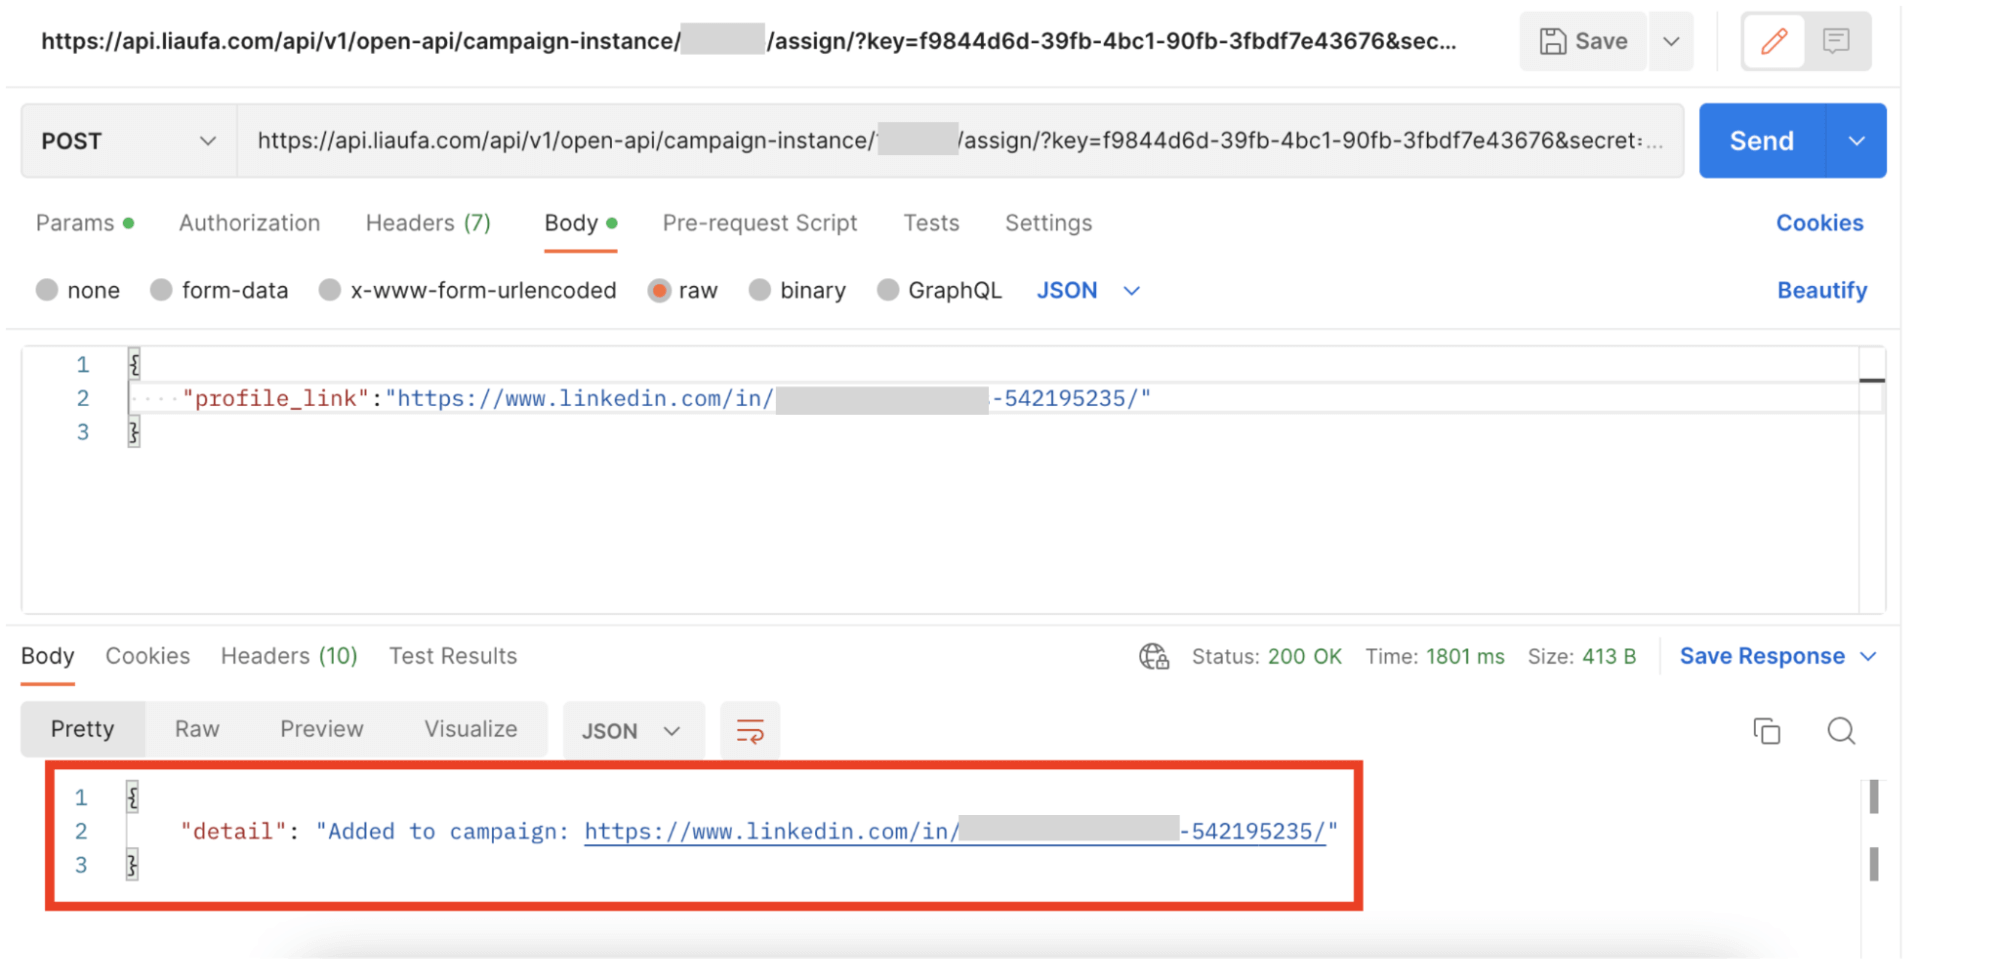
Now if you go to your campaign, People tab, you will see the lead you added via a reversed webhook there
Similarly, you can also add people to a campaign using a reversed webhook with Zapier.
How to add people to an Expandi campaign using a reversed webhook with Zapier
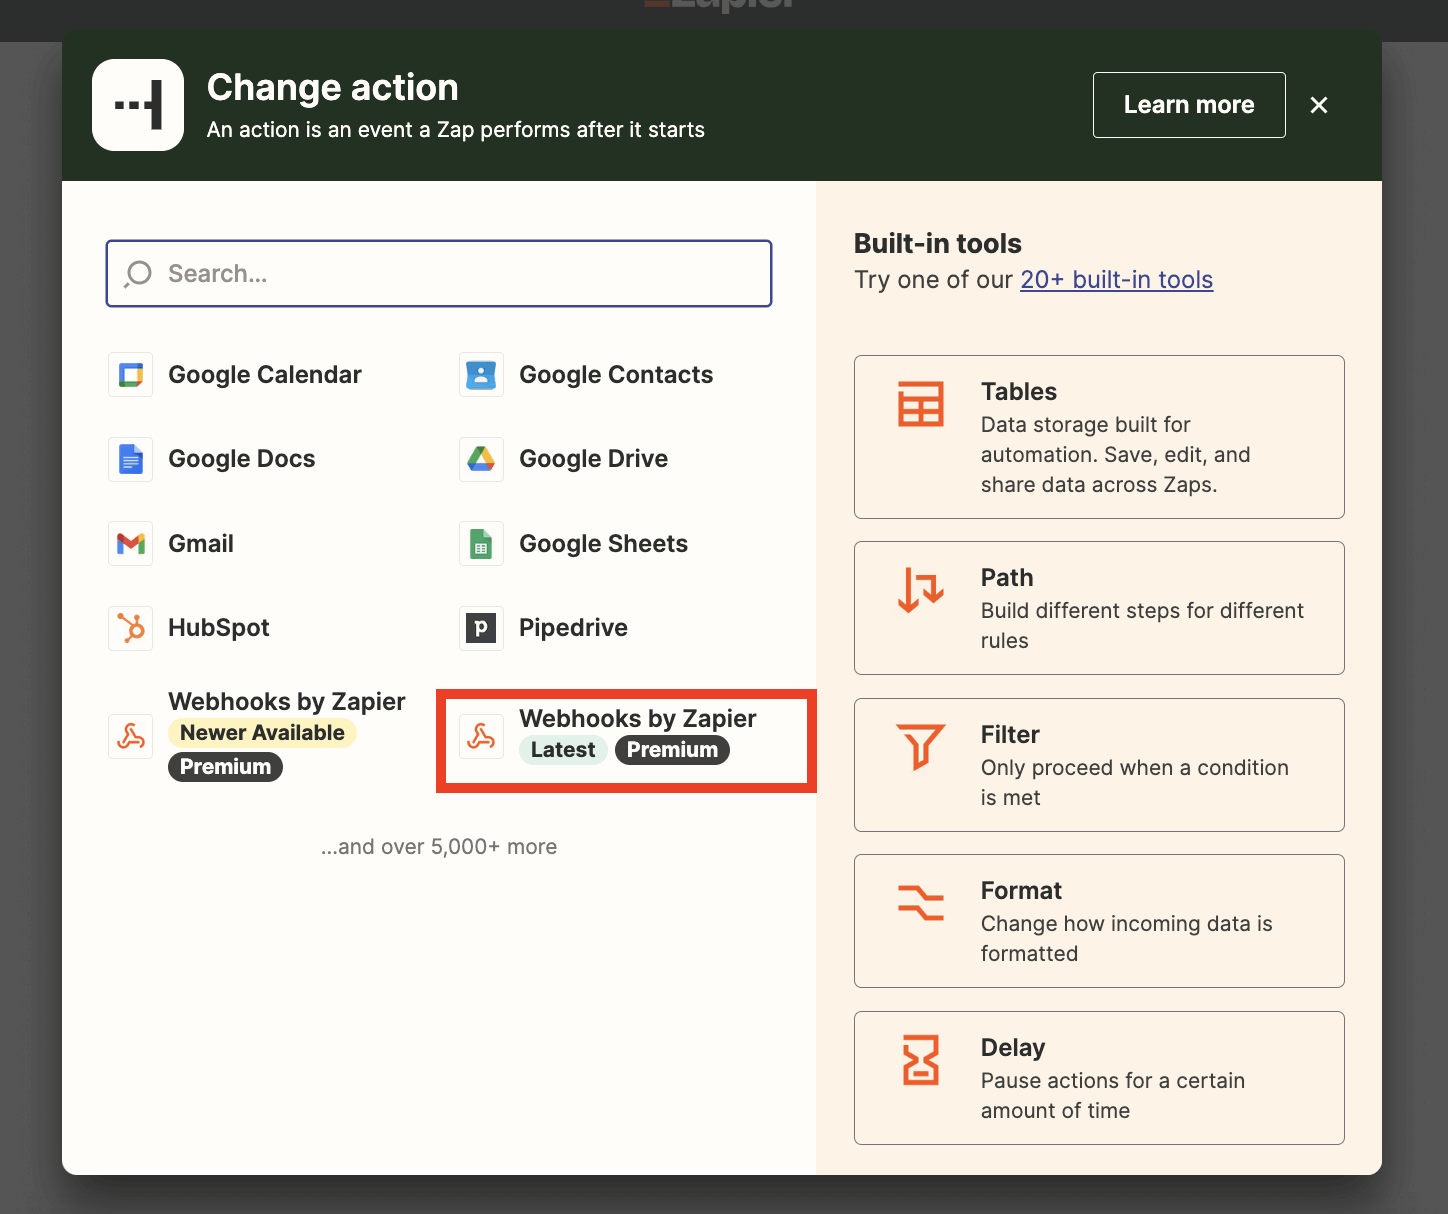
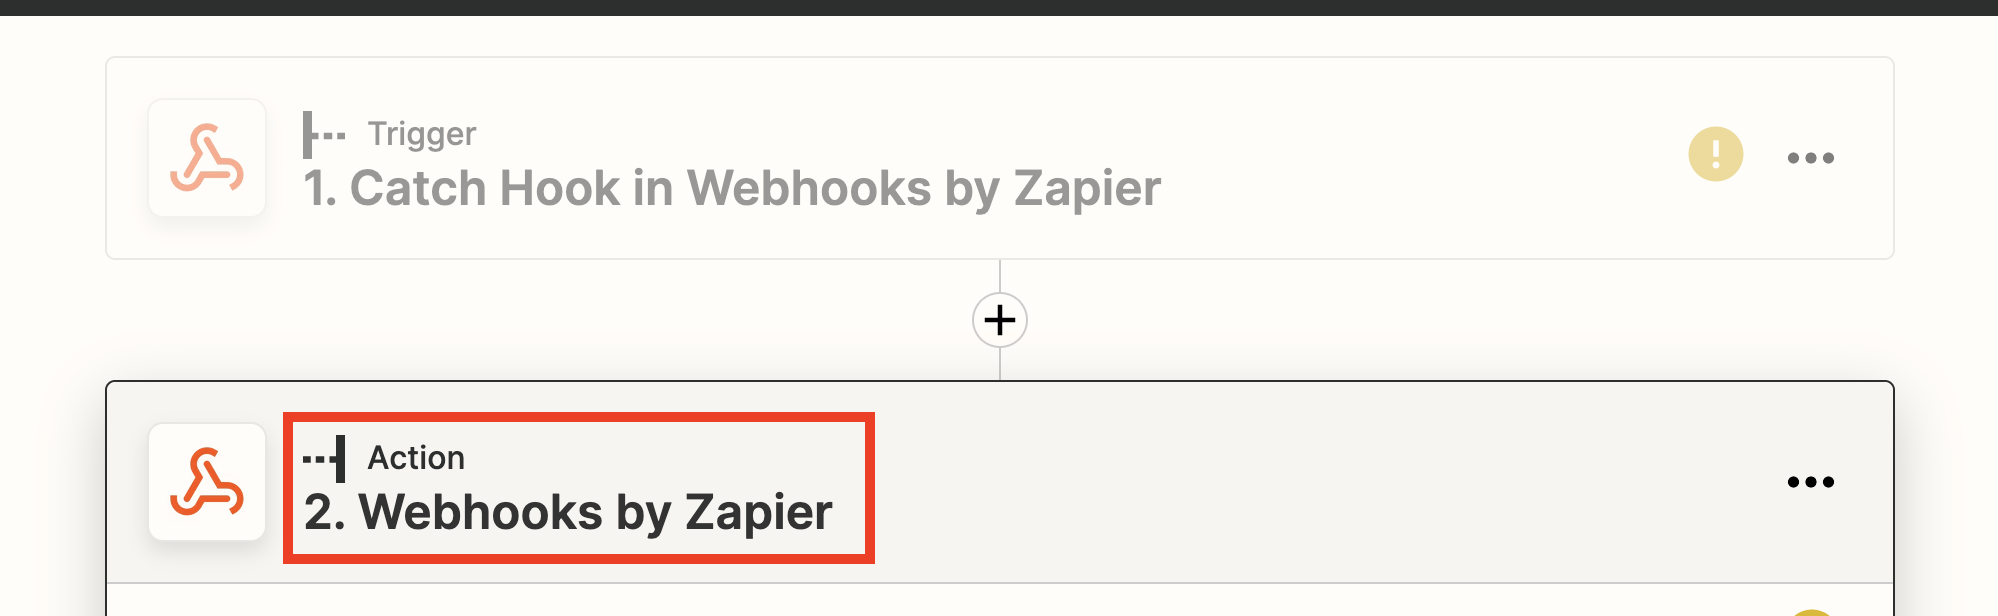
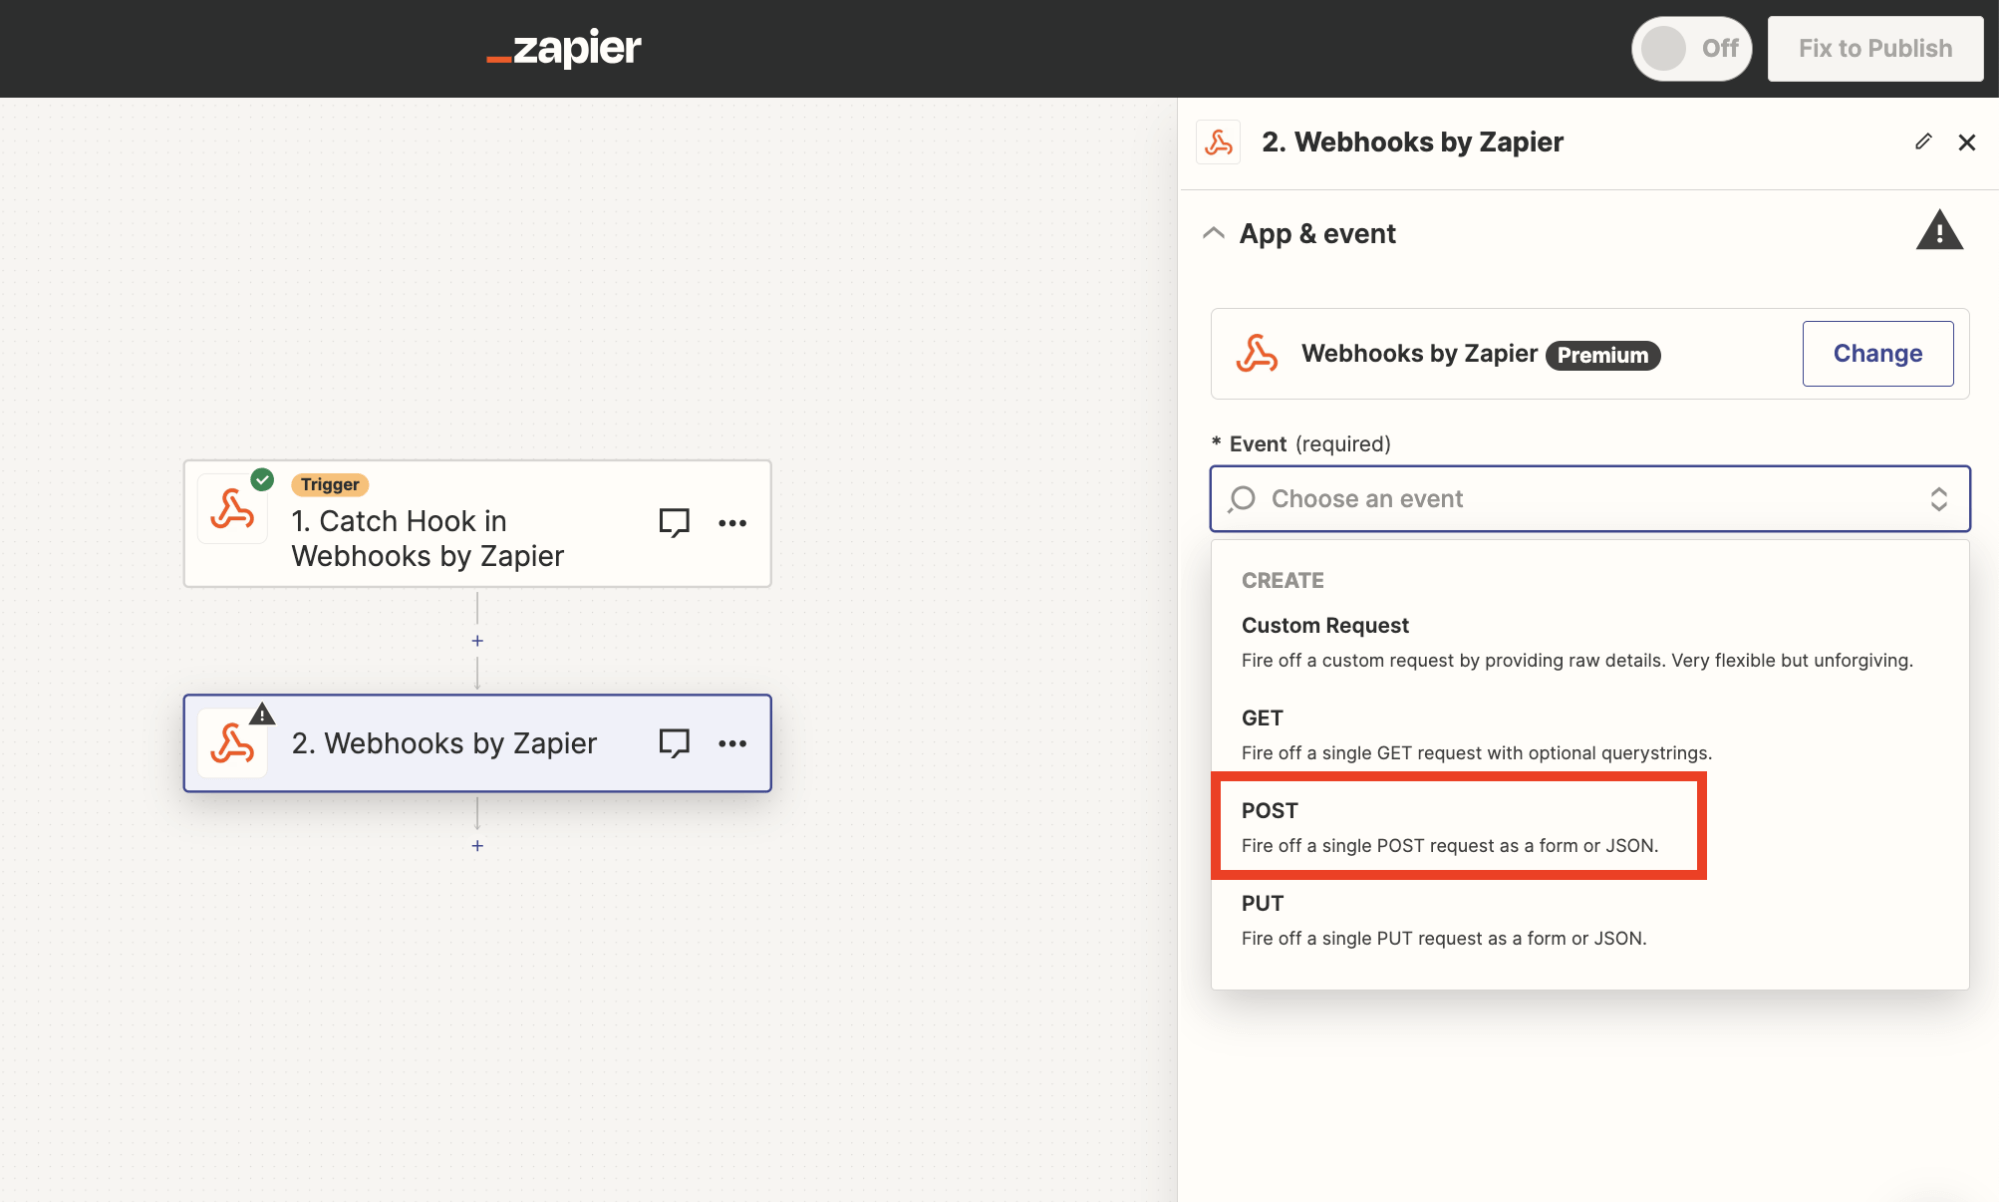
- Log into Zapier and open the Zap/webhook you created for one of your campaigns before and go to the second part of the process. Select webhooks by Zapier.
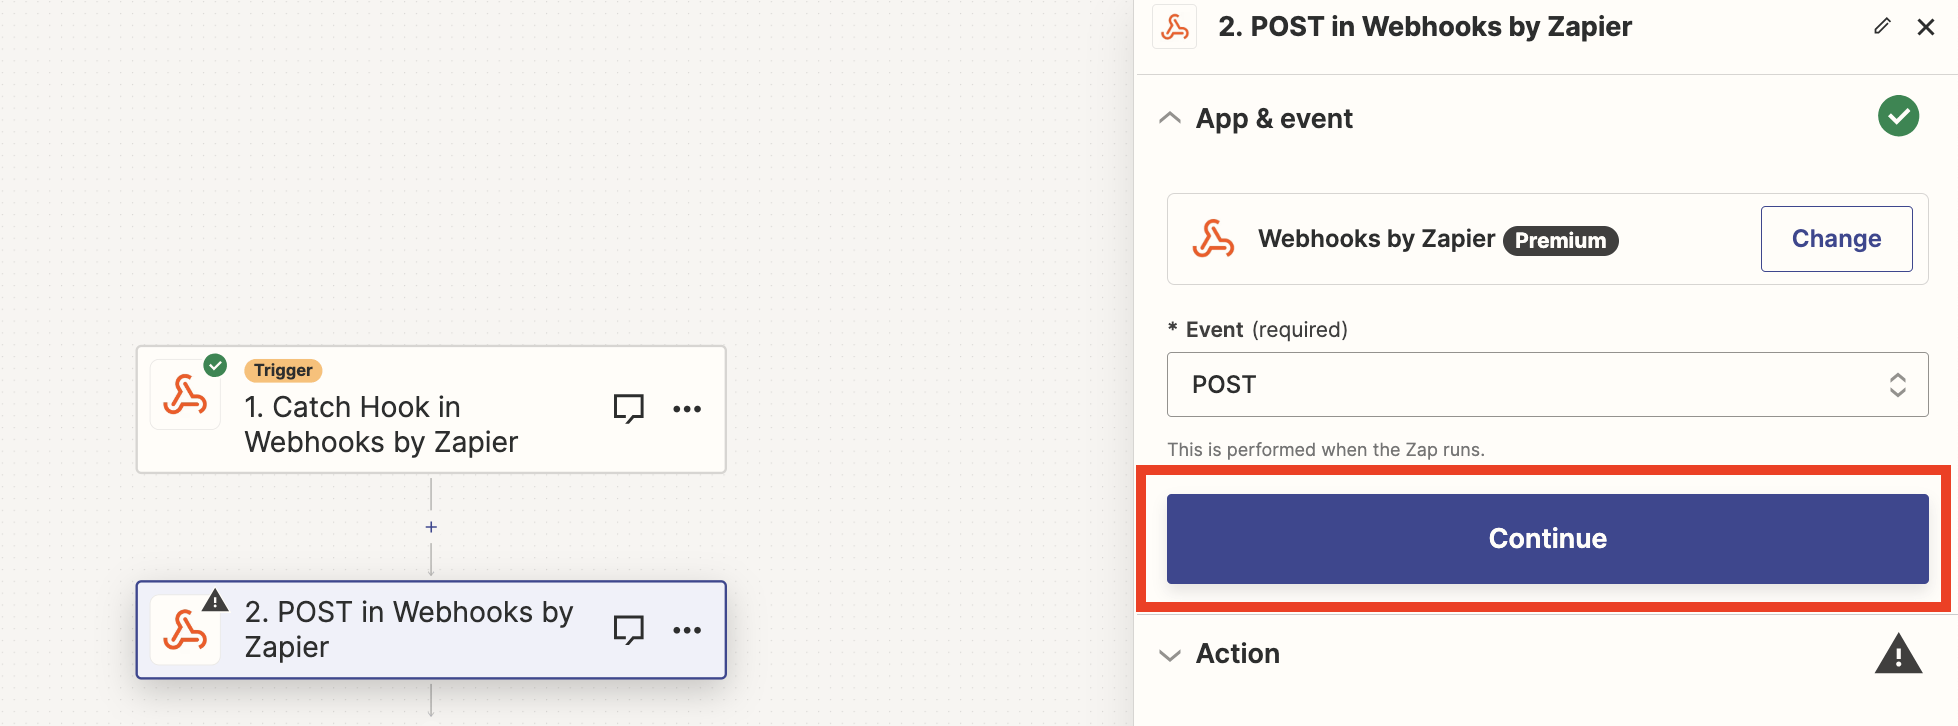
- In the Event section, choose POST and click Continue.
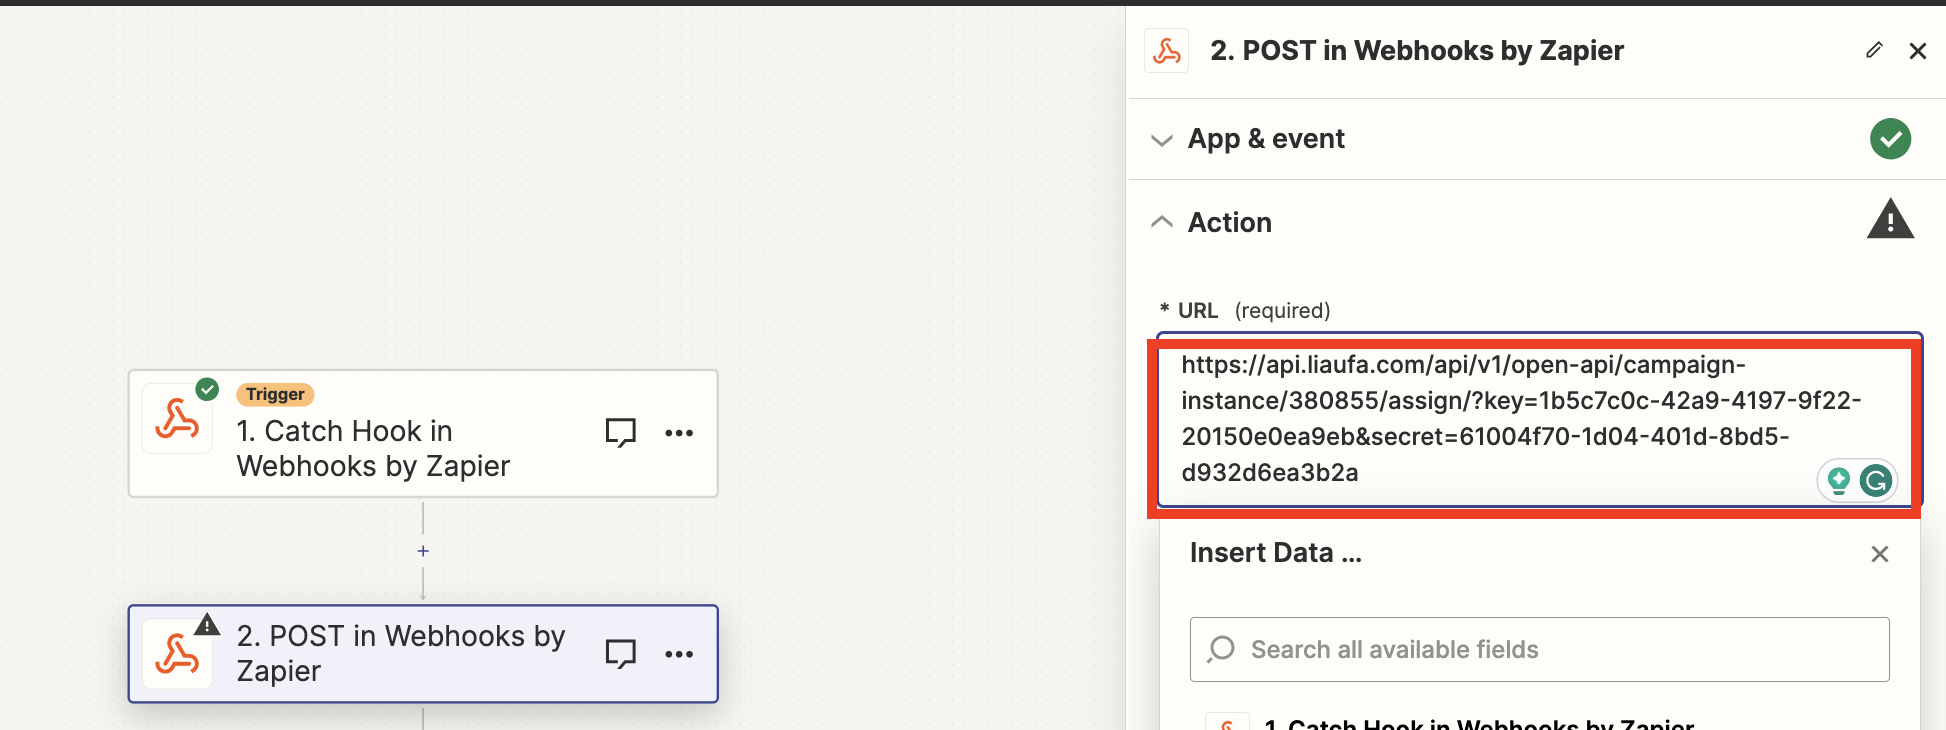
- Go to your campaign on Expandi, integrations tab, and copy the link from URL.
- Then to use section, then paste that URL on Zapier.
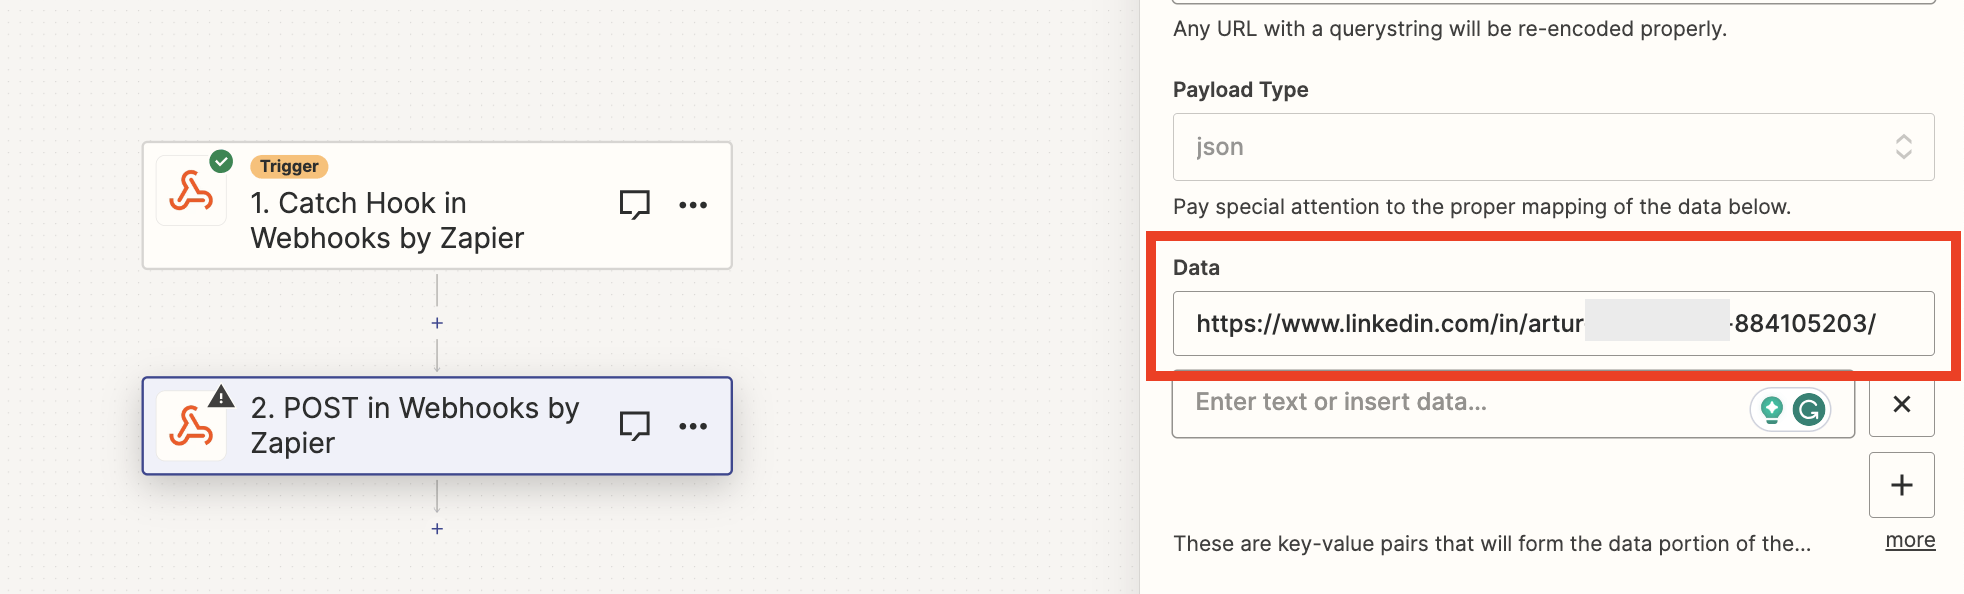
- Select the payload type to json.
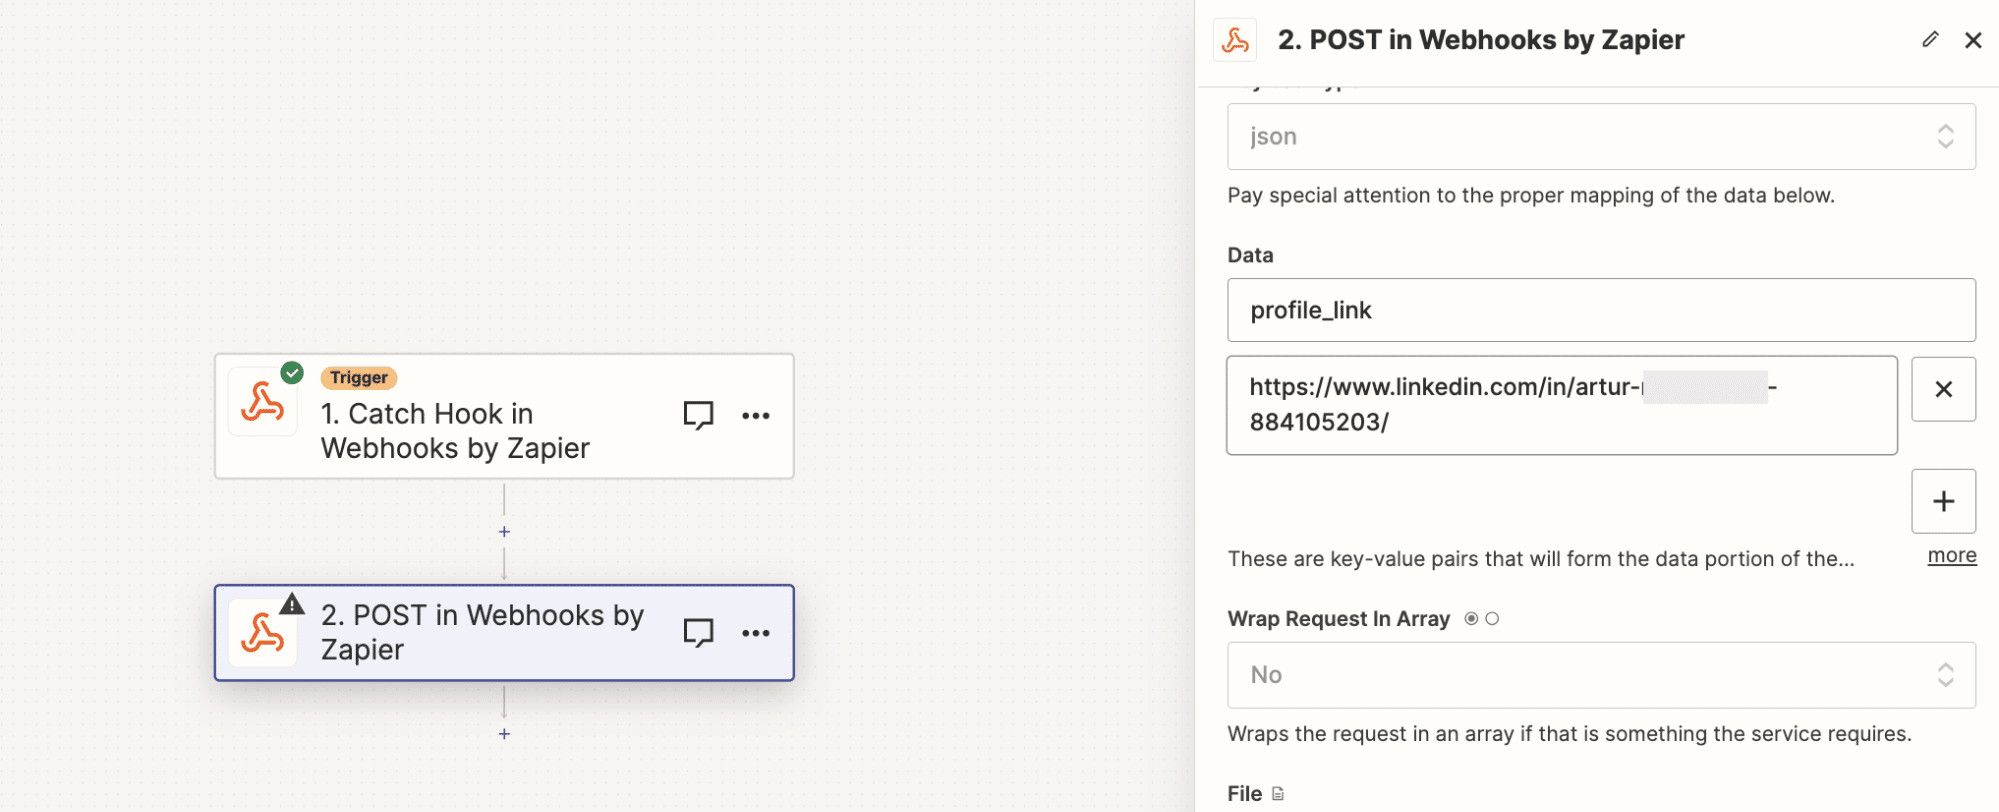
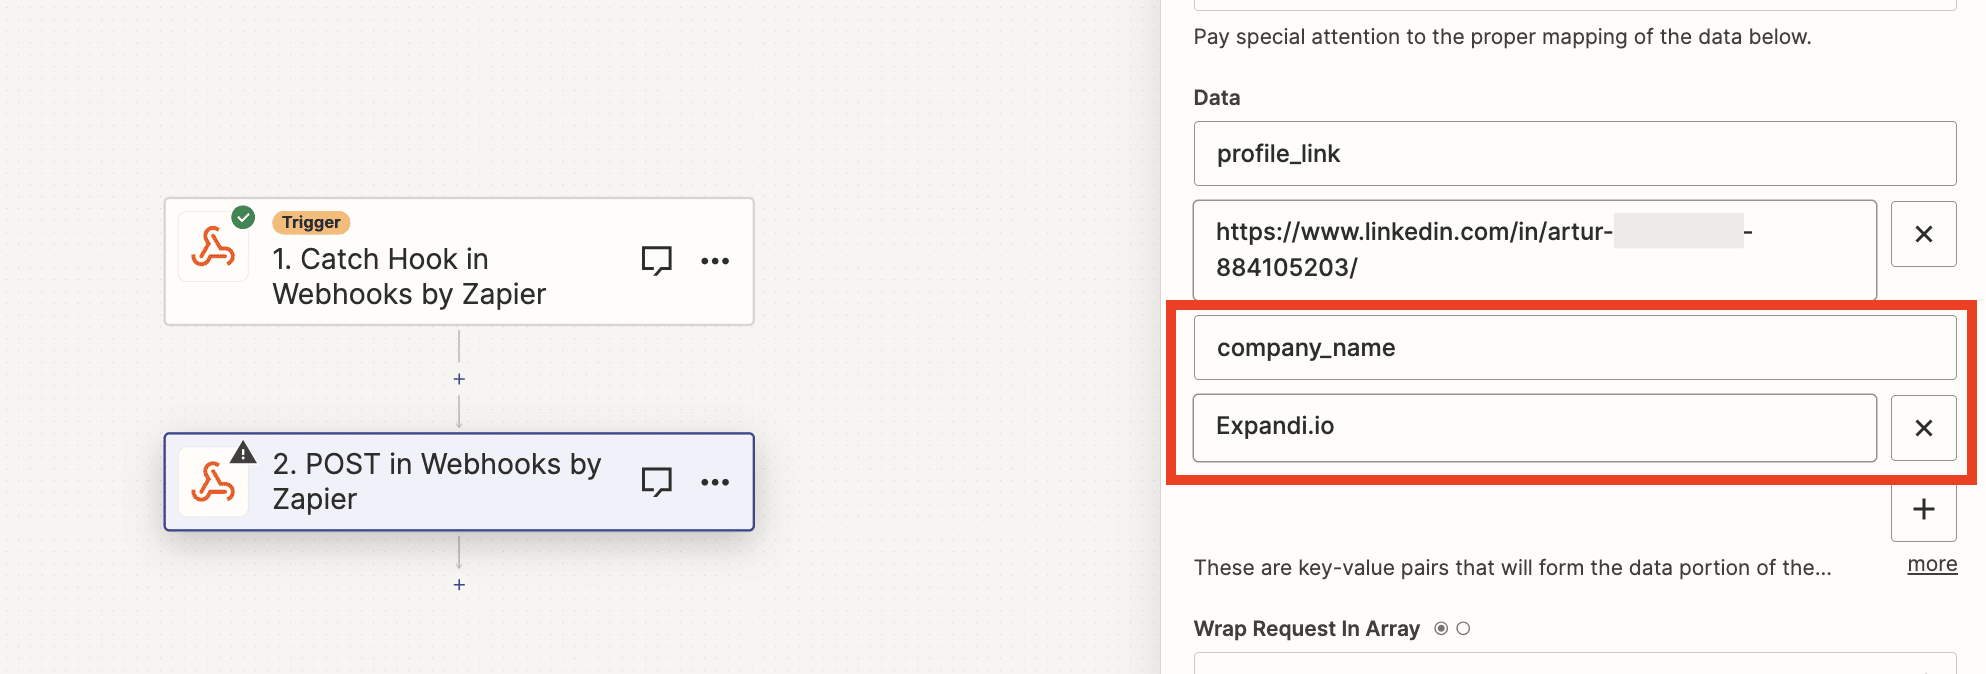
- In the next step, Data column you would need to add a LinkedIn profile link that you’d like to be imported to the campaign
- As an optional step, you can also import placeholders in this part of a set-up as well. If you’d like to import the profile link as a placeholder it’d look like this:
- Then, you can also import the name of the company this person works at. In this case, you’d have to click on the + button add company_name in the data field, and the name of the company below:
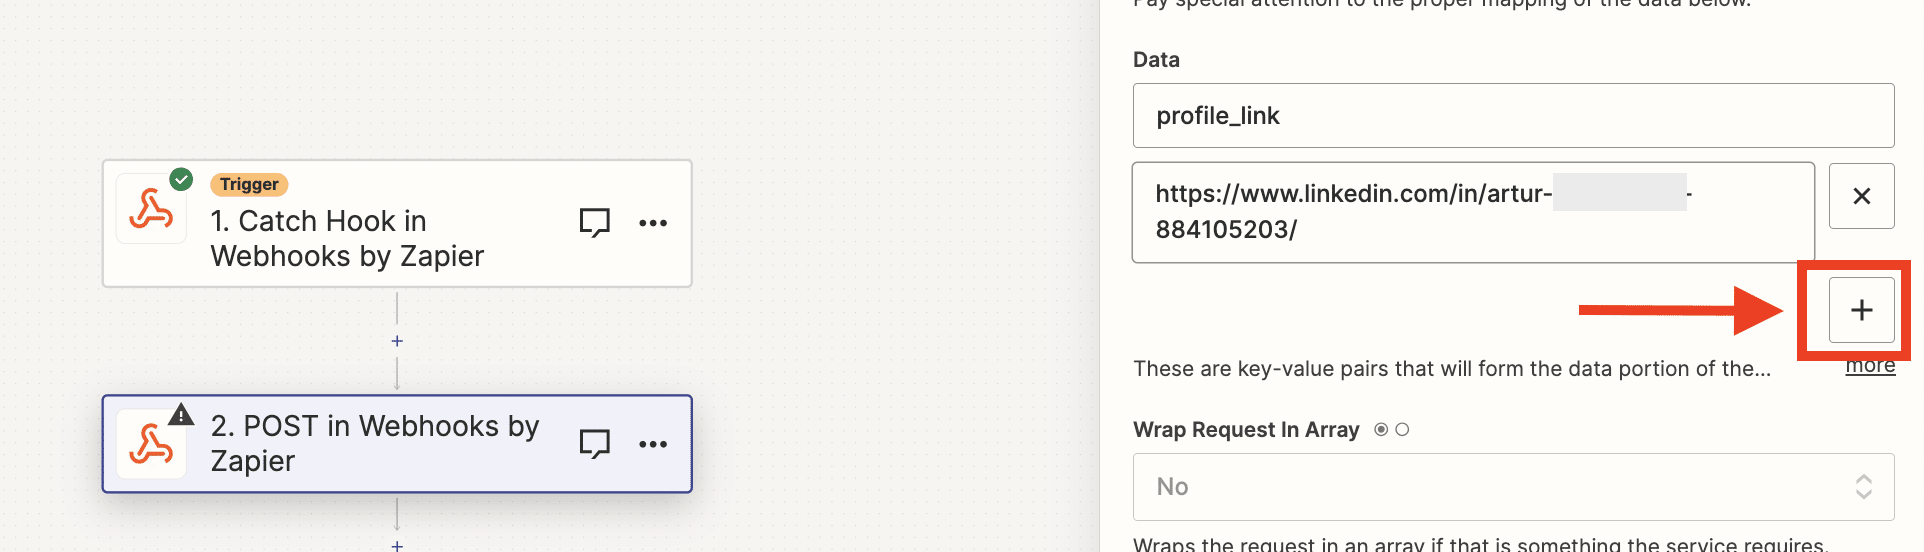
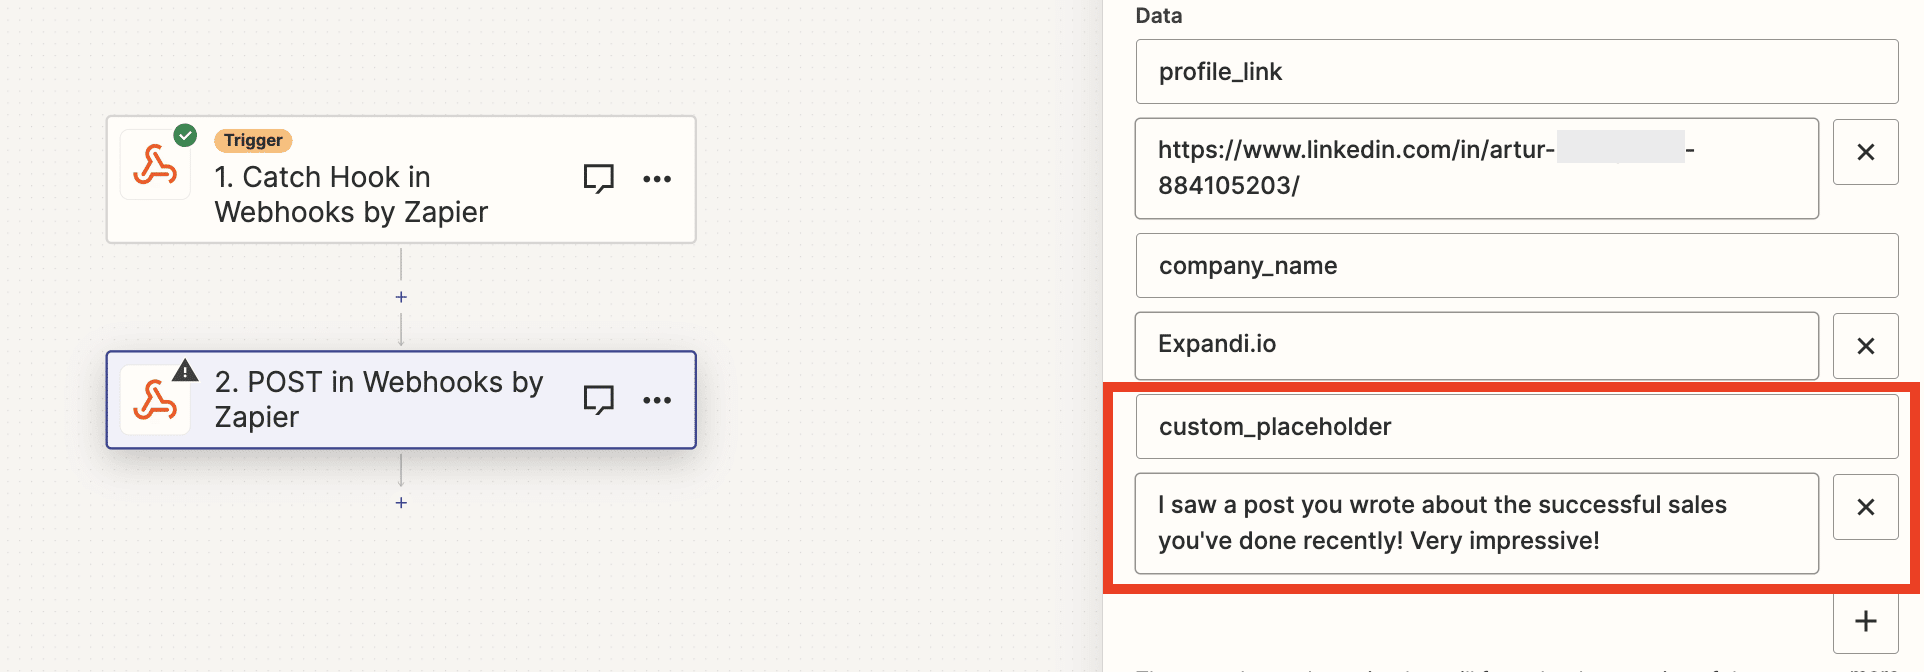
- You can also add a custom placeholder, something specifically for that lead. In this case, you would have to click on the + button again, enter custom_placeholder into the Data field and add custom information below for that placeholder that will be imported:
- Once you add all the placeholders you wanted set the Unflatten section to YES Wrap request in Array to No.
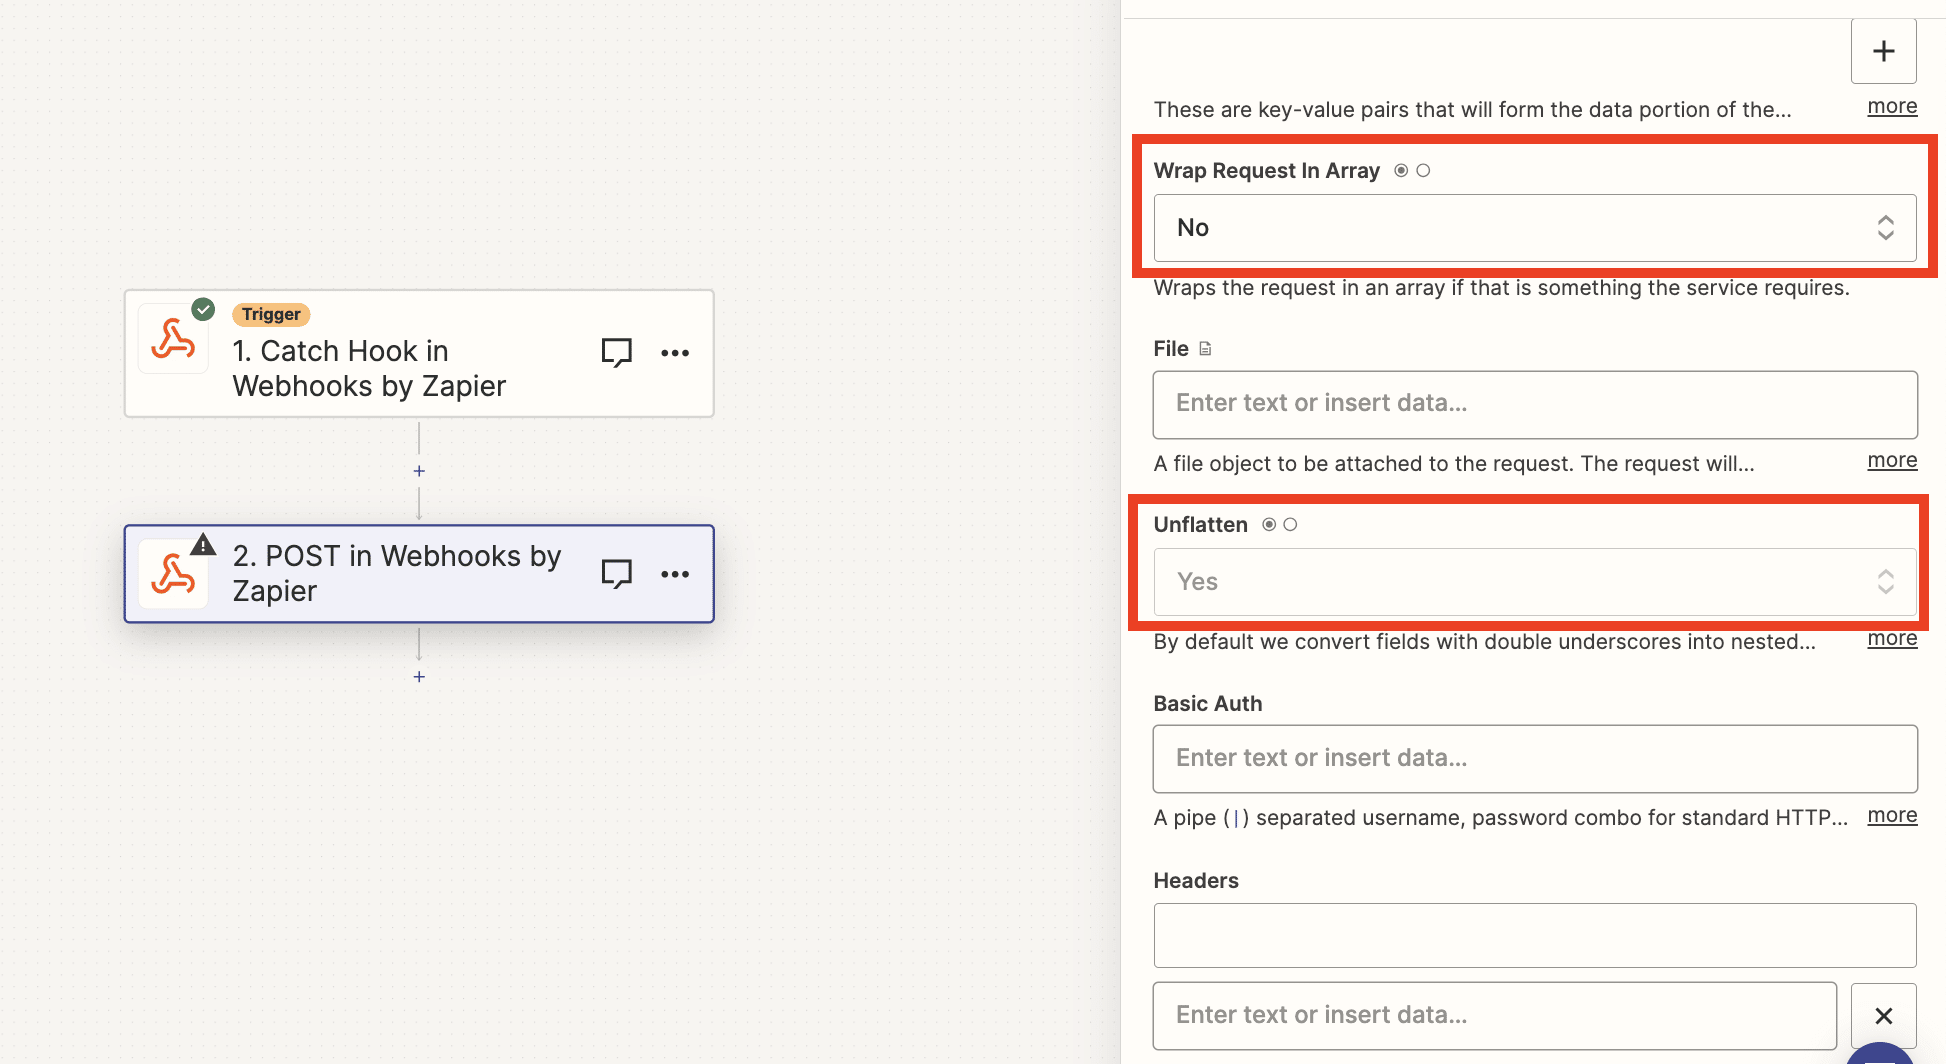
- Leave the other fields empty and click on Continue
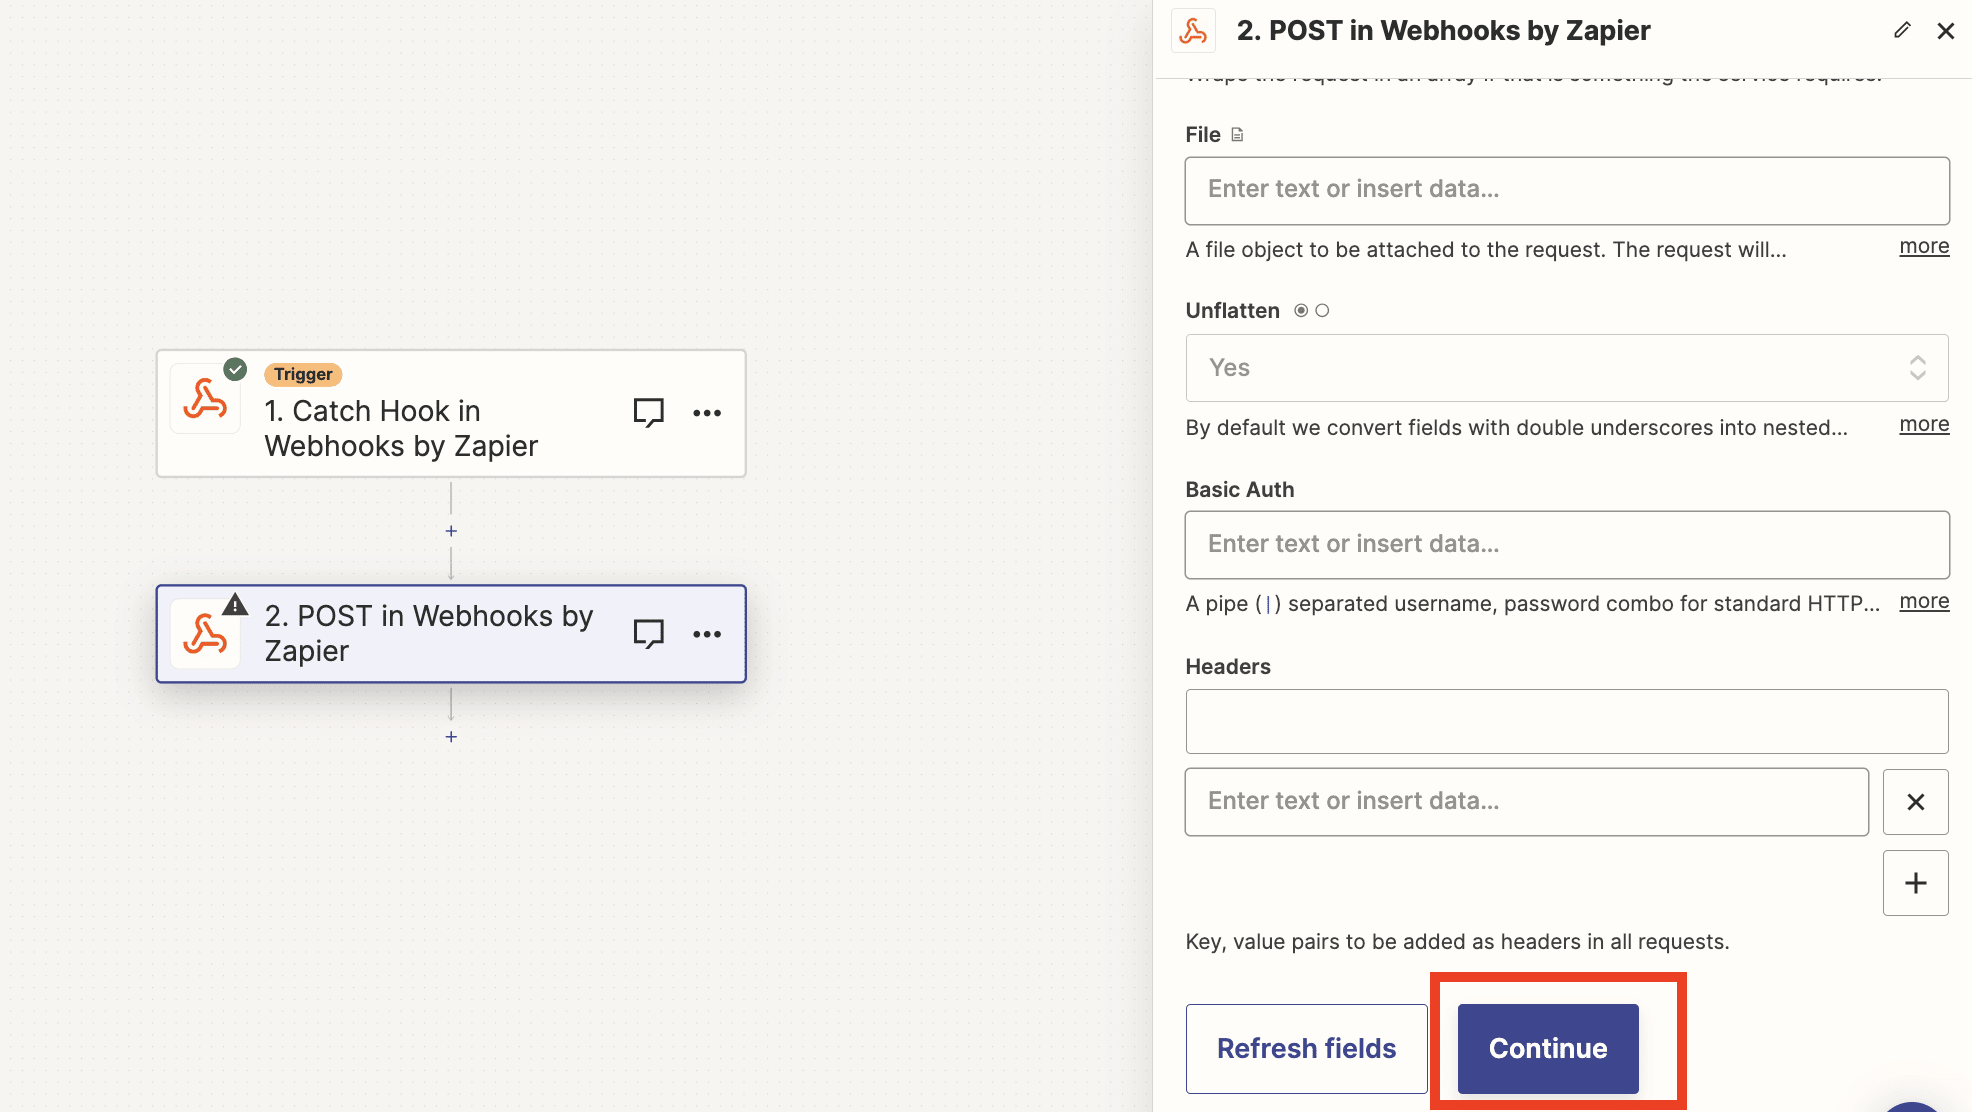
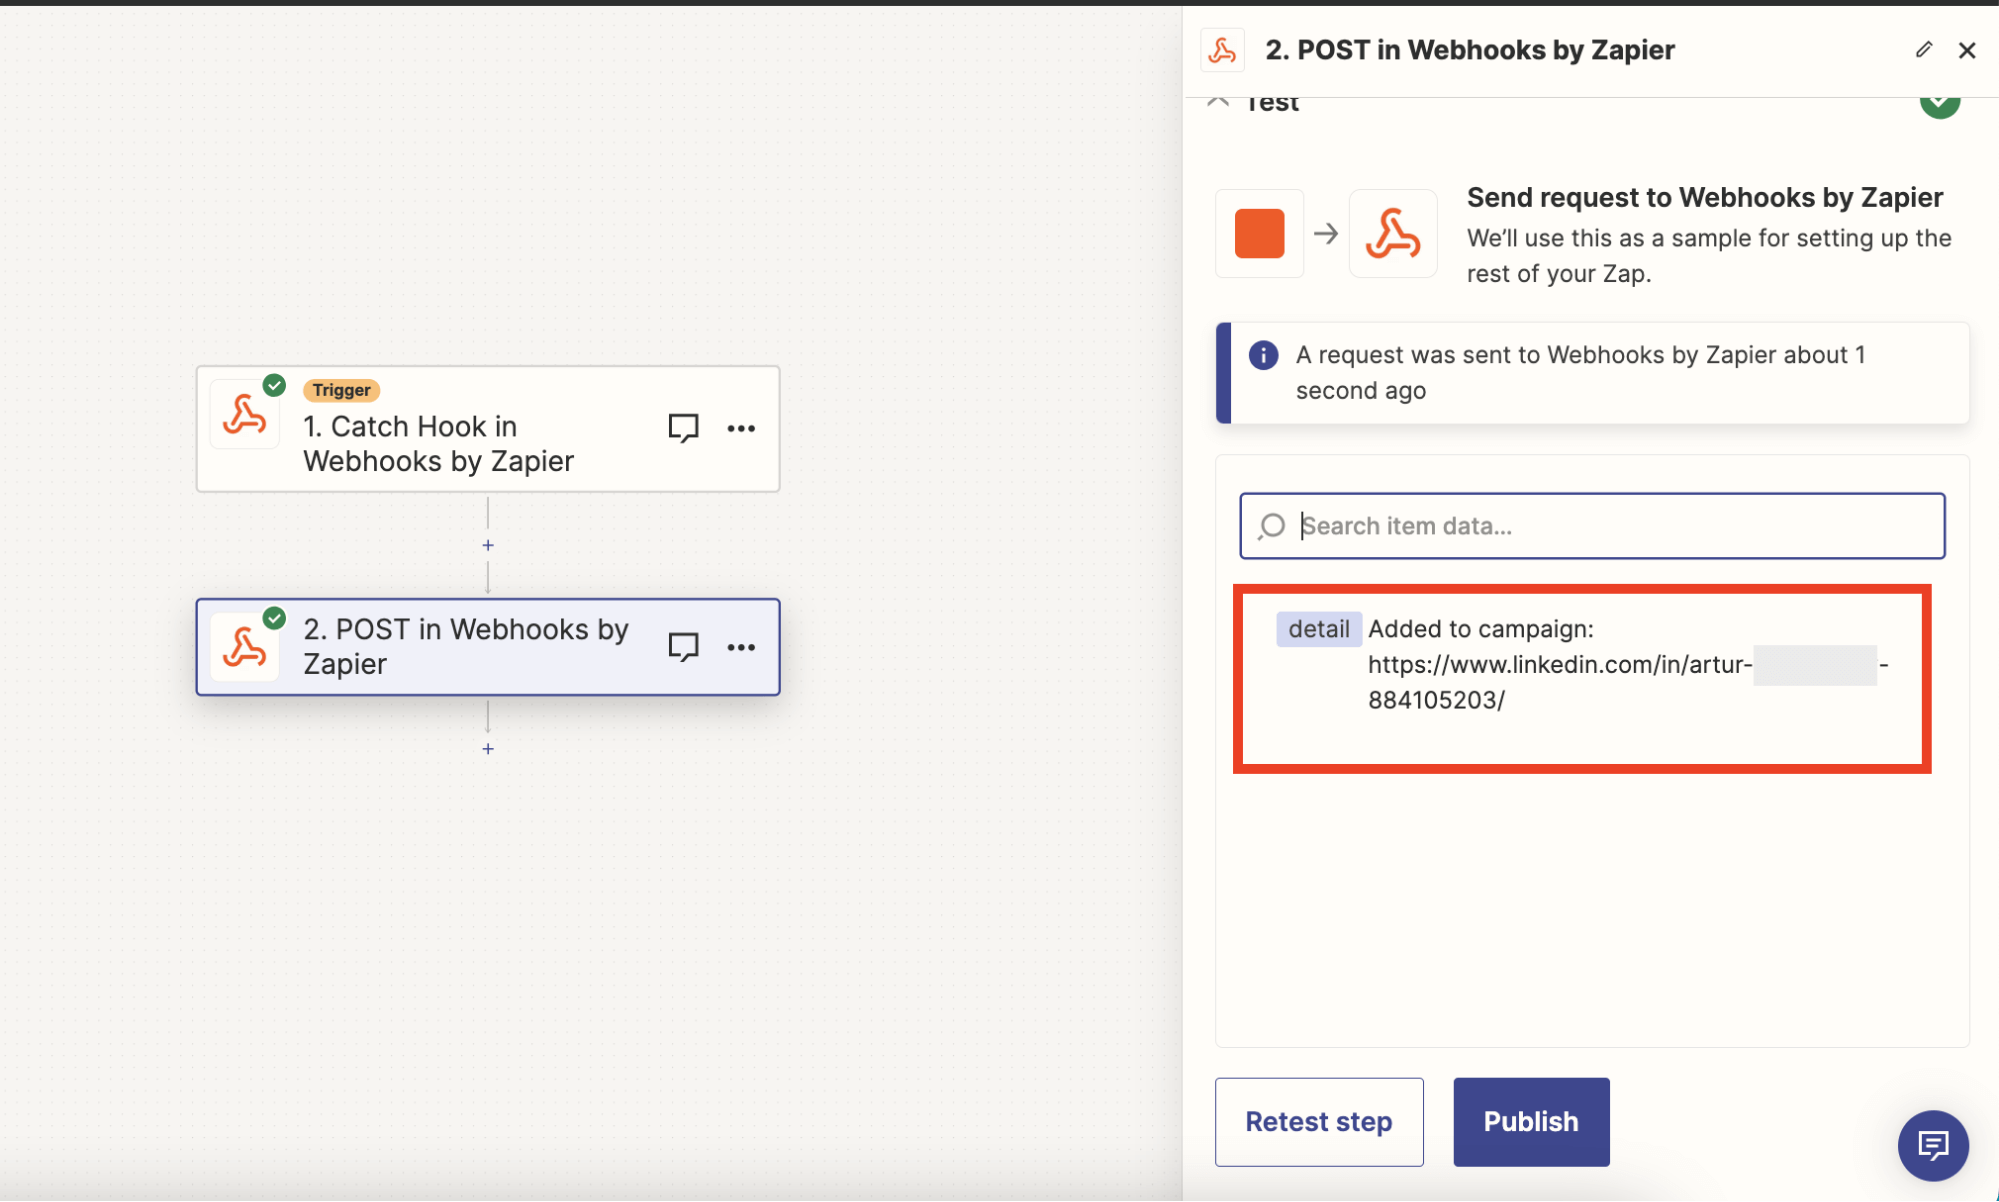
- Click on Test to test your webhook.
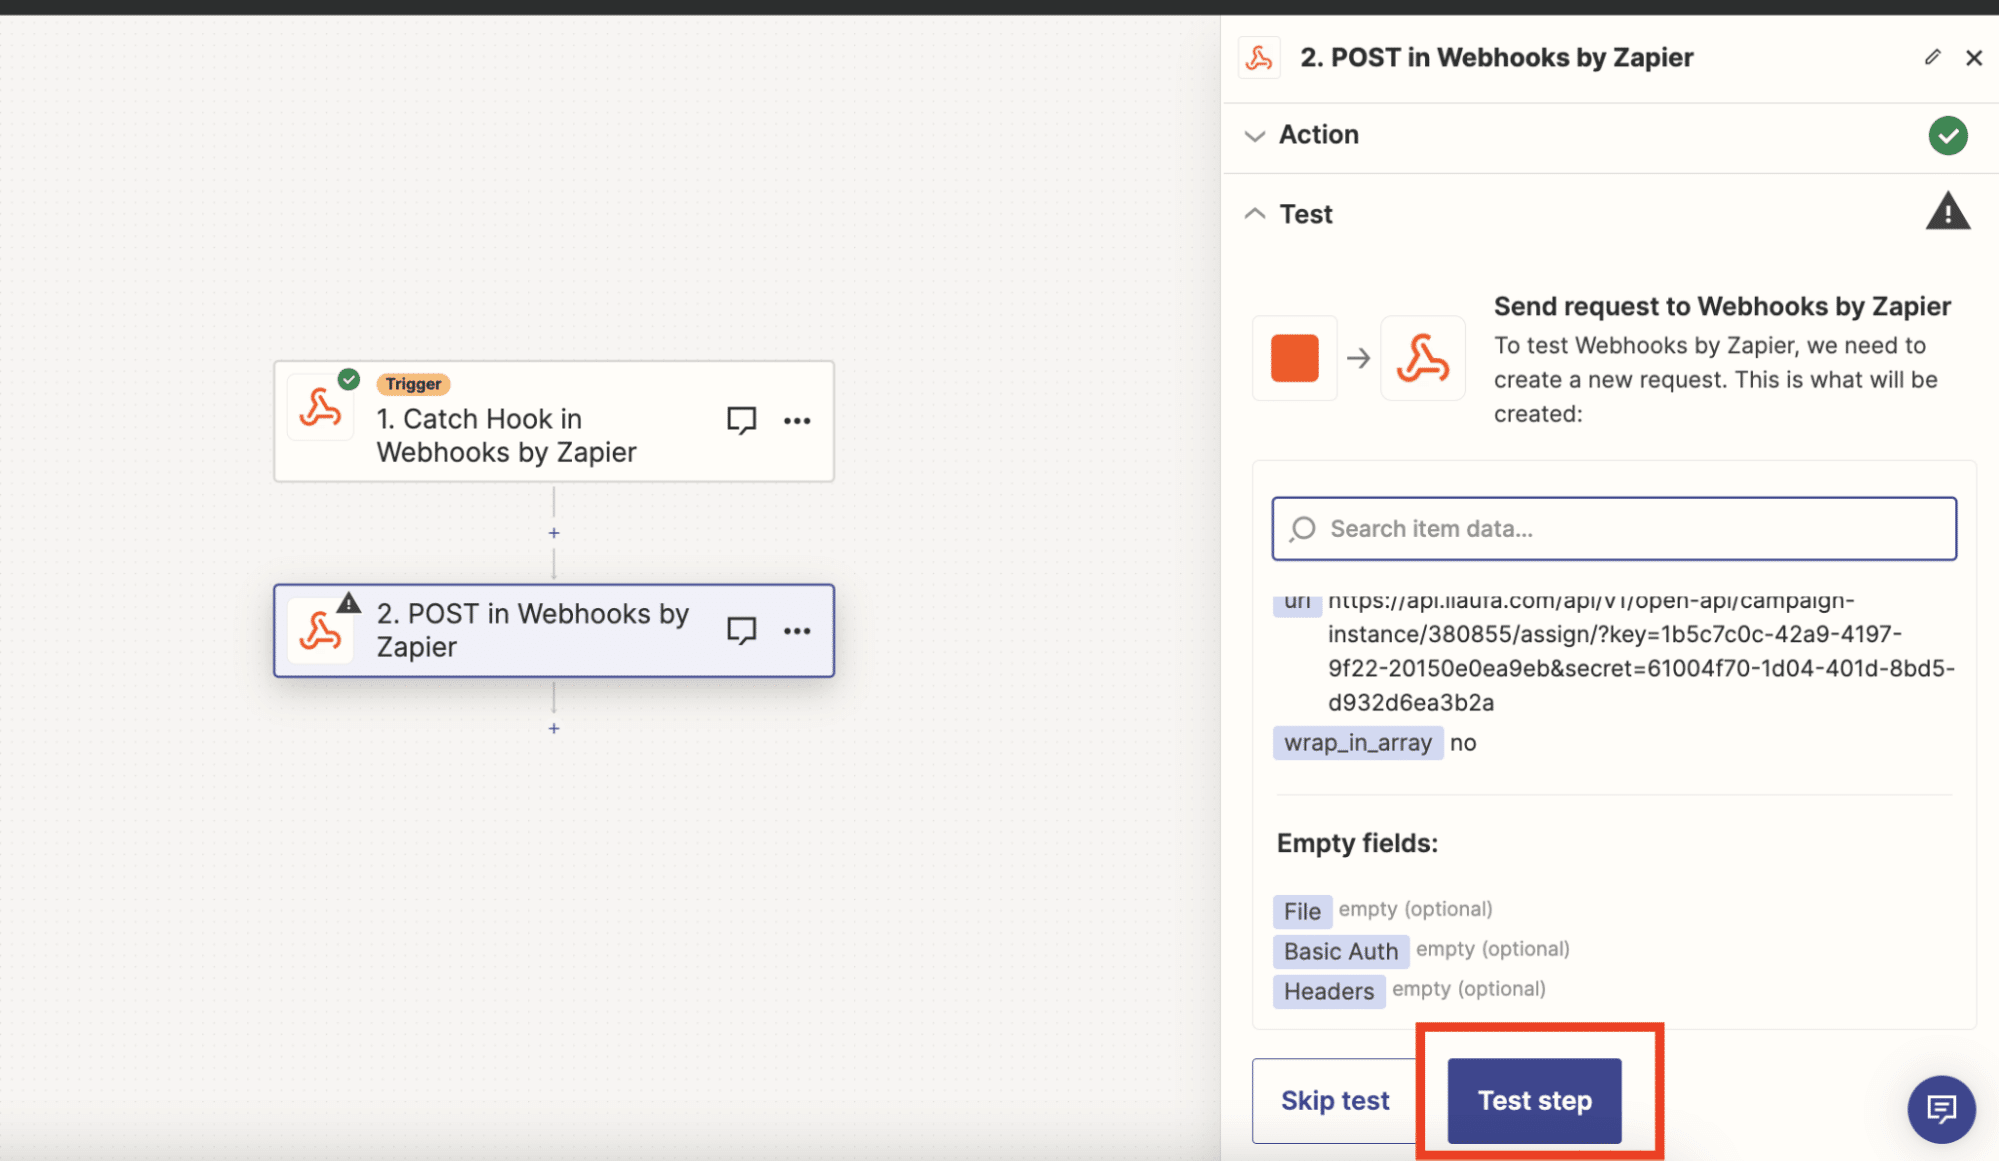
- Finally, if the test was successful, you’ll see a message that your lead was added to the campaign. Now, you can click Publish and finish the set up!
What are some practical applications of this?
Let’s say you want to automatically add leads from your CRM to an Expandi LinkedIn campaign.
In that case, you’d set up a reversed webhook to send LinkedIn profile data from your CRM to Expandi for very targeted outreach.
Alternatively, let’s say you’re managing leads through your CRM and want to control their status in Expandi without logging into Expandi.
You can simply use reversed webhooks to send commands from your CRM to Expandi to pause or resume leads.
Where To Go From Here
To recap, by leveraging webhooks and APIs, you can significantly boost your sales automation and lead generation processes.
To start with, we recommend integrating Expandi with your CRM (and any other relevant tech stack tools you use) to streamline outreach campaigns and ensure real-time updates.
Ready to fully automate your sales outreach?
Claim your free, 7-day Expandi trial now!
You can launch your first campaign in under 30 minutes and start seeing results in under 24 hours.
And being on the free trial doesn’t limit you in any way.
So, you can also start the integration use cases we covered above as well.


You’ve made it all the way down here, take the final step