PDF Lead Magnets: The Best LinkedIn Growth Hack – Expandi
We’re living in tough times right now.
This is not to spread fear, or to use it as a marketing opportunity. Rather, it’s just facts.
With the Coronavirus quarantine going on, more people are spending time at home. More people are now on social media, and now more than ever people DO NOT like being pitched or sold to.
So, that’s why we’re focusing on brand awareness and visibility right now.
But, before I forget, did you know that we have our own community were we share our best templates, tips, tricks and growth hack?
You can just join us, it’s called The LinkedIn Outreach Family. We would love to see you there, and don’t hesitate to share your hacks with us!
But let’s move on, In this guide, we’re going to focus on a growth hack to give back and provide free value, no questions asked.
We will be giving away our free LinkedIn outreach strategies PDF to people on LinkedIn, and then, retargeting those warmed contacts them through Facebook ads to increase our reach.
The goal here is to reach out to your clients via several channels (LinkedIn, Facebook ads) and to provide value (free growth hacking PDF).
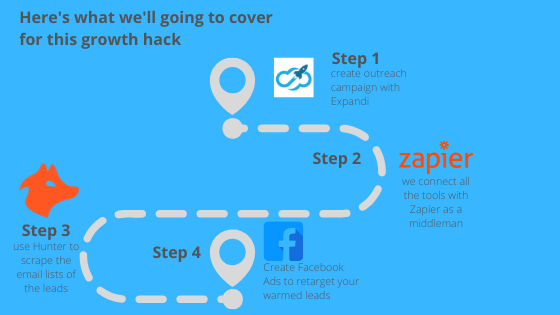
Here’s what we’ll need for this growth hack:
- Expandi to reach out to people and warm up your leads on LinkedIn. We’ll be focusing on outreach that focuses on your brand reach and awareness – nothing too sales-y.
- Zapier which will be the middleman and connect all of the tools mentioned here.
- Hunter to scrape the email lists of your leads.
- Facebook Ads to retarget your warmed leads. We’re going to be building our own Facebook ads custom audience pipeline here. No advanced Facebook Ads knowledge is necessary here, and we’re going to be explaining this step more in-dept below. So, be sure to keep on reading!
This guide might seem a bit more complex, compared to the other case studies we’ve covered here. But if done well, it can be a really powerful way to increase your reach.
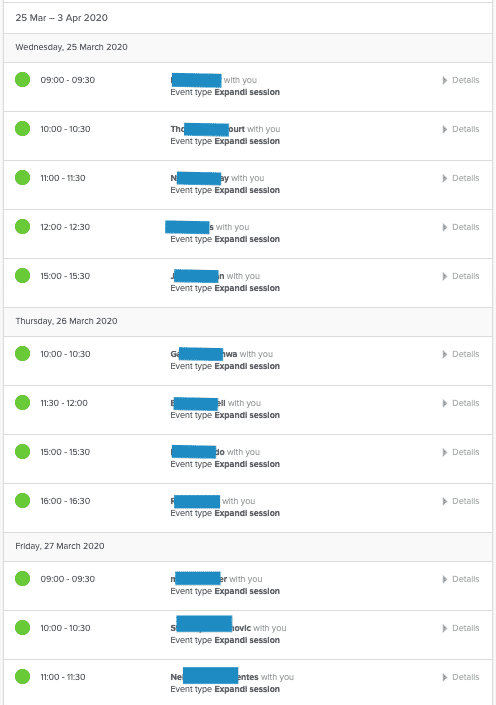
Here’s a little preview of what we achieved using this growth-hack:
Preparing LinkedIn Offer for Outreach
Before we get anywhere, we first need to define our offer and prepare for outreach.
For us, the offer is this landing page where the reader can claim the free PDF for The Top 3 LinkedIn outreach strategies.
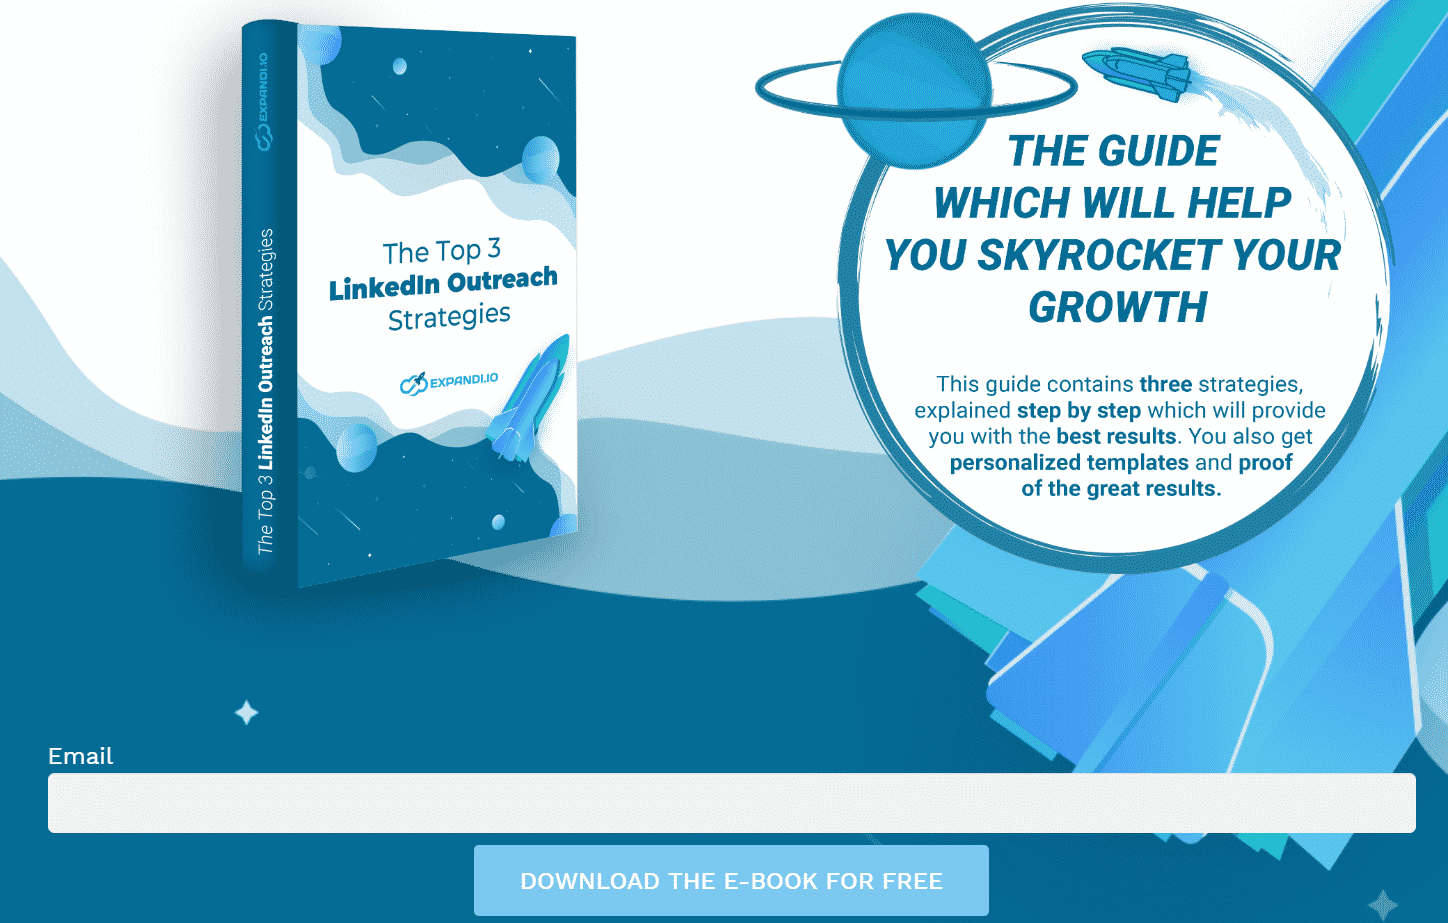
We created this really nice PDF which people can download for free with actionable tips and a step-by-step guide on how to launch top growth hacks for your business.
Once you have an idea of your offer, the next thing you need to do is prepare for outreach.
On LinkedIn, first impressions are everything. So, before you do outreach, it’s important you optimize your profile.
When I personally look at LinkedIn connection requests, the main things I’m looking for are their profile and banner photos, tagline, and summary.
So, let’s start there.
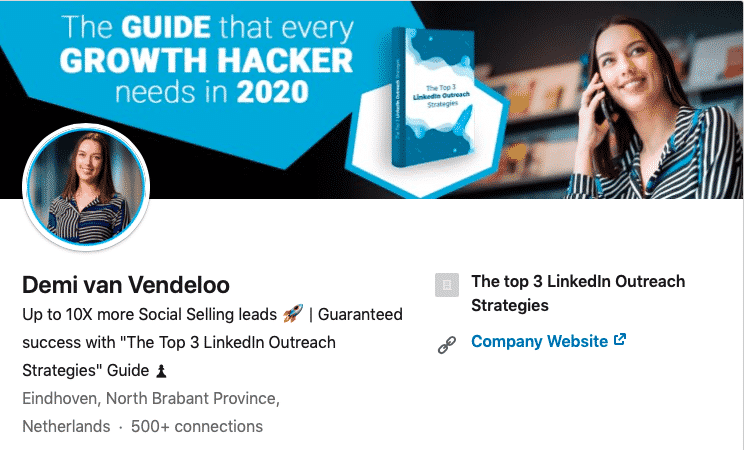
We optimized the profile picture, designed a specific banner picture for outreach, and created a headline for the outreach campaign. And here’s the profile that will be doing all the outreach :
So far, we have:
- A relevant and free PDF value for the leads ✔️
- An optimized LinkedIn profile ready for outreach ✔️
Great, now we can move onto finding and targeting the right target audience:
PS – Before doing outreach, you should make sure your account is warmed up and that you’re using personalization right. Check out our full guide and more tips on that here:LinkedIn Outreach Guide for Beginners
Targeting the Right People Through LinkedIn Sales Navigator
Who are you targeting?
This will largely depend on your offer.
Because our offer is a PDF for the Top 3 LinkedIn Outreach Strategies, we want to target growth-hackers active in the B2B industry within the United States.
And because we want to build brand awareness here, we’re going to be targeting 2nd and 3rd degree connections, aka, people we’re not already connected with.
As a note, 1st degree connections are people you’re already connected with. 2nd degree connections are people who are connected to your 1st degree connections (meaning, you have mutual connections), and 3rd degree connections people connected to your 2nd degree connections (meaning, you have only 1 or 0 mutual connections).
For this, we’re going to use LinkedIn Sales Navigator to prepare a search with 16,000+ people.
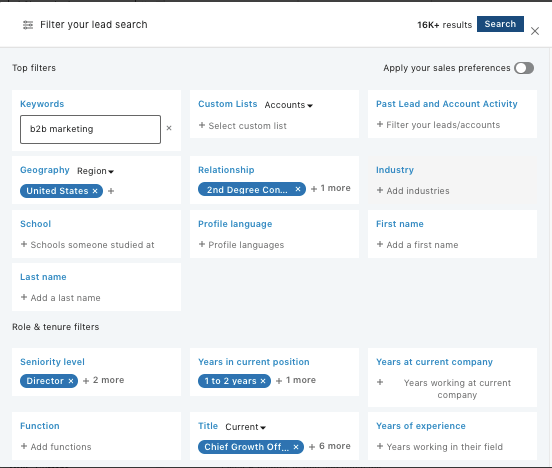
We’re using some super simple but effective filters here:
- Keywords – B2B Marketing.
- Geography – United States.
- Relationship – 2nd and 3rd degree connections.
- Seniority Level – Director, Owner and Partner.
- Title – Chief Growth Officer, Director of Growth, Head of Growth, Chief Marketing officer Marketing Director and Vice President of growth.
Note on Sales Navigator: LinkedIn Sales Navigator can be a great investment if you’re going to be doing a lot of prospecting. You can target the right people, and do filter better than regular LinkedIn. If that’s the case, we’d recommend using the one month free trial. Then, you can see if it’ll be worth buying from there.
Now, we can start preparing the LinkedIn outreach sequence.
Building a Sales Sequence
With our target audience ready, we’re going to start writing the outreach sequence messages.
For this, we’ll be using Expandi (gasp!).
Yes. That’s our tool. But guess what? Expandi’s the safest LinkedIn tool on the market! More info on generating leads through LinkedIn safely here: How to Generate Leads Through LinkedIn Automation Tools Without Getting Banned
With it, we can build nice sales sequences to schedule whenever we want. And more importantly, in this case, we’re going to be utilizing webhooks with a bunch of triggers to build our Facebook Ads Custom Audience pipeline
Sounds exciting, right?
We’ll be explaining the whole Facebook Ads retargeting magic below. Let’s continue with the sales sequence for now.
As an experienced growth-hacker, I always try and test different approaches. One main takeaway from my experience is to first define the outreach intent, and then write the sequence based on that. In this case, the highlight is on providing free value, and not being overly sales-y. People don’t like being sold to, especially nowadays.
So, why not drop them a free gift in their inbox with no annoying “SIGN UP NOW” call-to-actions all over the place?
In this case, we’re focusing all of our efforts on sharing value and building relationships.
Time to get to writing the sequence steps. After a bit of research and a brainstorming sessions, here’s what I came up with:
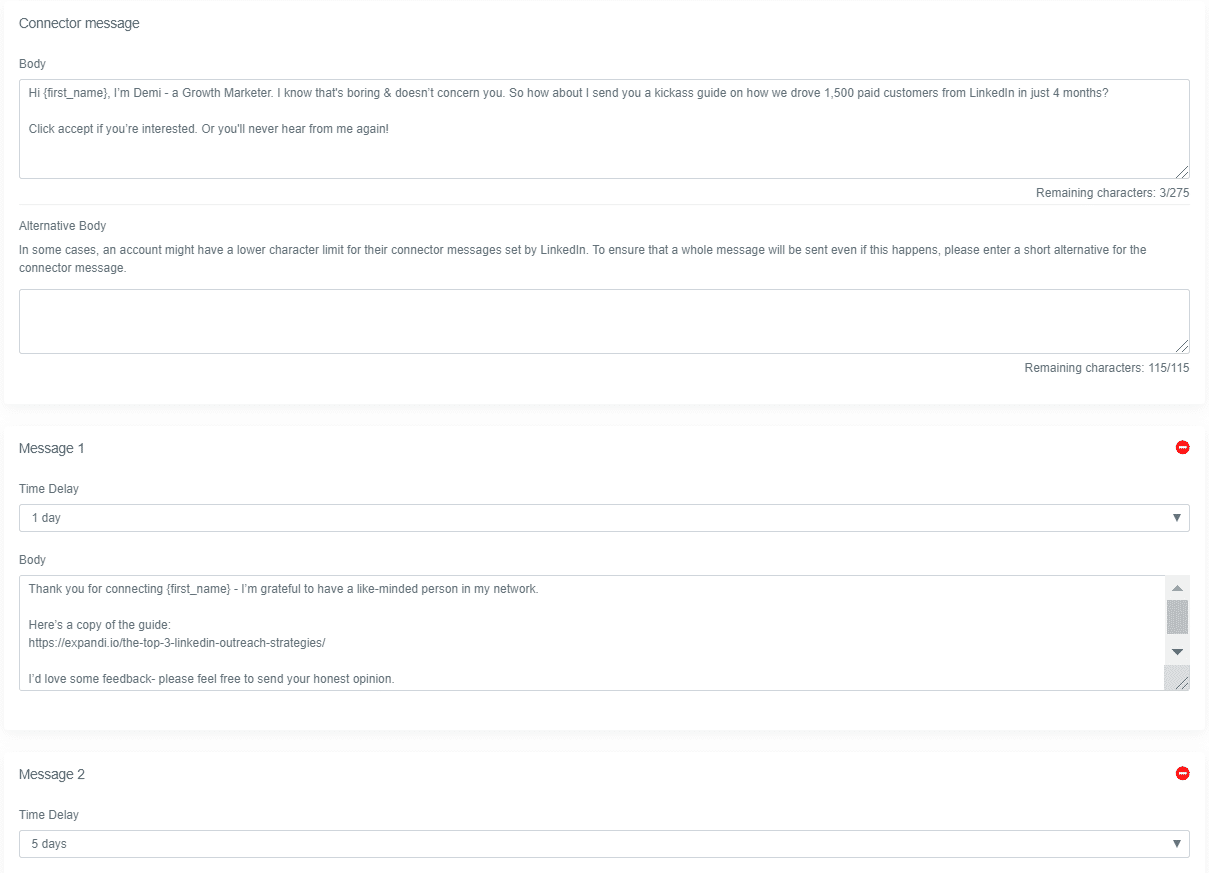
Or, to make things easier for you, here are all of the steps, for your copy-and-paste pleasures. Obviously, you can edit the text and the links so that they’re suited for your campaign.
Check it out:
Connection Request Version 1
Hi {first_name}, I’m Demi – a Growth Marketer. I know that’s boring & doesn’t concern you. So how about I send you a kickass guide on how we drove 1,500 paid customers from LinkedIn in just 4 months?
Click accept if you’re interested. Or you’ll never hear from me again!
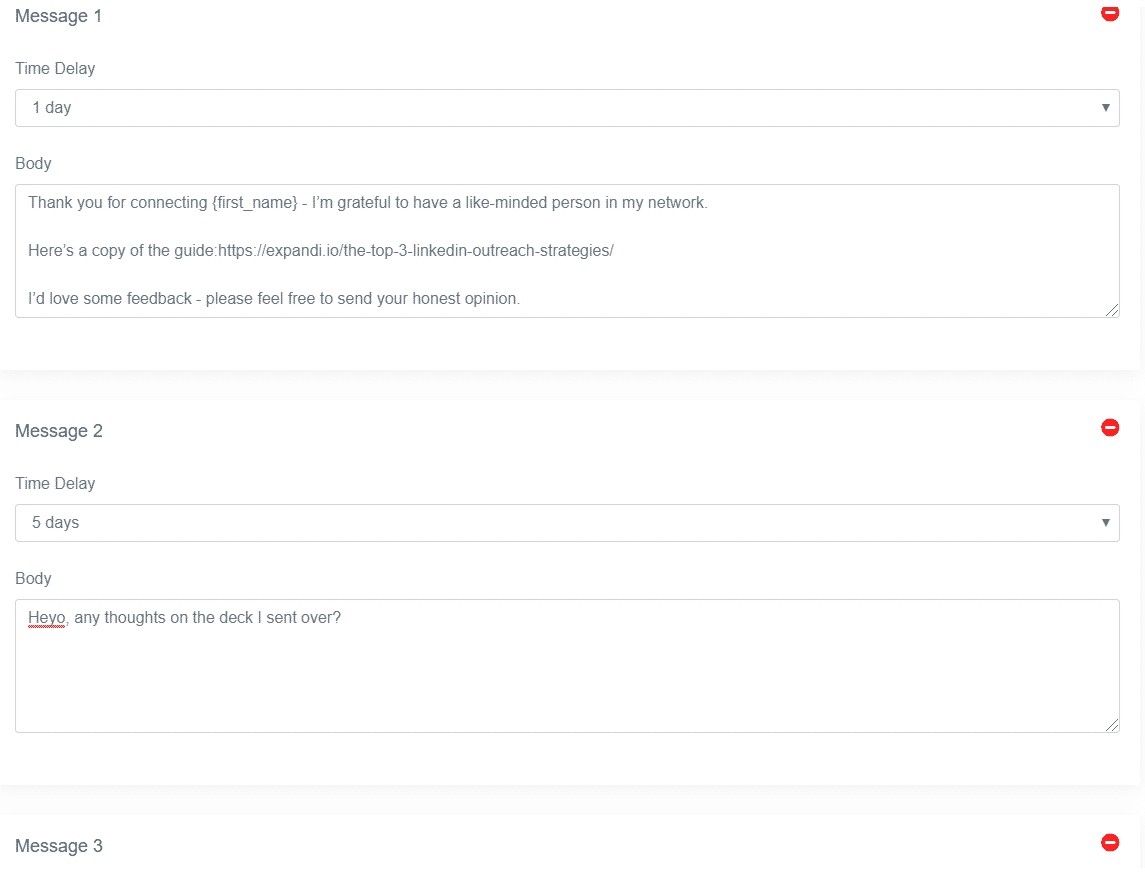
Message 1 – 1 Day Later
Thank you for connecting {first_name} – I’m grateful to have a like-minded person in my network.
Here’s a copy of the guide:The Top 3 LinkedIn Outreach Strategies
I’d love some feedback – please feel free to send your honest opinion.
Message 2 – 5 days
Heyo, Any thoughts on the deck I sent over?
Message 3 – 7 days
Hey {first_name}, just floating this on top of your inbox. Looking forward to your response.
Experimenting with your sequence templates is key here. This is why I wrote another sales sequence steps just in case. The second one is without an added message (so it is empty) to the connection request.
Connection Request – Version 2
Yes – this was purposefully left blank.
And surprisingly – this version got a higher percent of connection requests accepted and more replies. I guess that’s why A/B testing is so important.
Could it be that a well-optimized profile picture and a tagline is enough for most people to accept your request? One thing for certain is that this speaks volumes to Demi’s optimized LinkedIn profile.
Full campaign results and results you need to know are all the way down to the end of this guide.
Message 1 – 1 Day Later
Hope you are safe and healthy {first_name}.My name is Demi, I’m the author of the top 3 LinkedIn Outreach Strategies that converts like BOOM! Based on your job, it seems we have a growth mindset in common.
So I just wanted to share a couple of LinkedIn growth hacks and templates that generated me 40 conversions a week, if you don’t mind?
Message 2 – 5 Days Later
Here’s the guide: Top 3 LinkedIn Outreach Strategies
I’d love some feedback – please feel free to send your honest opinion.
Message 3 – 7 Days Later
Hi {first_name}, hope you’re doing well.
Did you have a chance to go over the guide? I’d love to hear your thoughts when you get a minute.
You’ll need these templates for the connector campaign you’ll create to automate your outreach. More on that below.
Connecting via Expandi
Time to slowly start making things happen.
Step 1: Import sales search to Expandi
- We want to import the engine search from Sales Navigator to Expandi. To do that, go back to LinkedIn Sales Navigator and copy the URL of the search with the filters from above, but we only import the most active people from the search, these who posted on LinkedIn in the past 30 days.
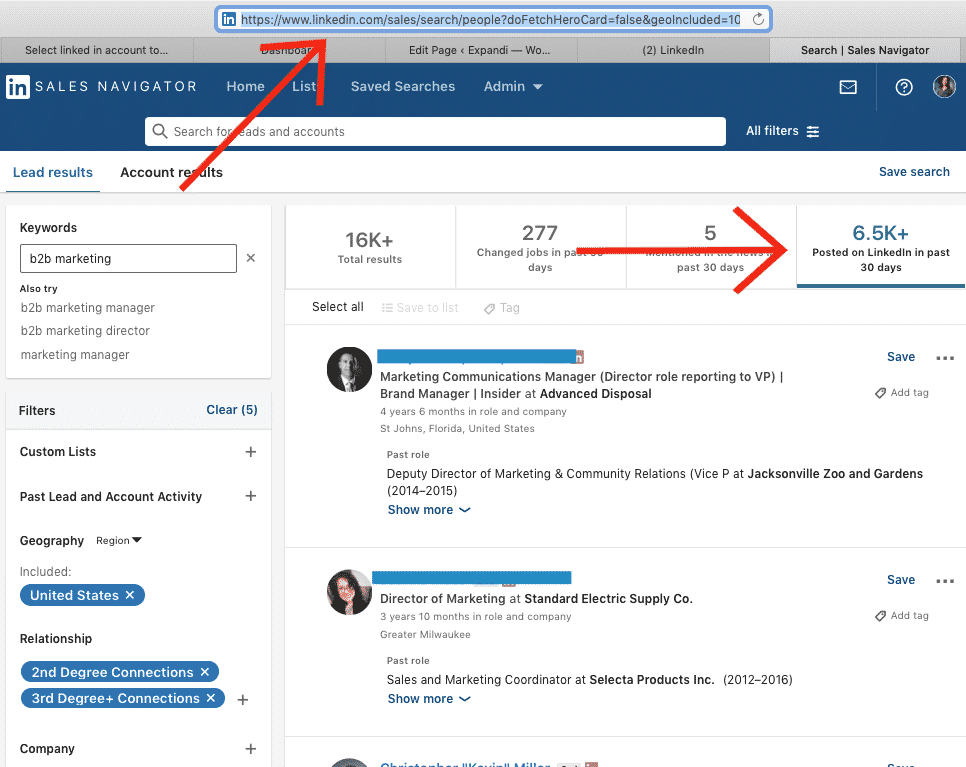
That’s a lot of people…
To better manage our leads, we’re just going to only select people who posted on LinkedIn in the past 30 days. And that’s 6.5k+ leads – not bad!
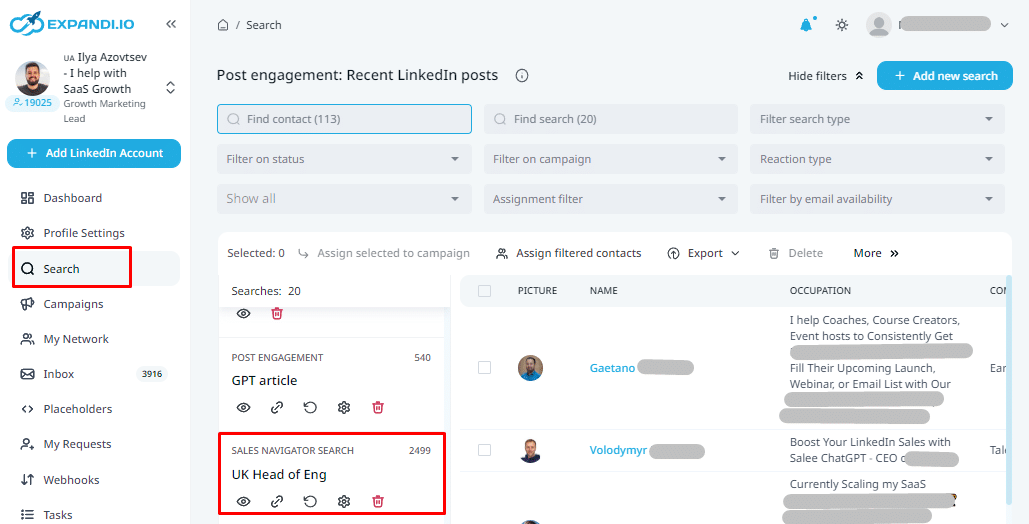
2. Then, go to Expandi, click Search on the sidebar and then create a New Search.

3. From the popup, enter a Search Name, choose the LinkedIn Sales Navigator tab, and paste the LinkedIn Sales Navigator URL (from above) in the Enter Search URL tab. Like so:
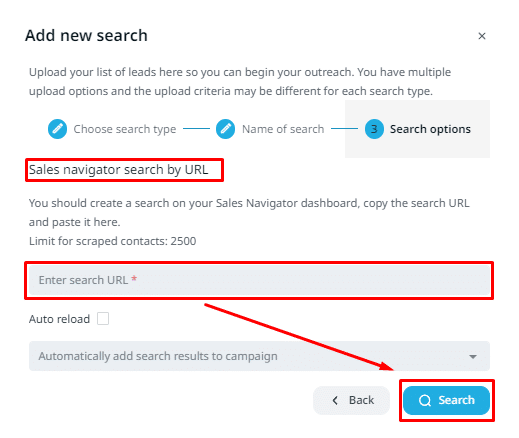
After importing search results, your results page should look something like this:
Step 2: Create a connector campaign on Expandi
After retrieving your search results, you’ll need to set up a connector campaign to prepare your messages for outreach.
If you’re not a reader, check out this quick explanation video I made that covers all the steps here (sound on) :
Here’s the breakdown step-by-step:
1. Go to Campaigns on the left sidebar. Click Add Campaign

2. Select Connector Campaign, and Click Add Campaign
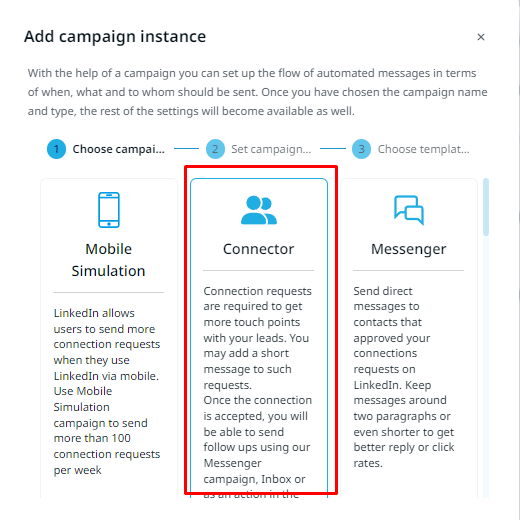
3. Write your connection request, follow-up messages (or just copy the ones we used above ) and set the appropriate time delay (our recommended settings in screenshot).
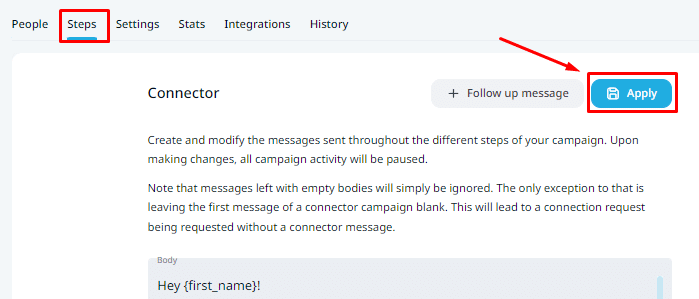
4. Once done, save your campaign by clicking Apply.
5. Finally, to finish the campaign, simply go to Settings and click “Inactive” to activate on.
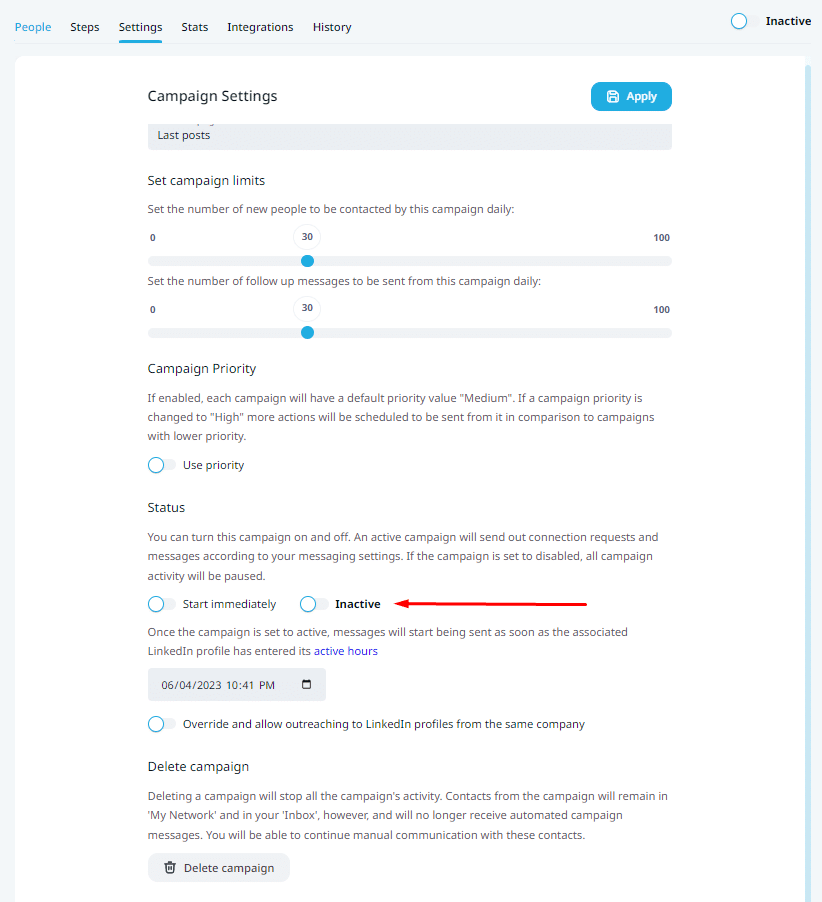
If you’ve been following the steps accurately and have added the prospect to your campaign, it should be ready now.
As a recap, here’s what the process should look like, from adding prospects to your campaign to starting the outreach:
NOTE: Importing a Sales Navigator search to Expandi is limited to 2,500 results per search. But we have much more results – 6,696 to be precise.
So, what do we do?
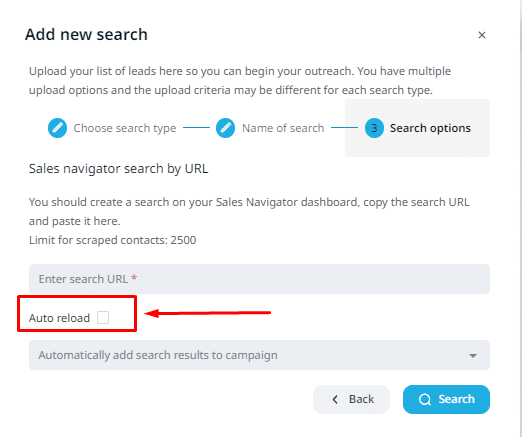
We just import the entire search, and use the AMAZING new auto-reload option to automatically refill them every 30 days on autopilot in the campaign.
This way – we never run out of requests, and can go through the whole list of leads!
Now the campaign is all ready to go from Expandi’s side.
But we’re not done yet!
Here’s where the brand awareness step of this growth-hack really takes off.
Creating a Retargeting Facebook Ad for Brand Awareness
Here’s the thing:
There are more people on Facebook now than ever before. More people are working from home, and using social media.
We’re going to take advantage of that, and retarget people on Facebook, AFTER the LinkedIn outerach campaign. Not bad, right?
This way, we’ll know for a fact they saw our offer. They’ll know that it’s specifically tailored to them, and naturally, will be curious as well.
First thing we did was create a LinkedIn banner with the same style as the optimized LinkedIn profile from before. So, they’ll be sure to recognize it as well and catch on to what’s happening.
Here’s the banner we made for the Facebook ad:

And here’s the Facebook Ad live:
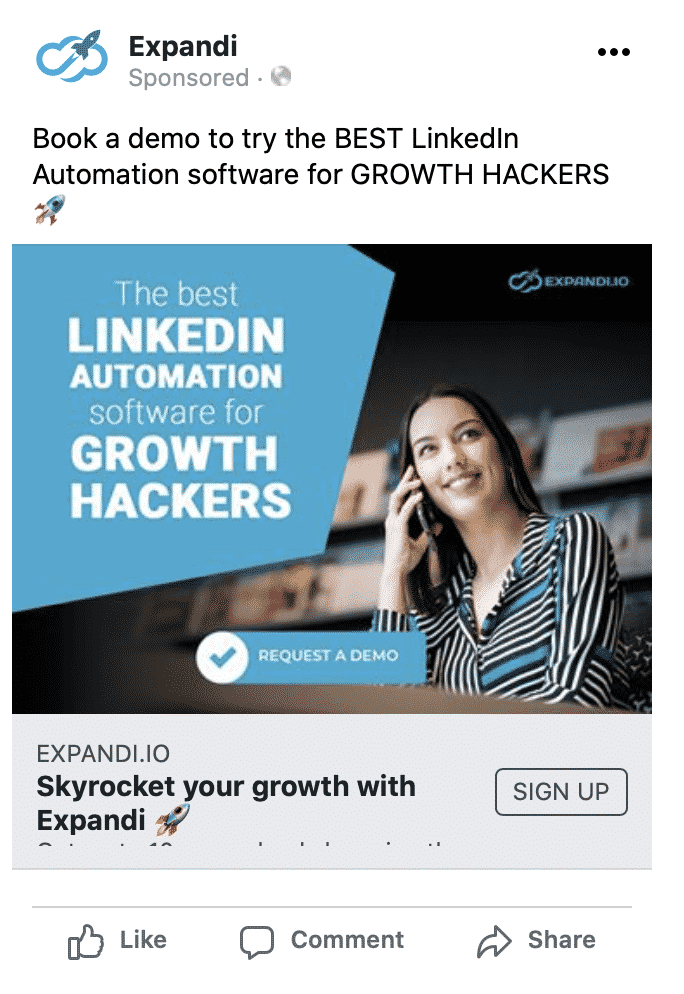
To actually create a Facebook Ad, all you need is a Facebook Business Manager Account which you get after managing a Facebook page. For us, it’s the Expandi Facebook page.
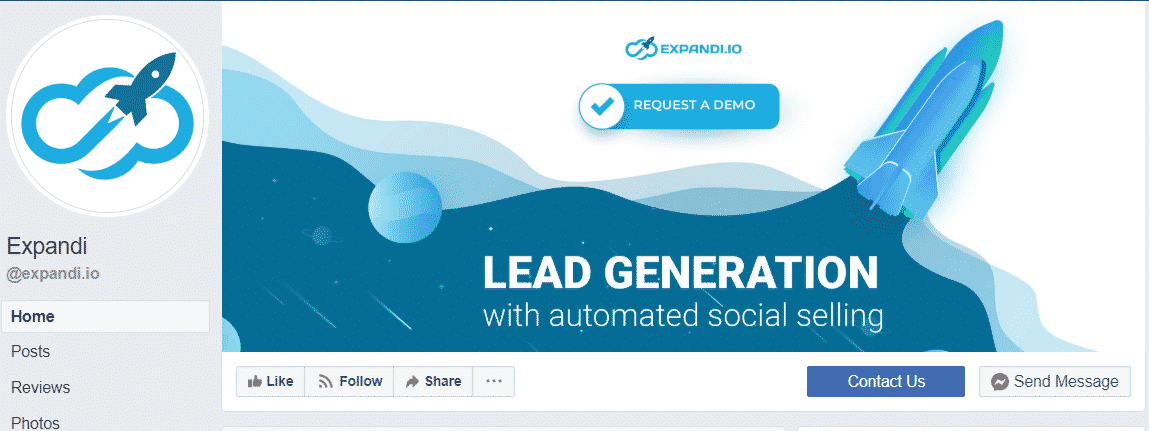
The objective of the little ad here is to drive traffic and link clicks to the website.
Now, once we have the Facebook Ad set up, we need to insert a Custom Audience spreadsheet of the people we’ll be retargeting (people from the LinkedIn Sales Navigator Search).
Connecting Facebook Custom Audiences to Your Expandi List via Zapier and Hunter
AKA: All the technical stuff.
Essentially, we’re using Zapier to connect Expandi to your Facebook Custom audience. And Hunter to grab your leads’ contact information. Zapier is just the middleman here.
We want to show the above Facebook Ad to all the people we’ve added to the Connector Campaign. So also those who will not accept our connection request. Otherwise this is only 36% on average and now we can really add anyone.
For this, we need their email address – which we’ll grab using Hunter and then use Zapier to connect everything together.
Here’s how we’re going to do that:
Step 1. Connecting Zapier and Expandi via Webhooks
- Log in (or register) on Zapier.
- Click on Make A Zap.

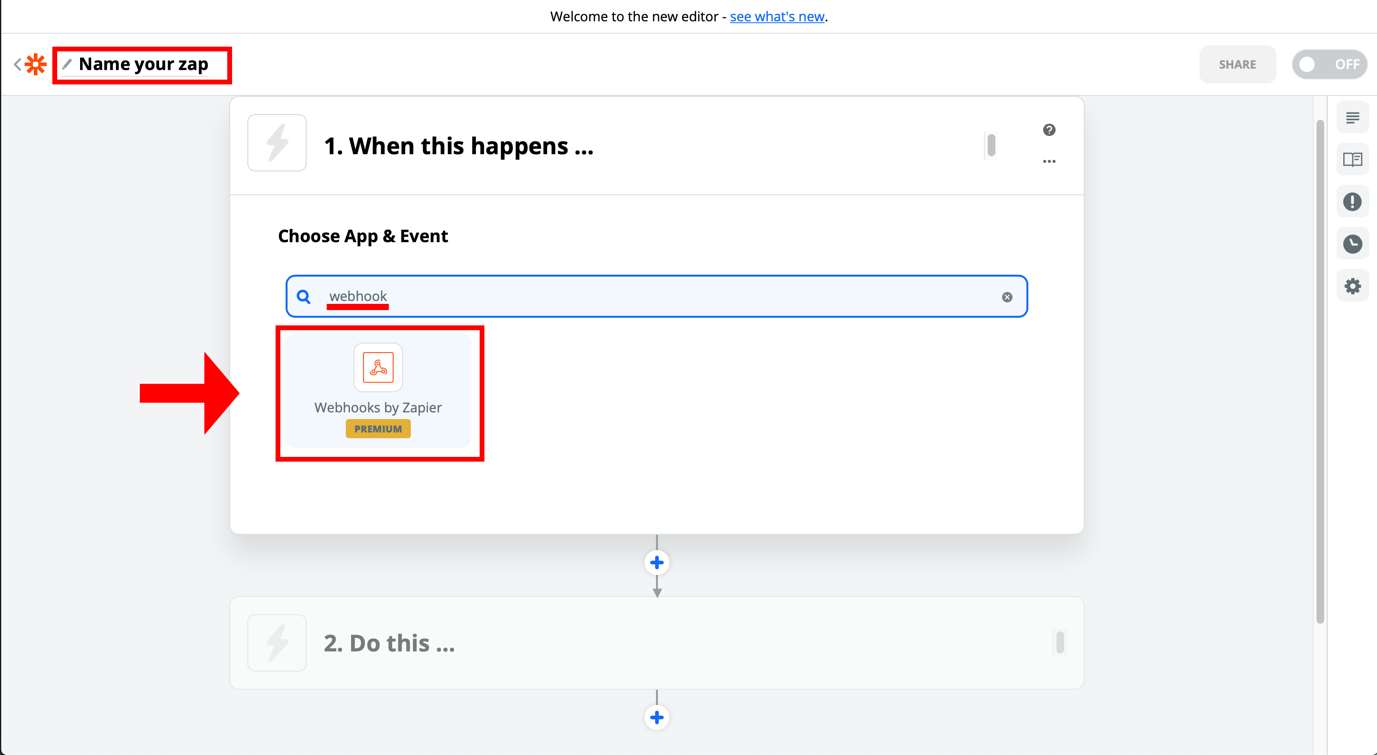
3. Name your Zap and select Webhooks by Zapier in the Choose App & Event section.
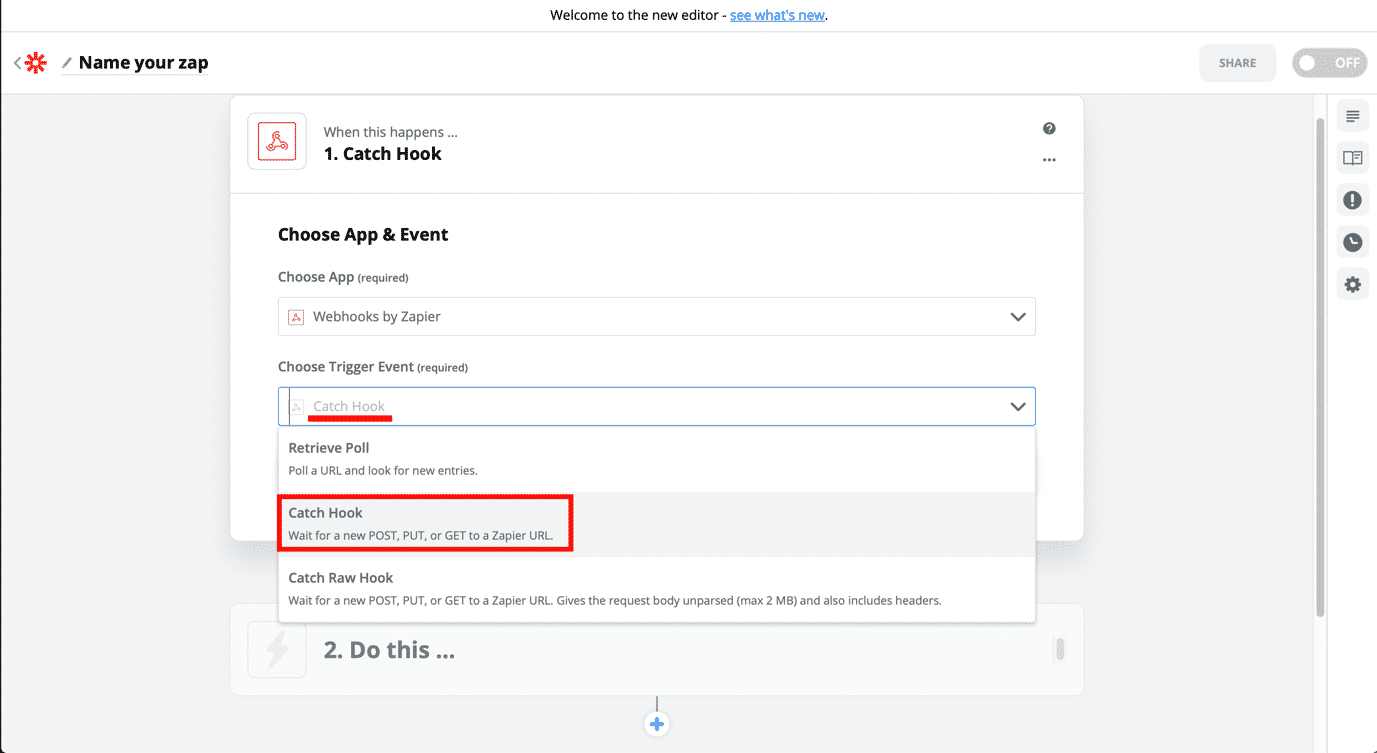
4. Choose a trigger event called Catch Hook in the Choose Trigger Event section.
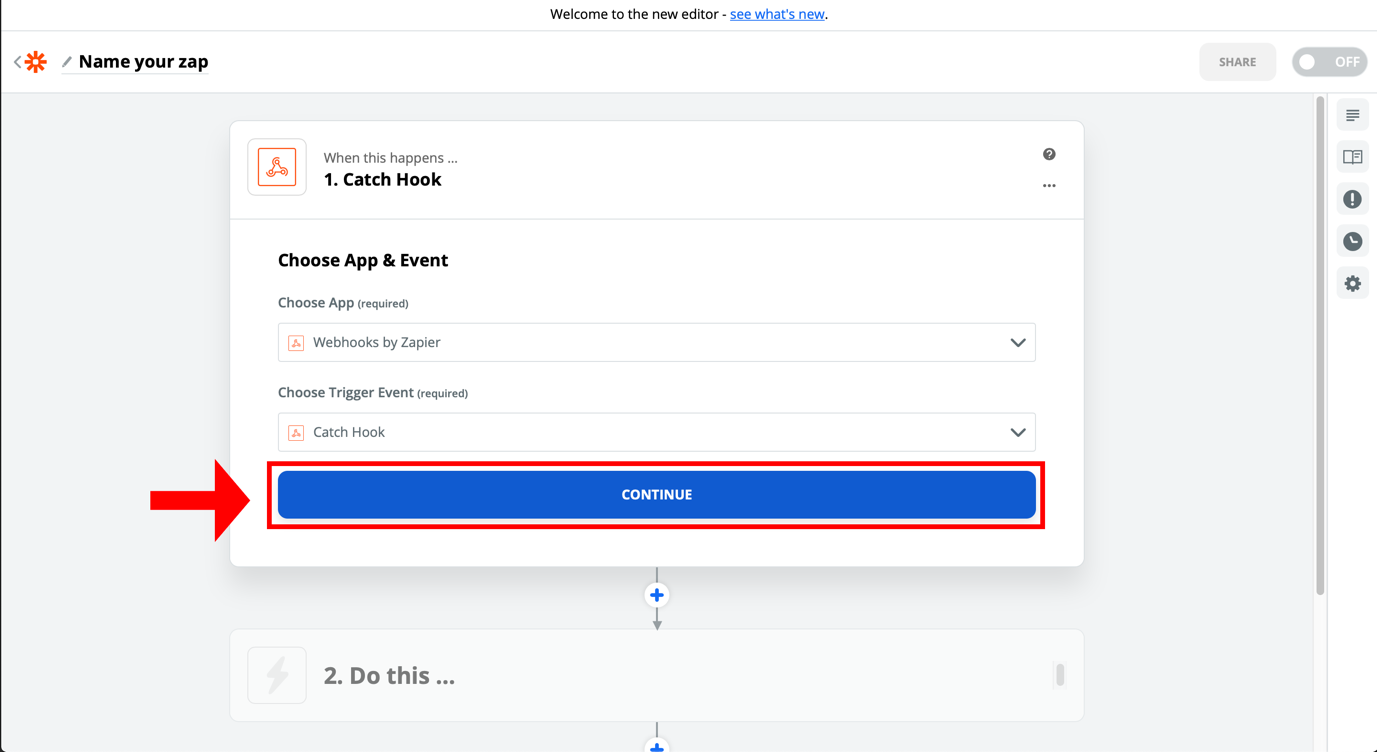
5. Click Continue, which will lead you to a Customize Hook page.
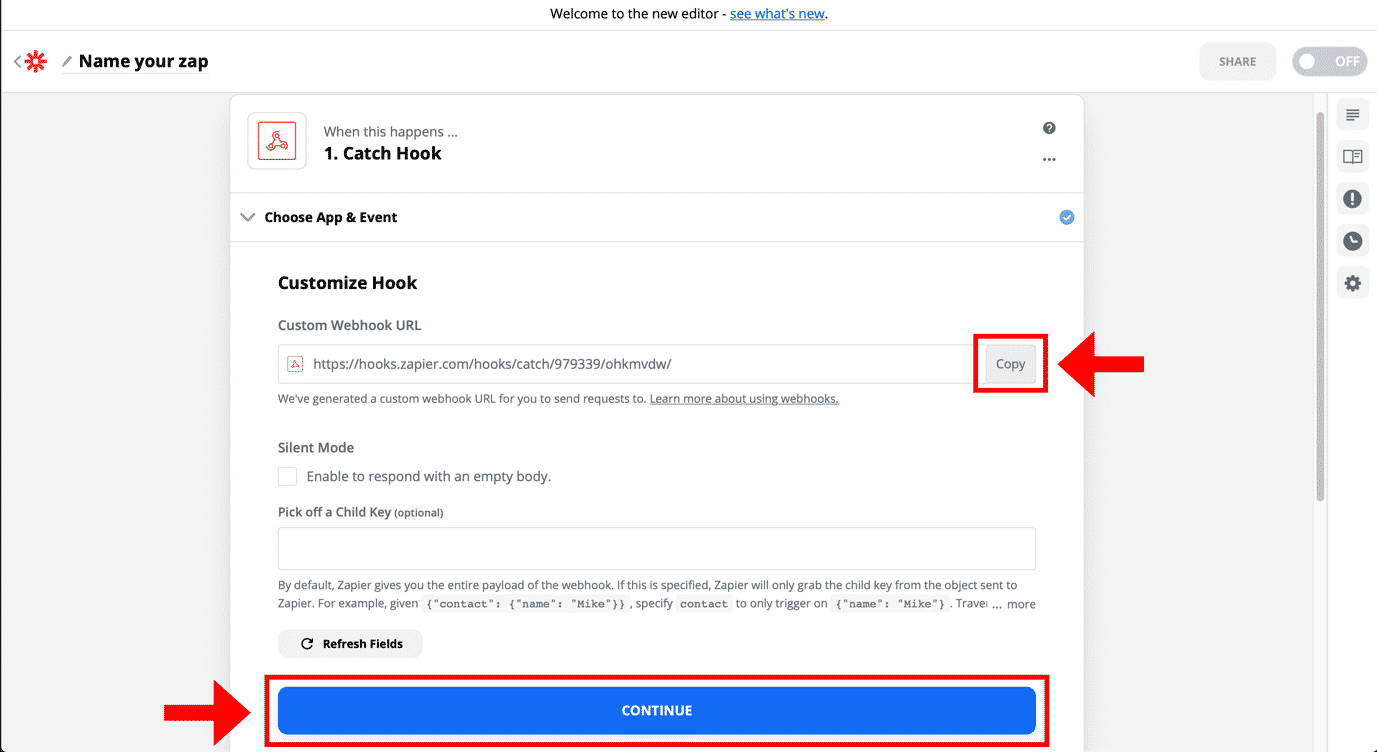
6. Here, Copy Custom Webhook URL and click Continue again.
Now, go back to Expandi to connect it to Zapier.
Step 2. Connecting Expandi to Zapier
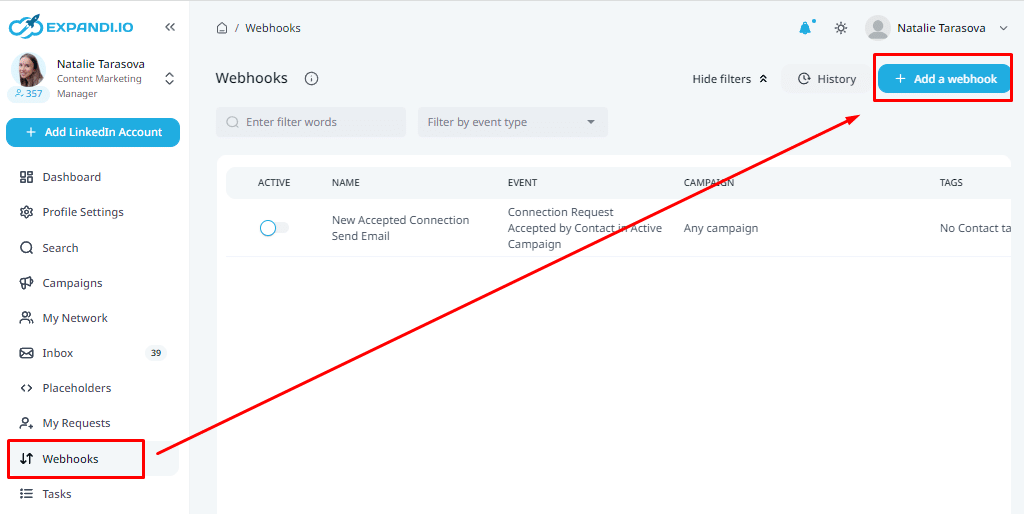
1. Click Web Hooks on the sidebar and Add a Web Hook
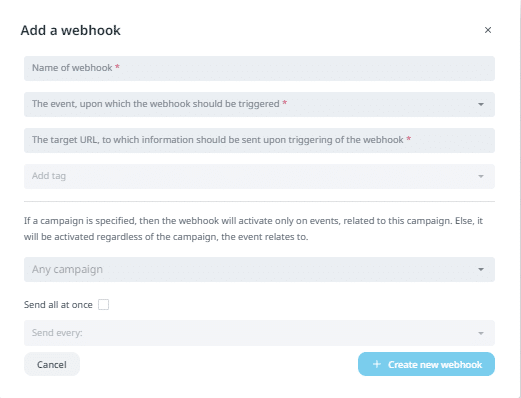
2. A pop up window should appear here. Here, you should name the webhook, choose the event you want your hook to be triggered by (connection request sent, connection request accepted, contact replied to campaign message), and then, choose the Campaign for which you want this web hook for (the one we made above).
And finally, paste the Zapier Webhook URL from above.
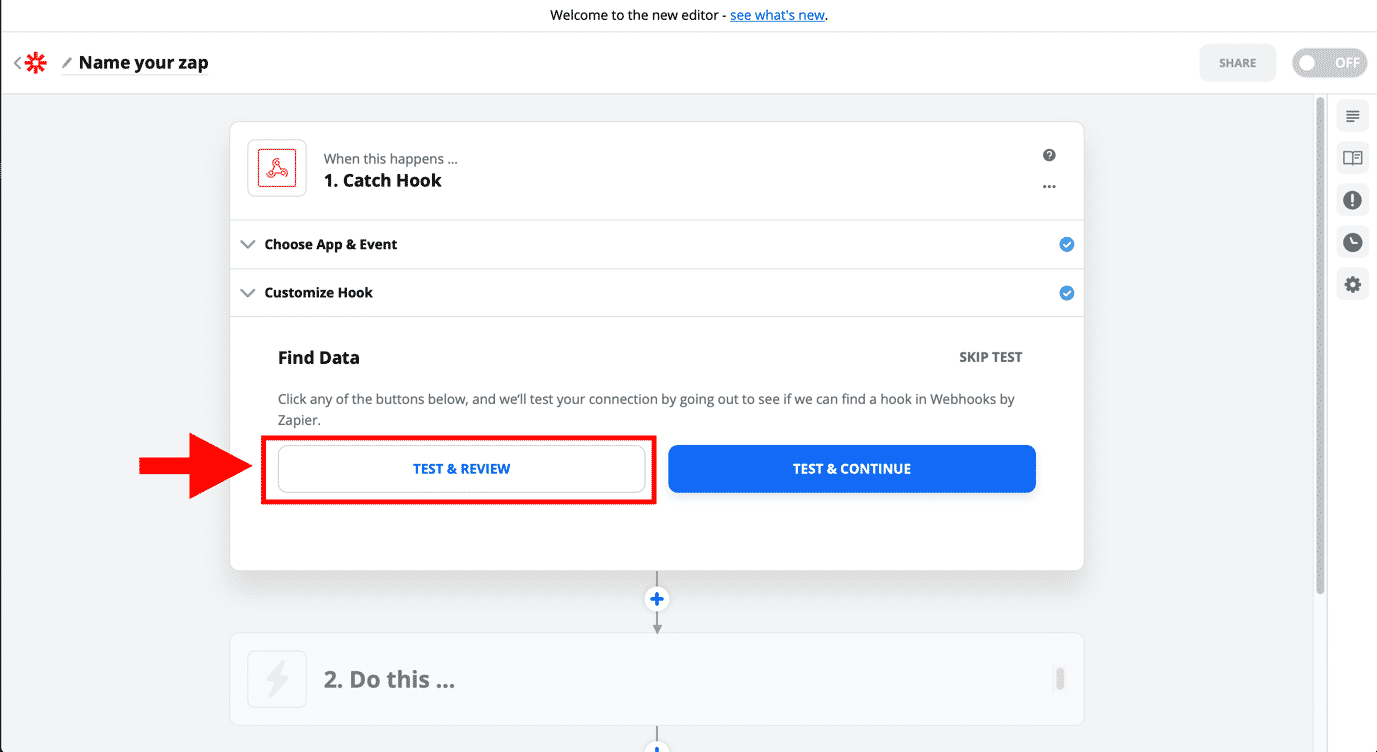
3. Now, back to Zapier (to the Zap you made before), click Continue and Test & Review.
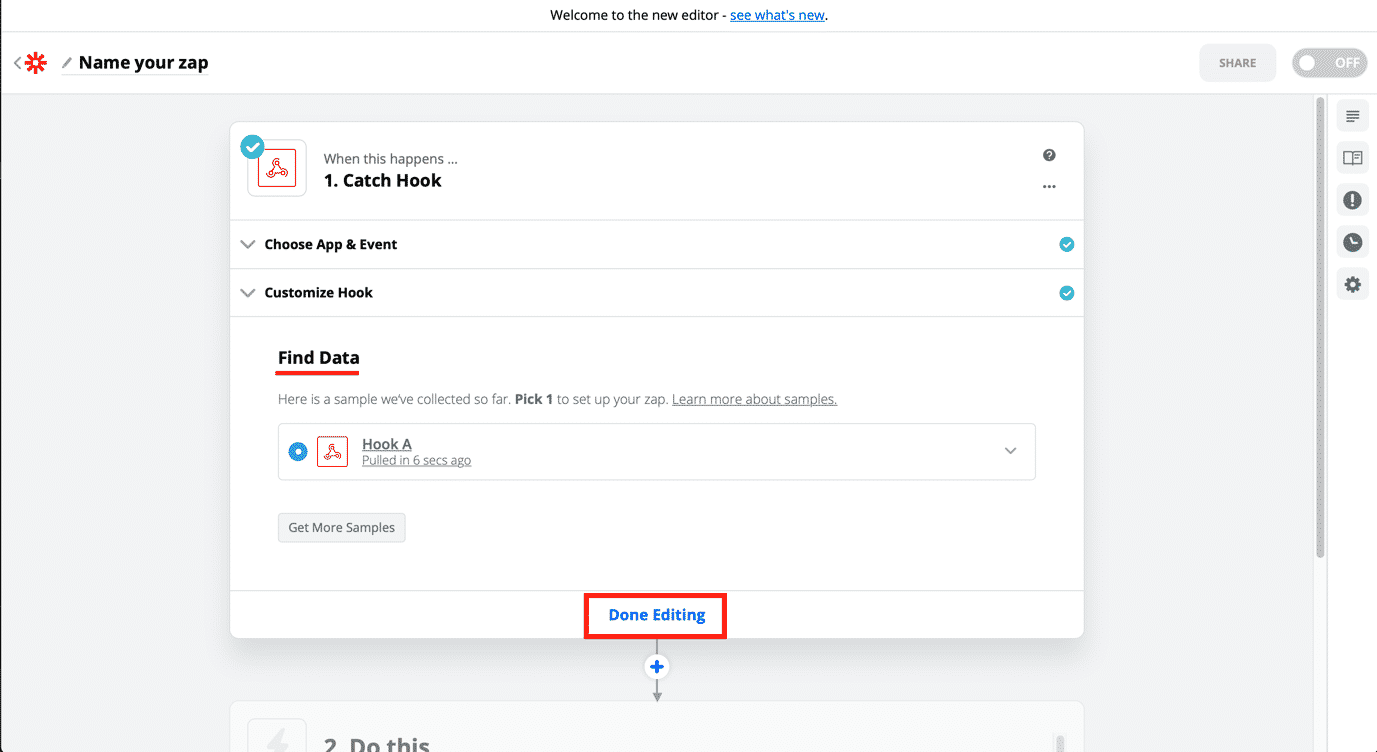
4. If everything goes smooth, you can find your results in the Find Data section. Now, click on Done Editing to continue to the next step.
Step 3. Retrieving contact information via Hunter
Here, you need to select an application to scrape your list’s contact information.
For this growth hack, we recommend Hunter, but you can use just about any email scraping tool.
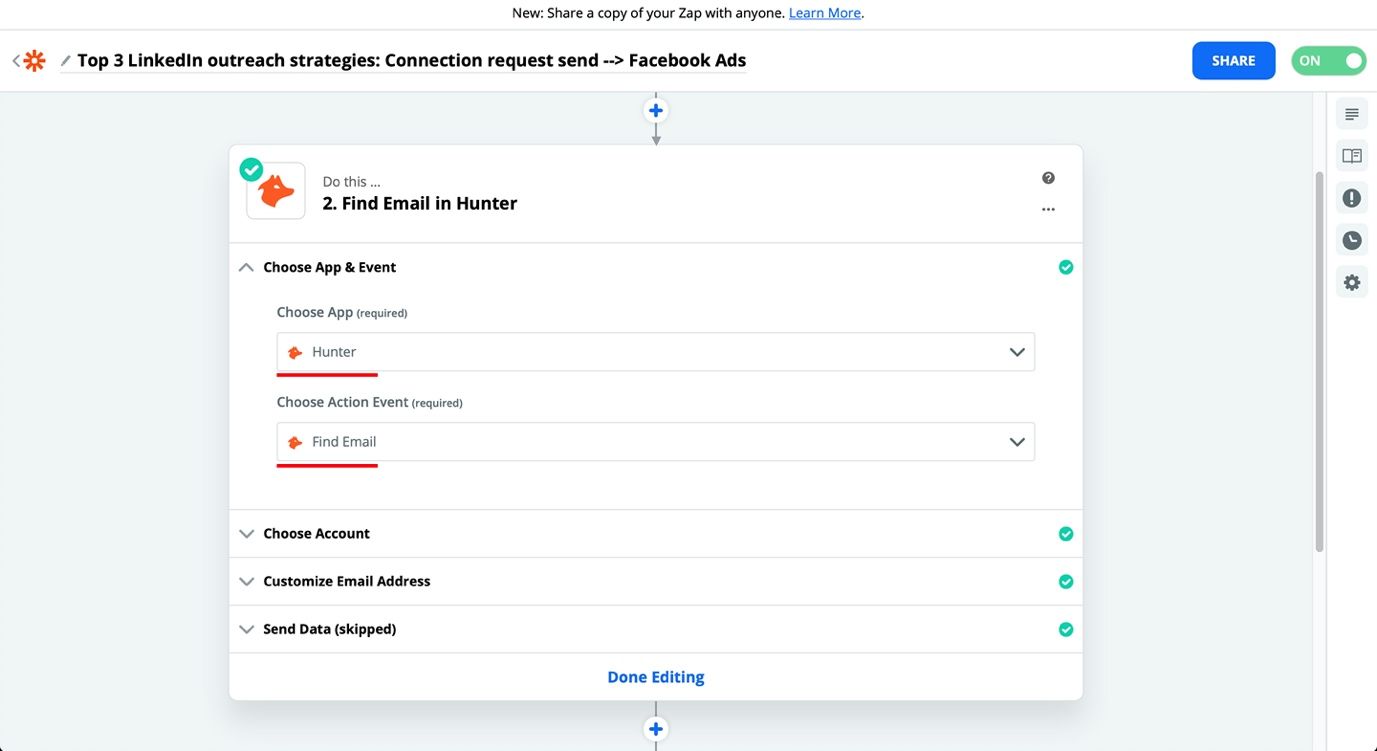
- Select Hunter as the App and Find Email as the action type.
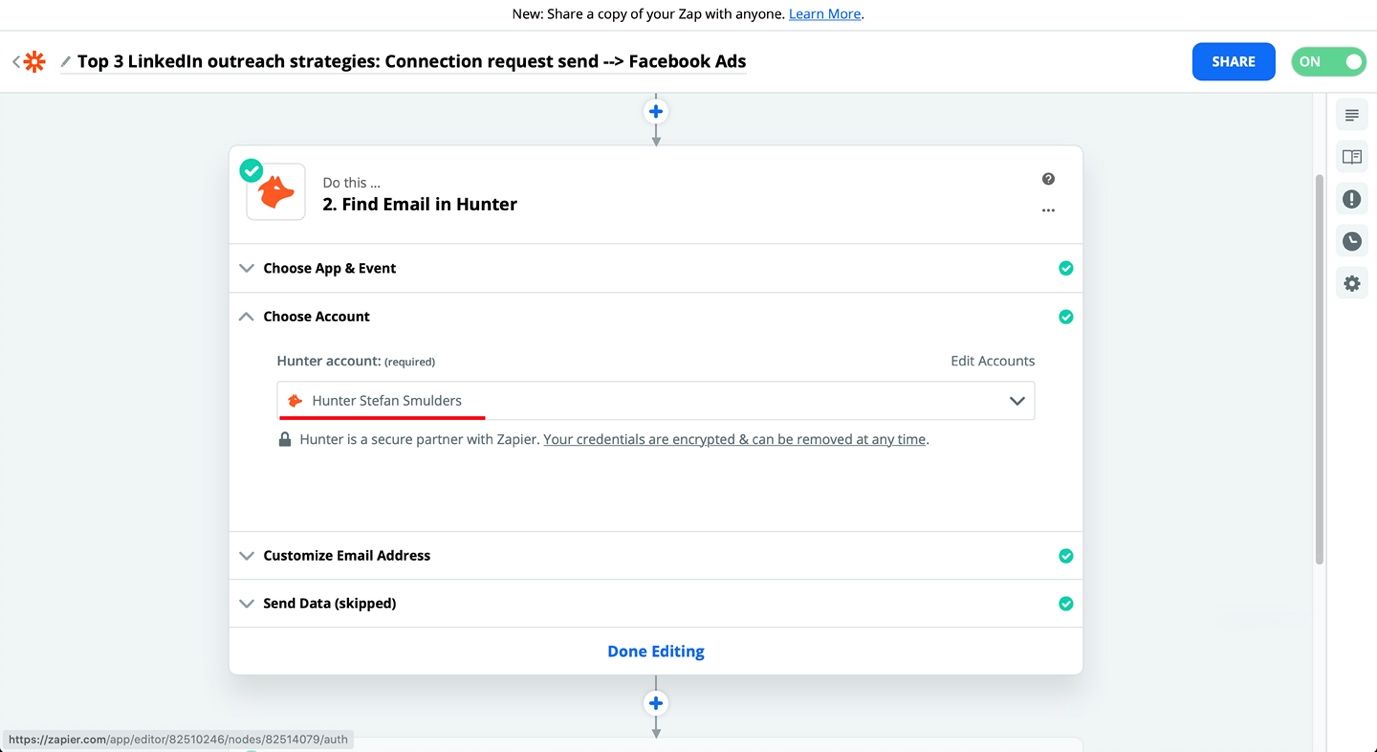
2. Then, choose your Hunter Account which you’ll use for this Zap.
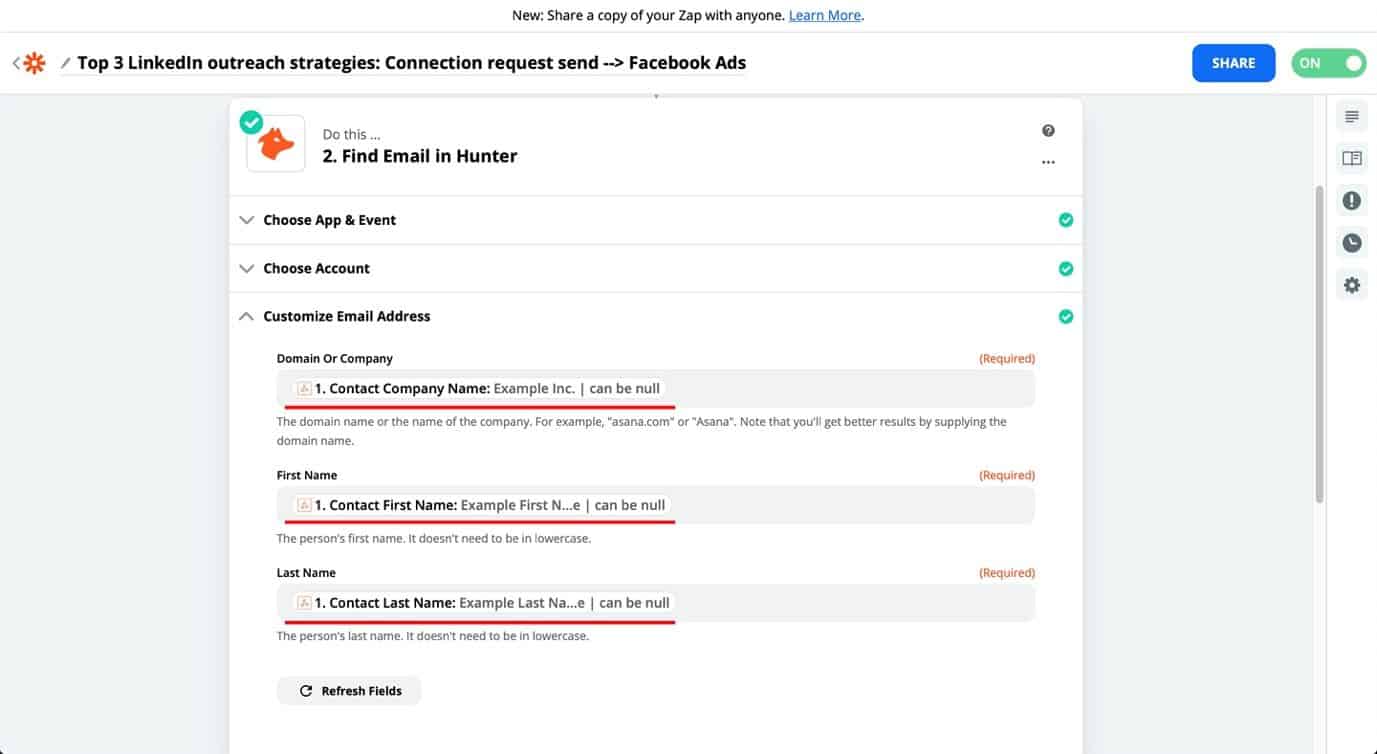
3. Then, you have to Customize Email Address by adding Domain or Company, First Name, and Last Name. Here’s an example.
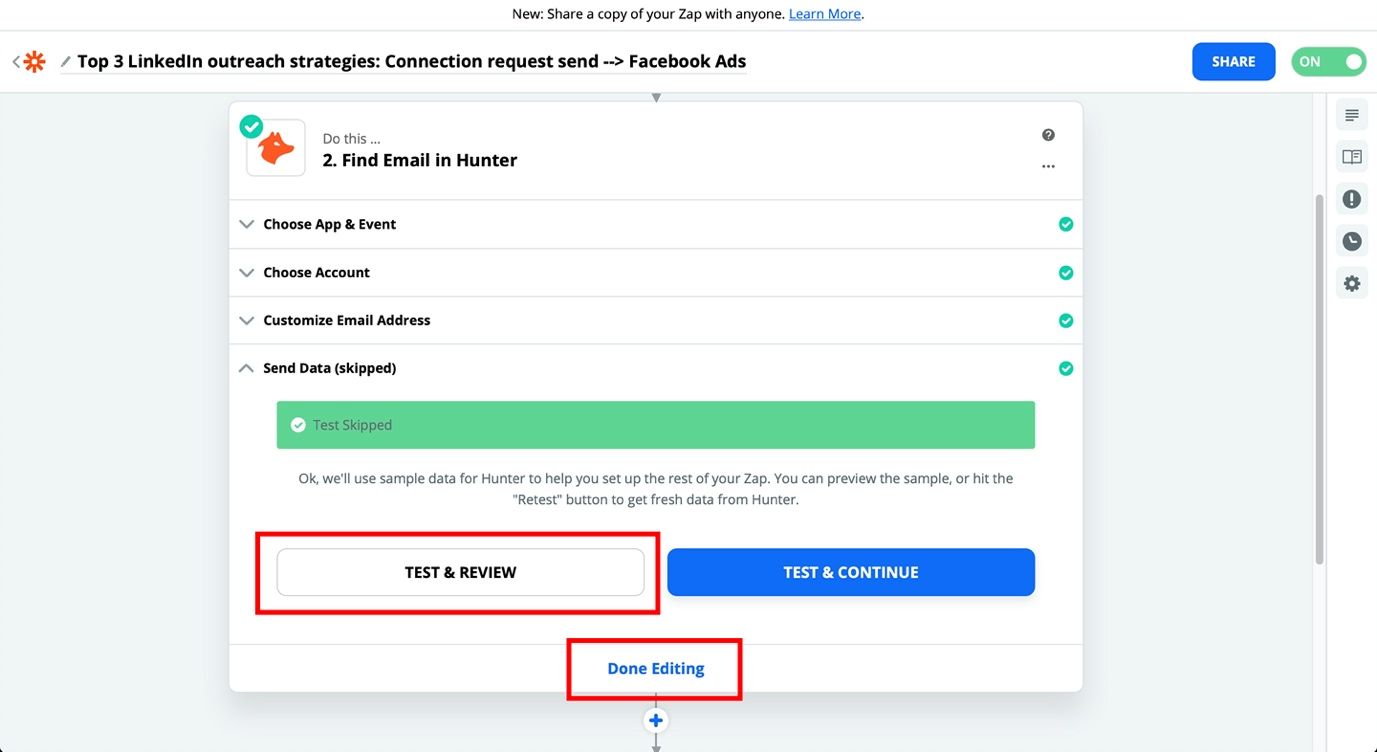
4. To finish the step, do another Test & Review, and if it’s working press Done Editing.
And done! Not much is left now!
Step 4. Creating and connecting custom Facebook custom audience
In this last part, you have to create a custom Facebook audience and connect the Zap to the Audience you create.
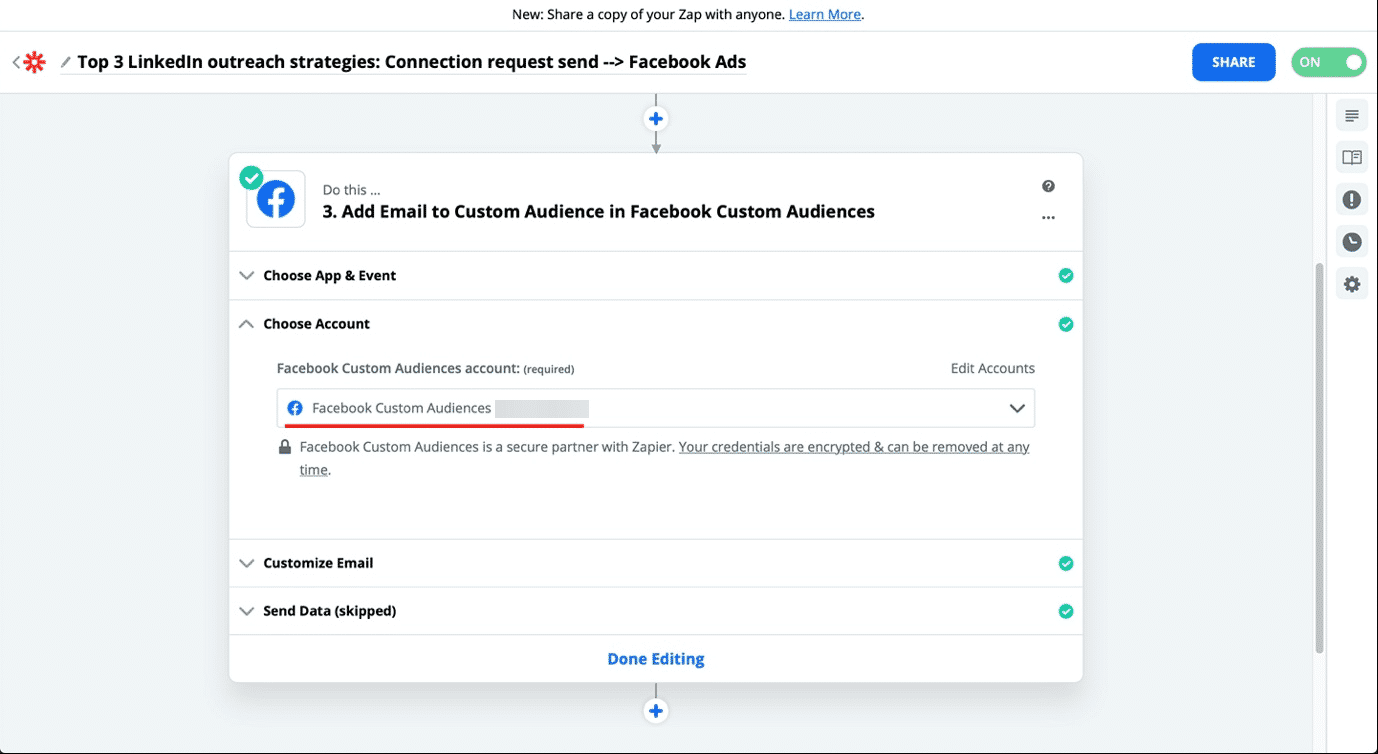
- To do that, choose Facebook Custom Audiences as the app and Add Email to Custom Audiences as the action event.

2. Make sure you’re logged in Facebook for this step as Zapier will automatically show your account in the Facebook Custom Audiences account section.
And now, the final step!
Step 5. Setting up Facebook custom audience and preparing for launch
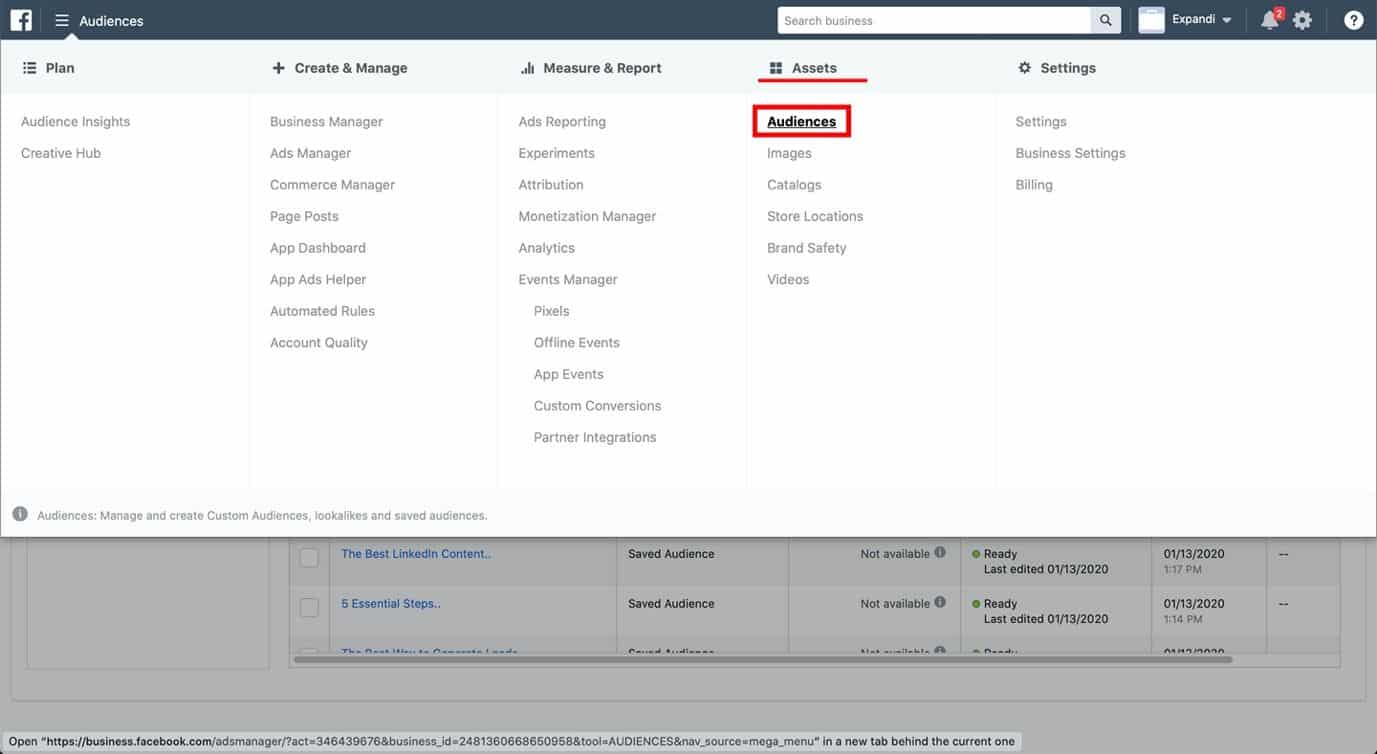
- Once your choose your Facebook Audiences account on Zapier, it’s time to go back to Facebook Ads Manager. On the top left side, click the Hamburger Button (the one with three lines), and select Audiences under the Assets section.
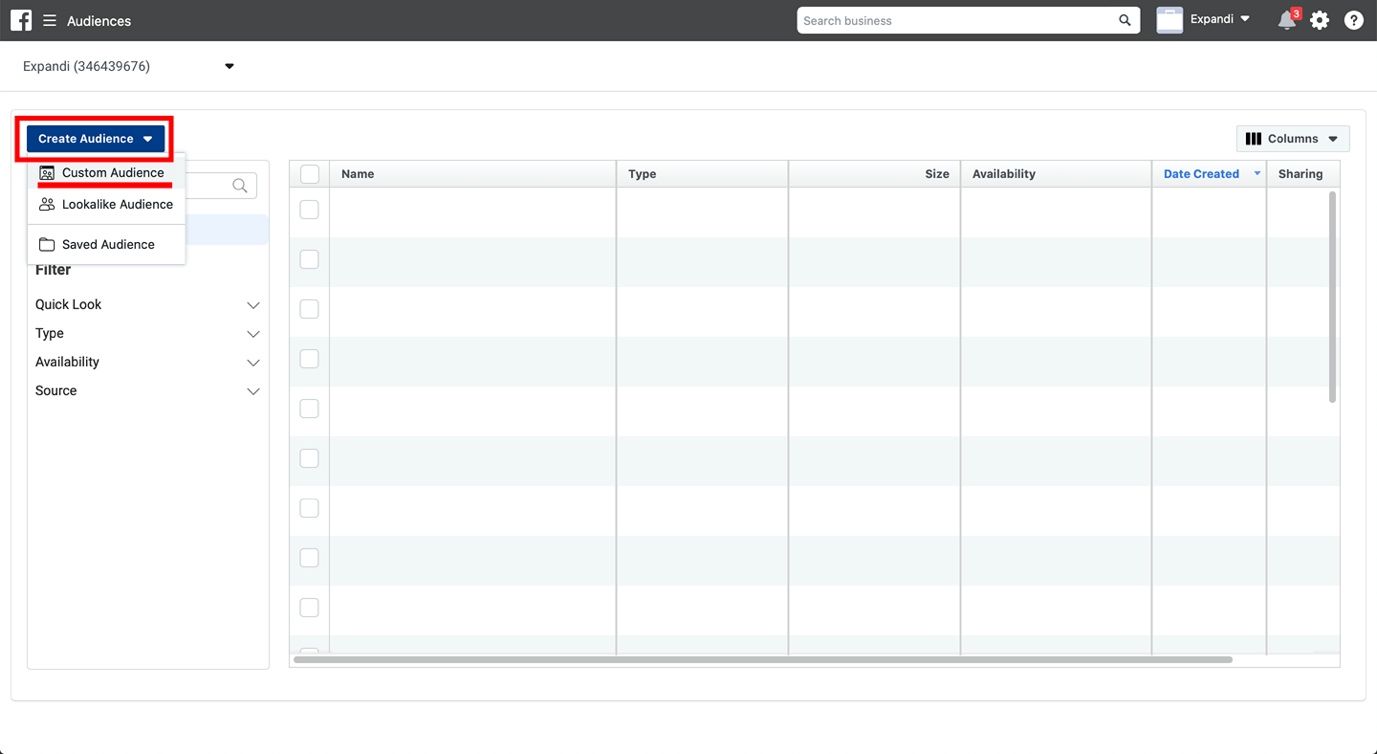
2. On the left side, press Create Audience and choose the Custom Audience from the drop down.
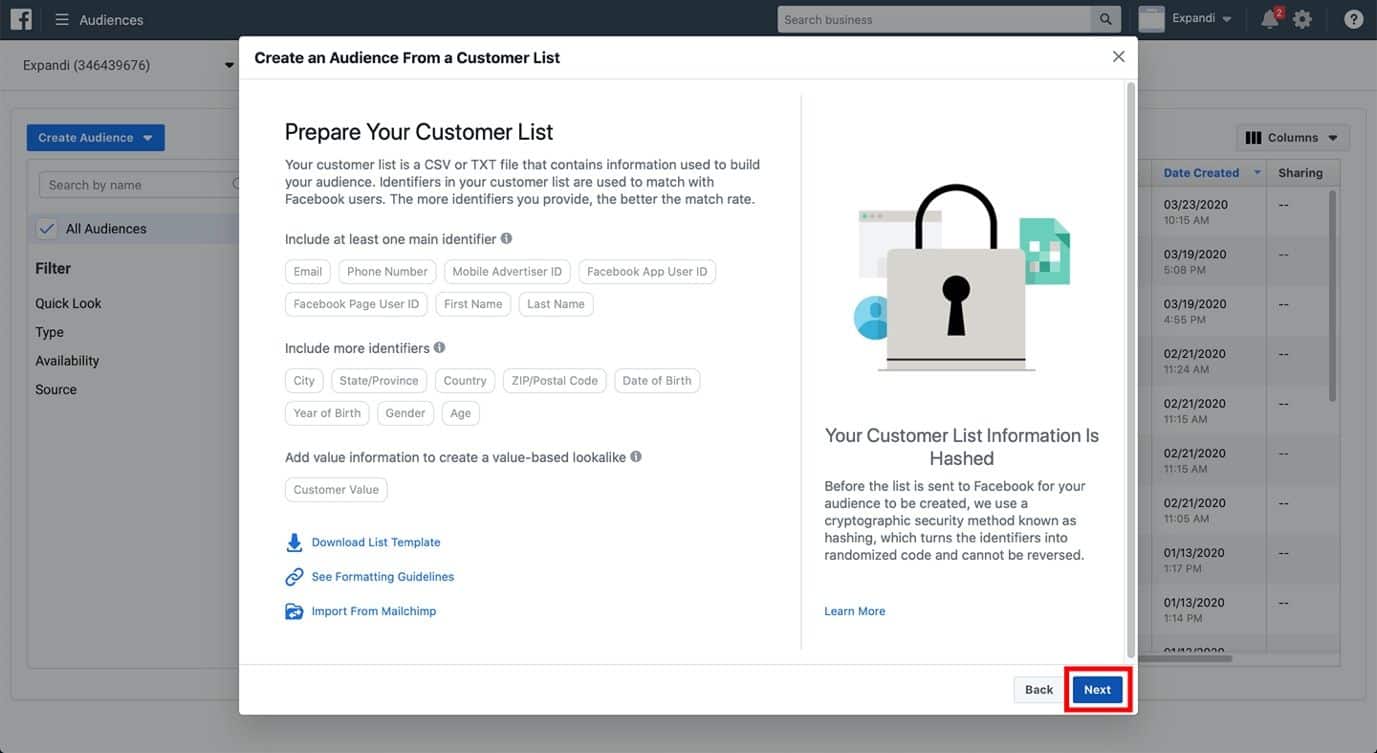
3. Here, select Customer list. You’ll need to upload a CSV list with some emails to create the audience. But you can just use a few sample emails (e.g. your and colleague’s emails just as an example).

4. Then, just click Next.
5. Here, select No, as the only column we need in the CSV is the email. And the Zap is going to add emails only.

6. Finally, it’s time to upload the aforementioned CSV list. Remember, you can upload whatever you want here. So, just create a spreadsheet with only one email column. We’re doing this is only to create the audience, so, it’s fine for now.

7. The last step is to process the CSV we just uploaded. Because we only had one column in the email list, it’ll be automatically identified. So, once it’s done, you can just press Upload and Create and be done with it.
Note: Facebook Ads need at least 1,000 results to run. For now, we just want to give it an example email, and we’ll come back and give the actual emails from Expandi later.

And now, we’re finally done!
Everything’s in place, and if you’ve been following accurately, things are set up and ready to go.
To launch this long and crazy funnel we’ve been working on, you need to go back to Zapier (yes, again. But for the last time!).
Choose the Facebook Ads account you use, and the custom audience that you want to import these people to. Lastly, you need to choose the option to add the email to your audience.
Like so:
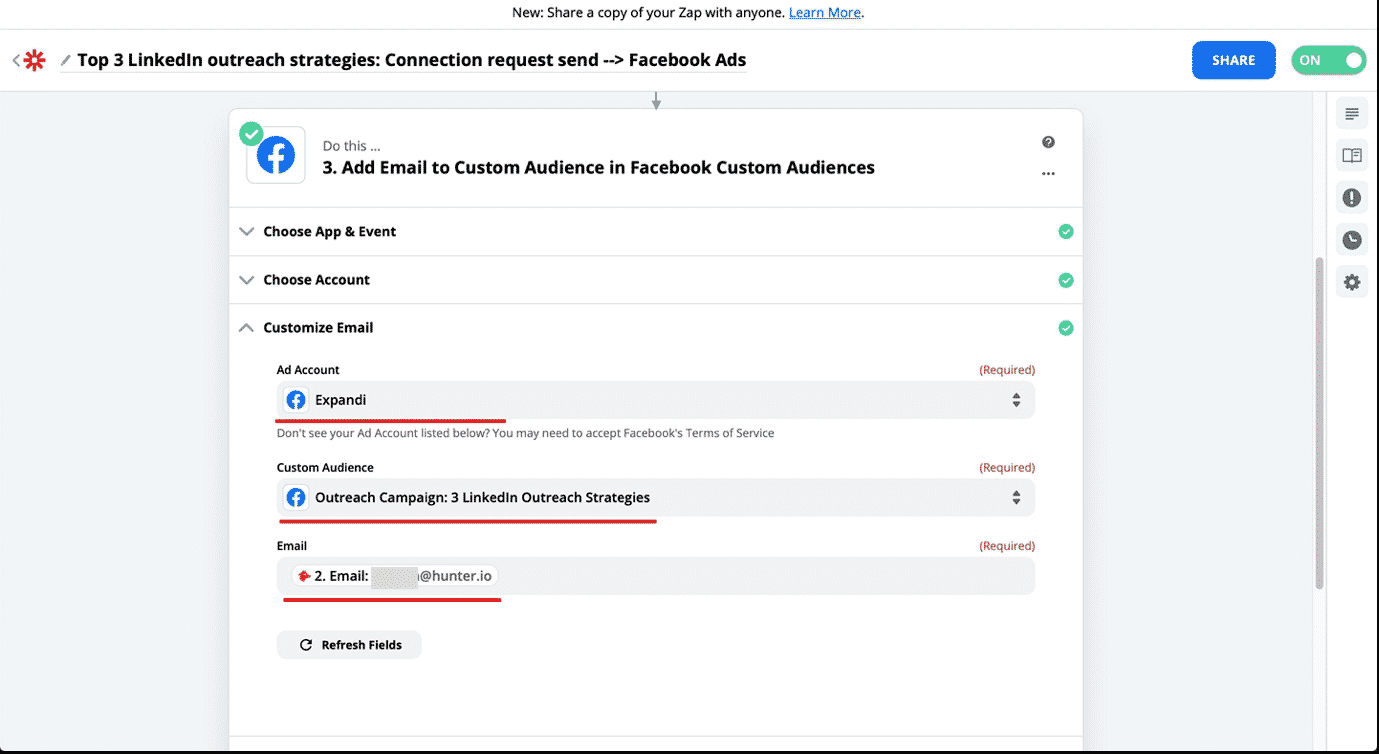
The only thing that’s left to do is Test & Review your Zap and turn it on!

Now, if you remember from above, our Facebook Ad still only has a few example emails. And Facebook Ads only start if they have a minimum of 1,000 contacts.
Let’s fix this real quick.
We have 2 options.
We can either upload a CSV list directly on Facebook.
Or even better, just pick an expired campaign on Expandi with a lot of people in it – and feed the webhook with the manually push trigger to the ad.
Because I’m lazy, I prefer the latter method.
So, one last step.
1. Open any of your expired or old campaigns on Expandi. Scroll down to the campaign inbox, click the CSV Actions, and select Export Filtered Contacts to Webhook.
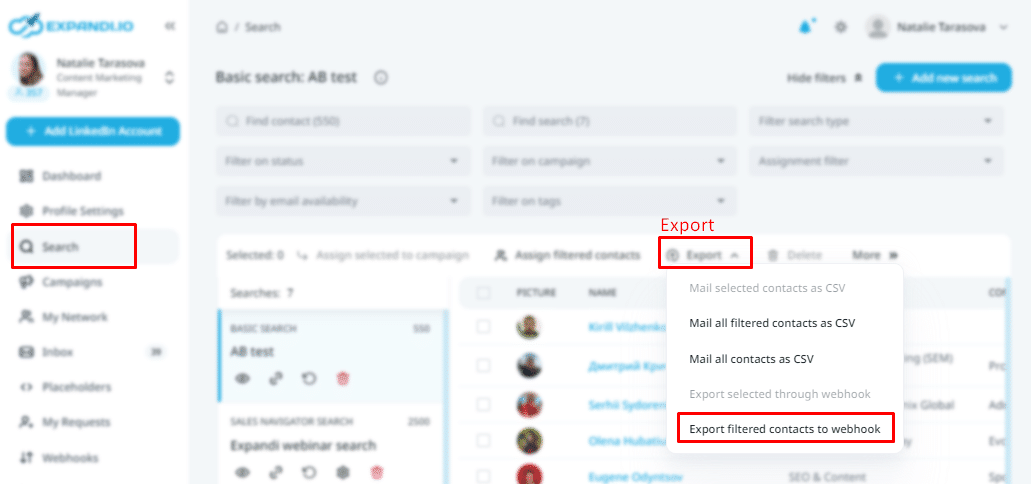
2. And then, select the webhook we’ve been working on.

And voila!
The audience will now be fired to the Facebook Ad.
Because we specifically created a custom audience for the list, we can just copy the list of people we’re targeting from Expandi to Facebook directly, through Zapier.
Got it?
Optional: Blacklisting Certain People or Companies
Want to make sure certain companies (e.g. customers, current colleagues, etc.) don’t get targeted by your outreach?
Guess what?
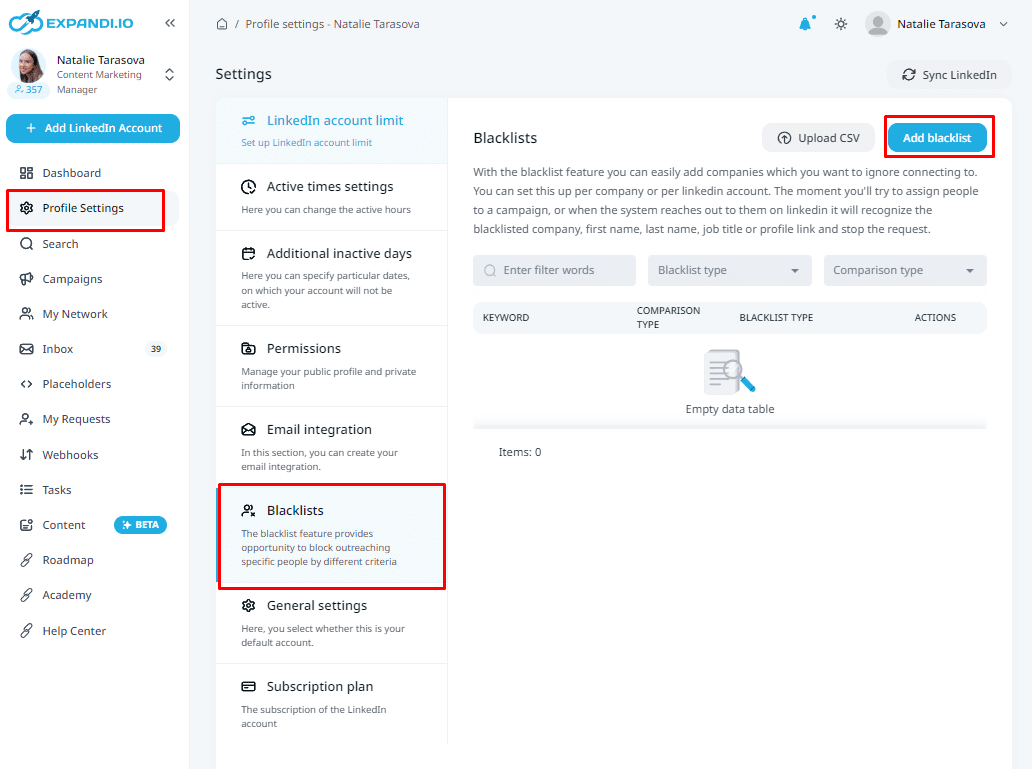
You can now exclude companies from your campaign thanks to Expandi’s new blacklisting feature. You can exclude certain LinkedIn companies, or accounts.
Check it out!
Wrapping Up (Results)
So, this guide seems pretty complex, and it might be, with all the switching to-and-from with Zapier…
But I think the end results speak for themselves:
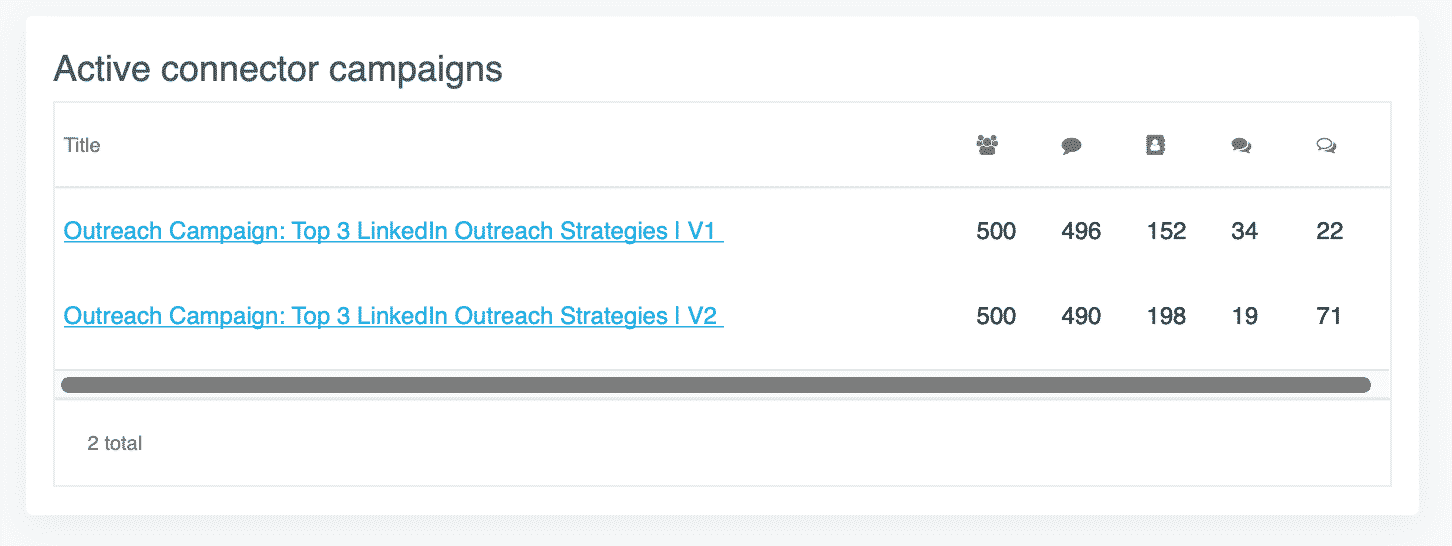
Campaign Version 1
- Contacts: 500
- Connected: 495
- Connected: 152
- Replied to connection message: 34
- Replied to follow-ups: 22
Campaign Version 2
- Contacts: 500
- Contacted: 490
- Connected: 198 (notice how this connection rate is higher than version 1 )
- Replied to connection message: 19
- Replied to follow-ups: 71(!!!)
As you can see, 30% of the leads accepted our request in version 1.
But almost 40% of the leads accepted the request in version 2!
As a reminder – version 2 was the one with the purposefully blank connection request.
Moral of the story: Always experiment, do A/B tests, and make sure your LinkedIn profile is optimized to the max.
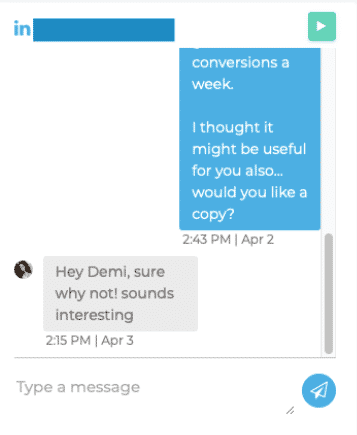
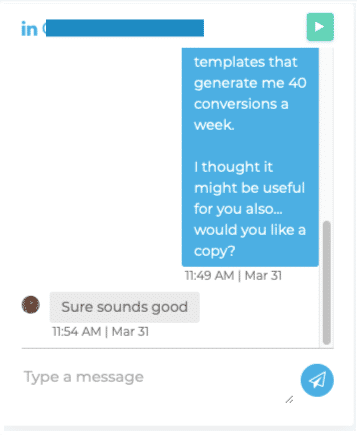
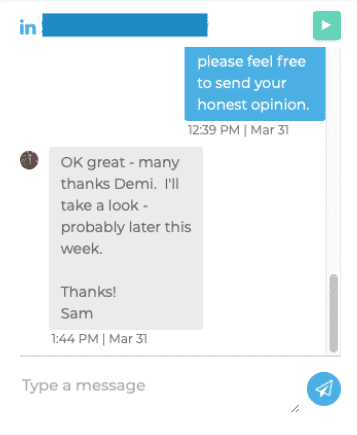
The second campaign also had more replies to the follow-up messages in the sales sequence.
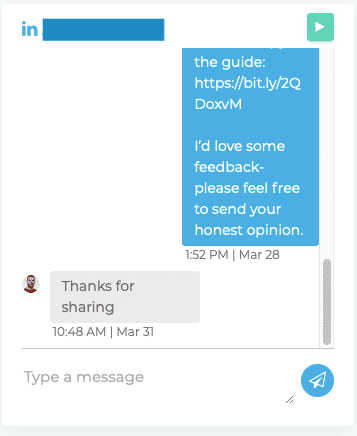
Here are some of the snippets:
[vc_column_inner width=”1/3″]

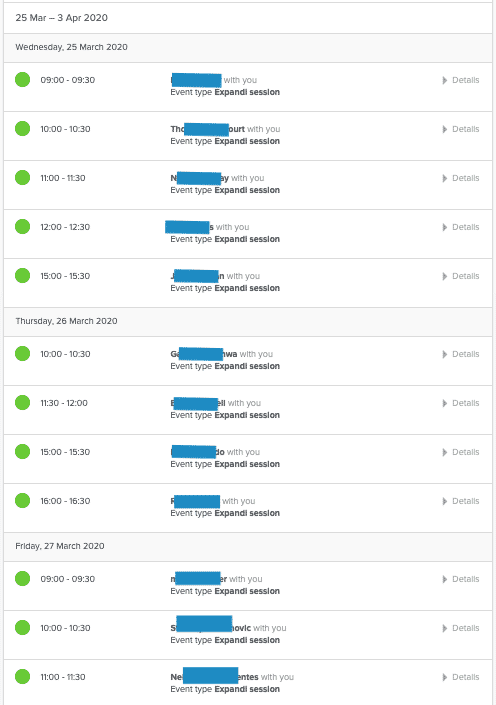
And finally, here are the results from the Facebook retargeting ad with the custom audience:
Now, let’s recap:
- Search for your target audience on LinkedIn Sales Navigator and remember that search.
- Set up a Connector Campaign on Expandi and write the connection request and follow-up messages (or just copy ours! ) and paste the LinkedIn Sales Navigator search URL to fill up your prospects list.
- Set up a Facebook Ad draft with the relevant offer design and copy.
- Connect Expandi to Zapier via webhooks.
- Connect Hunter (or your favorite email scraping tool) to Zapier via the Find Email action type. We’ll be using those scraped emails for the Facebook Ad you created to set up a custom audience.
- Connect Facebook Business Manager Account to Zapier and choose your Facebook Ads account.
- Set up a Custom Audience list for your Ad with a few sample emails.
- Go back to Zapier and connect your Facebook Ad account to the long Zap flow.
- And finally, go back to Expandi again, find any old or expired campaigns, select Export Filtered Contacts to Webhook, and select the webhook you’ve been working on (the one tied to the Facebook Zap).
And there you go!
PS. Don’t forget to join The LinkedIn Outreach Family on Facebook, it’s a closed community were we share our best templates, growth hacks and many more! We can’t wait to see you there!
Now you can sit back, and watch your growth hack do your work for you.
Hope you enjoyed this growth hack on boosting your brand awareness.
If you have any questions on the funnel – feel free to get in touch. I’d love to help you 10x your leads on LinkedIn via the best growth-hacking methods.
Or if you’re hesitant, just follow me on Twitter and let me know you read this guide. I’ll send over a free 7 day trial for Expandi, so you can test out this growth hack for yourself with 0 expenses.
And if you’re looking for other LinkedIn growth hacks and case studies, you can also read:
You’ve made it all the way down here, take the final step
