How to Use the Expandi MCP to Monitor and Improve Outreach Campaigns

Key Takeaways
The Expandi MCP connects AI agents like Claude or ChatGPT to your Expandi account, enabling lead enrichment, targeting, campaign building, and reply management via prompts. It operates within strict safety limits and human approval workflows. By running a 15-minute weekly loop to diagnose bottlenecks, review reply-to-acceptance cohorts, and cluster conversation themes, sales teams can refine targeting and optimize subsequent campaigns while maintaining full compliance.
How to Use the Expandi MCP to Monitor and Improve Outreach Campaigns


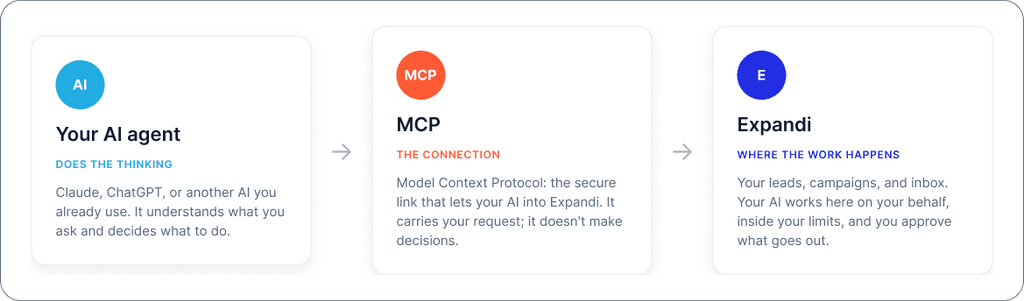
The Expandi MCP connects your AI agent to your Expandi account. As a LinkedIn outreach MCP, it can diagnose live campaigns, compare results, review replies, and draft the next sequence. You approve replies and launch campaigns yourself.
If you only review outreach after a campaign ends, a campaign can slow down or stop without anyone investigating the cause during the run. Expandi’s 2026 outreach benchmarks also point to a trend: connection-note reply rates fell from 3.5% in May 2025 to 2.2% in April 2026, a 37% relative decline. This makes it more relevant than ever to continually improve your outreach and refine future campaigns.
The workflow below walks you through how to monitor LinkedIn campaigns and turn campaign data into improvements you can make before your next launch.
How does the Expandi MCP help monitor and improve campaigns?
Model Context Protocol (MCP) is an open standard introduced by Anthropic that connects AI applications to external tools and data. The Expandi MCP server gives your agent access to supported outreach tasks through your existing account permissions.
Expandi’s CEO and co-founder Glenn Miseroy describes the team’s approach:
“We really thought through the use cases and how it would really help people instead of just having some endpoints available to use.”
Those use cases cover 7 jobs:
- Enrich: Add details from connected enrichment tools to lead records.
- Target: Match available leads against your criteria and create a lead list.
- Route: Add leads to campaigns and manage their pause status.
- Build: Draft a campaign with messages and step timing.
- Reply: Read conversations and prepare responses for approval.
- Diagnose: Investigate why sending slowed or stopped.
- Measure: Read campaign results and compare performance.
You run these checks when you prompt the agent. The connection alone doesn’t create background monitoring. MCP LinkedIn automation keeps campaign changes and outbound messages behind human approval.
The main idea is to make the review a recurring task, then carry the findings into your next campaign.
Step 1: Connect the Expandi MCP and give your agent context
Before the agent can inspect a campaign, it needs access to Expandi and enough context to understand the task. Set up the connection once, then tell it what a useful result looks like.
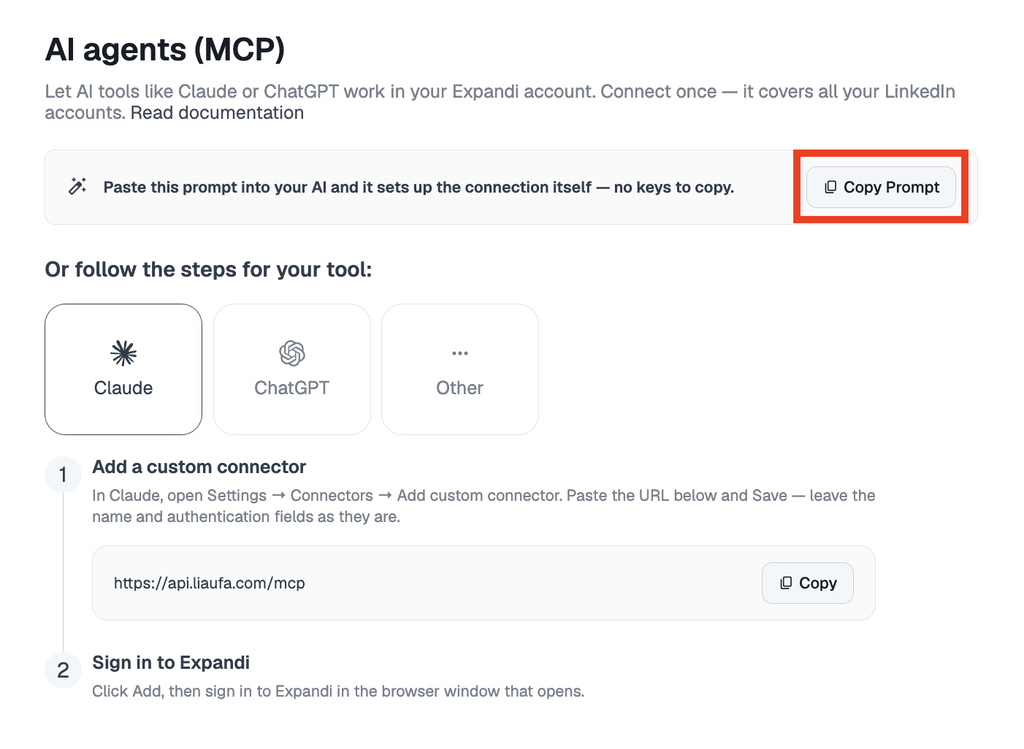
Connect from Account Settings to AI agents
Open Account Settings, then AI agents. Add the server address shown there to your AI tool and follow the sign-in instructions. Read the authorization screen before approving access.
For a Claude LinkedIn outreach setup or a ChatGPT connection, use browser sign-in. Tools that can’t complete that flow, such as a headless n8n or Make setup, use an access token. Follow Expandi’s MCP connection guide for your client. Treat the token like a password.
One connection covers the LinkedIn accounts your Expandi user manages. Name the account and campaign in each prompt, especially if you work across clients.
During beta, access opens in batches and requires an active Expandi subscription. Check availability before planning a rollout, plus any MCP requirements on your AI tool’s plan.
Load your outreach context
For AI-powered LinkedIn outreach to work well, give the agent your:
- ICP and exclusion criteria
- Offer and desired outcome
- Tone of voice
- Examples of messages that earned useful replies
Define the reporting period before asking for comparisons. If a requested field is unavailable, have the agent identify the missing input instead of estimating it. The sample prompts in Steps 2 though 5 are starting points. Replace the bracketed fields and adapt each prompt to the data available in your Expandi account.
Step 2: Use the MCP to audit your campaigns
A campaign with a daily limit of 40 invitations can send fewer of them for several reasons. The limit is a ceiling; eligible leads and scheduling determines what can run. Check whether the sending window has finished before treating the total as a shortfall.
Ask why sending fell short
The prompt should look something like this:
For [LinkedIn account] and [campaign], explain why [12] invitations were sent on [date, timezone] against a limit of [40]. Check completed and scheduled work. Show the evidence for each blocker and proposed next action. Diagnose first; wait for my approval before changing anything.
Check the operational causes
| Check | What to establish |
|---|---|
| Daily limits | Remaining capacity across campaigns using this account |
| Sending hours | The campaign’s timezone and active sending window |
| Account connection | Connection status and any restriction requiring your attention |
| Eligible leads | The number of leads ready for their next action |
| Warm-up | Current ramp-up settings and their effect on sending volume |
| Failed or paused work | The affected leads and the reason each action stopped |
You can cross-check completed and upcoming tasks in Expandi. Sending hours sit under LinkedIn Settings in Activity schedule settings. Review your LinkedIn connection limits and account warm-up before adding volume.
Decide what to change
The MCP supports pausing and resuming leads. Ask which leads are eligible to resume and what that change will do to scheduled outreach. Review failed actions before retrying them; leave opt-outs excluded.
A disconnected or restricted LinkedIn account calls for your attention. Follow the recovery instructions instead of repeatedly resuming its leads. If you want to pause someone who booked a meeting elsewhere, provide that information or connect the source that records it.
Step 3: Read performance the way a marketer does
Once sending is healthy, compare segments over the same period. Ask for counts alongside percentages, so a handful of replies doesn’t look like a dependable pattern.
Compare like-for-like rates
Expandi’s 2026 industry benchmarks covers 13,218,869 connection requests from 13,302 accounts between May 2025 and April 2026. Its averages are 28.5% connection acceptance and 10.4% message reply. Staffing & Recruiting senders averaged 36.5% acceptance; Computer Software senders averaged 27.5%.
These are sender-industry benchmarks. Choose the row for the sender’s business when using the report as a reference. It doesn’t predict response rates by prospect industry.
| Metric | Definition to use |
|---|---|
| Connection acceptance | Accepted connections divided by requests sent |
| Message reply | Replies divided by outbound messages sent |
| Reply-to-acceptance | Accepted contacts who subsequently replied divided by accepted contacts in the same cohort |
| Business conversion | A defined outcome, such as a booked meeting, divided by a stated eligible audience |
The report’s message metric includes email and InMail alongside other message types. Keep that distinction visible when comparing it with a LinkedIn-only campaign or a contact-based rate.
Use this prompt to compare segments over one reporting period and keep every rate tied to its underlying count:
For [account], compare [campaign]’s segments and lead lists over [period]. Show acceptance and reply rates with their counts and definitions. Include [conversion event] only if its source data is available. Use a matching sender-industry benchmark where definitions align; flag every mismatch or small sample.
Find the reply-to-acceptance leak
Use this cohort prompt to see what happens after a contact accepts your connection request:
For contacts who accepted during [cohort dates], calculate the share who replied afterward by [cutoff date]. Rank segments against the campaign’s same-cohort result. Show counts and time since acceptance, and flag groups that need more observation time.
This is a separate measure from the report’s 10.4% message reply rate. Compare your segments using the same definition before deciding which audience or opener to test next.
Inspect sequence progression
The following prompt can be used to distinguish expected waits and branches from an unexplained drop between steps:
Show progression through [campaign] by step. Separate completed actions from leads waiting, paused, failed, or finished after a reply. Explain branches and delays before identifying any unexplained drop. Label messaging explanations as hypotheses.
A lead waiting for a scheduled follow-up hasn’t necessarily dropped out. Once you’ve accounted for timing and branch rules, inspect the message at the step with the clearest unexplained drop and choose one change to test.
Step 4: Cluster replies and turn objections into intent
Campaign metrics show where performance changed. The reply threads help explain why and point to the next audience or message test.
Group conversations by theme
Type in the following prompt:
Read [campaign]’s reply threads from [period]. Group them by the next decision: respond now, revisit at a stated time, seek a referral, reassess fit or offer, or stop contact. Keep unclear replies separate. Count each thread once, show its primary category and share of all threads, and include anonymized examples. Separately summarize themes among clearly negative replies, stating that denominator.
Use the examples to check the categories. A “wrong person” reply may contain a referral. A request for clarification may reveal a confusing opener. Preserve those distinctions before changing your targeting.
Keep judgment and reply approval with you
Ask for response drafts to interested prospects, then check them against the conversation. Correct unsupported claims and promises before approving a reply.
Treat explicit opt-outs as exclusions. A timing objection belongs in a later follow-up plan only when the thread supports that interpretation. An uncertain classification should stay uncertain until you review it.
Use reply patterns to choose the next audience test
Expandi’s signal-based outreach lets you use prospect activity to inform campaign entry. Supported sources include profile visits and engagement with selected posts. Apply ICP filters before adding people.
Profile-visitor workflows require LinkedIn Premium or Sales Navigator. Check the access requirements for each signal you plan to use.
Use this prompt to turn patterns in the replies into a specific audience or Signal test:
Compare interested prospects with people who gave a specific timing objection. Identify supported patterns in their roles and company context. Suggest ICP changes or available Signals to test next, with the evidence for each. Keep explicit opt-outs excluded and leave configuration changes for my review.
Review the suggestions before configuring the next campaign. A reply analysis can inform your trigger choices, but it doesn’t establish that every useful pattern has a matching automated signal.
Step 5: Draft the next campaign inside the builder
Now turn the diagnosis and reply analysis into a campaign you can review. The agent can prepare the audience and sequence, then leave the final checks and activation to you.
Brief the agent with the findings
Use this prompt:
Using [approved data source], build a lead list matching [ICP], excluding [criteria]. Apply the supported findings from [campaign]. Draft a 4-step sequence for [offer] and [outcome], with messages and delays. Identify missing data and leave the campaign inactive for review.
The agent can create a lead list and campaign draft. Tell it which account and source to use; add connected enrichment data where needed. Review the result in the campaign builder and edit the flow in Smart Sequences.
Review the audience and activate the campaign
You can assign the audience yourself or ask the agent to assign it. Check the selected leads against your exclusions and read the whole sequence before activation.
Pay particular attention to personalization. A field populated by an enrichment tool still needs to support the claim in the message. Approve the copy and launch the campaign yourself when it’s ready.
The 15-minute weekly loop
Use these as suggested timeboxes for one campaign. Larger accounts or ambiguous replies need longer.
- Connect and load context: complete once, then update when your offer changes.
- Diagnose, 2 minutes: inspect blockers and approve appropriate recovery actions.
- Read performance, 4 minutes: compare matched segments and identify one question to investigate.
- Cluster replies, 5 minutes: review categories and prioritize conversations needing a response.
- Draft the next campaign, 4 minutes: prepare a draft from the findings. Allow extra time for audience and copy approval.
What the Expandi MCP won’t do
There are some things you can’t expect from the Expandi MCP to do, including:
- Send an unapproved reply: MCP responses remain drafts until you approve them individually or in bulk.
- Independently launch a campaign: you review and activate the campaign; its scheduled sequence then follows its settings.
- Restore a LinkedIn connection for you: account-access problems require your attention.
- Bypass account controls: Expandi says MCP follows existing daily limits and warm-up settings. It can access only the accounts assigned to your Expandi user account.
MCP actions are logged by account and time. You can review them from the AI agents settings.
These controls don’t guarantee protection from restrictions. LinkedIn prohibits third-party software that automates activity, and configured limits don’t establish compliance with its rules.
Run your first campaign check with Expandi MCP
Connect your AI tool from Account Settings > AI agents, then ask one focused question about a live campaign:
“Why did this campaign stop sending, and what needs my attention?”
Review the evidence before approving any changes.
New to Expandi? Start a free trial and check MCP access availability before setting up your first campaign review.
Frequently Asked Questions
Expandi MCP is a Model Context Protocol server that connects an AI agent to supported tasks in your Expandi account. You can use it to investigate why campaigns slow down or stop, review results, manage leads, and prepare campaign or reply drafts.
No. Follow the connection guide for your AI client and approve its access. Browser-based clients use sign-in, and headless setups use an access token.
No. Expandi says the connection respects its existing limits and warm-up controls. LinkedIn’s restrictions on third-party automation still apply.
No. MCP reply drafts need approval, and campaign drafts need human activation. Once you’ve activated a campaign, its configured automation can run scheduled actions.
The API supports integrations that call Expandi directly, including workflows built with code or integration tools. MCP exposes supported tasks to compatible AI clients so you can request them conversationally. Check each interface’s documented capabilities for your workflow.
Claude and ChatGPT can connect, as can Cursor. Compatible automation clients include n8n and Make. Requirements vary by client. Expandi’s Disconnect all control revokes access for every connected tool at once.





You’ve made it all the way down here, take the final step