How To Create Your First LinkedIn Outreach Campaign [Full Guide]
You don’t need to be an expert marketer or salesperson to know LinkedIn is the single best platform for outreach and lead generation.
The facts are, according to LinkedIn:
- There are 950+ million members on LinkedIn worldwide. With 4/5 members driving business decisions (that’s 65+ million decision-makers).
- 57+ million companies have a page on LinkedIn, across 200 countries and territories. With 75% of LinkedIn members being outside the U.S.
- LinkedIn was rated the #1 platform for B2B lead generation, with brands seeing a 2x higher conversion rates on LinkedIn and 40% of B2B marketers saying LinkedIn has been the most effective channel for driving high-quality leads.
What’s the point here?
No matter what you sell, who your audience is, or where you’re based…
You can find your target audience on LinkedIn, reach out to them, and start booking meetings today.
Typically, LinkedIn is different from cold emailing, in the sense that it’s less scalable, but you’ll see better conversions. That’s because a LinkedIn connection feels more personal.
Leads go through your profile, see the kind of content you’re creating, and engage you on a more personal level.
The best part?
You can start setting up your first LinkedIn outreach campaign today, and have it reaching, engaging with, and booking meetings with your ideal prospects.
All this can be fully automated, in under 30 days.
After which you’ll have a fully customizable, personal lead generation and outreach machine connecting with your ideal prospects for you.
In this ultimate guide on how to create a campaign on LinkedIn, we’ll be spreading this process across 5 weeks, which will cover:
- Week 1: Preparing and setting up your first LinkedIn outreach campaign.
- Week 2: Launching your first LinkedIn campaign.
- Week 3: Optimizing your outreach.
- Week 4: Taking your outreach to the next level with dynamic images and GIFs.
- Week 5: Creating reports, campaign performance analysis, and integrating with your CRM.
Now, here’s everything you need to know about creating your first LinkedIn outreach campaign.
Week 1: Preparing To Set Up Your First LinkedIn Marketing Campaigns
If you want to get the most results out of your LinkedIn cold outreach, you shouldn’t skip this part.
Because, if you jump right into connecting with your prospects immediately, chances are, your campaign will fail.
That’s because, first, you should:
- Prepare your LinkedIn profile.
- Set up the right tools for automated outreach.
- Warm up your LinkedIn account.
- Find prospects to reach out to.
- Set up your first outreach campaign the right way.
Let’s take a look at what this means.
1. Preparing and optimizing your LinkedIn profile
Imagine you get a connection request from a stranger on LinkedIn.
What’s the first thing you do, after reading their connection note?
Probably check their LinkedIn profile, right?
This is why it’s so important to optimize your own LinkedIn profile first, before doing any outreach.
You should treat your LinkedIn profile like your personal landing page.
In short, your profile should explain to your prospects:
- What you do.
- Why they should connect with you.
- How your solution helps them.
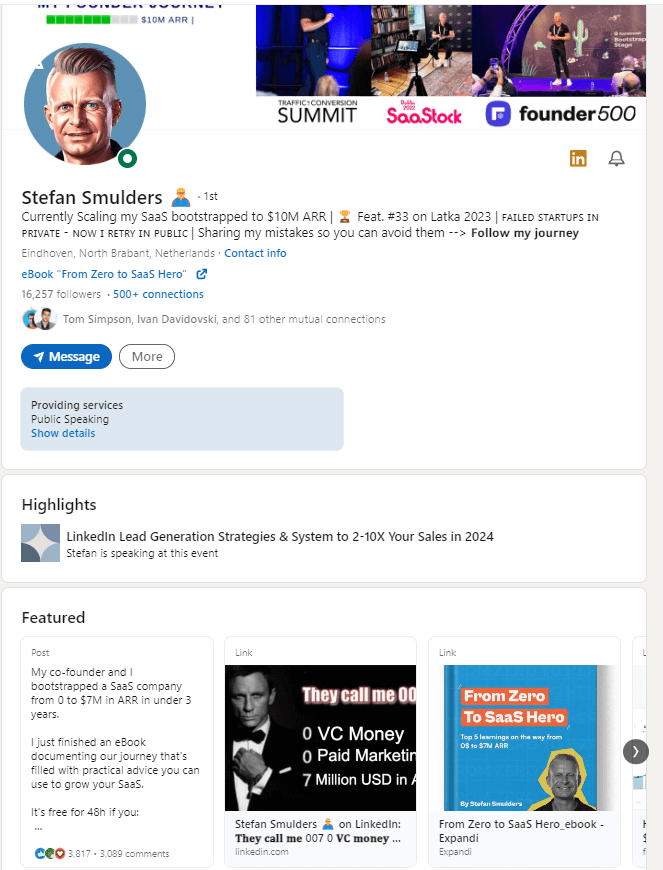
And here’s a brief overview of how you can do this, based on different LinkedIn profile sections:
- LinkedIn URL – Make sure you claim a custom URL that’s more user-friendly and professional. You’ll want your LinkedIn URL to be something like “https://www.linkedin.com/in/FirstName-LastName” NOT “https://www.linkedin.com/in/FirstNameLastName134823”.
- LinkedIn profile picture – Try to aim for a professional headshot of around 400×400 px.
- LinkedIn profile headline (tagline) – The formula for writing the perfect profile tagline is something like: “(Title) at (Company) – Helping (ICP)”, “(Title) | (Company) | (Unique Selling Proposition)” or “(Title) + (Company) + (benefit of working with you) | keywords related to your role.”
- LinkedIn portfolio – Here, you should highlight your achievements, personal content, your call-to-action, and other important samples.
- LinkedIn summary – Your summary should describe who you are, what you’ve accomplished, and who you help.
- Work experience – Here, focus on quantifiable results, data, and achievements.
- Social proof – Try to get LinkedIn endorsements, testimonials, and other forms of social proof.
Need more info and examples?
Check out our guide on tips for improving your LinkedIn profile.
What about the other sections?
For a full guide on how to optimize your LinkedIn profile so that you’re getting leads coming to you on their own…
Check out our free eBook on the guide!
2. Setting up Expandi correctly and integrating your email
This step is technically optional. But we highly recommend it as part of your creating your own LinkedIn outreach campaign.
With LinkedIn automation tools like Expandi, you can fully automate your LinkedIn outreach.
What does this mean?
Instead of manually:
- Sending connection requests.
- Following up with prospects.
- Engaging with prospects, sending an email follow-up, and commenting on someone’s latest post to get their attention…
You can automate all this and more with Expandi so that you’re booking meetings on autopilot, without you having to be in front of the screen all day.
And the best part is you can use Expandi for this entire guide to creating your outreach campaign with its free, 7-day trial!
Getting started with Expandi is easy.
Here’s what you need to do:
- Grab the free, 7-day trial here.
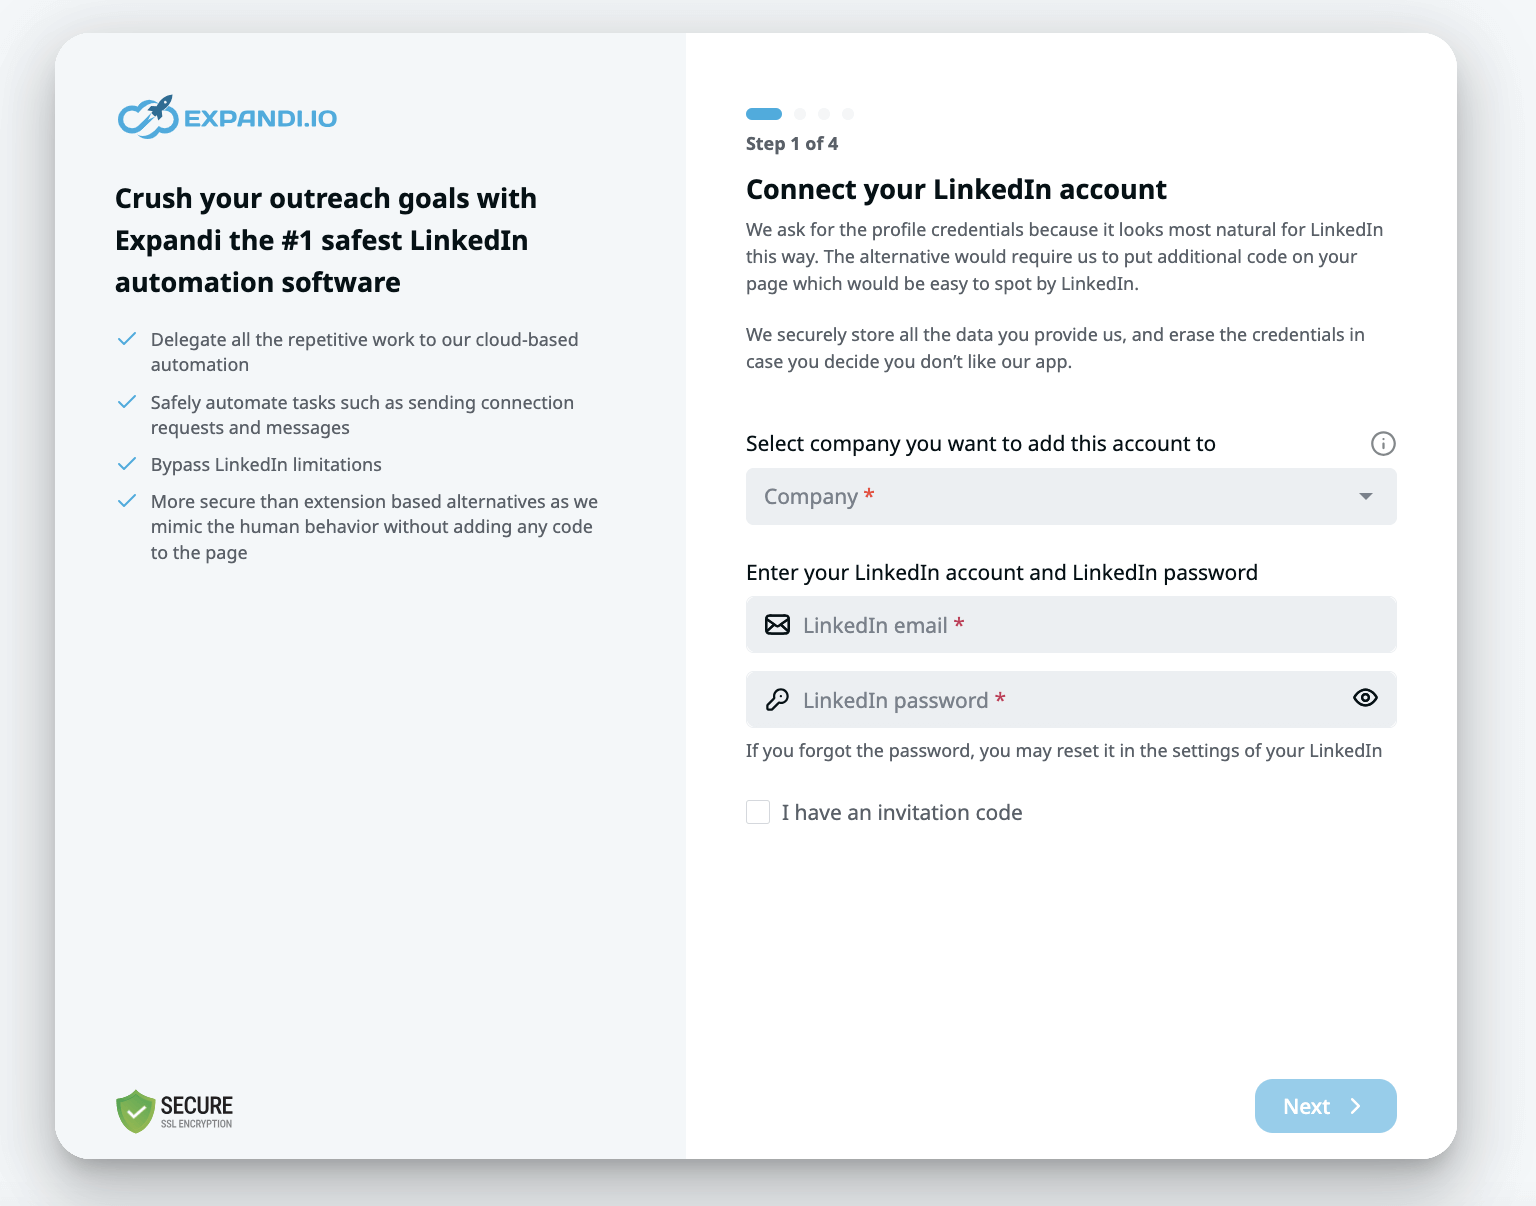
- Connect your LinkedIn account to Expandi. This is totally safe and lets Expandi automate your account from the cloud, instead of the front-end, which would be easier to detect.
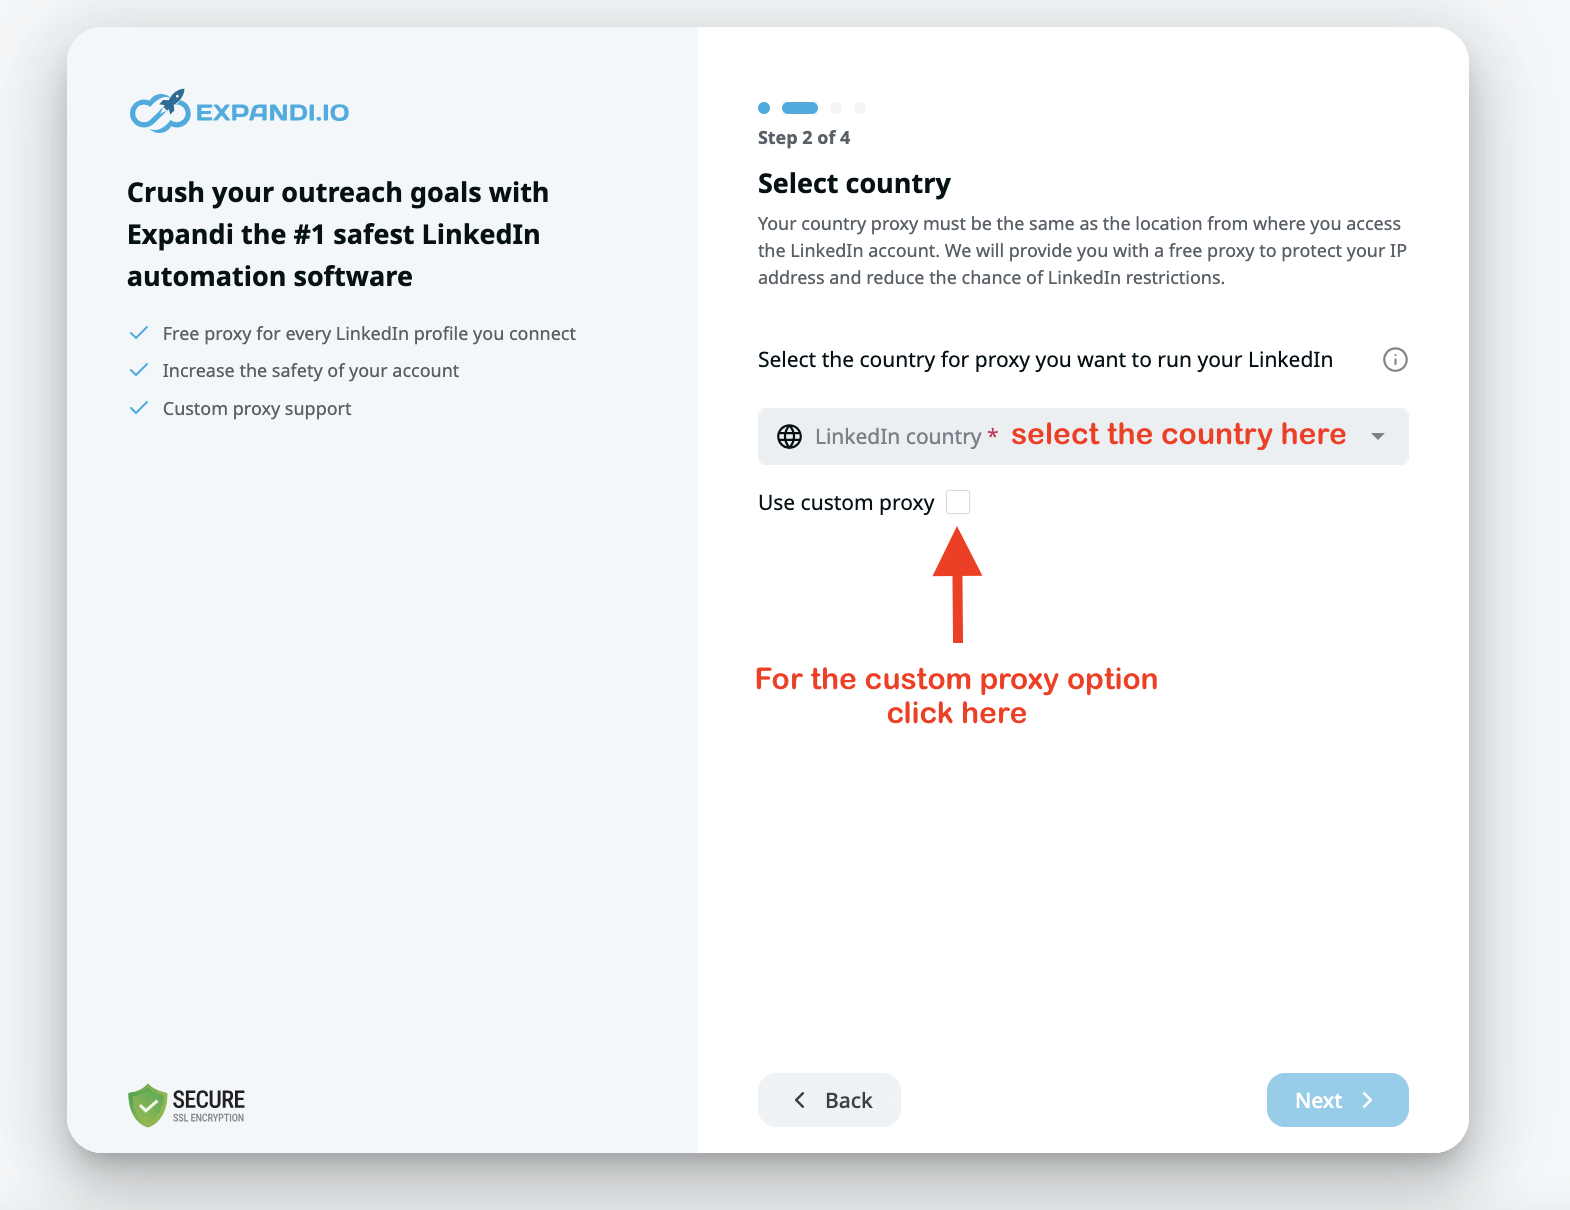
- Then, select the country you’ll be accessing your LinkedIn account from (where you currently are). This is so that Expandi gives you a free proxy with a dedicated IP address. In other words, if you live in Germany, Expandi’s activity will also be from Germany. Without this feature, LinkedIn would be more likely to detect suspicious activity coming from your account. For example, if you’re logging in daily from Germany, but your virtual assistant is logging into your account to reply to leads from Mexico, LinkedIn will be quick to notice that. If you’re traveling to a new country, you can also change your Expandi IP.
- Then, set up your subscription settings. Keep in mind, you will NOT be charged when activating the trial. So, if you decide Expandi is not for you, you can always opt out before the free trial ends.
- Wait a couple of minutes, sync your account, and enter a pin you’ll receive to your LinkedIn email.
And that’s it!
After this, we’d recommend warming up your LinkedIn account (see below) to get the most out of Expandi automation.
Or, if you also want to be able to create omnichannel outreach campaigns (LinkedIn AND email), you should integrate your email with your Expandi account too.
Here’s how to do that:
- Go to your Profile settings in Expandi, select Email integration, and then Connect.
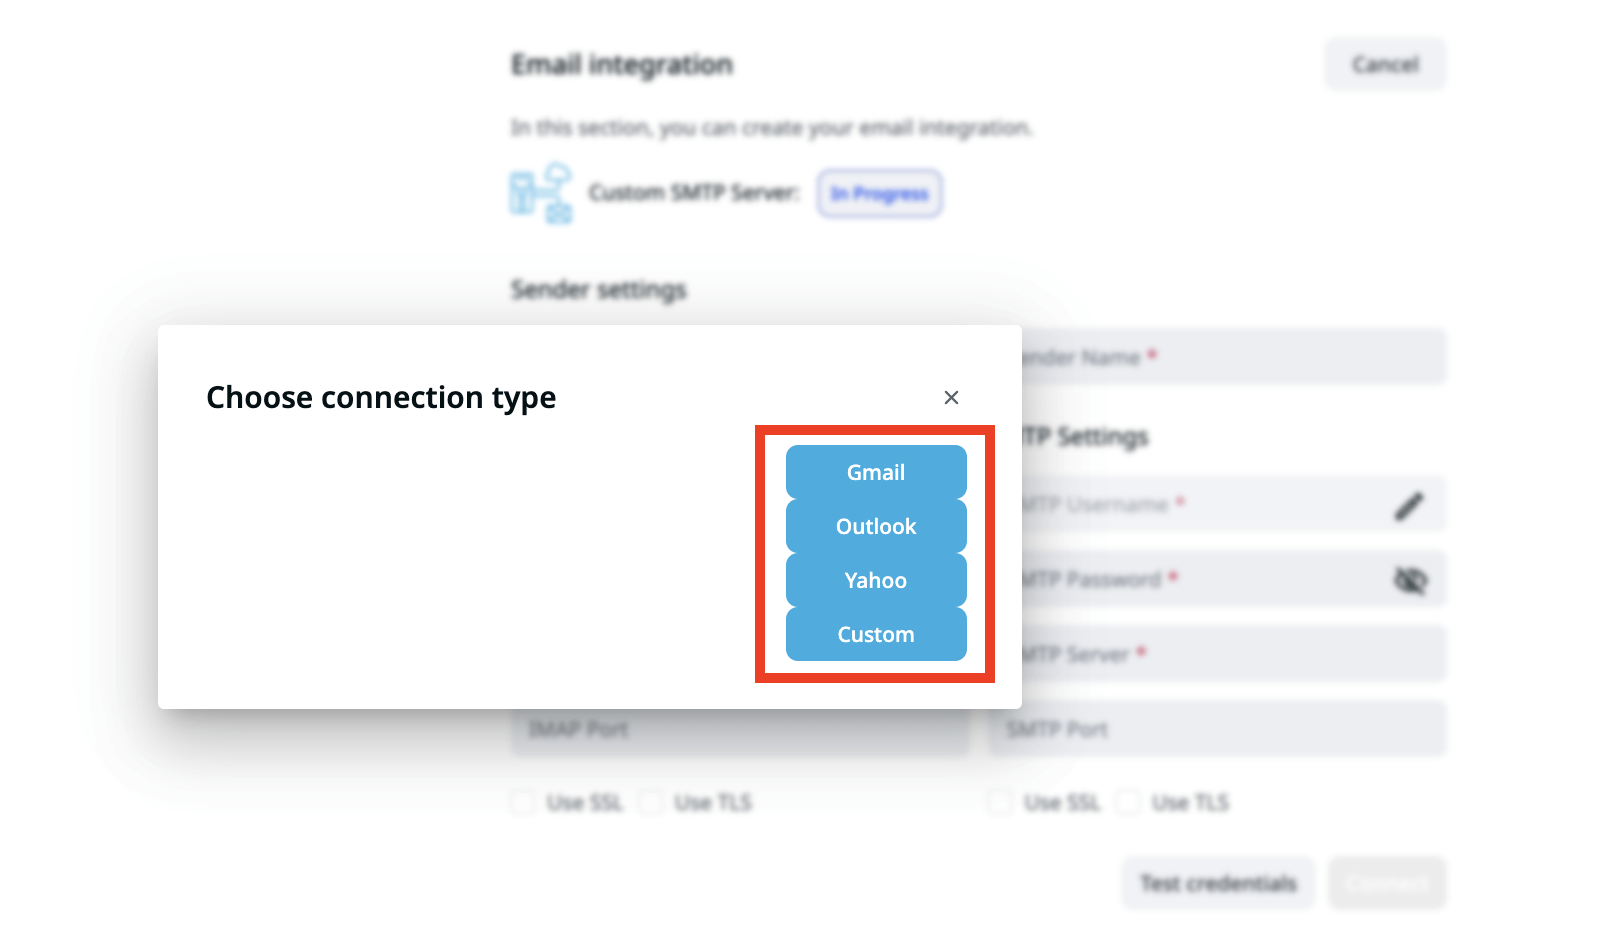
- Select connection type depending on your email account. Here’s how to integrate Gmail with Expandi.
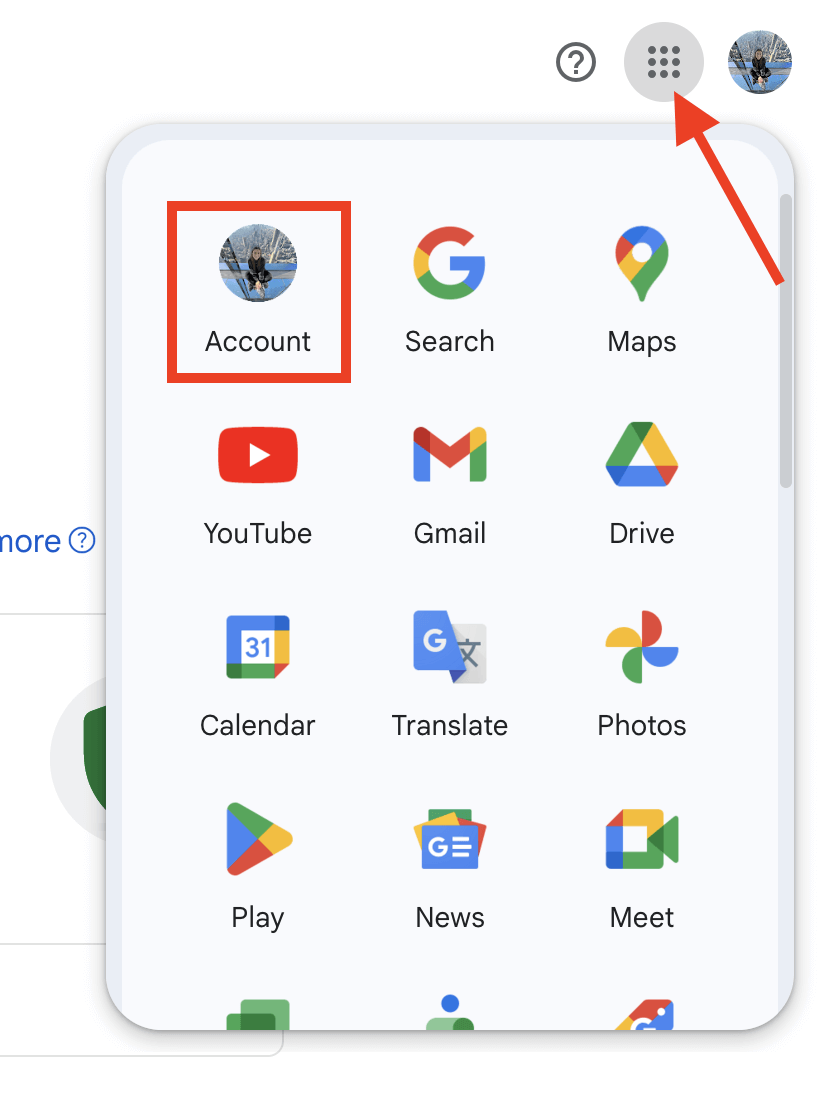
- Navigate to Manage your Google Account.
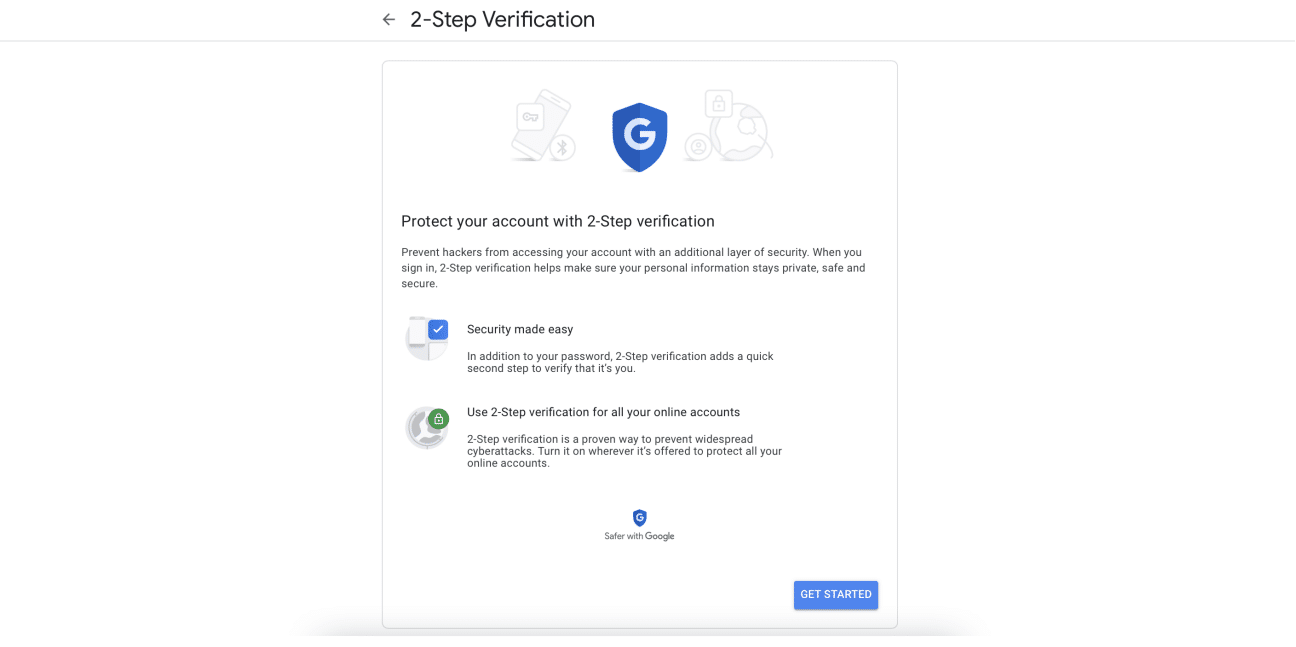
- In the search bar, look up “2-step verification” and click on the first option.
- Follow the instructions and get started.
- Once successful, the following screen should look like this.
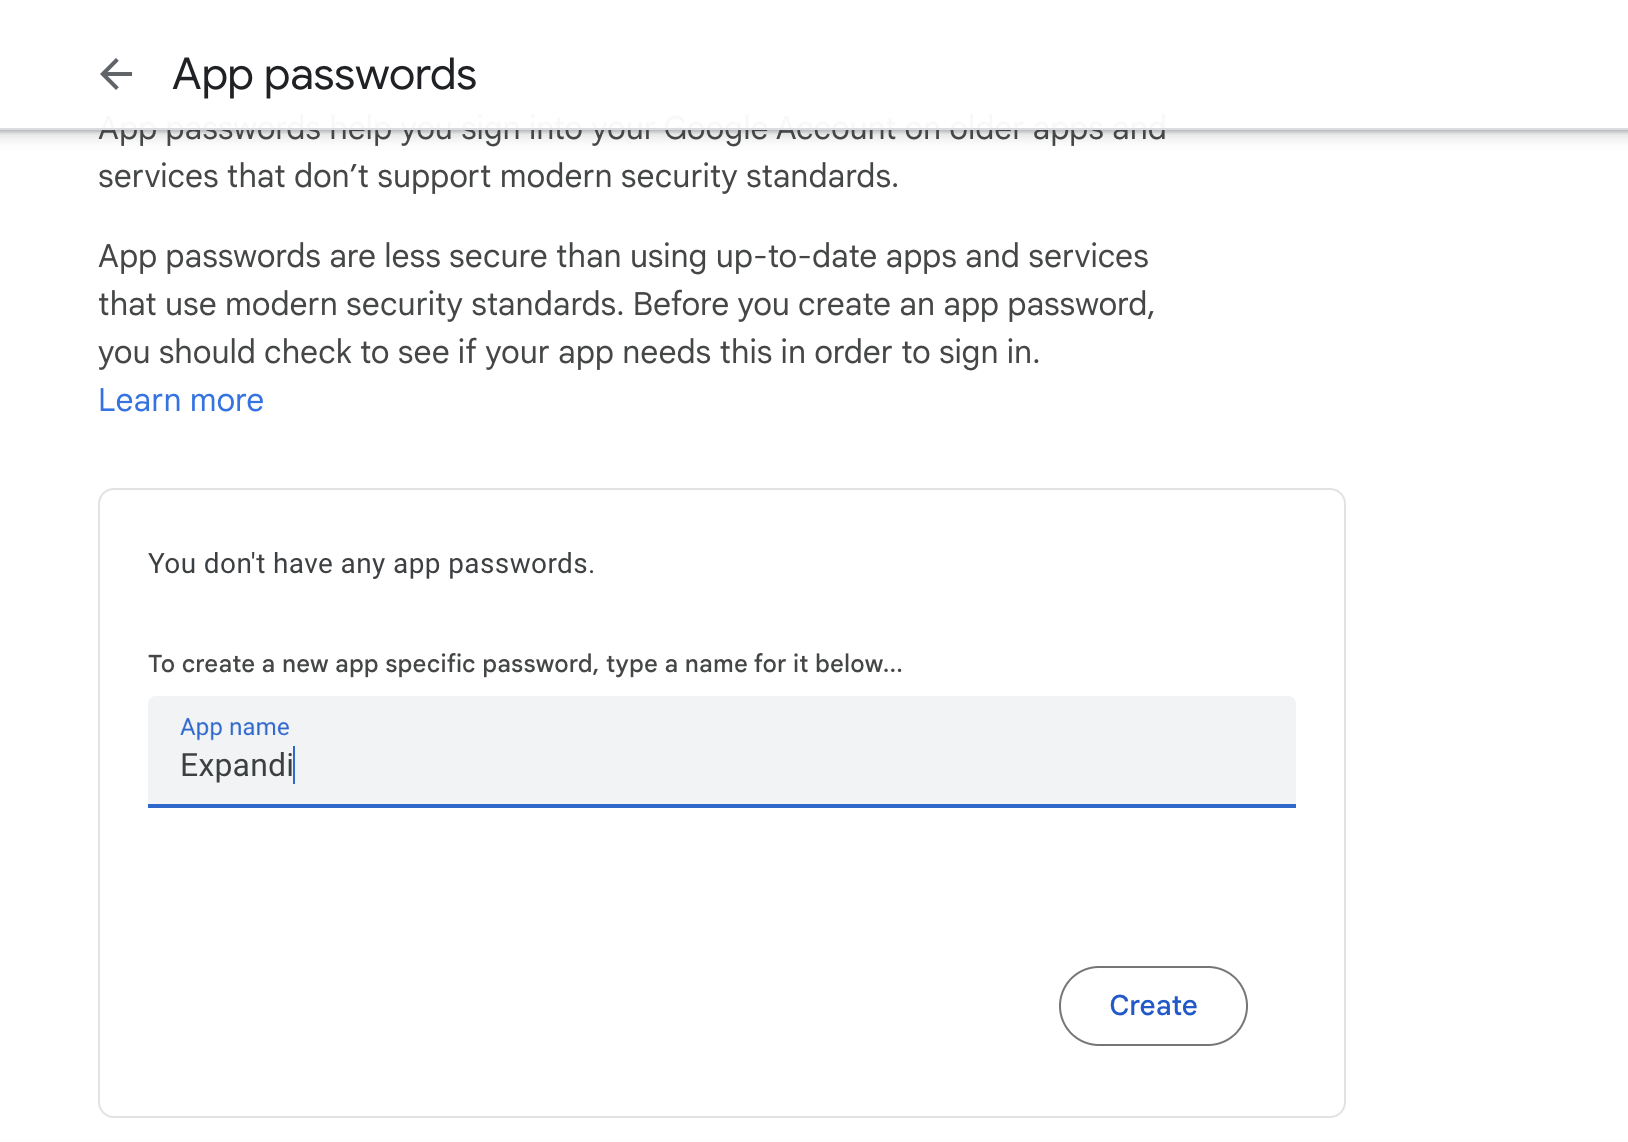
- Click on the arrow next to the 2-step verification title. And in the search bar, look up “app passwords”. Click on the first option.
- Enter Expandi as the app name and click Create.
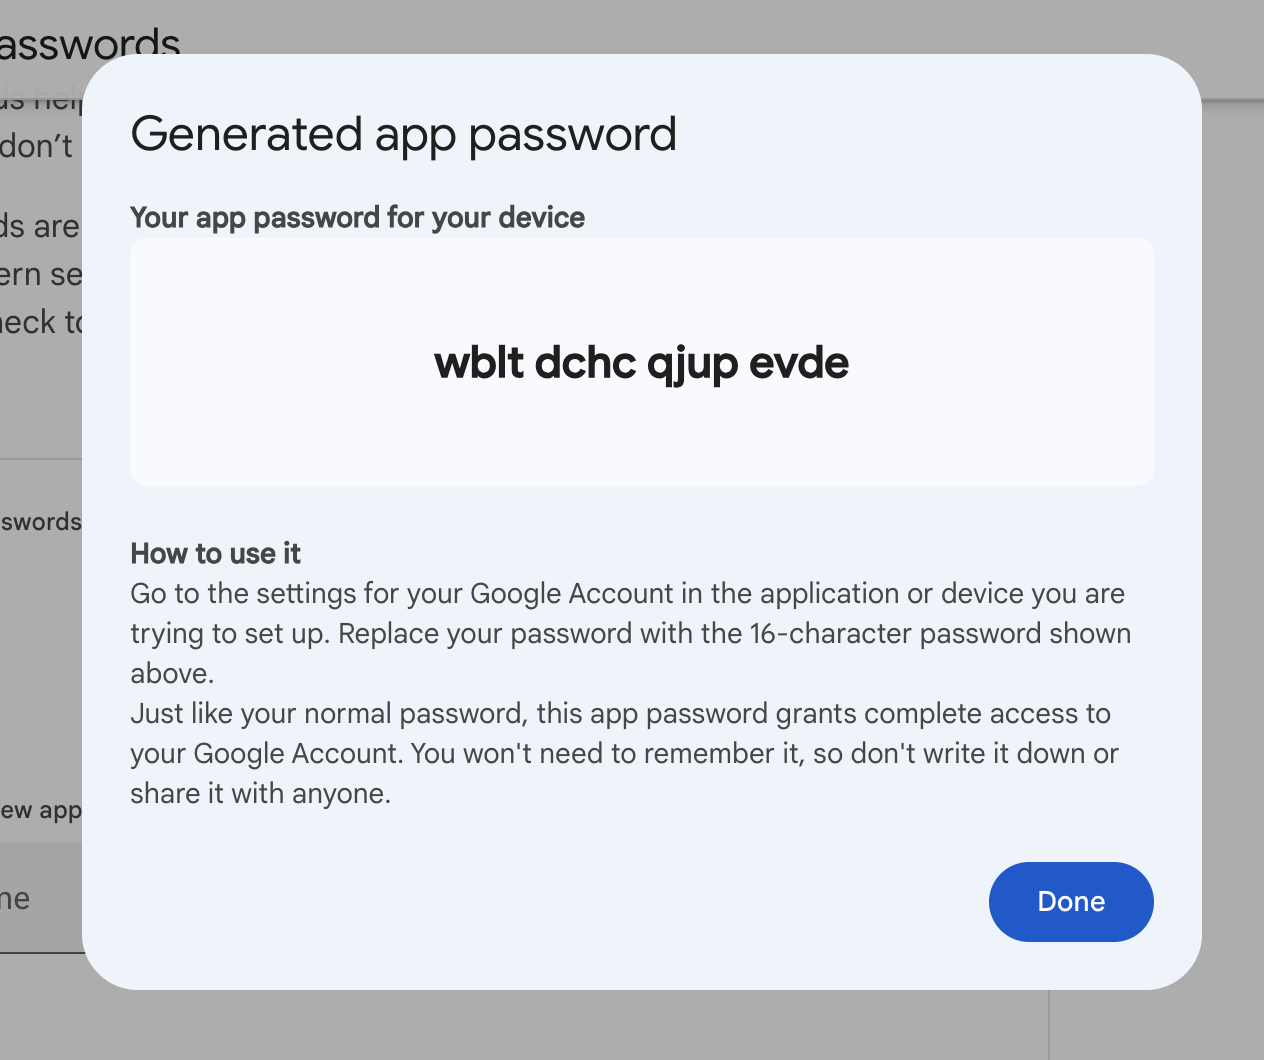
- Copy the password that appears.
Once the Google setup is complete, you also need to set up the password in Expandi.
- Go back to the Email integration section.
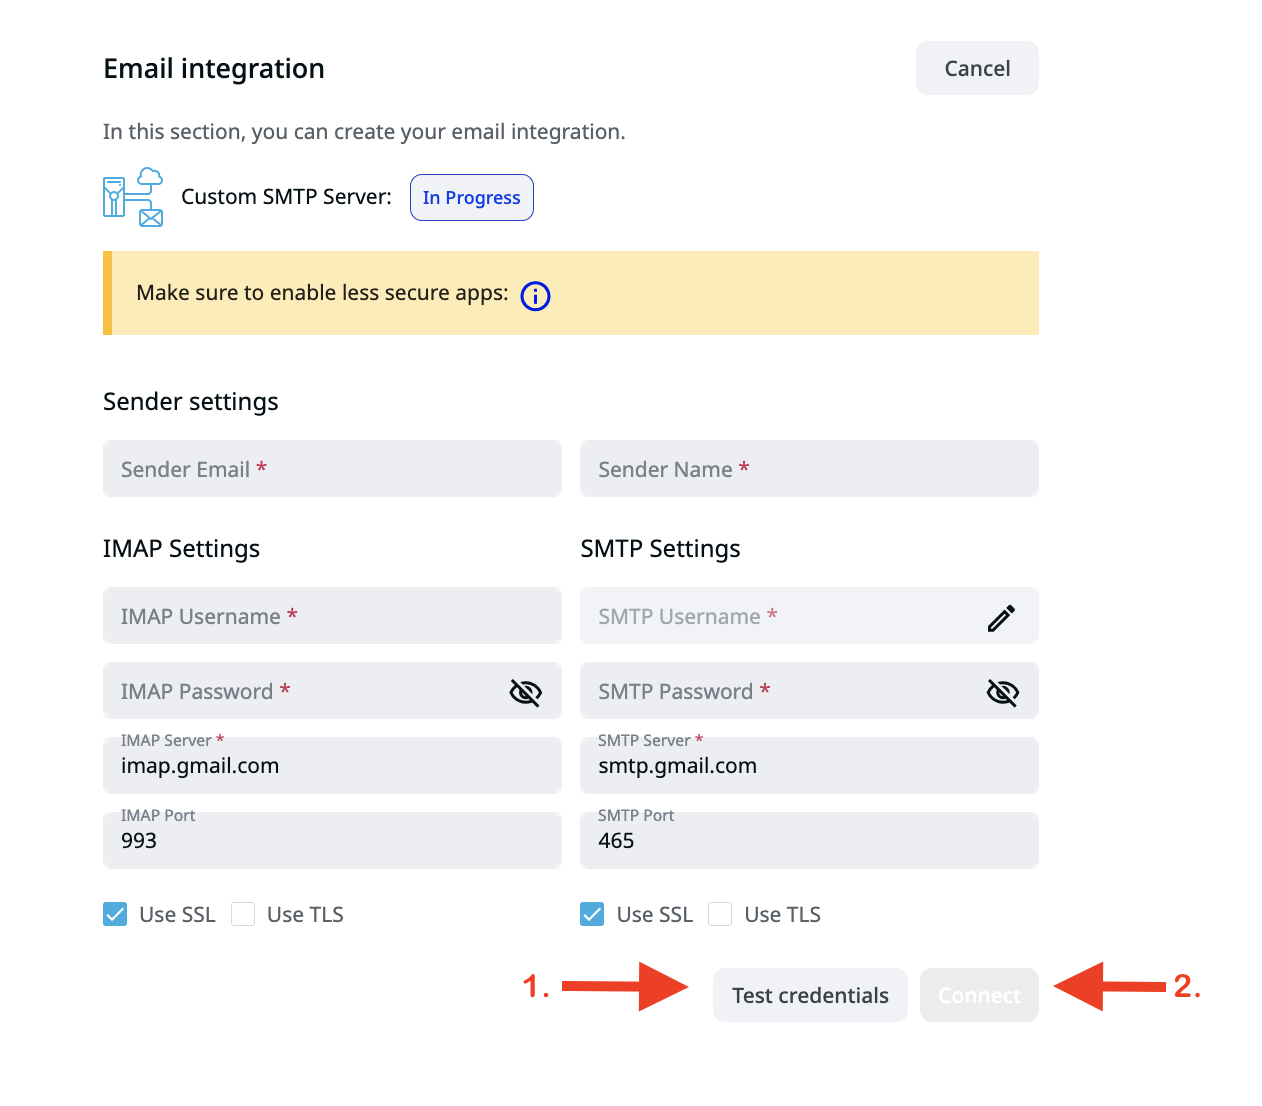
- Fill out the following settings accordingly:
- Sender name: add your name
- IMAP username: add your Gmail address
- IMAP password: add the password that was generated
- IMAP server: imap.gmail.com
- IMAP port (SSL): 993
- SMTP username: add Gmail address
- SMTP password: add the password that was generated
- SMTP server: smtp.gmail.com
- SMTP port (SSL): 465
Then, click Test Credentials and Connect.
And voila!
If you followed the steps successfully, you can now start creating omnichannel outreach campaigns – targeting prospects via LinkedIn and email.
For custom email integration, you’d have to add all the data yourself as it won’t be auto-populated by Expandi. And if you use Outlook, check our guide on how to integrate here.
3. Set up your LinkedIn account warm-up settings
This is an important step we always recommend following before jumping into your outreach campaigns.
Within your LinkedIn account limit settings, you can optimize your outreach campaigns for maximum safety.
If you suddenly started blasting out 100+ cold messages in under an hour, LinkedIn would assume that activity sounds automated and suspend your account.
o prevent that, here are a few security settings we recommend tuning within Expandi for maximum safety.
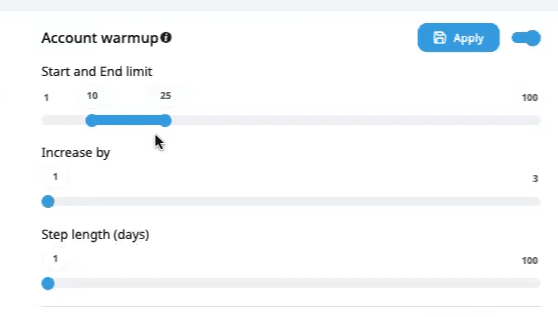
Account warmup.
If this is your first time automating your LinkedIn outreach campaigns, we recommend using the following settings:
- Account warmup: Turned on.
- Start and end limit: 10-25.
- Increase by: 1.
- Step length (days): 1.
This means, Expandi will send 10 actions on day 1, 11 on day 2, and so on, until it reaches 25.
Depending on your setup, this should take around a week.
Active times settings
This setting is fairly straightforward.
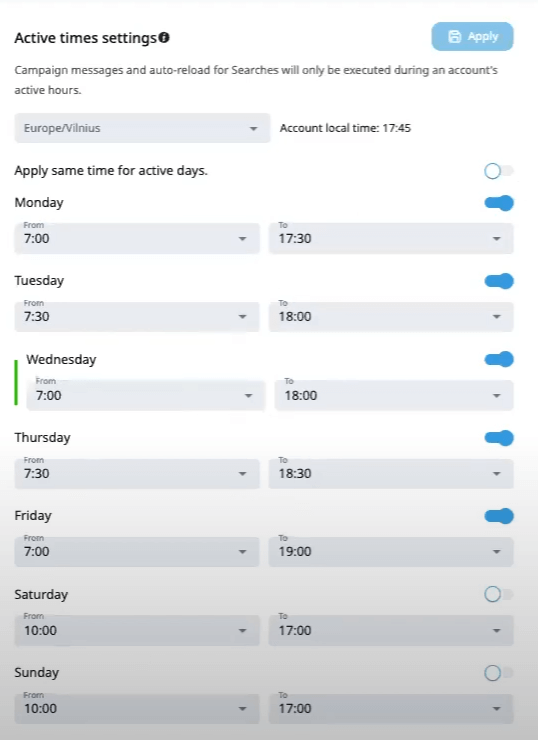
Here, you adjust the exact, active time settings for which your campaigns and actions will be working.
For most people, this might include 9AM-5PM, because that’s when most people are working.
Depending on your audience, you could also exclude the weekends, because less people check LinkedIn during those days.
This might depend on your location and audience demographics, but we recommend time settings that look something like this.
For maximum safety, we also recommend NOT using LinkedIn within those time settings on your own.
Expandi will be taking actions from your account directly. And you being active as well might come across as suspicious because of having two different active sessions.
4. Finding your first list of prospects to reach out to
Now, we can start focusing on the outreach part of this guide.
Now, there are many different ways to set up your LinkedIn outreach prospects here.
But what you need to know is that any method you use to find prospects natively on LinkedIn (search results, LinkedIn groups, Sales Navigator, etc.), you can use Expandi to automatically start contacting them.

The way this works is within Expandi, you can use Search and Campaigns features to manage your leads and start contacting them, respectively.
Using the Search feature you can upload or export your list of leads in the following ways:
- Basic LinkedIn search results.
- Scraping company page followers.
- LinkedIn Sales Navigator search results.
- LinkedIn Recruiter premium search upload.
- Imported by CSV spreadsheet file.
- Scraping list of people who engaged with any specific LinkedIn post.
- Scraping people in a LinkedIn group.
- Scraping LinkedIn events.
- And finally, automatically connecting with ‘People You May Know’ recommendations.
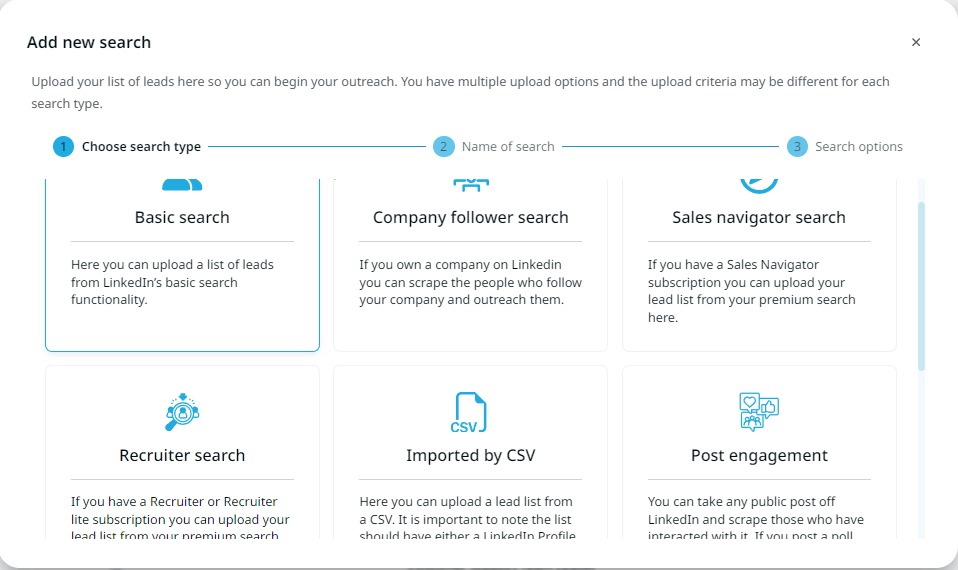
From there, you name the search and continue with the steps to export the list of people within Expandi.
Once you do so, you can then:
- Search within your exported list of leads.
- Filter by search name and type.
- Filter by campaign, status, and comment activity.
- Filter by whether or not they’ve commented on a specific post.
- Filter by reaction type.
- Exclude people without an email associated with their profile.
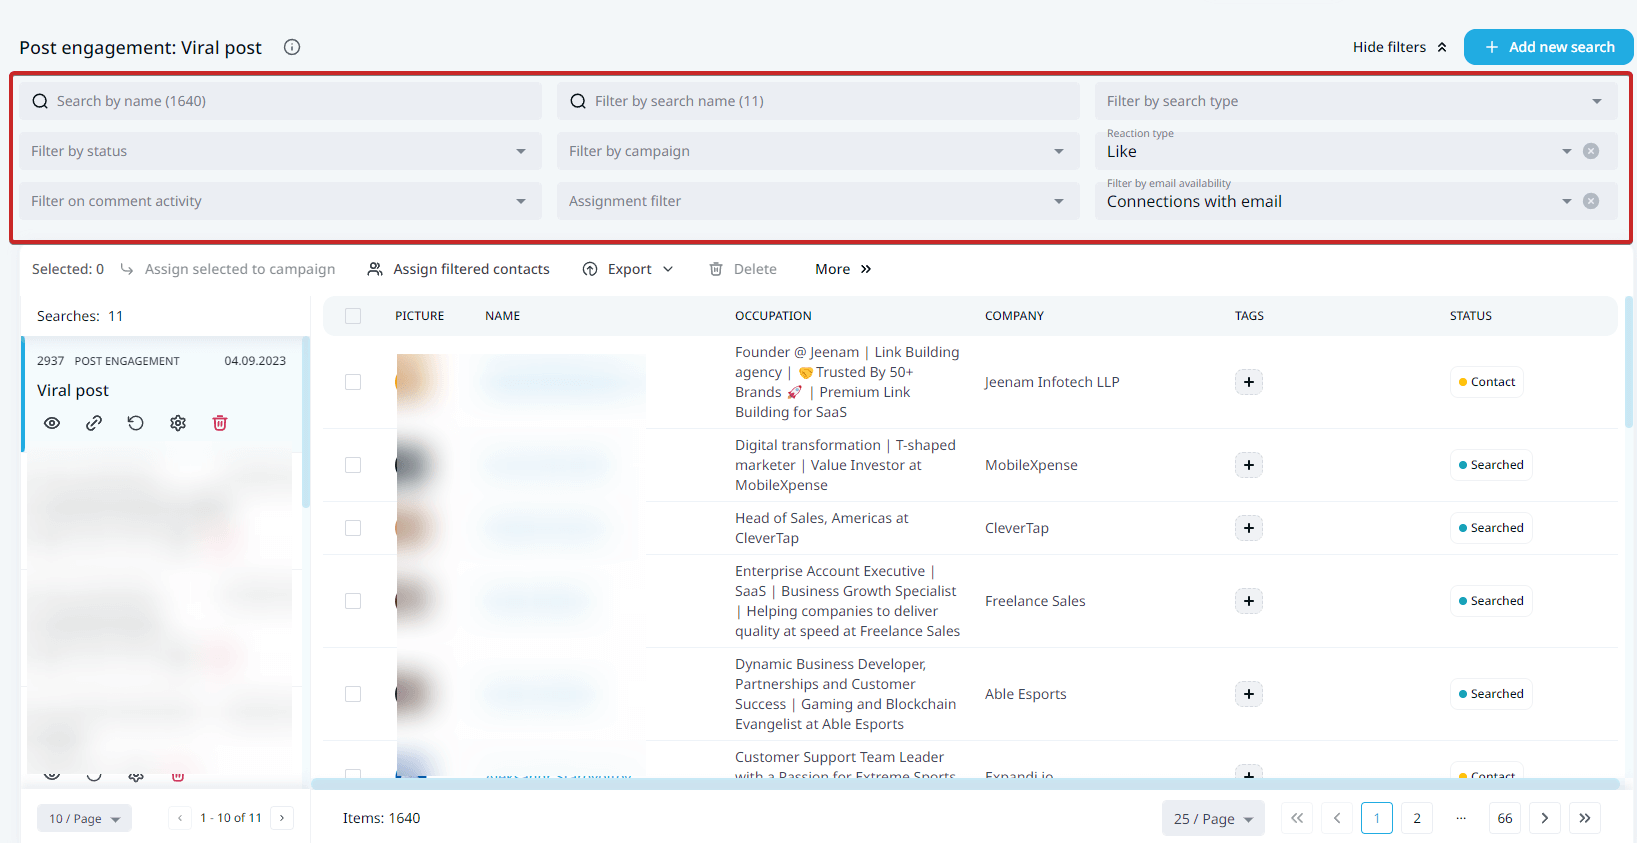
Once you filter down, manage, or organize your prospect list as needed, you can move on to setting up your outreach campaign.
5. Setting your first LinkedIn outreach campaign
Using Expandi, you can set up the following kinds of outreach campaigns:
- Company follow invite: To invite 1st-degree connections to follow your company page on LinkedIn.
- Mobile connector: Allows you to send an additional 10-15 connections per day to avoid the LinkedIn connections limit.
- Connector: Campaign with the objective to send connection requests to 2nd and 3rd-degree connections.
- Messenger: Start sending cold messages to contacts that have approved your request.
- Builder: Allows you to create custom, more advanced outreach sequences. This campaign gives you the most options to really adjust your outreach as needed.
- Open In-Mail: Send LinkedIn open InMails to prospects without being connected with them.
- Group: Send message requests to members of a LinkedIn group you’re in.
- Event invite: Invite first-degree LinkedIn connections to attend a LinkedIn event you’re hosting.
- Event participants: Send message requests to participants of a LinkedIn event. Ideal for scraping LinkedIn events.
- Inbound: Automatically reach out ot people who have viewed your LinkedIn profile.
- Recovery: Recover contacts and last messages sent to connections.
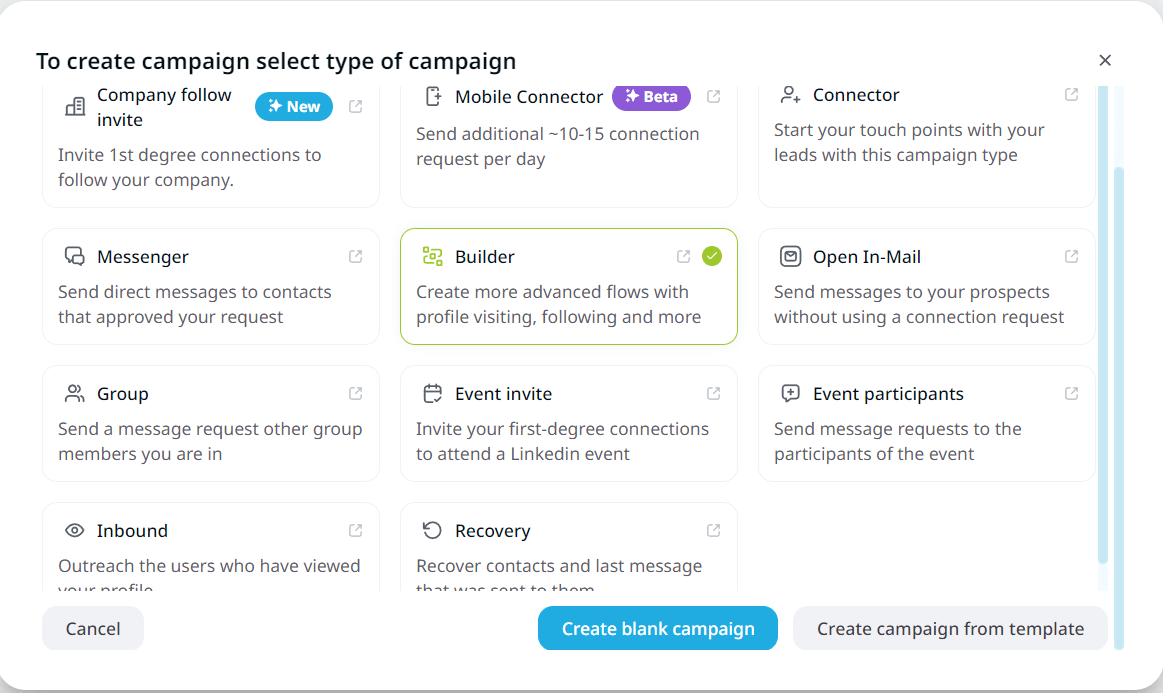
From here, you can create a blank campaign or from a template.
Once you create a campaign in Expandi, you can import the prospects from the previous step.
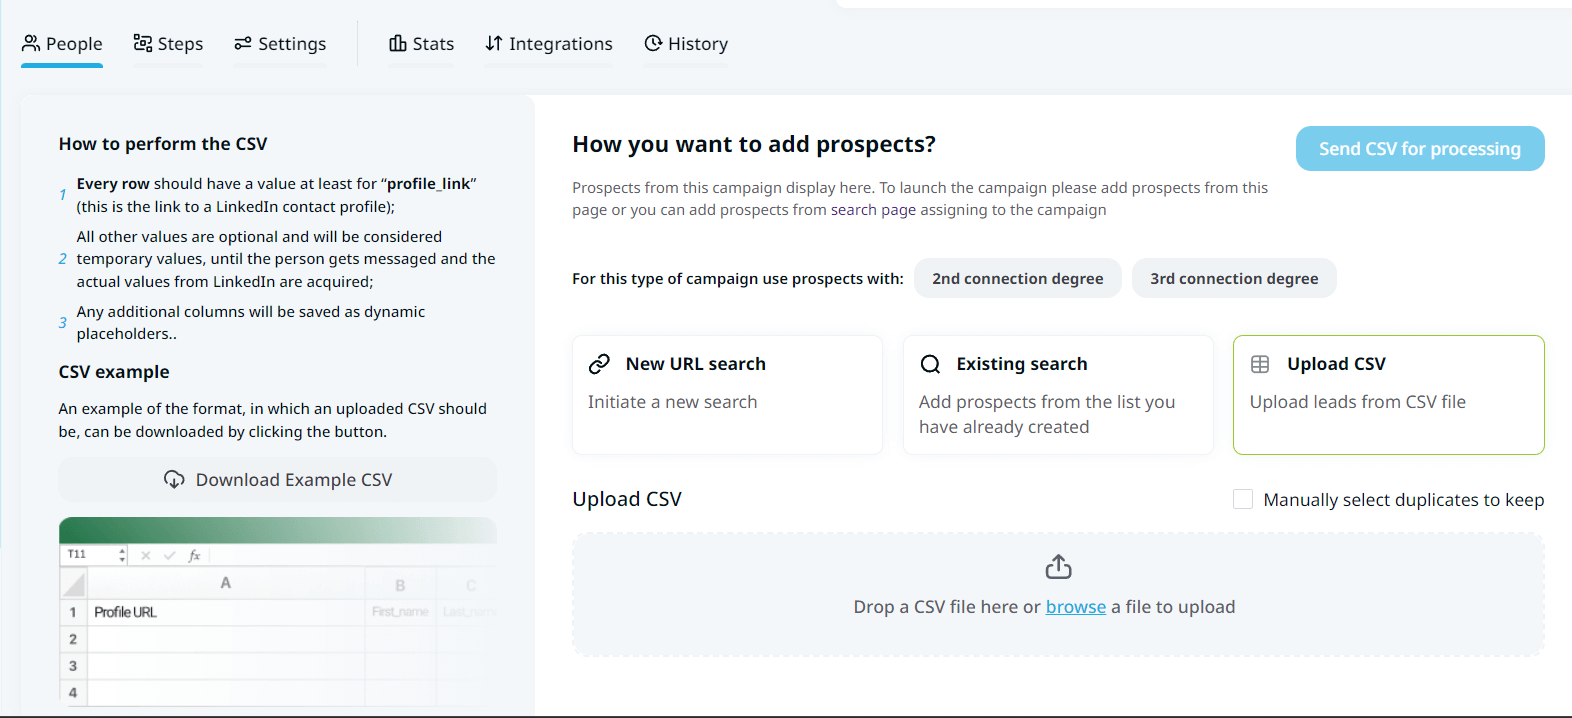
Then, you can add your outreach sequence steps and templates.
And the way the campaign will work is based on your Actions and Conditions set, which are as follows:
Actions:
- Visit profile.
- Follow profile.
- Follow company.
- Invite to follow company.
- Skill endorsement.
- Connection request.
- Mobile connection request.
- Follow up message.
- Email.
- Like a post.
- Like a company post.
Conditions:
- Custom condition.
- If connected.
- If followed you.
- If visited your profile.
- If email opened.
- If email bounced.
- If email clicked.
- If email exists.
- If open InMail.
- If post liked.
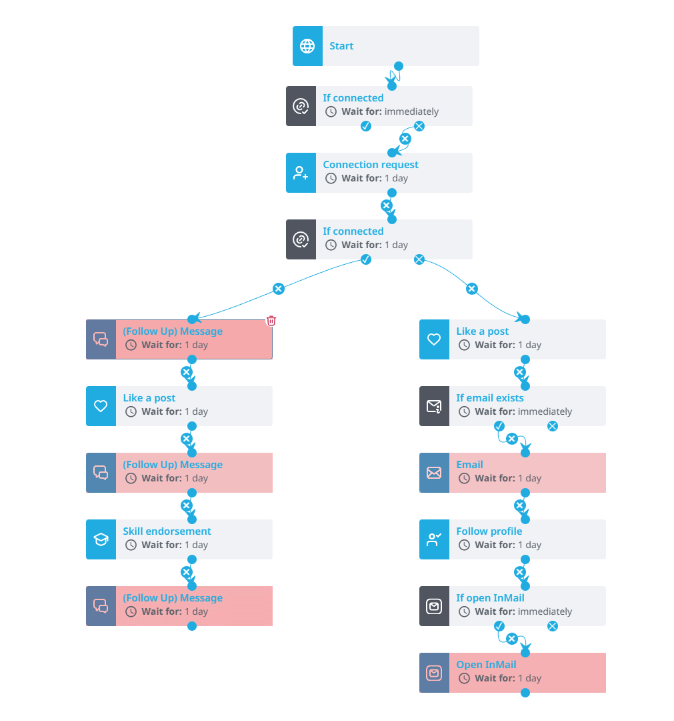
So, as you might have guessed, you can easily set up advanced outreach campaigns that take into consideration every outcome or behavior of a prospect.
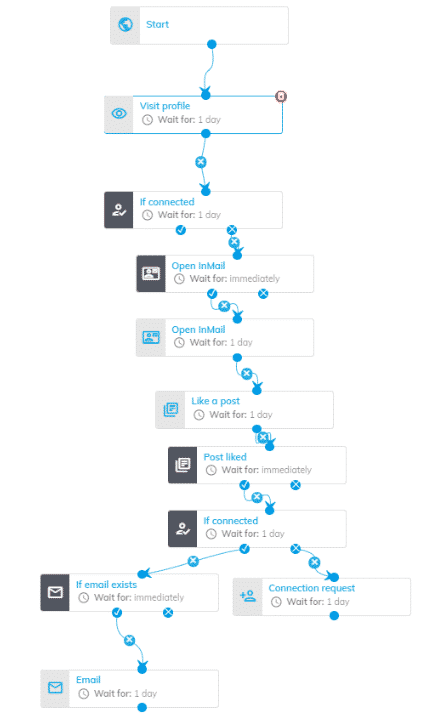
For example, this sequence sends a connection request, and depending on whether or not they’ll accept, the campaign will end differently (cold message follow-ups vs sending an email and InMail).
For a more detailed overview of this, see our full guide on LinkedIn account-based marketing.
What about the templates?
Check out our ebook on the top 10 LinkedIn templates experts use.
Week 2: Launching Your First LinkedIn Outreach Campaign
Now that we’re finally done with the admin and set up steps, we can finally launch the campaign!
Depending on your objectives and budget, you can also start creating LinkedIn ads.
But typically, the steps for launching your first LinkedIn outreach campaign will be as follows:
- Turn off account warm-up.
- Set up limit ranges.
- Access the first results of your campaign.
1. Turn off your LinkedIn account warm-up
Warming up your LinkedIn account should take around 7-14 days, depending on your warmup settings.
Either way, when you’re ready for outreach, you should turn this setting off first.
You can do so from your profile settings in Expandi.

2. Set up limit ranges
Limit ranges allow you to select different number of actions that each campaign will perform per day.
This settings mimic human behavior, which is why they will vary across the range.
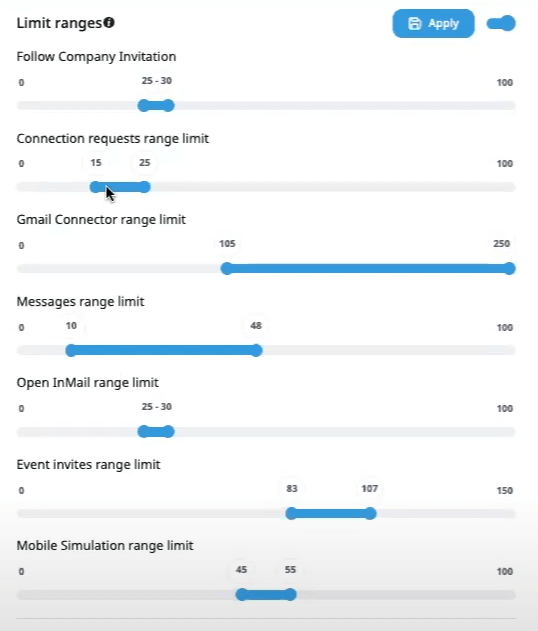
Based on LinkedIn connection limits, you can send around:
- 100 connection requests per week.
- 100 messages per day.
- 20-25 LinkedIn group messages per day.
- And 25 InMails per day.
This is to prevent spam on the platform.
So, with that in mind, consider keeping a max of 20 requests per day, 5 days a week to start with.
3. Access campaign results
With Expandi, you get to automatically track campaign performance and results with our easy-to-understand dashboards.
All you have to do is select your campaign and click on Stats.
Here, you can track per-step statistics and evaluate the performance of each action in your sequence, or gain insights on the overall performance of your campaign.
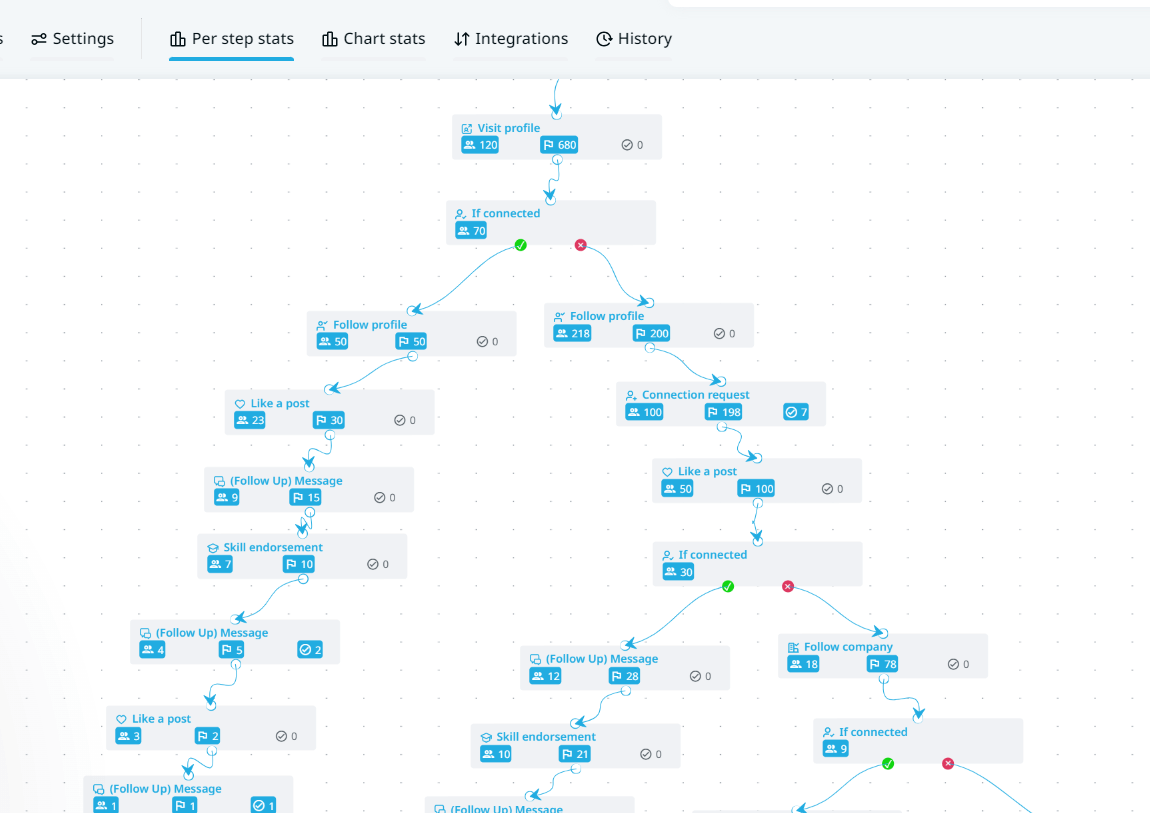
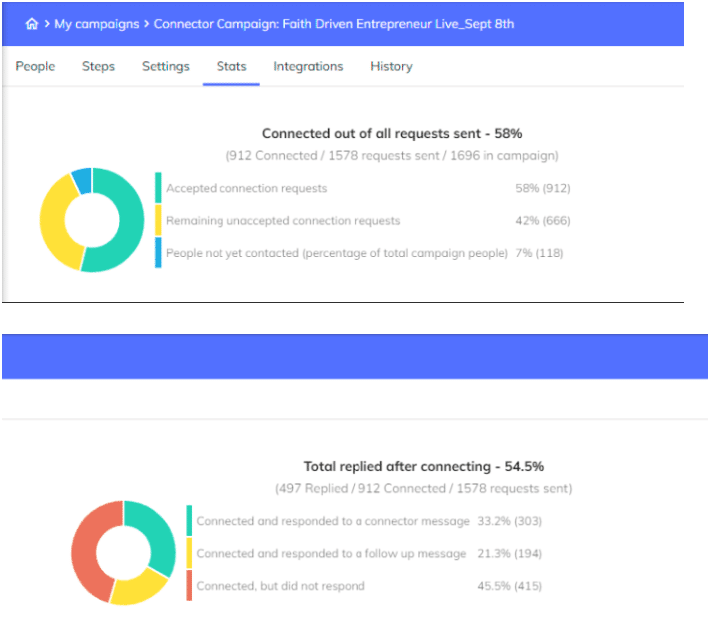
Then, you can evaluate your campaign performance accordingly.
For example, if your campaign has a low connection acceptance rate, then, chances are, you should try a different connection request template.
Week 3: Optimizing Your LinkedIn Campaign
Once your outreach campaign is live and running, you should look into optimizing it so that you’re getting better results.
That involves:
- Increasing limit ranges.
- Experimenting with new steps or templates and further optimizing current campaigns.
Here’s how.
1. Increasing campaign limit ranges
As mentioned above, limit ranges feature allows you to adjust the number of actions you can take for each campaign.
Once your account is warmed up and you’re getting some solid results, consider increasing your limit ranges to start reaching more people per day.
Over time, once your account is “healthy”, it’s not uncommon to be able to go over the daily and weekly LinkedIn limits mentioned above.
Alternatively, you can also use the Mobile Simulation campaign to send more than 100 requests per week.
2. Experimenting with and optimizing current campaigns (a/b testing)
Another way to start seeing better results from your outreach campaigns is to start A/B testing different templates, sequences, and audiences.
First, it’s important to how your sales engagement metrics work.
For example:
- If you have a low open rate (in email and InMails), you should experiment with a different subject line.
- If you have a low reply rate, then you should change your pitch angle, call-to-action, or audience
- And overall, if you have a low meeting booked rate, consider changing your offer or your audience.
Fortunately, when using Expandi, it’s easy to A/B test different campaigns and outreach messages.
The best way to do this is to change only one thing at a time.
- Create campaigns you want to use for A/B testing.
- Create a search you want to use for the campaigns
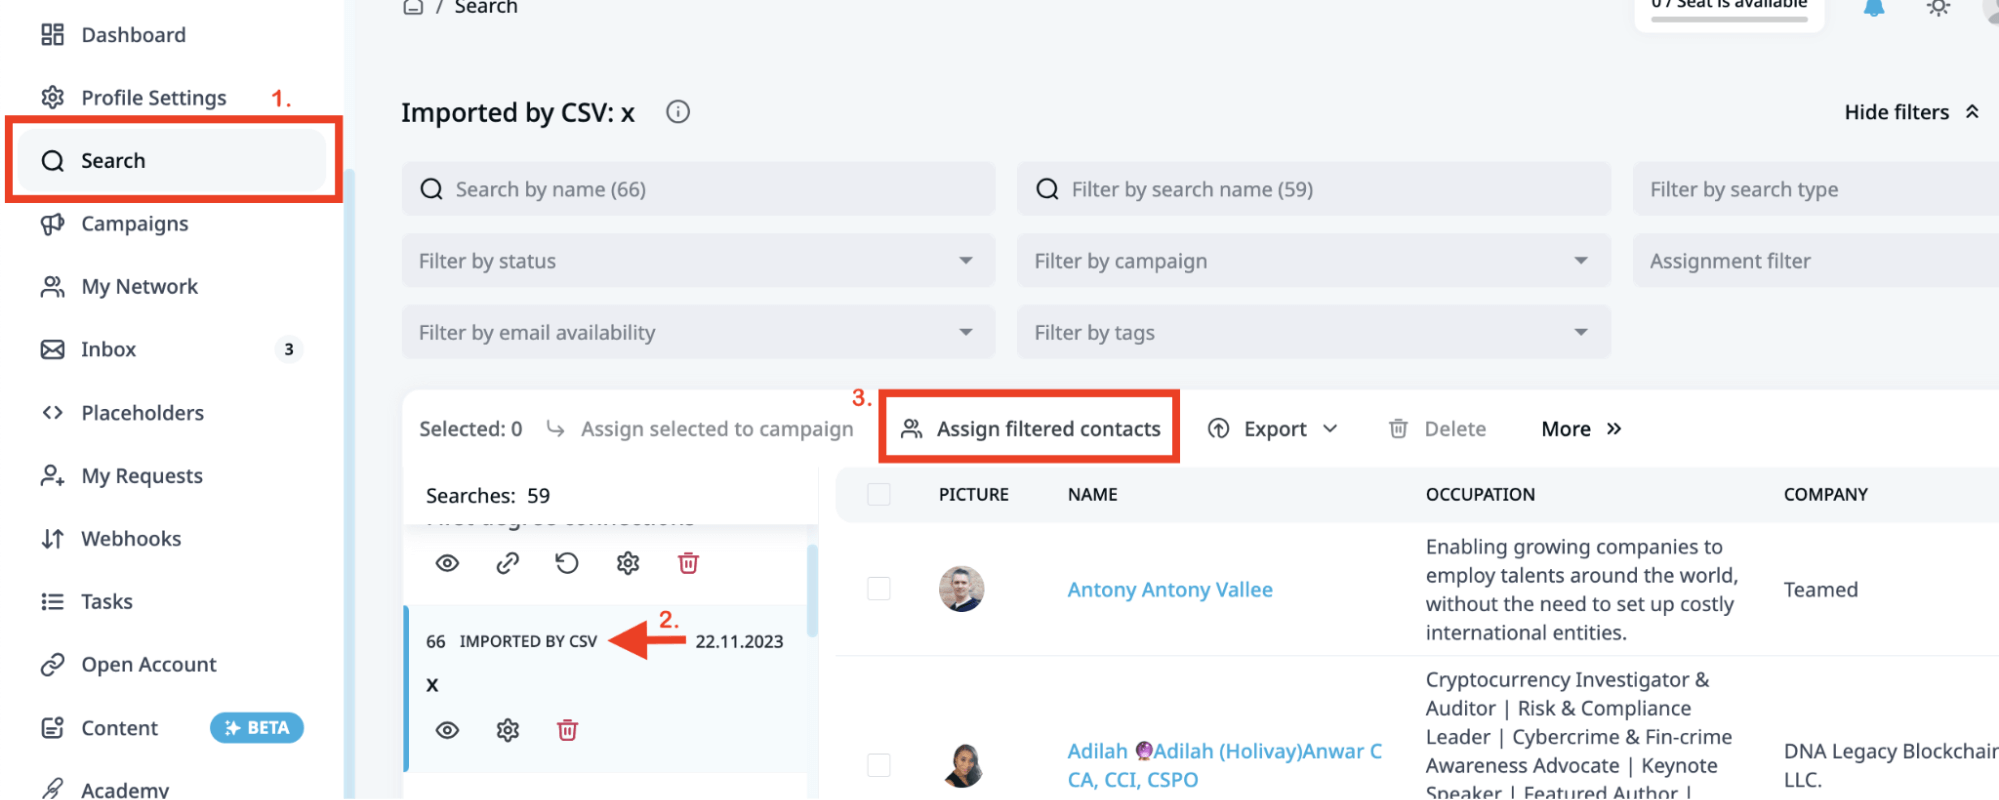
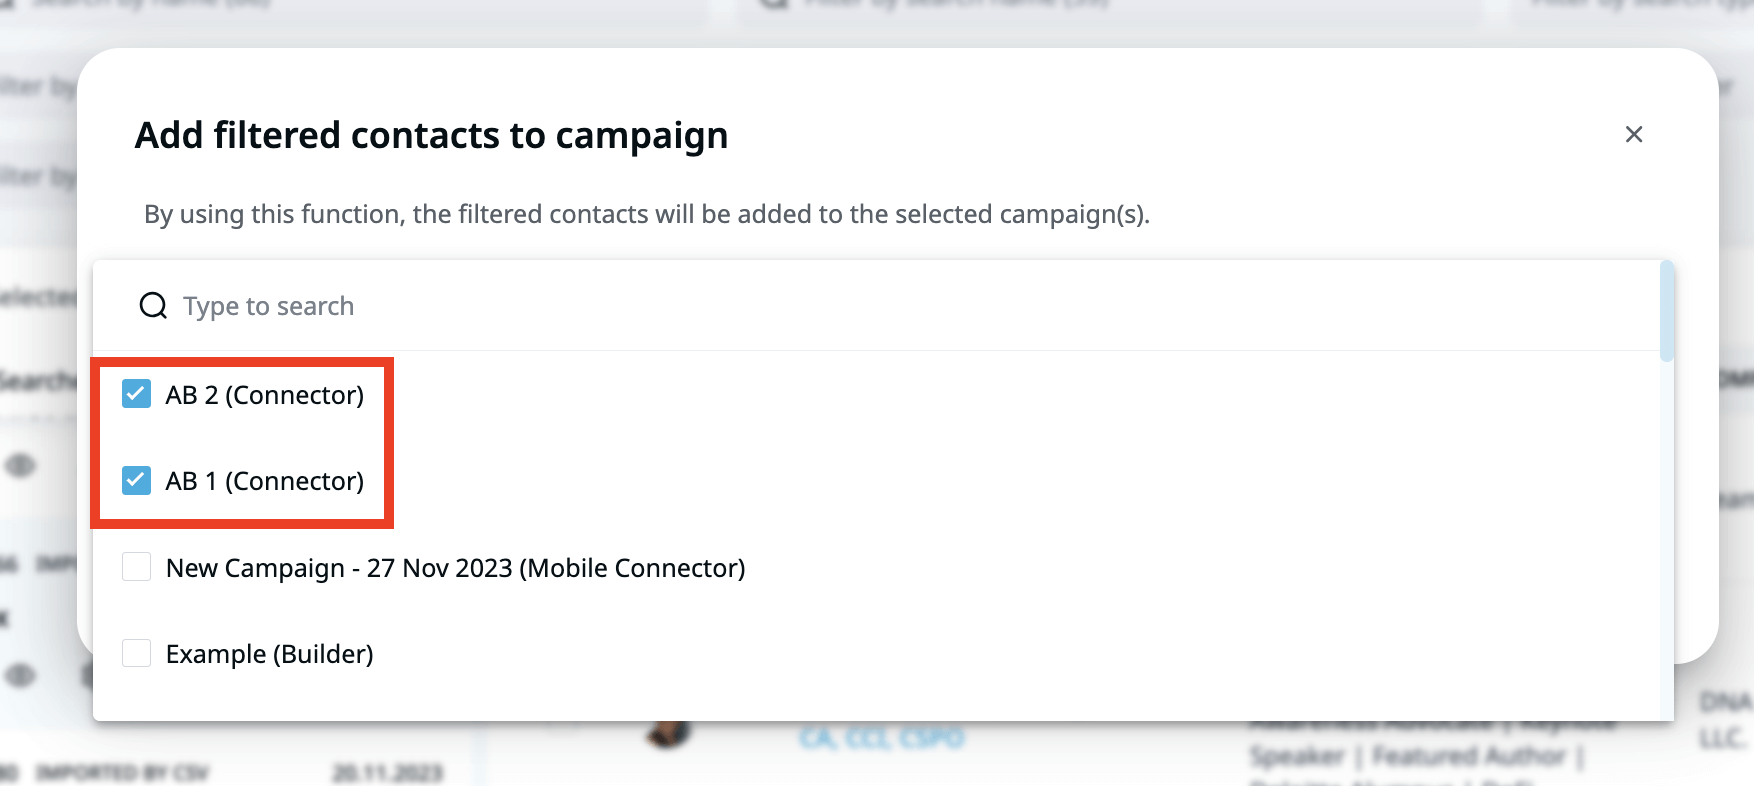
- Then, you need to evenly split the prospects from your Search. Click on created search, and select Assign filtered contacts
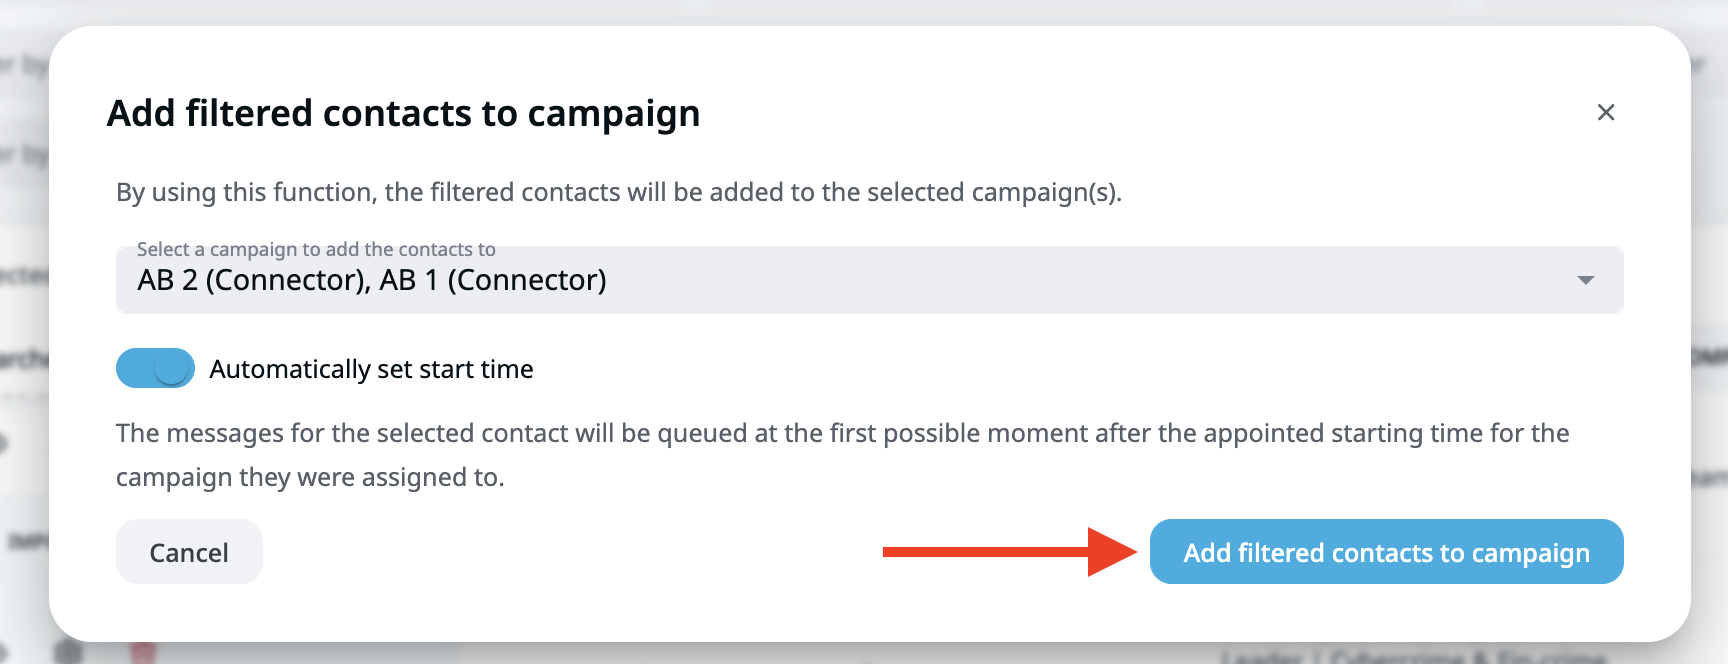
- Select both A/B testing campaigns from the drop-down menu and click Add filtered contacts to campaign.
- Now the leads are evenly split and assigned to your campaigns. It will look something like the below (depending on the number of leads that you have in your search)
Finally, you can activate the campaigns and start the testing!
Week 4: Taking Your Outreach To The Next Level
Until now, we’ve only covered the basics of LinkedIn outreach and lead generation.
If you’re looking to connect with people, automate follow-ups, and grow your network, the above can work well.
But if you’re looking to start booking meetings, keep in mind it’s getting harder and harder to stand out.
Business owners get 100s of pitches per day.
Which is why, in this step, we’ll go over how you can take your campaign to the next level and what you can do to stand out.
Which includes, 2 main steps:
- Converting your campaign into a Builder campaign (and what this means).
- Including dynamic image and GIF personalization within your outreach (with Hyperise).
Though these steps are optional, we highly recommend not skipping them if you want to get the most out of your outreach.
1. Converting your campaign into a Builder campaign (ideal for omnichannel outreach)
A Builder campaign in Expandi allows for more advanced flows based on certain actions and conditions.
This is recommended because the Builder campaign is the only way to add additional steps that can really take your outreach to the next level.
To create a Builder campaign, simply select Builder from the Campaigns section.
Though, the main point of this campaign lies in the Steps section. Where you can adjust the steps and conditions as needed.
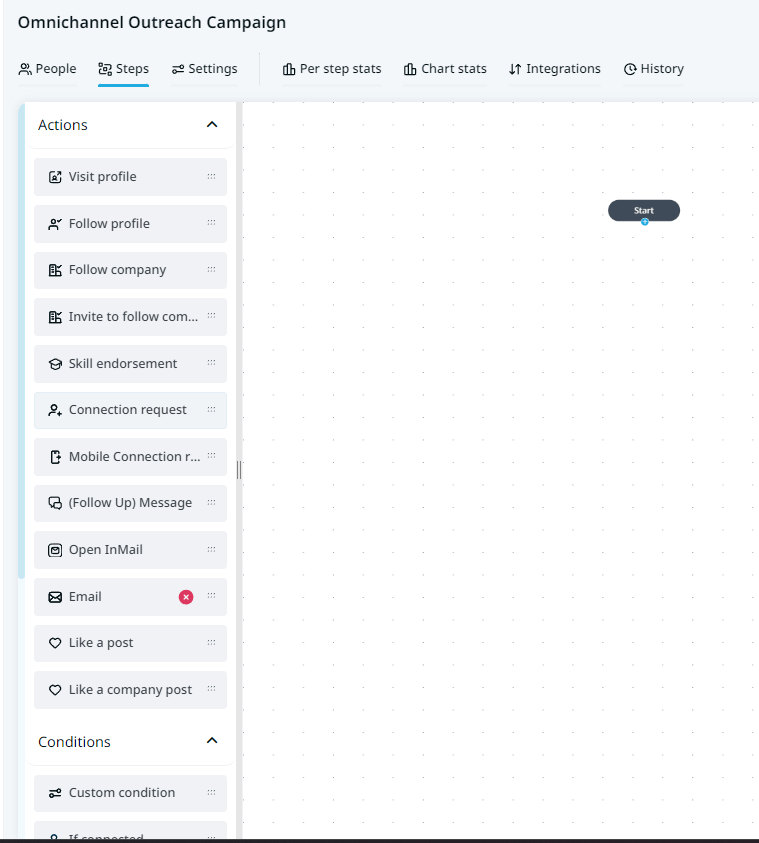
Here, you can adjust the steps as needed, based on your objective.
But typically, the Builder campaign is ideal for creating omnichannel outreach campaigns, in which you engage with prospects on LinkedIn, InMail, email, and other actions.
To save time and so that you’re not coming up with outreach sequence from scratch, be sure to see our guide on marketing funnel automation.
2. Set up dynamic image and GIF personalization with Hyperise to skyrocket your reply rate
Want to make sure your outreach campaigns stand out in an otherwise cluttered inbox?
Yes, you can mention something so unique that will apply to just that specific prospect.
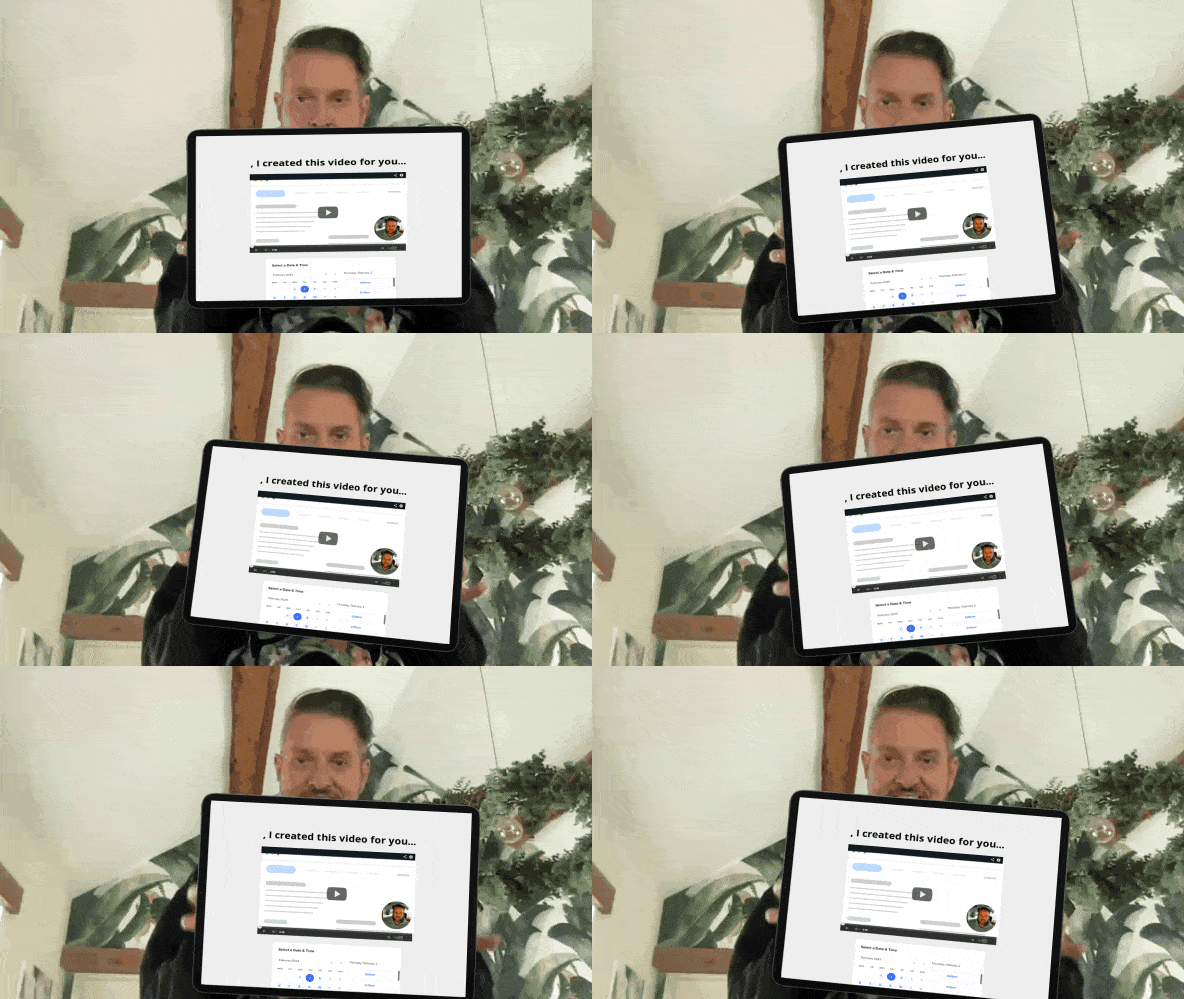
Alternatively, you can use dynamic personalization which automatically grabs the prospect’s profile picture, landing page, or some other visual that stands out even if the prospect’s inbox is overcrowded.
Here’s what that looks like.
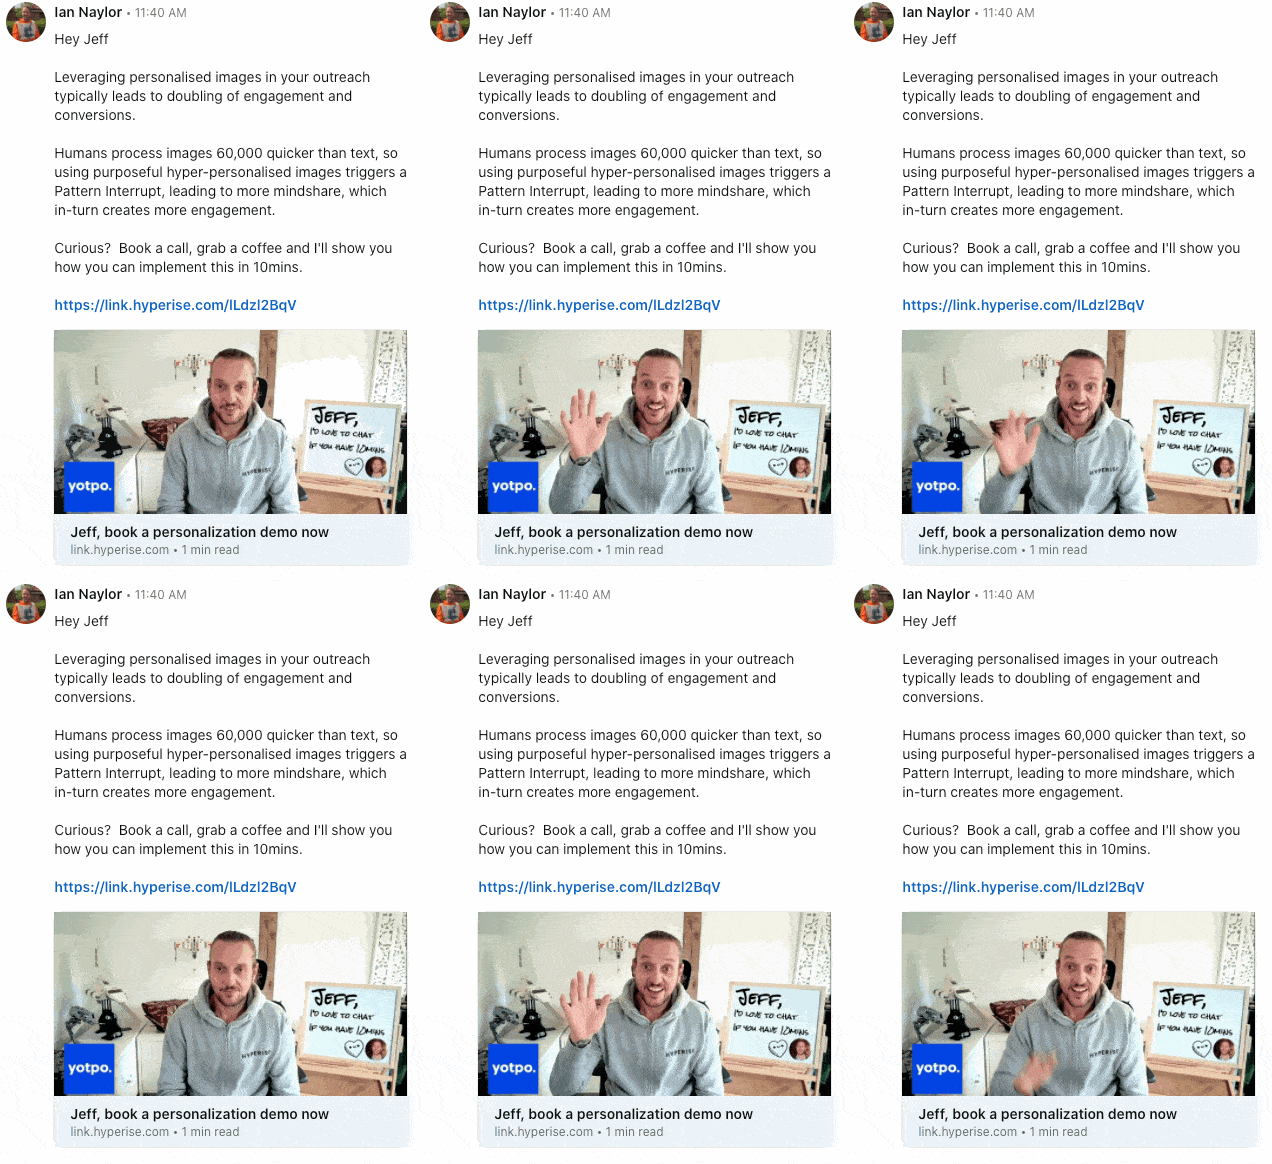
The best part is that you can use this kind of dynamic personalization in LinkedIn follow-up messages, InMails, AND emails.
To do that, you have to integrate Hyperise with Expandi, which takes under 5 minutes.
- Grab a free, 14-day Hyperise trial here.
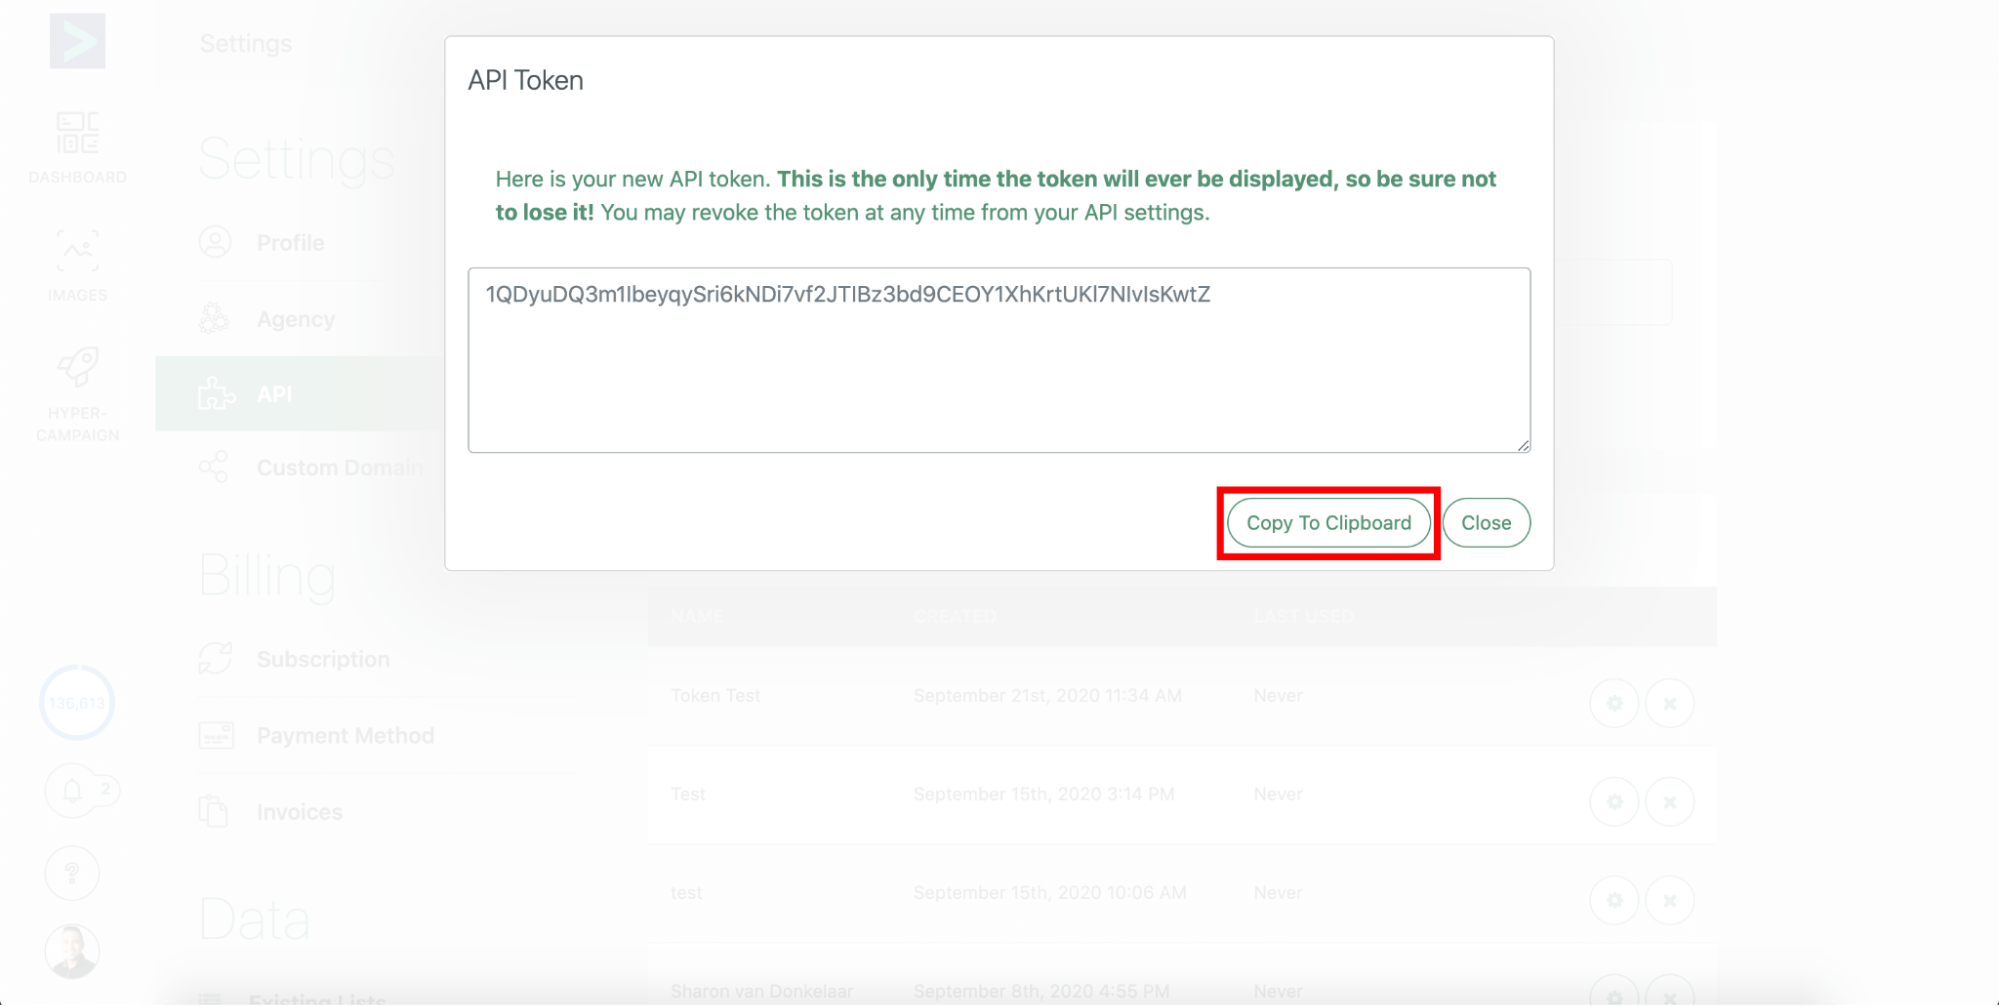
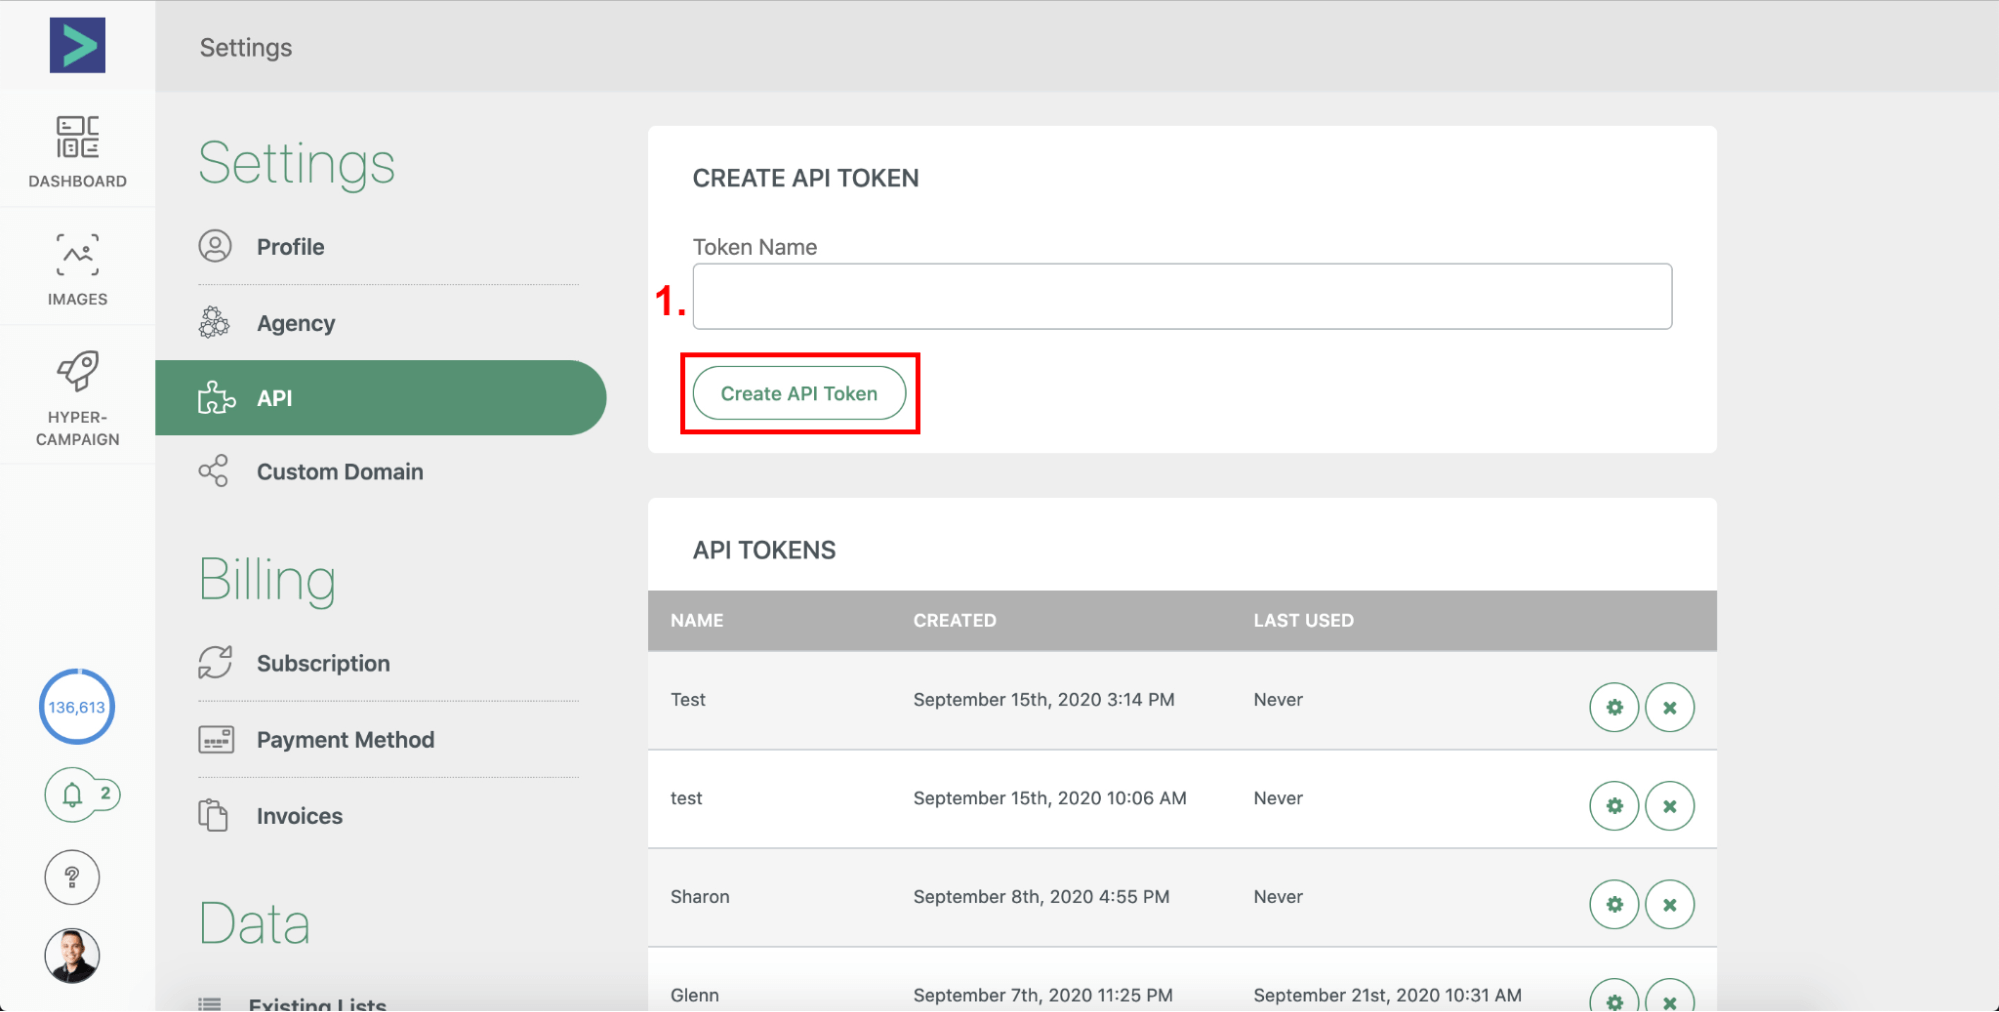
- Under Settings, click on API, and create a name for the API token.
- Then, create API token.
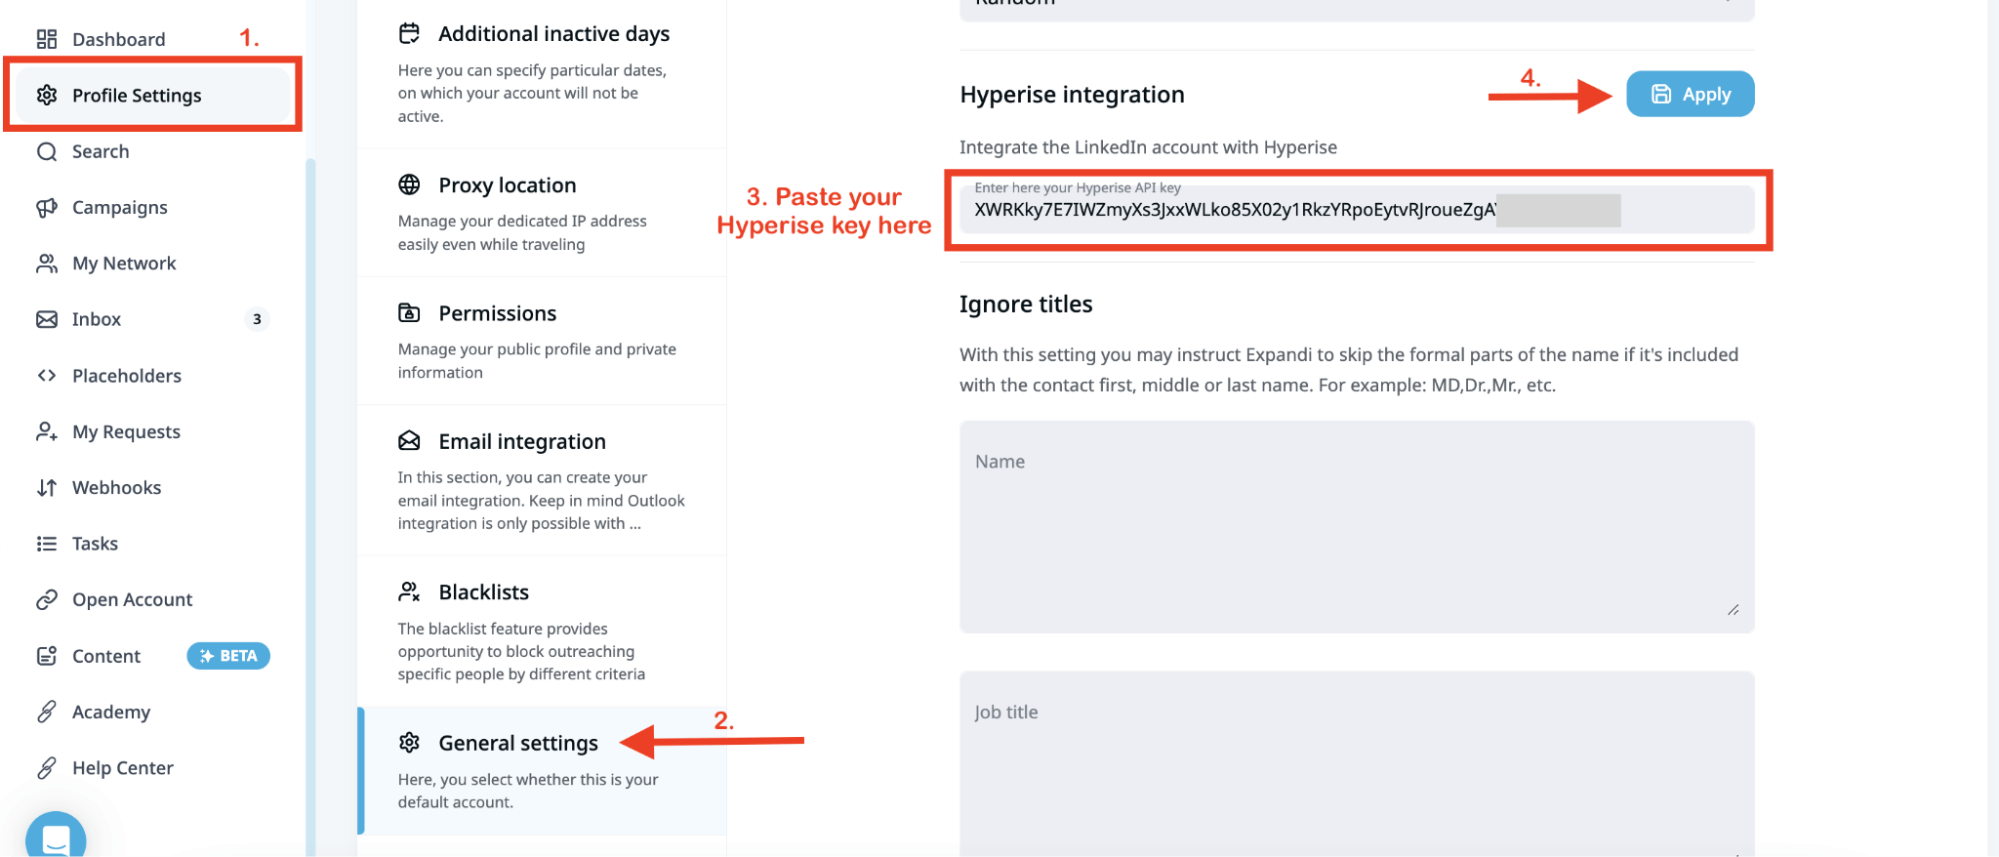
Now:
Finally, to create dynamic images and GIFs, you need to set them up in Hyperise first and then sync to Expandi.
What makes Hyperise so great is that you can include the following personalization details in your outreach:
- Dynamic text: First name, last name, gender, company name, job title, etc.
- Profile images: From an email or LinkedIn profile.
- Business logos: You can grab this automatically from the prospect’s website domain.
- Website screenshots, pinned map locations, personalized QR codes, and more.
Then, all you have to do is include those personalization tags within your visuals.
For best results, we recommend creating a quick GIF from your phone yourself, so your outreach feels more human.
Finally, some other tips to keep in mind here:
- Aim for a 1:1 ratio at 600×600 for embedded images and a 2:1 ratio at 600×300 for short link images.
- Record a visual from your mobile, and use a free online app to convert into a GIF.
- Get creative! Some GIF formats we’ve had success with here include product animations, memes, seasonal GIFs, celebrations, and more.
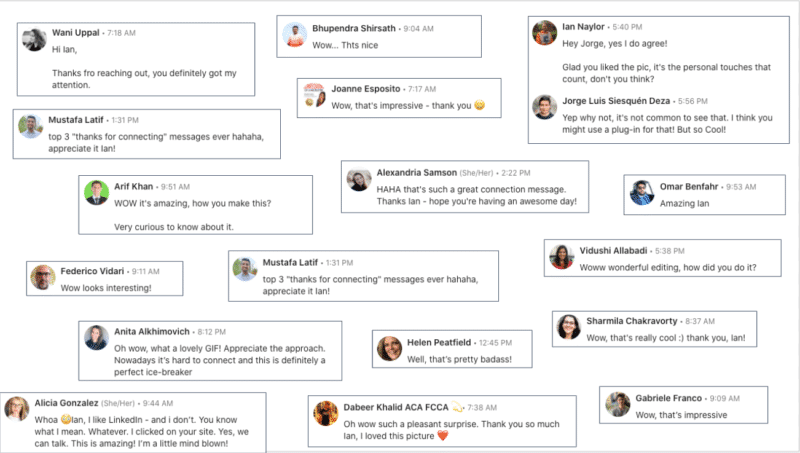
Check out how we managed to skyrocket our reply rate to under 60% via dynamic GIFs in this LinkedIn outreach campaign and how you can do so as well.
Week 5: LinkedIn Marketing Campaign Results, Data Analysis, And Reports
At this point, your campaigns are all set up, live, and generating real results.
One last thing to do before we wrap up is to understand how to tie all this together and get the most out of your data. Which includes:
- Analyzing results for reports.
- Increasing limit ranges even more.
- Setting up a CRM integration.
1. Analyzing and creating LinkedIn campaign reports
Creating campaign reports is essential in analyzing their performance.
Especially if you’re working with clients or collaborating with other departments inside your business.
Now, using Expandi for your outreach campaigns gives you access to performance dashboards which are understandable at a glance.
And you can share, export, or repurpose those campaign performance graphs as needed.
But that only gives the surface-level overview of your campaigns.
If you want to start creating effective outreach reports, be sure to also keep in mind the following:
- Define objectives and key metrics for your LinkedIn marketing campaigns – Start backward, look at your strategy, and what outcome you want to achieve. E.g. if you’re looking to book more meetings with qualified leads, you’d start tracking your conversion rate or how many meetings you’re booking per outreach.
- Choose the right reporting tools – Expandi gives access to metrics such as reply rate, connection acceptance rate, day-by-day statistics, and more. But you should also consider integrating your CRM (see how below).
- Customize report templates – You can’t go wrong with visually appealing and easy-to-understand reports. Consider your client’s branding, main metrics, data points, and more.
- Executive summary – When creating reports, start with this first to provide a high-level overview of your campaign’s performance. Include key achievements, challenges, and other notable insights.
- Lead generation metrics – Don’t confuse this with campaign performance analytics (number of people connected, replied, etc.). Instead, also consider number of leads generated, lead sources, conversion rates, and more.
Keep in mind, creating campaign reports will differ vastly for you. Depending on who you’re creating them for and what your operations look like.
Be sure to see our full guide on client reporting for more best practices and tips to keep in mind.
2. Increase outreach campaign limit ranges even more
If you’ve been following along all the steps so far successfully, your account should be “healthier” and you can start reaching more and more people.
One way to look at your account “health” is through LinkedIn SSI, which is based on 4 elements:
- Establishing your professional brand and creating content.
- Finding the right people.
- Engaging with insights.
- Building relationships.
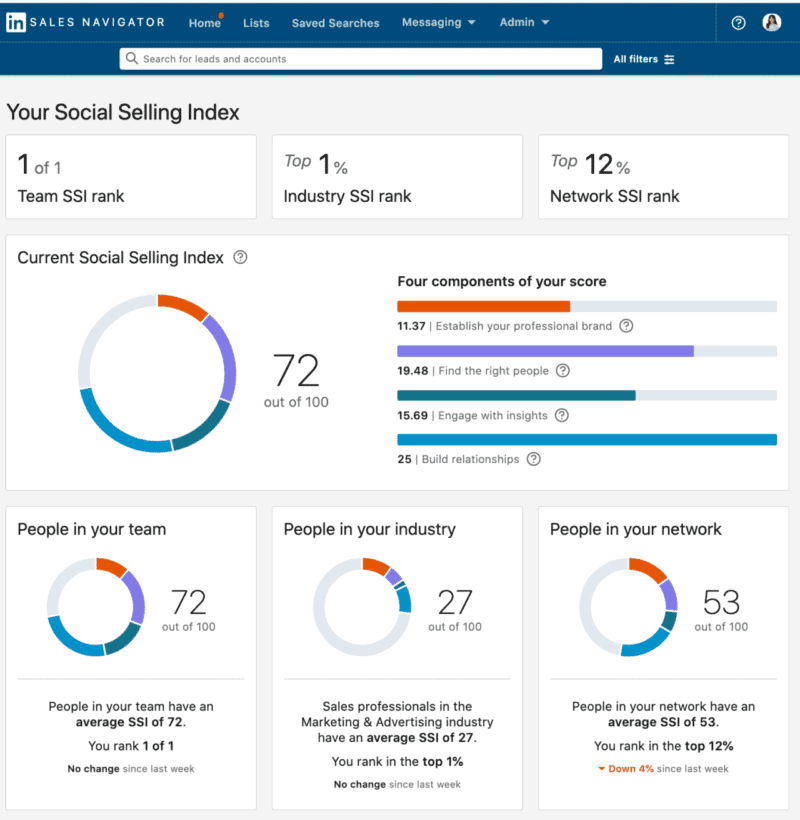
Simply go back to your Expandi profile settings and increase your limit ranges to start reaching more people.

3. Set up your CRM integration with your LinkedIn outreach campaign
Your CRM acts as a single, centralized place for all of your contacts.
This is especially helpful if you’re using automated LinkedIn campaigns and contacts upwards of 100+ people per week.
You’ll want to keep track of how many of them are interested, who to follow up with in a few months, and who to never contact again.
This is where your CRM comes in.
Now, this will depend on what CRM you use, but here’s how you can automatically start adding people who replied to your Expandi campaigns into your CRM:
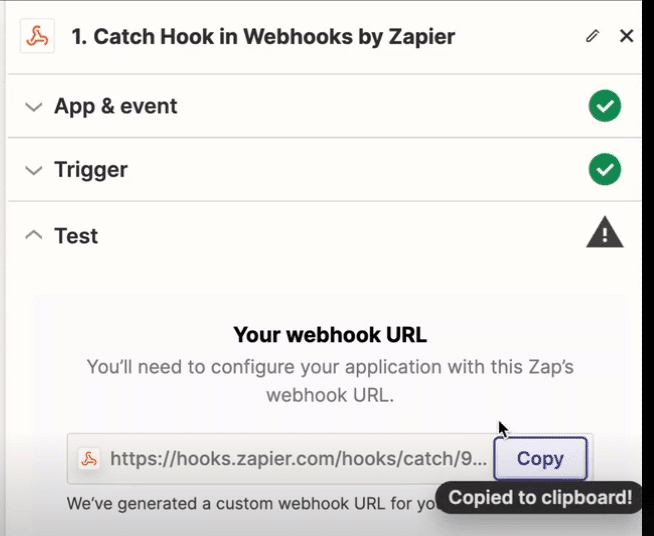
- Sign up for Zapier.
- Add Webhooks by Zapier as a trigger.
- As an event, choose Catch Hook.
- Copy the Webhook URL.
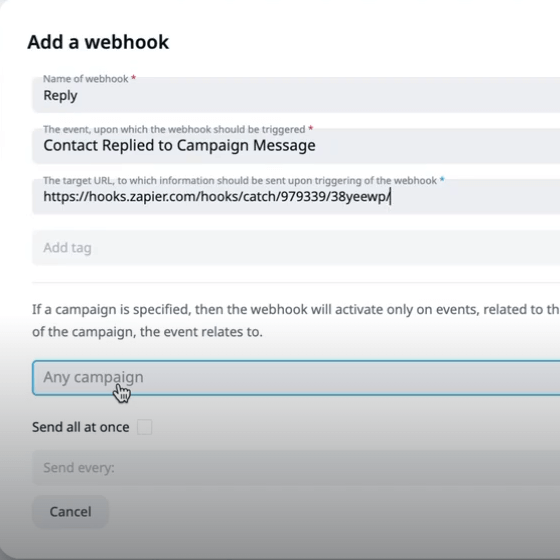
- Go to Webhooks within Expandi and Add a webhook. Select “Contact replied to Campaign message” as the event and paste the Zapier URL under target URL. Select any campaign if you want this to apply to all of your campaigns. Then, click Create new webhook.
Now, test your Zapier trigger and it should work well.
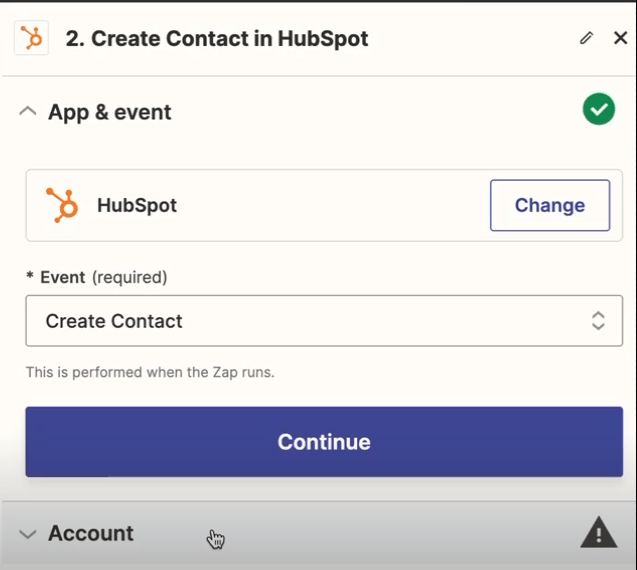
Then, it’s time to add an action in Zapier.
- Select your CRM, add an event, and sync your CRM with Zapier.
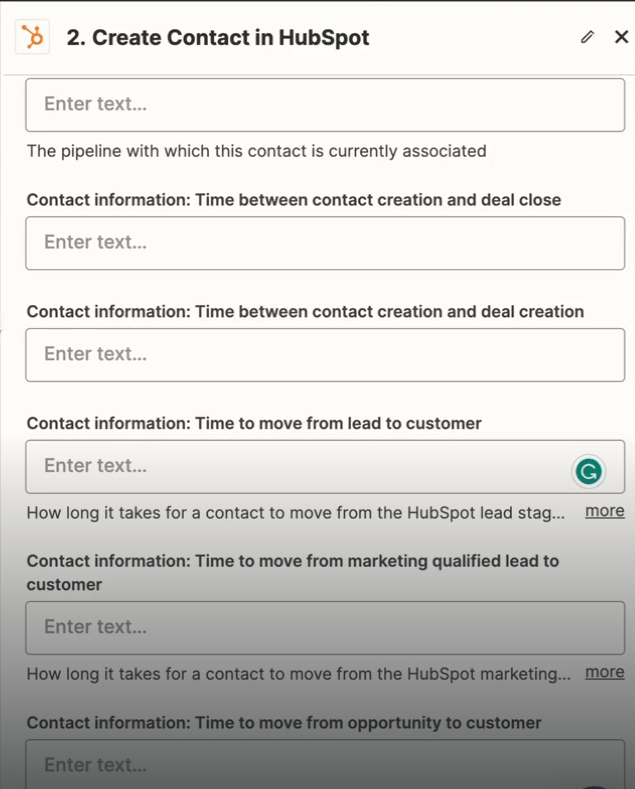
- Zapier gives you a lot of options to add for each person synced to your CRM. To keep things simple, you can just first name, last name, company name, and email (if available).
Finally, test it again and everything should be working as intended.
Where To Go From Here
So, that’s a wrap.
This has been a super comprehensive and actionable guide to LinkedIn outreach.
To recap, the steps we’ve covered are as follows:
- Preparing to launch your first LinkedIn outreach campaign.
- Launching your first campaign.
- Optimizing and testing your campaign.
- Taking your outreach to the next level.
- Creating reports, assessing campaign results, and integrating your CRM.
Though, that said, some of the steps we’ve covered above are completely optional.
And chances are, your LinkedIn outreach journey will be different.
So, the best way to kickstart your LinkedIn outreach campaign is to start small and then scale up as you go.
And the best way to do that is by grabbing the free, 7-day Expandi trial now.
You can still use the trial to launch your campaign today and start booking meetings before the trial expires. Which would mean the software would be paying for itself during the free trial!
Then, if you don’t like how things are going, you can always cancel without paying.
Or scale up and implement the full steps covered above to start booking meetings with qualified leads on autopilot now!
You’ve made it all the way down here, take the final step
